Hi Bloggers.
Back to Vintage Cars today but still using Spellbinders dies.
This card uses the out of the box technique that Sue taught me some time ago and you can read how to do it in this post.
For the background I covered a piece of Milk card with some Idea-ology Journeyman Tissue Tape. I coloured some of the lettering using Scarlet Flame Cosmic Shimmer Matt Drawing Ink from the Autumn Shades Set. When I demonstrated this on TV I added the Compass Mask at this stage and spritzed with Black Night Cosmic Shimmer Acrylic Mister.
I stamped the image from the Creative Expressions Vintage Cars Stamp Set using Jet Black Archival and embossed with Cosmic Shimmer Clear Embossing Powder. I coloured it in using Scarlet Flame from the Cosmic Shimmer Autumn Shades Matt Drawing Inks Set and Black Night from the Summer Fayre Set. I then cut it out using the Out of the Box Technique and the Spellbinders Back to Basics Hexagon die set. I inked through the die with Black Soot Distress Ink. I also cut out a black hexagon.
I cut a Back to Basics Tag and inked through the die with Black Soot. I cut a Fancy Tag out of black card, cut in in half and glued it at the back of either end of the basics tag. I popped a couple of Silver Faux Screw Brads through the holes. I added the word 'Classic' using the Idea-ology Ransom Alpha Parts.
I coloured a Watch Face Charm using a black Promarker (you could also use Pitch Black Alcohol Ink). I threaded some Black Baker's Twine through an Idea-ology Shabby Accoutrement. I added both of these to the top right-hand corner of the card.
I finished the card with some dots of Cosmic Shimmer Pearlescent PVA in Black Pearl.
Thanks for stopping by.
Julia.
Monday, 27 August 2012
Sunday, 26 August 2012
Dance Like No One is Watching
Hi Bloggers.
Another Spellbinders card today. I cannot remember whether I demoed this on the Pick of the Week or not - going senile. However, if I had I would have left the bow as natural Chalk White American Seam Binding rather than dying it with the Squeezed Lemonade Distress Ink from the Spring set. It seems a little too bright dyed.
The background is Venetian M-Bossabilities edged with the Squeezed Lemonade. I stamped the image from the Creative Expressions At the Ballet Stamp Set using Jet Black Archival and embossed with Cosmic Shimmer Clear Embossing Powder. I cut it out using Spellbinders Labels Twenty-Seven and inked through the die with Squeezed Lemonade. I cut a Grand Decorative Circles and again inked through the die with Squeezed Lemonade.
I stamped the sentiment from the same stamp set with the Jet Black Archival and embossed with the clear powder. I cut it out with a smaller Labels Twenty-Seven but this time I rotated the die which gives a totally different look. I popped this on to an Asian Accents circle.
I dyed some American Seam Binding in Chalk White with the Squeezed Lemonade. I scrunched it up a bit while I dried it and then tied a messy bow. I added some ink to a Studio 490 Embellish Your Art piece and popped that in the middle.
I finished the card off by piercing around the edges with my Tim Holtz Ruler.
Thanks for stopping by.
Julia.
Another Spellbinders card today. I cannot remember whether I demoed this on the Pick of the Week or not - going senile. However, if I had I would have left the bow as natural Chalk White American Seam Binding rather than dying it with the Squeezed Lemonade Distress Ink from the Spring set. It seems a little too bright dyed.
The background is Venetian M-Bossabilities edged with the Squeezed Lemonade. I stamped the image from the Creative Expressions At the Ballet Stamp Set using Jet Black Archival and embossed with Cosmic Shimmer Clear Embossing Powder. I cut it out using Spellbinders Labels Twenty-Seven and inked through the die with Squeezed Lemonade. I cut a Grand Decorative Circles and again inked through the die with Squeezed Lemonade.
I stamped the sentiment from the same stamp set with the Jet Black Archival and embossed with the clear powder. I cut it out with a smaller Labels Twenty-Seven but this time I rotated the die which gives a totally different look. I popped this on to an Asian Accents circle.
I dyed some American Seam Binding in Chalk White with the Squeezed Lemonade. I scrunched it up a bit while I dried it and then tied a messy bow. I added some ink to a Studio 490 Embellish Your Art piece and popped that in the middle.
I finished the card off by piercing around the edges with my Tim Holtz Ruler.
Thanks for stopping by.
Julia.
Saturday, 25 August 2012
Simply Fabulous
Hi Bloggers.
There's quite a lot going on in this card. Once again, it's one that I'm not really sure about but it was shown on Sue's Pick of the Day so I'd thought I'd share it anyway.
For the background, I ran some Coconut White Card through the Grand Calibur with the Couture Creations Radiant Embossing Folder. I ran it through a second time to extend the pattern.
I stamped the image from the Creative Expressions Gala Event Stamp Set using Plum Archival and embossed with Cosmic Shimmer Clear Embossing Powder. I coloured it in using Aged Mahogany Distress Ink and then cut it out leaving a small white border all around it.
I cut a Spellbinders Back to Basics Hexagon from black card. At the emboss stage I added the Small Polka Dots Mask. I cut some Venetian Accents borders and glued a couple of sections to each side of the hexagon.
I cut a Labels Twenty-Eight out of burgundy card. At the emboss stage I added the Trellis Mask.
I cut a branch out of black card using the Cherry Blossoms set. I cut lots of flowers out of white card and inked though the dies with Aged Mahogany.
I stamped the sentiment from the same stamp set again using Plum Archival and embossed with clear powder. I cut it out using Back to Basics Tags and inked through the die with Aged Mahogany. I added a bow of Baker's Twine from the Vintage Set.
I cut a mask out of white card using the Venetian Accents die set. I inked through the die with Aged Mahogany.
I cut a couple of little motifs out of black card using the Venetian Motifs die set and popped a dot of Cosmic Shimmer Pearlescent PVA in Black Pearl in the centre of each.
I finished the card of with some more dots of Black Pearl PVA around the edges.
Thanks for stopping by.
Julia.
There's quite a lot going on in this card. Once again, it's one that I'm not really sure about but it was shown on Sue's Pick of the Day so I'd thought I'd share it anyway.
For the background, I ran some Coconut White Card through the Grand Calibur with the Couture Creations Radiant Embossing Folder. I ran it through a second time to extend the pattern.
I stamped the image from the Creative Expressions Gala Event Stamp Set using Plum Archival and embossed with Cosmic Shimmer Clear Embossing Powder. I coloured it in using Aged Mahogany Distress Ink and then cut it out leaving a small white border all around it.
I cut a Spellbinders Back to Basics Hexagon from black card. At the emboss stage I added the Small Polka Dots Mask. I cut some Venetian Accents borders and glued a couple of sections to each side of the hexagon.
I cut a Labels Twenty-Eight out of burgundy card. At the emboss stage I added the Trellis Mask.
I cut a branch out of black card using the Cherry Blossoms set. I cut lots of flowers out of white card and inked though the dies with Aged Mahogany.
I stamped the sentiment from the same stamp set again using Plum Archival and embossed with clear powder. I cut it out using Back to Basics Tags and inked through the die with Aged Mahogany. I added a bow of Baker's Twine from the Vintage Set.
I cut a mask out of white card using the Venetian Accents die set. I inked through the die with Aged Mahogany.
I cut a couple of little motifs out of black card using the Venetian Motifs die set and popped a dot of Cosmic Shimmer Pearlescent PVA in Black Pearl in the centre of each.
I finished the card of with some more dots of Black Pearl PVA around the edges.
Thanks for stopping by.
Julia.
Friday, 24 August 2012
Wish Big
Hi Bloggers.
Thank you for all of you comments yesterday. It's really good to get your feedback.
I don't think this card has been shown very much either in the Pick of the Week or Sue's Pick of the Day. So, I'm sharing it here today.
This card started with the backing paper which is from Wild Rose Studio. I then found some pale yellow and lilac card to co-ordinate. I drew around one of the Spellbinders Scalloped Labels One dies to help me plan where I needed to stamp. I stamped the sentiment and the grasses from the Creative Expressions Dandelion Wishes Stamp Set using Cobalt Archival and embossed with Cosmic Shimmer Clear Embossing Powder. I placed the Scalloped Labels One die back over the pencil line and cut it out. I cut a motif from the Venetian Motifs die set out of lilac and pale yellow card - best to use some greaseproof paper with these. I offset them on top of each other and popped the Scalloped Labels One on top.
I made two flowers using the border from Asian Accents die set, one in pale yellow card and one in purple felt. I made them using the same technique as in Sue's Ribbon Flower Tutorial. I cut a couple of 'leaves' out using the Venetian Motifs set. I wrapped some Baker's Twine from the Vintage set around the card and added a bow then popped my leaves and flowers on top.
I cut 2 corners from the Venetian Motifs die set out of pale yellow card and 2 out of lilac card. I popped them in the top corners of the card as shown. I completed the card with some piercing around the edges with my Tim Holtz Ruler.
Thanks for stopping by.
Julia.
Thank you for all of you comments yesterday. It's really good to get your feedback.
I don't think this card has been shown very much either in the Pick of the Week or Sue's Pick of the Day. So, I'm sharing it here today.
This card started with the backing paper which is from Wild Rose Studio. I then found some pale yellow and lilac card to co-ordinate. I drew around one of the Spellbinders Scalloped Labels One dies to help me plan where I needed to stamp. I stamped the sentiment and the grasses from the Creative Expressions Dandelion Wishes Stamp Set using Cobalt Archival and embossed with Cosmic Shimmer Clear Embossing Powder. I placed the Scalloped Labels One die back over the pencil line and cut it out. I cut a motif from the Venetian Motifs die set out of lilac and pale yellow card - best to use some greaseproof paper with these. I offset them on top of each other and popped the Scalloped Labels One on top.
I made two flowers using the border from Asian Accents die set, one in pale yellow card and one in purple felt. I made them using the same technique as in Sue's Ribbon Flower Tutorial. I cut a couple of 'leaves' out using the Venetian Motifs set. I wrapped some Baker's Twine from the Vintage set around the card and added a bow then popped my leaves and flowers on top.
I cut 2 corners from the Venetian Motifs die set out of pale yellow card and 2 out of lilac card. I popped them in the top corners of the card as shown. I completed the card with some piercing around the edges with my Tim Holtz Ruler.
Thanks for stopping by.
Julia.
Thursday, 23 August 2012
Make a Wish
Hi Bloggers.
I really wish I liked this card but I don't. There's something about it that's not quite right. I think the blue label would have been better with a folder or mask embossed into it and I also think that the card should have been a bit smaller. I'm sharing it as it was shown quite a lot during the Pick of the Day on Tuesday and Wednesday just in case you'd like a run down on how it was made.
The background is the Venetian M-Bossabilities which has been inked around the edges with Faded Jeans Distress Ink.
I cut the largest of the Spellbinders Labels Twenty-Seven dies out of Coconut White Card and inked through the die with Faded Jeans. I cut the next size down out of cobalt card. I stamped my sentiment from the Creative Expressions Dandelion Wishes Stamp Set using Cobalt Archival. I cut it out using the middle size of Labels Twenty Seven and inked through the die with Faded Jeans.
I cut some branches out of brown card using the Cherry Blossoms die set. I cut lots of flowers out of Coconut White card and inked through the dies with Faded Jeans.
I assembled the card as shown adding a large bow made from blue sheer dots ribbon and a medium square dazzler. I also edged the card with some dots of Cosmic Shimmer Pearlescent PVA in White.
Thanks for stopping by.
Julia.
I really wish I liked this card but I don't. There's something about it that's not quite right. I think the blue label would have been better with a folder or mask embossed into it and I also think that the card should have been a bit smaller. I'm sharing it as it was shown quite a lot during the Pick of the Day on Tuesday and Wednesday just in case you'd like a run down on how it was made.
The background is the Venetian M-Bossabilities which has been inked around the edges with Faded Jeans Distress Ink.
I cut the largest of the Spellbinders Labels Twenty-Seven dies out of Coconut White Card and inked through the die with Faded Jeans. I cut the next size down out of cobalt card. I stamped my sentiment from the Creative Expressions Dandelion Wishes Stamp Set using Cobalt Archival. I cut it out using the middle size of Labels Twenty Seven and inked through the die with Faded Jeans.
I cut some branches out of brown card using the Cherry Blossoms die set. I cut lots of flowers out of Coconut White card and inked through the dies with Faded Jeans.
I assembled the card as shown adding a large bow made from blue sheer dots ribbon and a medium square dazzler. I also edged the card with some dots of Cosmic Shimmer Pearlescent PVA in White.
Thanks for stopping by.
Julia.
Wednesday, 22 August 2012
A Perfect Day
Hi Bloggers.
I hope you're enjoying the Spellbinders Pick of the Day with Sue. I love the new Decorative Elements dies - I have those on pre-order so should have them to play with soon and some in my Amazon Store.
Today's card started with the flower. I made it using Spellbinders Blossom Five just to see how it would work. Then, of course, I had to make a card so I could use it.
So, as I said the flower is made with Blossom Five - Sorry can't tell you the sizes I used as I don't have the card at the mo. I made it using some Creative Expressions Foundations paper called Floral Dream, same method as the flower on yesterdays card. The paper is double-sided and I used the other side for the backing paper popping it through the Grand Calibur with the Couture Creations Radiant Embossing Folder. I cut some 'leaves' using the Venetian Motifs die set.
I stamped the sentiment which is from the Studio 490 Sentimental Art Stamp Set using Cobalt Archival. I cut it out using the Spellbinders Venetian Motifs die set and then cut another from plain white card. I really is best to use some greaseproof paper when cutting these dies as they are very delicate. I stacked the motifs on top of one another turning slightly.
I popped some Self-Adhesive Film onto some Coconut White Card and cut a mask out using the Venetian Accents die set. I ran it through the machine a couple of times to make sure it had cut through the self adhesive film. I did not emboss it. I peeled of the backing and dipped it into some Creative Expressions Glass Micro Beads. This is a great way of using the mask die. It also looks great with glitter.
I assembled the card as shown adding some Creative Expressions Self-Adhesive Pearl Swirls and I pierced around the edges with my Tim Holtz Ruler.
Thanks for stopping by.
Julia.
I hope you're enjoying the Spellbinders Pick of the Day with Sue. I love the new Decorative Elements dies - I have those on pre-order so should have them to play with soon and some in my Amazon Store.
Today's card started with the flower. I made it using Spellbinders Blossom Five just to see how it would work. Then, of course, I had to make a card so I could use it.
So, as I said the flower is made with Blossom Five - Sorry can't tell you the sizes I used as I don't have the card at the mo. I made it using some Creative Expressions Foundations paper called Floral Dream, same method as the flower on yesterdays card. The paper is double-sided and I used the other side for the backing paper popping it through the Grand Calibur with the Couture Creations Radiant Embossing Folder. I cut some 'leaves' using the Venetian Motifs die set.
I stamped the sentiment which is from the Studio 490 Sentimental Art Stamp Set using Cobalt Archival. I cut it out using the Spellbinders Venetian Motifs die set and then cut another from plain white card. I really is best to use some greaseproof paper when cutting these dies as they are very delicate. I stacked the motifs on top of one another turning slightly.
I popped some Self-Adhesive Film onto some Coconut White Card and cut a mask out using the Venetian Accents die set. I ran it through the machine a couple of times to make sure it had cut through the self adhesive film. I did not emboss it. I peeled of the backing and dipped it into some Creative Expressions Glass Micro Beads. This is a great way of using the mask die. It also looks great with glitter.
I assembled the card as shown adding some Creative Expressions Self-Adhesive Pearl Swirls and I pierced around the edges with my Tim Holtz Ruler.
Thanks for stopping by.
Julia.
Tuesday, 21 August 2012
Fancy Pearl Embellishments Back in Stock
Hi Bloggers.
I'm pleased to announce that the Fancy Pearl Embellishments that Sue Wilson loves so much are back in stock in my Amazon Store.
I also have a brand new stamp set called Beaded Elements which is just gorgeous!
I've also added the Holly Mask and the Snowflakes Mask.
Don't forget that I'm still having a clearout so there's lots of bargains in My Amazon Store and on eBay. Links are in the right-hand sidebar of this blog.
All for now.
Julia
I'm pleased to announce that the Fancy Pearl Embellishments that Sue Wilson loves so much are back in stock in my Amazon Store.
I also have a brand new stamp set called Beaded Elements which is just gorgeous!
I've also added the Holly Mask and the Snowflakes Mask.
Don't forget that I'm still having a clearout so there's lots of bargains in My Amazon Store and on eBay. Links are in the right-hand sidebar of this blog.
All for now.
Julia
Pretty in Purple
Hi Bloggers.
This card did not get much air time as it was tucked away on a display that the studio crew put together. It's a shame as it's one of my favourites from the shows.
I stamped the image from the Creative Expressions Gala Event Stamp Set using Jet Black Archival and embossed with Cosmic Shimmer Clear Embossing Powder. I cut it out using Spellbinders Labels Twenty-Seven and inked through the die with Dusty Concord Distress Ink using Cut n Dry Foam. I cut a Grand Decorative Oval out of purple card.
I cut a strip of slightly darker purple card and ran it though the Grand Calibur with the Couture Creations Ornate Diamonds Embossing Folder. I cut 2 borders out of white card using the Venetian Accents die set - it's best to use some greaseproof paper when cutting these out. I threaded some Mauve Rose American Seam Binding through the borders and attached them to the dark purple card.
I made a flower using Spellbinders Blossom Five. I missed the largest die and cut 3 of each of the next 2 sizes down. I spritzed them with water to break down the fibres of the card and scrunched each piece up. I opened them up and layered them on top on one another and then pierced a hole in the centre and added a purple brad. I then scruched them up again. I added some Dusty Concord to the edges of the petals and put aside to dry. Unfortunately, the scraps of white card I used were different whites - be careful of that. I don't mind too much. I cut some 'leaves' out of white and purple card using the Venetian Motifs die set. I inked through the die with Dusty Concord on the white ones.
I assembled the card as shown, adding a corner from the Venetian Motifs die set and pierced around the edges with my Tim Holtz Ruler.
Don't forget that Sue Wilson launches the Spellbinders Pick of the Day on Ideal World this evening at 9pm.
Thanks for stopping by.
Julia.
This card did not get much air time as it was tucked away on a display that the studio crew put together. It's a shame as it's one of my favourites from the shows.
I stamped the image from the Creative Expressions Gala Event Stamp Set using Jet Black Archival and embossed with Cosmic Shimmer Clear Embossing Powder. I cut it out using Spellbinders Labels Twenty-Seven and inked through the die with Dusty Concord Distress Ink using Cut n Dry Foam. I cut a Grand Decorative Oval out of purple card.
I cut a strip of slightly darker purple card and ran it though the Grand Calibur with the Couture Creations Ornate Diamonds Embossing Folder. I cut 2 borders out of white card using the Venetian Accents die set - it's best to use some greaseproof paper when cutting these out. I threaded some Mauve Rose American Seam Binding through the borders and attached them to the dark purple card.
I made a flower using Spellbinders Blossom Five. I missed the largest die and cut 3 of each of the next 2 sizes down. I spritzed them with water to break down the fibres of the card and scrunched each piece up. I opened them up and layered them on top on one another and then pierced a hole in the centre and added a purple brad. I then scruched them up again. I added some Dusty Concord to the edges of the petals and put aside to dry. Unfortunately, the scraps of white card I used were different whites - be careful of that. I don't mind too much. I cut some 'leaves' out of white and purple card using the Venetian Motifs die set. I inked through the die with Dusty Concord on the white ones.
I assembled the card as shown, adding a corner from the Venetian Motifs die set and pierced around the edges with my Tim Holtz Ruler.
Don't forget that Sue Wilson launches the Spellbinders Pick of the Day on Ideal World this evening at 9pm.
Thanks for stopping by.
Julia.
Monday, 20 August 2012
Be a Designer of Dreams
Hi Bloggers.
I love the way this card turned out. It's hard to tell in the photo but all the ferns are different colours. I embossed them with Cosmic Shimmer Aurora Embossing Powders. They have a black base but as you move the card they turn a different colour. The left one is Lava Red, the middle one is Arctic Black and the right one is Lapis Black.
So, I started with the fern image which is from the Creative Expressions Dandelion Wishes Stamp Set. I stamped it using Perfect Medium and added one of the Cosmic Shimmer Embossing Powders. I did this 3 times, using a different powder for each one. I cut them out using Spellbinders Labels Twenty-Eight and inked with Black Soot Distress Ink using Cut n Dry Foam.
For the background, I randomly stamped the flower spray image from the Studio 490 Botanical Art stamp set using Chipped Sapphire Distress Ink. Then I randomly stamped the German script from the same stamp set using Black Soot. I did not mount the stamp on to a block but used it straight from my hand. I edged the background with Black Soot using Cut n Dry Foam.
I stamped the sentiment from the same stamp set using Cobalt Archival. I did not emboss it. I cut it out using Spellbinders Fancy Framed Tags One inking through the die with Black Soot.
I assembled the card as shown adding some dots of Cosmic Shimmer Pearlescent PVA in Black Pearl around the edges.
Thanks for stopping by.
Julia.
I love the way this card turned out. It's hard to tell in the photo but all the ferns are different colours. I embossed them with Cosmic Shimmer Aurora Embossing Powders. They have a black base but as you move the card they turn a different colour. The left one is Lava Red, the middle one is Arctic Black and the right one is Lapis Black.
So, I started with the fern image which is from the Creative Expressions Dandelion Wishes Stamp Set. I stamped it using Perfect Medium and added one of the Cosmic Shimmer Embossing Powders. I did this 3 times, using a different powder for each one. I cut them out using Spellbinders Labels Twenty-Eight and inked with Black Soot Distress Ink using Cut n Dry Foam.
For the background, I randomly stamped the flower spray image from the Studio 490 Botanical Art stamp set using Chipped Sapphire Distress Ink. Then I randomly stamped the German script from the same stamp set using Black Soot. I did not mount the stamp on to a block but used it straight from my hand. I edged the background with Black Soot using Cut n Dry Foam.
I stamped the sentiment from the same stamp set using Cobalt Archival. I did not emboss it. I cut it out using Spellbinders Fancy Framed Tags One inking through the die with Black Soot.
I assembled the card as shown adding some dots of Cosmic Shimmer Pearlescent PVA in Black Pearl around the edges.
Thanks for stopping by.
Julia.
Sunday, 19 August 2012
Flowers are Proof
Hi Bloggers.
Today I'm sharing one of the cards that I made for the Spellbinders Pick of the Week last month. Sue Wilson will be launching a new Spellbinders Pick of the Day on Tuesday evening and she has some of the dies we had on our shows added in to her shows. She also has lots of dies that we didn't have and I can tell you I really need most of them! So, if you don't want to spend any more money at the moment, I suggest that you sit on your hands during Sue's shows because I guarantee you will need lots of them too!
Anyway, here's the card. I did kind of demo it but I had to change a lot of it because of the sellouts.
For the background, I randomly stamped the butterfly image from the Studio 490 Botanical Art Stamp set all over some Coconut White Card using Cobalt Archival. I then popped it through the Grand Calibur with the Spellbinders Venetian M-Bossabilities Folder. I popped it through a second time to extend the pattern. I then inked all over with Chipped Sapphire Distress Ink using Cut n Dry Foam.
I stamped the sentiment from the Studio 490 Sentimental Art stamp set using Cobalt Archival. I did not emboss it. I cut it out using Scalloped Labels One and inked through the die with Chipped Sapphire. I cut a Labels Twenty-Seven out of cobalt card. At the emboss stage I added the Grid Mask. I cut 2 circles out of Coconut White Card using the Asian Accents Die Set and inked through the die with Chipped Sapphire.
I cut a border out of Coconut White card using the Asian Accents die set. Using my scoreboard, I scored down every peak and every trough on the border (hope that makes sense). I then concertina folded the border and glued the two ends together using Cosmic Shimmer Dries Clear Glue. I cut a small circular motif out of one of the die sets (Sorry- can't remember which one and I haven't got the card to check) - you can use any small circle nestie or a circular punch. I popped a piece of super sticky tape in the centre and popped my border flower on top. I then added a good squeeze of Cosmic Shimmer Glue and put it aside to dry for a while. I cut 2 'leaves' out of cobalt card using the Venetian Motifs die set. When the glue on the flower was dry I added a coupe of foam pads and then a Studio 490 Embellish Your Art Flower to which I had added a little Chipped Sapphire ink. I tied some American Seam Binding around a couple of Idea-ology Memo Pins and added them sticking out of the flower.
I assembled the card as shown adding some dots of Cosmic Shimmer Pearlescent PVA in White around the edges.
Thanks for stopping by.
Julia.
Today I'm sharing one of the cards that I made for the Spellbinders Pick of the Week last month. Sue Wilson will be launching a new Spellbinders Pick of the Day on Tuesday evening and she has some of the dies we had on our shows added in to her shows. She also has lots of dies that we didn't have and I can tell you I really need most of them! So, if you don't want to spend any more money at the moment, I suggest that you sit on your hands during Sue's shows because I guarantee you will need lots of them too!
Anyway, here's the card. I did kind of demo it but I had to change a lot of it because of the sellouts.
For the background, I randomly stamped the butterfly image from the Studio 490 Botanical Art Stamp set all over some Coconut White Card using Cobalt Archival. I then popped it through the Grand Calibur with the Spellbinders Venetian M-Bossabilities Folder. I popped it through a second time to extend the pattern. I then inked all over with Chipped Sapphire Distress Ink using Cut n Dry Foam.
I stamped the sentiment from the Studio 490 Sentimental Art stamp set using Cobalt Archival. I did not emboss it. I cut it out using Scalloped Labels One and inked through the die with Chipped Sapphire. I cut a Labels Twenty-Seven out of cobalt card. At the emboss stage I added the Grid Mask. I cut 2 circles out of Coconut White Card using the Asian Accents Die Set and inked through the die with Chipped Sapphire.
I cut a border out of Coconut White card using the Asian Accents die set. Using my scoreboard, I scored down every peak and every trough on the border (hope that makes sense). I then concertina folded the border and glued the two ends together using Cosmic Shimmer Dries Clear Glue. I cut a small circular motif out of one of the die sets (Sorry- can't remember which one and I haven't got the card to check) - you can use any small circle nestie or a circular punch. I popped a piece of super sticky tape in the centre and popped my border flower on top. I then added a good squeeze of Cosmic Shimmer Glue and put it aside to dry for a while. I cut 2 'leaves' out of cobalt card using the Venetian Motifs die set. When the glue on the flower was dry I added a coupe of foam pads and then a Studio 490 Embellish Your Art Flower to which I had added a little Chipped Sapphire ink. I tied some American Seam Binding around a couple of Idea-ology Memo Pins and added them sticking out of the flower.
I assembled the card as shown adding some dots of Cosmic Shimmer Pearlescent PVA in White around the edges.
Thanks for stopping by.
Julia.
Saturday, 18 August 2012
Paper Piecing
Hi Bloggers.
Debbie Shaw really liked this card on the recent shows on Create & Craft so I thought I'd share it with you.
The papers are all from Polka Doodles Sundae of Seasons CD. I stamped the image from the Creative Expressions Classic Cars Stamp Set using Coffee Archival and embossed with Cosmic Shimmer Clear Embossing Powder. I cut it out with scissors and a craft knife. I also cut out the windows and placed acetate behind them. I coloured some sections in using Black Night from the Summer Fayre Set of Cosmic Shimmer Matt Drawing Inks. I stamped and embossed the image again onto 2 patterned papers. I cut out sections of the patterned images and glued them in place on top of the plain image. I cut out a Spellbinders Labels Twenty-Eight and popped the image on top.
I stamped the small 'Hello Friend' ticket from the Creative Expressions Celebration Tickets Stamp Set using Coffee Archival and embossed it with clear powder. I stamped it 6 times on to 2 different papers I cut the ticket out, pierced a hole through all of them, fanned them out and added an Antique Copper Faux Screw Brad. I cut some 'leaves' out using the Spellbinders Venetian Motifs die set.
I assembled the card as shown and added some purple glass glintz.
Thanks for stopping by.
Julia.
Debbie Shaw really liked this card on the recent shows on Create & Craft so I thought I'd share it with you.
The papers are all from Polka Doodles Sundae of Seasons CD. I stamped the image from the Creative Expressions Classic Cars Stamp Set using Coffee Archival and embossed with Cosmic Shimmer Clear Embossing Powder. I cut it out with scissors and a craft knife. I also cut out the windows and placed acetate behind them. I coloured some sections in using Black Night from the Summer Fayre Set of Cosmic Shimmer Matt Drawing Inks. I stamped and embossed the image again onto 2 patterned papers. I cut out sections of the patterned images and glued them in place on top of the plain image. I cut out a Spellbinders Labels Twenty-Eight and popped the image on top.
I stamped the small 'Hello Friend' ticket from the Creative Expressions Celebration Tickets Stamp Set using Coffee Archival and embossed it with clear powder. I stamped it 6 times on to 2 different papers I cut the ticket out, pierced a hole through all of them, fanned them out and added an Antique Copper Faux Screw Brad. I cut some 'leaves' out using the Spellbinders Venetian Motifs die set.
I assembled the card as shown and added some purple glass glintz.
Thanks for stopping by.
Julia.
Friday, 17 August 2012
You're a Classic
Hi Bloggers.
Here's another monochromatic card from the Cars shows, but this time I've used milk card instead of white.
For the background I popped the Tyre Tracks Mask on to some milk card at a jaunty angle and ran it through the Grand Calibur using the embossing sandwich. I inked all over with Black Soot Distress Ink using Cut n Dry Foam. I curled a couple of the corners using a cocktail stick. I wrapped some Black & White Baker's Twine around the bottom section of the background and tied a Creative Expressions Key Charm which I had coloured with a Black Promarker to it.
I stamped the image from the Creative Expressions Classic Cars Stamp Set using Jet Black Archival and embossed with Cosmic Shimmer Clear Embossing Powder. I cut it out using Spellbinders Labels Twenty-Eight and inked through the die with Black Soot Distress Ink.
I stamped the sentiment from the same stamp set again using the Jet Black Archival and embossed with the clear powder. I cut it out using Spellbinders Mega Curved Rectangles and inked through the die with Black Soot.
I assembled the card as shown adding dots of Cosmic Shimmer Pearlescent PVA around the edges.
Thanks for stopping by.
Julia.
Here's another monochromatic card from the Cars shows, but this time I've used milk card instead of white.
For the background I popped the Tyre Tracks Mask on to some milk card at a jaunty angle and ran it through the Grand Calibur using the embossing sandwich. I inked all over with Black Soot Distress Ink using Cut n Dry Foam. I curled a couple of the corners using a cocktail stick. I wrapped some Black & White Baker's Twine around the bottom section of the background and tied a Creative Expressions Key Charm which I had coloured with a Black Promarker to it.
I stamped the image from the Creative Expressions Classic Cars Stamp Set using Jet Black Archival and embossed with Cosmic Shimmer Clear Embossing Powder. I cut it out using Spellbinders Labels Twenty-Eight and inked through the die with Black Soot Distress Ink.
I stamped the sentiment from the same stamp set again using the Jet Black Archival and embossed with the clear powder. I cut it out using Spellbinders Mega Curved Rectangles and inked through the die with Black Soot.
I assembled the card as shown adding dots of Cosmic Shimmer Pearlescent PVA around the edges.
Thanks for stopping by.
Julia.
Thursday, 16 August 2012
A Level Results
Hi Bloggers.
Thanks for all your good luck wishes.
Kathryn got an A in English and C's in Chemistry & Biology so she has her place at Postmouth Uni. Well Chuffed!
All for now.
Julia.
Thanks for all your good luck wishes.
Kathryn got an A in English and C's in Chemistry & Biology so she has her place at Postmouth Uni. Well Chuffed!
All for now.
Julia.
Homespun Part 2
Hi Bloggers.
Today is A level results day! I can tell you I've had everything crossed for weeks now. I'll try and post again this evening to let you know how Kathryn got on.
As promised, here's another card made with the Spellbinders Homespun die set.
I started with the background. I attached the Trellis Mask to a piece of Coconut White Card and ran it through my Grand Calibur with the embossing sandwich. I kept the mask in place and inked through it with Chipped Sapphire Distress Ink using Cut n Dry Foam.
I cut some of the motifs from the Spellbinders Homespun die set out of white card and inked through the dies with Barn Door Distress Ink.
I tied a large bow tied from Sheer Dots Ribbon and added a Blue Zipper Rose.
I assembled the card as shown adding some dots of Cosmic Shimmer Pearlescent PVA in Berry Red. Job done. Easy peasy!
Thanks for stopping by.
Julia.
Today is A level results day! I can tell you I've had everything crossed for weeks now. I'll try and post again this evening to let you know how Kathryn got on.
As promised, here's another card made with the Spellbinders Homespun die set.
I started with the background. I attached the Trellis Mask to a piece of Coconut White Card and ran it through my Grand Calibur with the embossing sandwich. I kept the mask in place and inked through it with Chipped Sapphire Distress Ink using Cut n Dry Foam.
I cut some of the motifs from the Spellbinders Homespun die set out of white card and inked through the dies with Barn Door Distress Ink.
I tied a large bow tied from Sheer Dots Ribbon and added a Blue Zipper Rose.
I assembled the card as shown adding some dots of Cosmic Shimmer Pearlescent PVA in Berry Red. Job done. Easy peasy!
Thanks for stopping by.
Julia.
Wednesday, 15 August 2012
Homespun
Hi Bloggers.
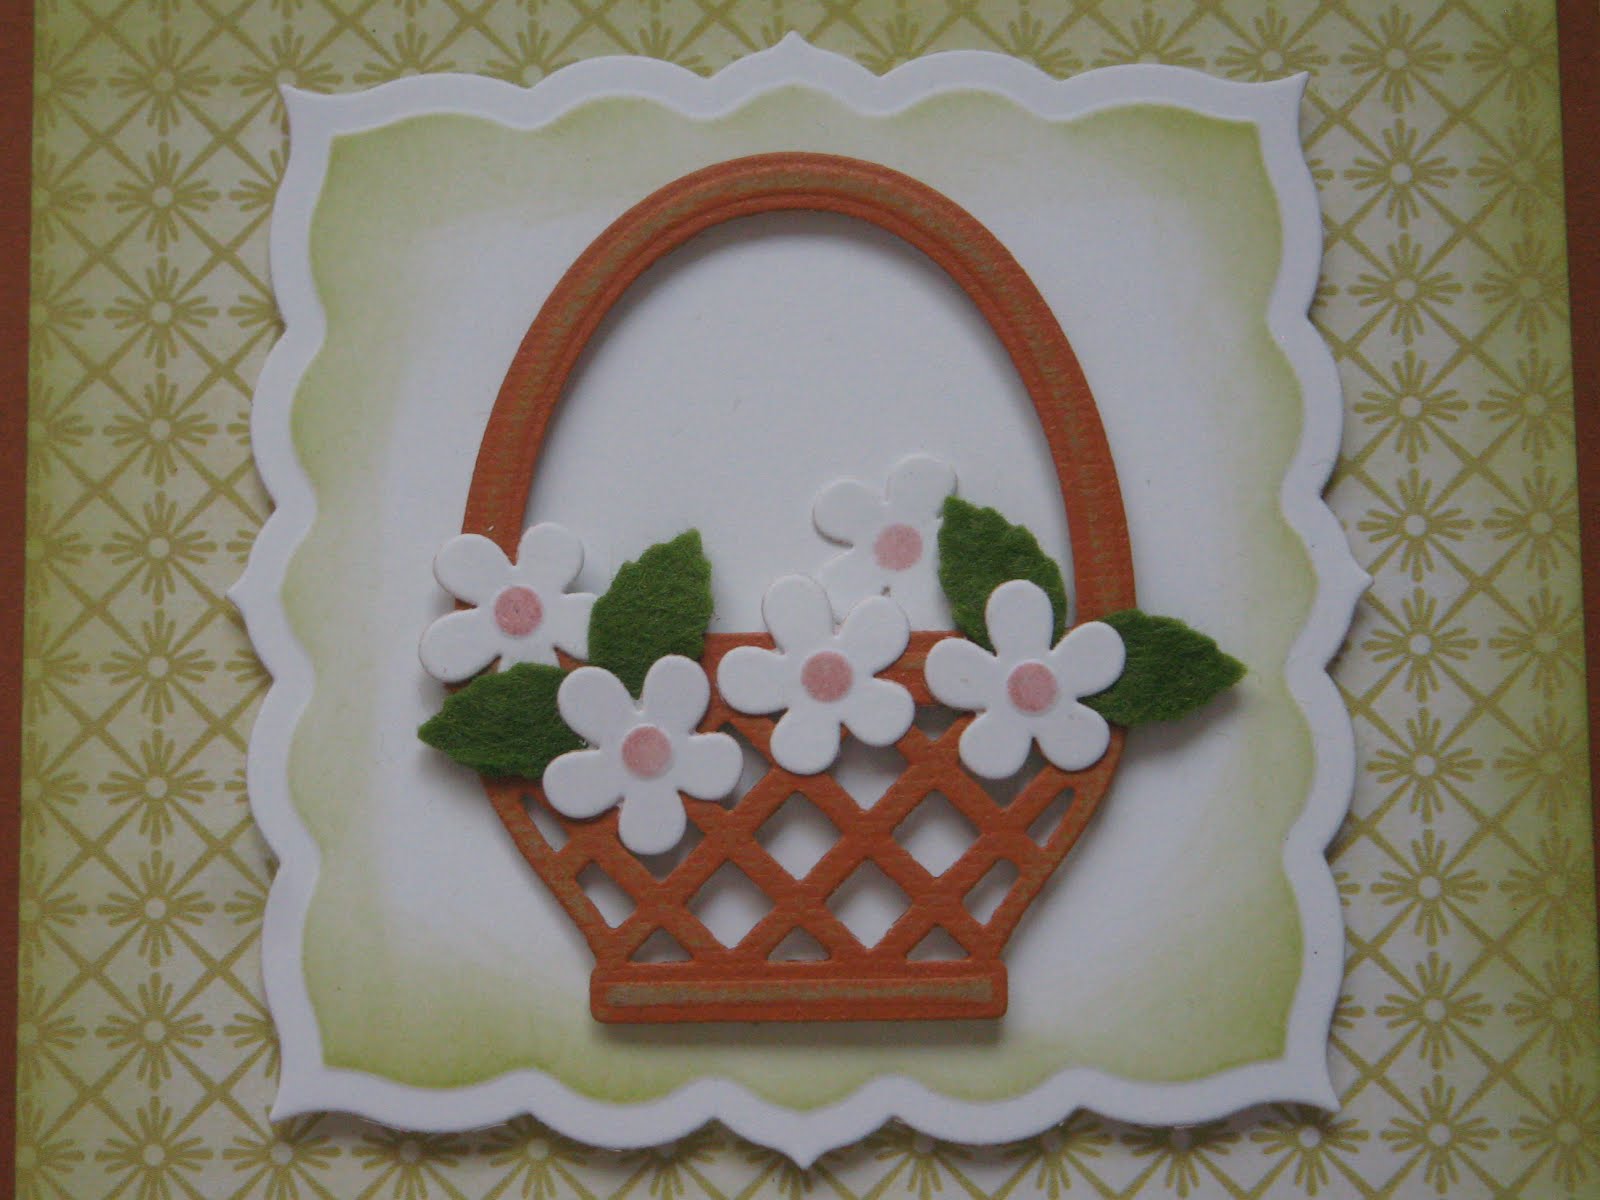
A break from Cars today as the lovely Christine Emberson is due on Create & Craft with some Spellbinders shows featuring some new dies. So, I'm sharing a simple card featuring the new Homespun set from Spellbinders.
The backing paper is My Mind's Eye Lost and Found. I inked around the edges of it with Peeled Paint Distress Ink using Cut n Dry Foam.
I cut a Spellbinders Labels Twenty-Six out of Coconut White Card and inked through the die with Peeled Paint. I cut the basket out of Kraftcore and carefully sanded a little to reveal the core. I cut the little flowers out of white card and inked through the die with Victorian Velvet Distress Ink. I cut the little leaves out of felt that I got from Sam Poole here.
I stamped the sentiment from the Creative Expressions Dandelion Wishes Stamp Set using Jet Black Archival and embossed with Cosmic Shimmer Clear Embossing Powder. I cut it out using just the centre die of one of the Spellbinders Fancy Framed Tags Two dies. I inked through the die with Peeled Paint. I then cut the tag frame using both sections of the die pair.
I assembled the card as shown adding some dots of Cosmic Shimmer Pearlescent PVA in Choco Brown.
I'll share another Homespun card tomorrow.
Thanks for stopping by.
Julia.
A break from Cars today as the lovely Christine Emberson is due on Create & Craft with some Spellbinders shows featuring some new dies. So, I'm sharing a simple card featuring the new Homespun set from Spellbinders.
The backing paper is My Mind's Eye Lost and Found. I inked around the edges of it with Peeled Paint Distress Ink using Cut n Dry Foam.
I cut a Spellbinders Labels Twenty-Six out of Coconut White Card and inked through the die with Peeled Paint. I cut the basket out of Kraftcore and carefully sanded a little to reveal the core. I cut the little flowers out of white card and inked through the die with Victorian Velvet Distress Ink. I cut the little leaves out of felt that I got from Sam Poole here.
I stamped the sentiment from the Creative Expressions Dandelion Wishes Stamp Set using Jet Black Archival and embossed with Cosmic Shimmer Clear Embossing Powder. I cut it out using just the centre die of one of the Spellbinders Fancy Framed Tags Two dies. I inked through the die with Peeled Paint. I then cut the tag frame using both sections of the die pair.
I assembled the card as shown adding some dots of Cosmic Shimmer Pearlescent PVA in Choco Brown.
I'll share another Homespun card tomorrow.
Thanks for stopping by.
Julia.
Tuesday, 14 August 2012
New Products in My Amazon Store
Hi Bloggers.
I've just popped some gorgeous new pearl embellishments from Creative Expressions into my Amazon Store. You can view them here and here.
There's also 4 different packs of Shrink Plastic.
I have also re-stocked the Khaki Card and Black Pearl PVA.
All for now.
Julia
I've just popped some gorgeous new pearl embellishments from Creative Expressions into my Amazon Store. You can view them here and here.
There's also 4 different packs of Shrink Plastic.
I have also re-stocked the Khaki Card and Black Pearl PVA.
All for now.
Julia
Enjoy Your Day
Hi Bloggers.
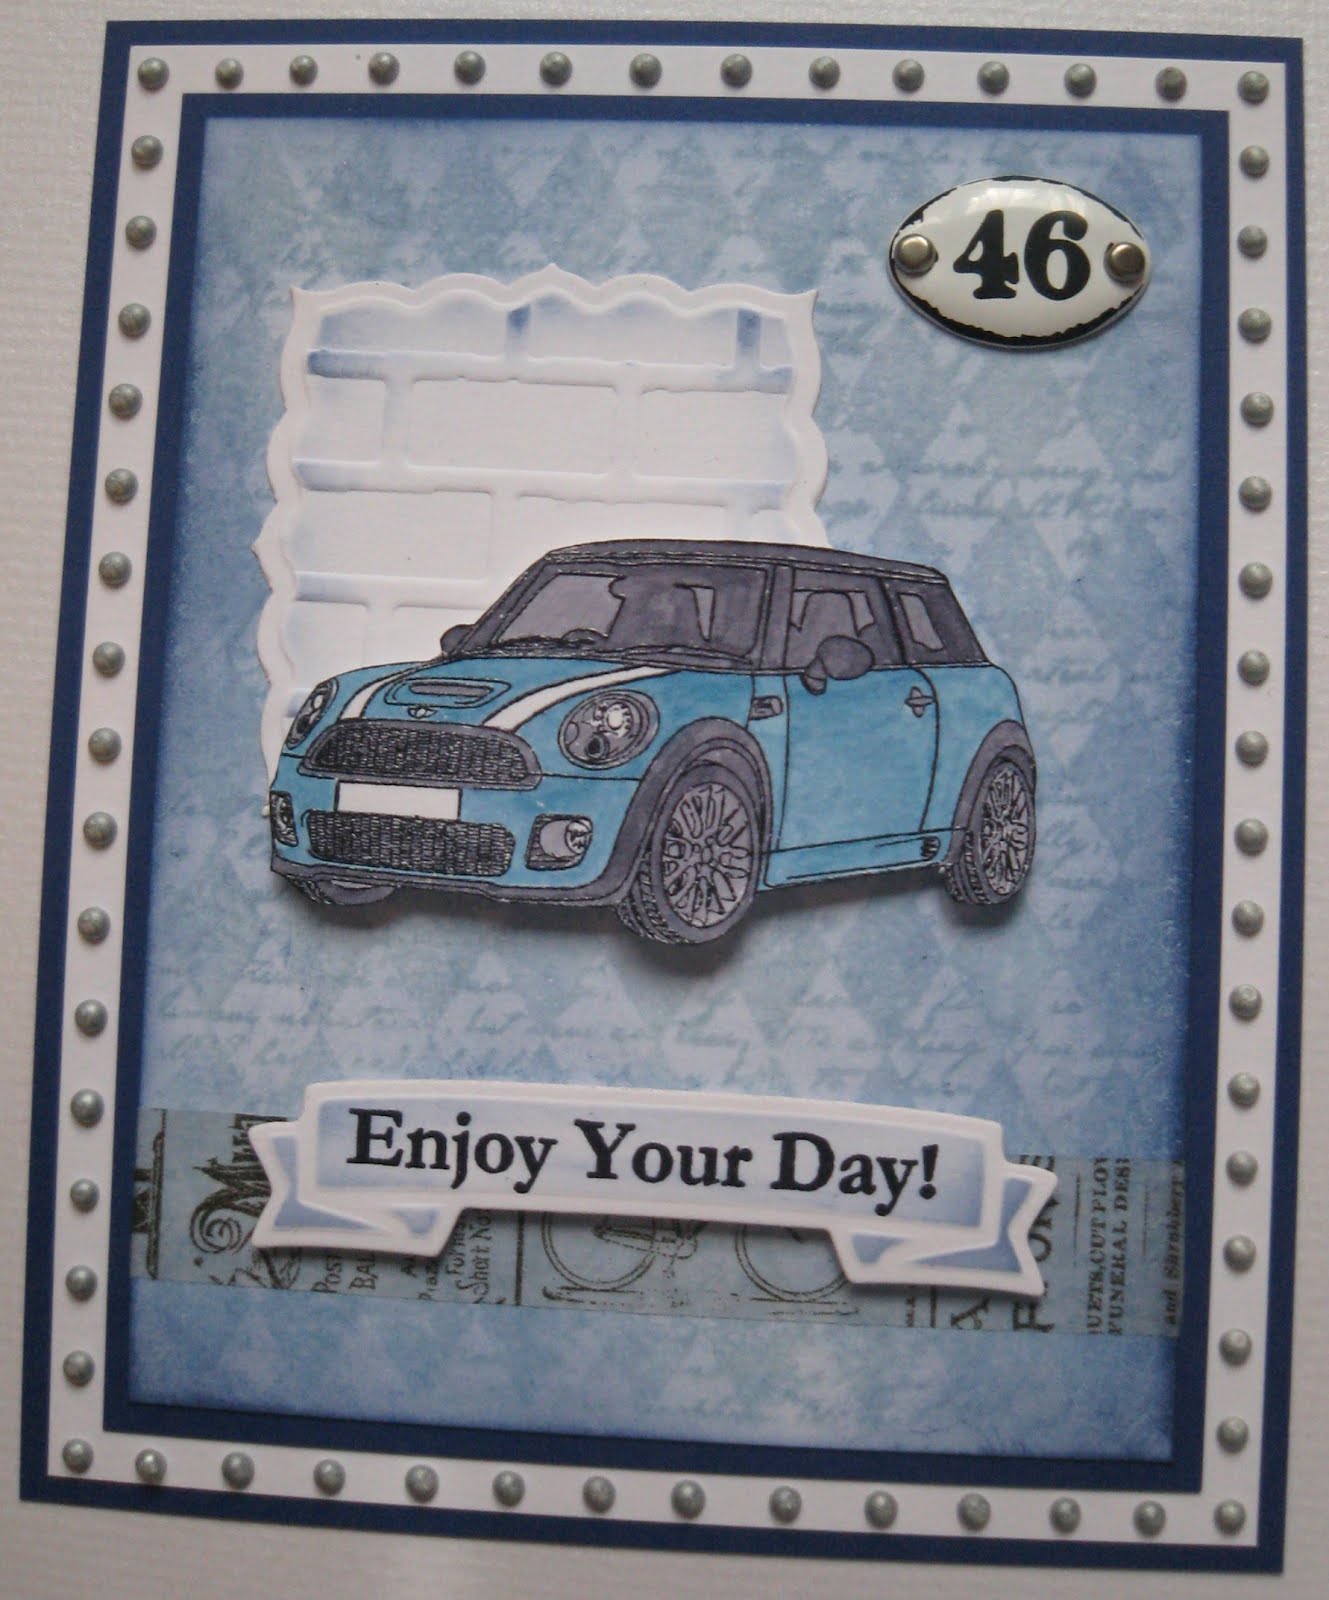
Here's another demo card from the shows last week.
For the background I placed the Justrite Harlequin Script Background stamp onto my craft sheet face up. I rubbed some Picket Fence Distress Stain onto the stamp. I then placed some Coconut White Card on top and carefully rubbed all over to transfer the stain. I removed the card and then dried the background. I then inked all over with Chipped Sapphire Distress Ink using Cut n Dry Foam.
I stamped the image from the Creative Expressions Dream Cars Stamp Set using Jet Black Archival and embossed with Cosmic Shimmer Clear Embossing Powder. I coloured it in using Cosmic Shimmer Matt Drawing Inks. I used Blue Cotton from the Soft Velvet Set and Black Night from the Summer Fayre Set.
I cut a piece of Coconut White card using Labels Twenty-Six. At the emboss stage I added the Creative Expressions Brick Embossing Folder. The sandwich you need for this is base plate, approx 15 sheets of copy paper, folder (open),die with card in it with cutting edge facing up (away from the folder), tan mat, pink embossing plate. DO NOT close the folder or you will damage it. I left the card in the die and inked around the edges with Chipped Sapphire Distress Ink using Cut n Dry Foam.
I wrapped some Idea-ology Journeyman Tissue Tape around the bottom section of the background. I stamped the sentiment from the same stamp set using the Jet Black Archival and embossed with the clear powder. I cut it out using Spellbinders Ribbon Banners. I inked through the die with Chipped Sapphire.
I added an Idea-ology Plaquette and assembled the card as shown. I popped some dots of Cosmic Shimmer Pearlescent PVA in Silver Lustre around the edges.
Thanks for stopping by.
Julia.
Here's another demo card from the shows last week.
For the background I placed the Justrite Harlequin Script Background stamp onto my craft sheet face up. I rubbed some Picket Fence Distress Stain onto the stamp. I then placed some Coconut White Card on top and carefully rubbed all over to transfer the stain. I removed the card and then dried the background. I then inked all over with Chipped Sapphire Distress Ink using Cut n Dry Foam.
I stamped the image from the Creative Expressions Dream Cars Stamp Set using Jet Black Archival and embossed with Cosmic Shimmer Clear Embossing Powder. I coloured it in using Cosmic Shimmer Matt Drawing Inks. I used Blue Cotton from the Soft Velvet Set and Black Night from the Summer Fayre Set.
I cut a piece of Coconut White card using Labels Twenty-Six. At the emboss stage I added the Creative Expressions Brick Embossing Folder. The sandwich you need for this is base plate, approx 15 sheets of copy paper, folder (open),die with card in it with cutting edge facing up (away from the folder), tan mat, pink embossing plate. DO NOT close the folder or you will damage it. I left the card in the die and inked around the edges with Chipped Sapphire Distress Ink using Cut n Dry Foam.
I wrapped some Idea-ology Journeyman Tissue Tape around the bottom section of the background. I stamped the sentiment from the same stamp set using the Jet Black Archival and embossed with the clear powder. I cut it out using Spellbinders Ribbon Banners. I inked through the die with Chipped Sapphire.
I added an Idea-ology Plaquette and assembled the card as shown. I popped some dots of Cosmic Shimmer Pearlescent PVA in Silver Lustre around the edges.
Thanks for stopping by.
Julia.
Monday, 13 August 2012
The Road to a Friend's House
Hi Bloggers.
Here's one of those cards where I've used the sentiment as the focal point and the image on the background.
Starting with the background, on some Milk Card, I randomly stamped one of the images from the Creative Expressions Classic Cars Stamp Set using Walnut Stain Distress Ink. I then popped the Grid Mask on top and ran it through the Grand Calibur with the embossing sandwich. I distressed the edges with my scissors and then inked all around them with Vintage Photo Distress Ink using Cut n Dry Foam. I wrapped some Idea-ology Journeyman Tissue Tape around the background as shown.
I stamped the sentiment from the same stamp set using Coffee Archival and embossed with Cosmic Shimmer Clear Embossing Powder. I cut it out using Spellbinders Labels Twenty-Eight and inked through the die with Vintage Photo. I cut another Labels Twenty-Eight the next size up and again inked through the die.
I stamped a couple of the small tickets from the Creative Expressions Celebration Tickets Stamp Set using Coffee Archival and embossed with Clear Powder. I coloured then in using the Umber and Dark Spice Matt Drawing Inks from the Autumn Shades Set and cut them out. I glued them to the background using Cosmic Shimmer Dries Clear Glue and then added a couple of staples that I had dyed with some Latte Alcohol Ink.
I threaded some Black & White Baker's Twine through 2 Idea-ology Shabby Accoutrements.
I tied some Baker's Twine through a Creative Expressions Watch Face Charm
and again used Cosmic Shimmer Dries Clear Glue to secure it.
I assembled the card as shown adding some faux stitching around the edges.
Thanks for stopping by.
Julia.
Here's one of those cards where I've used the sentiment as the focal point and the image on the background.
Starting with the background, on some Milk Card, I randomly stamped one of the images from the Creative Expressions Classic Cars Stamp Set using Walnut Stain Distress Ink. I then popped the Grid Mask on top and ran it through the Grand Calibur with the embossing sandwich. I distressed the edges with my scissors and then inked all around them with Vintage Photo Distress Ink using Cut n Dry Foam. I wrapped some Idea-ology Journeyman Tissue Tape around the background as shown.
I stamped the sentiment from the same stamp set using Coffee Archival and embossed with Cosmic Shimmer Clear Embossing Powder. I cut it out using Spellbinders Labels Twenty-Eight and inked through the die with Vintage Photo. I cut another Labels Twenty-Eight the next size up and again inked through the die.
I stamped a couple of the small tickets from the Creative Expressions Celebration Tickets Stamp Set using Coffee Archival and embossed with Clear Powder. I coloured then in using the Umber and Dark Spice Matt Drawing Inks from the Autumn Shades Set and cut them out. I glued them to the background using Cosmic Shimmer Dries Clear Glue and then added a couple of staples that I had dyed with some Latte Alcohol Ink.
I threaded some Black & White Baker's Twine through 2 Idea-ology Shabby Accoutrements.
I tied some Baker's Twine through a Creative Expressions Watch Face Charm
and again used Cosmic Shimmer Dries Clear Glue to secure it.
I assembled the card as shown adding some faux stitching around the edges.
Thanks for stopping by.
Julia.
Subscribe to:
Posts (Atom)