Showing posts with label Baker's Twine. Show all posts

Sunday, 29 November 2015

Springtime

Hi Bloggers.

It seems that this card has never had it's day on the blog -

For the background, I ran a piece of Coconut White Card through the Grand Calibur with the Couture Creations Small Dots Embossing Folder. I inked around the edges with Stonewashed Adirondack Dye Ink.

I stamped the Justrite Burlap Background onto Coconut White Card using Stonewashed Adirondack. I cut it out using Spellbinders Labels 29 and inked through the dye with Stonewashed Ink.

I stamped the garden tools onto Coconut White Card using Jet Black Archival and embossed with Cosmic Shimmer Clear Embossing Powder. I cut them out using scissors. I coloured them in using Weathered Wood and Stormy Sky Distress Markers with a Water Brush. I added a little bow tied with Baker's Twine.

I stamped the seed packet from the same stamp set, again using Jet Black Archival and embossed with Clear Embossing Powder. I coloured in using Weathered Wood, Stormy Sky and Mustard Seed Distress Markers.

I stamped the sentiment from the same stamp set, again using Jet Black Archival and embossed with Clear Embossing Powder. I cut it out using Justrite Vintage Labels 7 and inked through the die with Stonewashed Adirondack.

I assembled the card as shown adding some 5mm White Pearls and some dots of Cosmic Shimmer Crystal Sparkle PVA around the edges.

Phill Martin is launching a One Day Special on Hochanda this evening at 8pm with some brand new stamps. I have some on order and they should arrive Wednesday/Thursday. I have set up a category on my website with the products I have in stock from the show here. There's 10% discount on these items till midnight tomorrow night (Monday 30th November) including the new stamps. Dispatch on orders containing the new stamps will be delayed until the stamps arrive.

Thanks for stopping by.

Julia.
www.juliawattscrafts.co.uk

Saturday, 10 October 2015

Believe

Hi Bloggers.

John Lockwood & I are demoing for MJ Crafts in Gloucester today. It's actually being held at Northgate Hall, St Johns lane, Northgate street but it's via ticket so please contact the shop for info.

Here's today's card -

For the background, I first cut the Couture Creations Dasher Die out of Coconut White Card to cut an aperture. I then ran it through the Grand Calibur with the Gradient Mask. I wrapped some Metallic Bakers Twine around the card, tied a bow and added a Pine Cone which I had cut down a little to remove the berries.

I cut the Dasher Die again out of Vintage Gold Card and glued him into the aperture.

I cut the Couture Creations Believe Die out of Vintage Gold Card - I just used the wording on this card, not the flourish.

I assembled the card as shown adding some 5mm White Pearls and piercing around the edges using my Tim Holtz Ruler, Precision Probe and Piercing Mat.

John will be launching a One Day Special on Hochanda this evening at 8pm with Sue Wilson's Portuguese Collection. Shows will continue at tomorrow at 9am, 12noon, 4pm and 7pm. Hope you can tune in.

Thanks for stopping by.

Julia.
www.juliawattscrafts.co.uk

Monday, 9 December 2013

Congratulations

Hi Bloggers.

Had a great day yesterday - didn't Nikki do well?

Here's today's card -

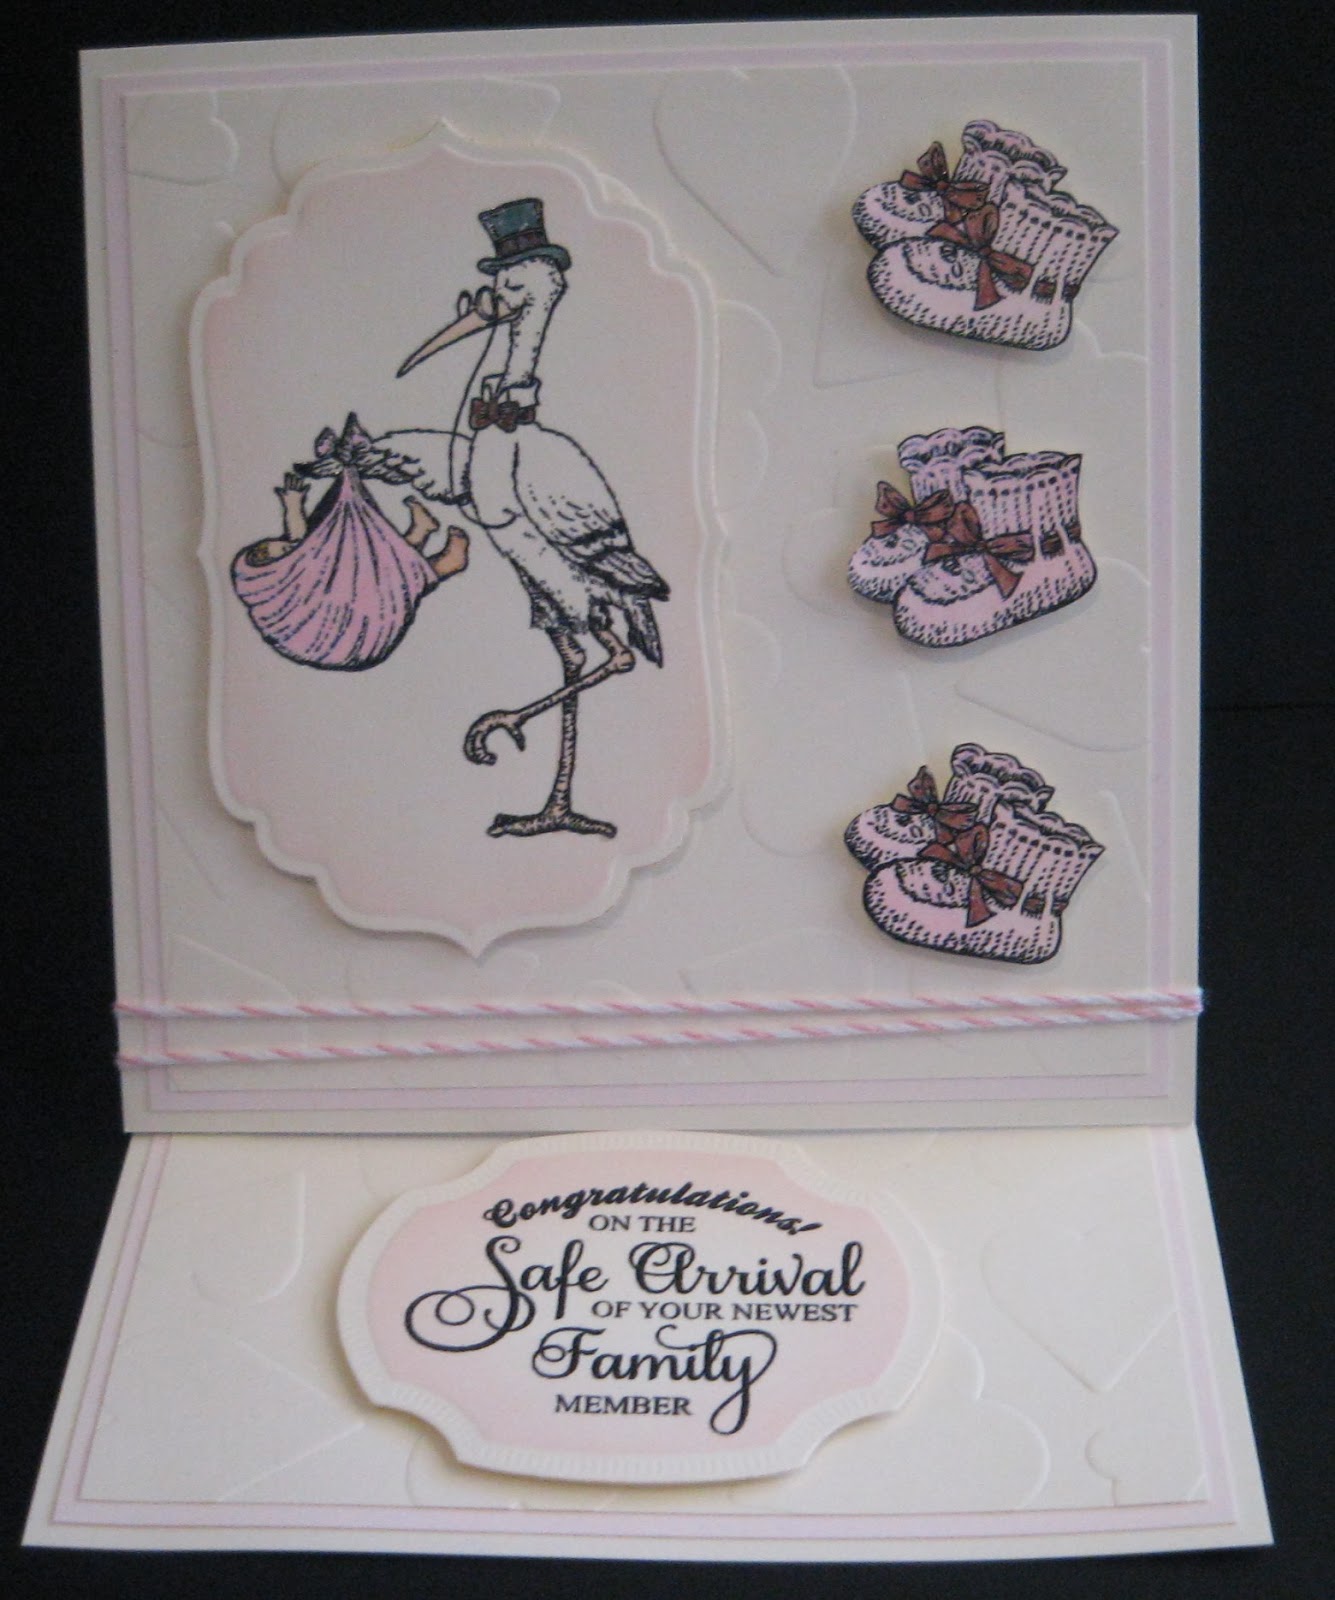
An easel card with that wonderful Stork image. I've used Milk and Blush Card on this.

So, some layers of Milk and Blush Card. The top layers were embossed with the Heart Confetti Mask. I wrapped some Pink & White Baker's Twine from the Pastel Set around the top section.

The Stork is from the Justrite Special Delivery Clear Stamp Set, stamped using Jet Black Archival and embossed with Cosmic Shimmer Clear Embossing Powder, coloured with Cosmic Tone Matt Drawing Ink from the Cosmic Shimmer Skin Tones Set, Pastel Pink Watercolour from the Cosmic Shimmer Pastels Watercolour Paint Set, Weathered Wood and Victorian Velvet Distress Markers. I cut it out using Spellbinders Labels 4 and inked through the die with Victorian Velvet Distress Ink.

I stamped 3 baby booties using Jet Black Archival and embossed with Cosmic Shimmer Clear Embossing Powder. I coloured them in using Pastel Pink Watercolour and Victorian Velvet Distress Marker.

I stamped the sentiment, again using Jet Black Archival and embossed with with Clear Powder. I cut it out using Justrite Vintage Labels Five and inked through the die with Victorian Velvet.

Thanks for stopping by.

Be sure to pop back later to see if you're a winner of the blog candy.

Julia.

Friday, 21 December 2012

Nature

Hi Bloggers.

Here's today's card -

For the background, I simply ran some Coconut White Card through the Grand Calibur with the Spellbinders Elite M-Bossabilities Folder. I inked around the edges with Stonewashed Adirondack Dye Ink using Cut n Dry Foam.

I dusted a piece of Coconut White Card with my Anti-Static Bag and stamped the sentiment from the Creative Expressions Falling Leaves Stamp Set and embossed with Cosmic Shimmer Steel Blue Embossing Powder from the Metallics & Darks Set. I cut it out using the largest of the Fancy Postage Edge dies. While Still in the die, I stamped the Ivy Branch from the same stamp around the edges using the Stonewashed Ink Pad. I then inked through the die with Stonewashed using Cut n Dry Foam. I threaded some Blue Baker's Twine from the Primary Set  through the holes in the die cut.

I tied a bow out of Blue Satin Edged Organza. I made a flower using the Bitty Blossoms die set, inking through the die with Stonewashed before rolling.

I assembled the card as shown adding some dots of Cosmic Shimmer Pearlescent PVA in White around the edges.

Thanks for stopping by.

Julia.

Sunday, 16 December 2012

Heart Tree

Hi Bloggers.

This is one the cards I made for the Pick of the Day last month and it got a brief showing on the shows last Monday.

For the background, I spritzed some Milk Card with Cosmic Shimmer Tarnished Gold Vintage Mister. I dried it with my heat tool and then inked through the Acorn Leaves Mask with Oregano Adirondack Dye Ink using Cut n Dry Foam.

I cut a Spellbinders Marvelous Square out of Black Card. I stamped the tree from the Creative Expressions Trees of Imagination Stamp Set using Jet Black Archival and embossed with Cosmic Shimmer Clear Embossing Powder. I cut it out using the backing die from the Spellbinders Triumphant Blossom Cut, Fold & Tuck die set and inked through the die with Oregano.

I tied a bow using 3 lengths of Black American Seam Binding. I threaded a key from the Assorted Key Charms Pack onto 2 lengths of Black Baker's Twine from the Primary Set and tied another bow.

I assembled the card as shown adding some 8mm Black Pearls in 3 of the corners and some dots of Cosmic Shimmer Pearlescent PVA in Black Pearl around the edges.

Sue Wilson is on Create & Craft today 12noon for 2 hours and 5pm. She's sure to have some fab demos to show.

Thanks for stopping by.

Julia.


Monday, 26 November 2012

You are So Loved

Hi Bloggers.

A simple masculine card today.

The background is a piece of Foundations Argyle Paper. I stamped the image from the Creative Expressions Trees of Imagination Stamp Set onto some Milk Card using Jet Black Archival and embossed with Cosmic Shimmer Clear Embossing Powder. I cut it out using the backing die from the Spellbinders CFT Puzzle Effect die set. I cut a Scalloped Labels One out of black card.

I wrapped a piece of American Seam Binding around my background as shown. I stamped the sentiment from the Creative Expressions Fanciful Phrases Stamp Set using Jet Archival and embossed with clear powder. I cut it out using the tag die from the Spellbinders French Frill die set. I cut another tag out of black card and used the inner stamped piece with the outer black piece. I tied 2 Key Charms to some Baker's Twine and added it to the bottom of the tag.

I assembled the card as shown adding some dots of Cosmic Shimmer Pearlescent PVA in Black Pearl around the edges.

Thanks for stopping by.

Julia.


Saturday, 3 November 2012

Yay! Lappy is back!

Hi Bloggers.

I'm happy to report that I have my pc back. I did have to spend a couple of hours at pc world yesterday while they put my data back where it should have been and re-installed my printer.

Here's today's card-


The images are from Urban Beats, stamped using Jet Black Archival and embossed with clear powder then cut out using Scalloped Labels One. The text is also from Urban Beats and cut out with Labels 28. The background is Creative Expressions Crackle Embossing Folder inked with Stormy Sky Distress Ink. I wrapped some Baker's  Twine from the Primary set around the card and added some buttons.

Sorry for brief description but Kathryn is home for the weekend and I want to spend as much time with her as poss.

Thanks for stopping by.

Julia.

Friday, 2 November 2012

Graffiti Wall

PHi Bloggers.

Another post scheduled on the ipad. I may have to go out and buy another machine as I'm getting desperate now.

You may see a few of the samples I've made for the Pick of the Day next Tuesday on a little video on either C & C or Ideal World as a preview. Let me know if you spot them. I'm a bit nervous about letting them out of my sight. I just hope I get them back for the shows!

Today's card was based on one I spotted that Sam had made. I'm not really happy with it. It's a bit flat. Sam's is much better. I thought I'd share it anyway - please be kind!

This card is all about the background. On some white card I spritzed some Dark Spice from the Winter Garden Misting Ink set. I then took the nozzle out of the Black Night Mister and splatted them over the background. I randomly stamped some of the images from the Urban Beats, Urban Life and Silhouette Skateboard stamp sets using various distress inks. I also stamped 'jake 14' from Sam's Vintage Alphabet and Mini Alpha Stamp Sets in Jet Black Archival (I don't know anyone called Jake by the way). I then popped the piece through the Grand Calibur with the Creative Expressions Brick Embossing Folder. I tore around the edges and inked with Pumice Stone Distress Ink using Cut N Dry Foam. I sanded it to reveal the white core of the card.

I stamped the aerosal can from the Urban Life Stamp Set using Jet Black Archival and embossed with Cosmic Shimmer Clear Embossing Powder. I added a couple of Idea-ology Sprocket Gears and a Faux Screw brad. I added the wall to some craft card and drew some lines around it with a black fineliner. I wrapped some black baker's twine around the card and added a button.
I also added some dots of Cosmic Shimmer Pearlescent PVA in Black Pearl around the edges.
Thanks for stopping by.
Julia.

Wednesday, 24 October 2012

No. 1

Hi Bloggers.

A boy card today from the shows on Monday. I will share as many of the cards from the shows as I can. Tracey Laughton made some of the samples for the Skateboard Silhouettes and Anything is Possible stamp sets. Sam Poole made a couple of the samples from the Urban Life and Urban Beats stamp sets.

For the background, I spritzed some Milk Card with Black Knight Acrylic Misting Ink from the Winter Garden Set. Once dry, I inked through the Retro Squares Mask with Brushed Corduroy Distress Ink using Cut n Dry Foam. I also stamped one of the stamps from Sam Poole's Urban Beats Stamp Set using the Brushed Corduroy. I wrapped some Black American Seam Binding around the card and added some Antique Copper Faux Screw Brads.

I spritzed some Milk Card with the Dark Spice Acrylic Misting Ink from the Winter Garden Set and dried it. I then dusted it with an anti-static bag and stamped the ghetto blaster image (from Urban Beats) using Jet Black Archival and embossed with Cosmic Shimmer Clear Embossing Powder. I tore around the image and then inked with Brushed Corduroy. I coloured part of the image in using Dark Spice Matt Drawing Ink from the Autumn Shades Set. I stamped the image agin and just cut out the cassette and mounted that onto the main image using 3d foam pads.

I stamped the 'No. 1' from the same stamp set again using Jet Black Archival and embossed with clear powder. I coloured in again using the Dark Spice Matt Drawing Ink and then cut out using Spellbinders Scalloped Labels One. I inked around the edges with Brushed Corduroy.

I tied some Black & White Baker's Twine through some buttons from my stash.

I assembled the card as shown adding some dots of Cosmic Shimmer Pearlescent PVA in Black Pearl around the edges.

Thanks for stopping by.

Julia.

Wednesday, 17 October 2012

You go Girl

Hi Bloggers.

Another girly card today - very simple.

For the background, I popped some Coconut White Card with the Creative Expressions Floral Embossing Folder. I ran it through a second time to extend the pattern and then edged it with Mustard Seed Distress Ink.

I stamped the image from the Fashionista : A Day Shopping using Jet Black Archival and embossed with Cosmic Shimmer Clear Embossing Powder. I coloured her in using Cosmic Shimmer Matt Drawing Inks and then cut her out using Spellbinders Floral Ovals. I inked through the die with Mustard Seed Distress Ink using Cut n Dry Foam.

I stamped the sentiment from the same stamp set using Jet Black Archival and embossed with clear powder. I cut it out using Spellbinders Ribbon Banners and inked through the die with Mustard Seed.

I tied a messy bow with 3 lengths of Chalk White American Seam Binding. I spritzed it with water, scrunched it and dried it with my heat tool. I threaded some Baker's Twine through a button and tied a bow. I added it to my ribbon bow.

I assembled the card as shown adding some dots of Cosmic Shimmer Pearlescent PVA in White around the edges.

Thanks for stopping by.

Julia.

Tuesday, 16 October 2012

Buy it in Every Colour!

Hi Bloggers.

A bright shoe card today.

For the background, I stamped one of the swirls from the Creative Expressions Beaded Elements Stamp Set (now back in stock) using Dried Marigold Distress Ink randomly over a piece of Coconut White Card. I dried the ink with my heat tool and then ran the piece through the Grand Calibur with the Couture Creations Bouquet Embossing Folder. I ran it through a second time to extend the pattern (it didn't line up exactly but that didn't matter as most of it would be covered by my topper. I inked around the edges with Wild Honey Distress Ink using Cut n Dry Foam.

I stamped the image from the Creative Expressions Sole Creations Stamp Set (also now back in stock) using Jet Black Archival and embossed with Cosmic Shimmer Clear Embossing Powder. I coloured it in using Cosmic Shimmer Matt Drawing Inks and then cut it out using Spellbinders Labels Twenty-Six. I inked through the die with Wild Honey.

I stamped the sentiment from the same stamp set again using the Jet Black Archival and embossed with the clear powder. I cut it out using Spellbinders Labels Fourteen.

I tied a messy bow using 3 lengths of Blue White American Seam Binding. I threaded some Baker's Twine through a yellow button and tied a bow. I added this to my bow.

I added a 8mm White Pearl to each corner and some dots of Cosmic Shimmer Pearlescent PVA in White around the edges.

Thanks for stopping by.

Julia.


Wednesday, 26 September 2012

Love

Hi Bloggers.

Thanks for all your emails yesterday - there were loads! As always, your support is much appreciated. I did make a bit of a mess of the last demo though - worst demo I've done on tv so far, I think. I know what went wrong with the snowflake though (I think). I assumed that the double-sided adhesive sheet was stuck on the card. However, I think it had just attached itself at the corners to fool me and the backing of one side hadn't actually been removed which meant that it was harder for me to cut and when I took it out of the die, it wasn't stuck to the card. I was quite tired by then so didn't think to double check it. Pity as I think that's the show that was scheduled to be repeated over night.

Today's card is another from the Card Creator shows.

For the background, I simply ran a piece of Coconut White Card through the Grand Calibur with the Spellbinders Ornamental Iron M-Bossabilities Folder. I ran it through a second time to extend the pattern and then inked around the edges with Dried Marigold Distress Ink.

I cut the largest of the Fancy Ribbon Threader dies out of Foundations Dot and Dash Paper and threaded some Blue White American Seam Binding through it.I cut Polka Dots out of white card and at the emboss stage added the Floral Vines Mask. I inked through the die with Dried Marigold. I cut a frame out using the Jewel Framed Sentiments Set and a 'Love' out of Brass Metal using the same die set. I added a bow tied from the Pastel Baker's Twine Set.

I tied a messy bow using 3 lengths of Blue White American Seam Binding. I stamped 2 flowers from the Button Florals stamp set on to Peach card and embossed them with Cosmic Shimmer True White Embossing Powder. I cut them out, layered them up and added an 8mm White Pearl.

I assembled the card as shown and added some dots of Cosmic Shimmer Pearlescent PVA in White.

Thanks for stopping by.

Julia.


Tuesday, 25 September 2012

Thanks a Bunch

Hi Bloggers.

I'm due on Create & Craft today at 8am, 1pm and 6pm with the Christmas dies that Sue and I demoed last Wednesday and Thursday. As I type this (Monday evening), I'm listening to Gonna Make You a Star by David Essex. I just had to download it after the shows with Loen last Thursday. I also downloaded Sugar Baby Love by the Rubettes - I was amazed at how many of their songs were on iTunes.

Today's card is from the shows with the Card Creator Dies a couple of weeks ago.

For the background I randomly stamped one of the stamps from the Creative Expressions Floral Silhouette Stamp Set using Jet Black Archival. I stamped it first on to some paper and then onto the card to lighten the image. I then stamped a little butterfly from the Creative Expressions Button Florals stamp set using Victorian Velvet Distress Ink. I popped this through the Grand Calibur with the Spellbinders Ornamental Iron M-Bossabilities Folder. I ran it through a second time to extend the pattern.

I stamped the Tulips from the Floral Silhouette Stamp Set using Jet Black Archival. I cut it out using Spellbinders Matting Basics B and inked through the die using Victorian Velvet and Cut n Dry Foam. I cut a frame out of Foundations Dot and Dash Paper using a Fancy Postage Edge die and a larger Matting Basics die than the one used to cut out the tulips.

I cut the largest of the Fancy Ribbon Threader dies out of some pink card and threaded some Rose Petal American Seam Binding through it. I tied a messy bow using 3 lengths of the American Seam Binding. I added a key charm and a button with some Pastel Baker's Twine tied through it. I stamped the sentiment from the Button Florals Stamp Set using Jet Black Archival and embossed with Cosmic Shimmer Clear Embossing Powder. I cut it out using a small Fancy Ribbon Threader die and inked through the die with Victorian Velvet.

I assembled the card as shown adding some dots of Cosmic Shimmer Pearlescent PVA in Dusky Pink.

Hope you can watch the shows today. Please email in if you can. If I look a bit haggered it's because I'll have been up since 4.30am!

Thanks for stopping by.

Julia.


Monday, 24 September 2012

Have a Classy Day

Hi Bloggers.

I thought I'd share a car card with you today.I gave this to Kathryn's boyfriend for his 18th so I hope I can remember how I made it!

I had fun with the background. I used Milk Card. I think I used Walnut Stain Distress Ink to stamp the Justrite Chevron Stripe Stamp randomly over the card. I also stamped the Creative Expressions Bubblewrap Stamp using Chipped Sapphire Distress Ink and there's the Creative Expressions Newsprint Stamp which I may have stamped with Coffee Archival. I also added some splats of Chipped Sapphire Distress Stain.

I stamped the image from the Creative Expressions Dream Cars Stamp Set using Coffee Archival and embossed with Cosmic Shimmer Clear Embossing Powder. I coloured it in using Cosmic Shimmer Matt Drawing Inks and cut it out using the 'Out of the Box' technique (see this post ) with Spellbinders Curved Rectangles. I inked through the die with Chipped Sapphire. I added a mat cut from a larger rectangle and inked through the die with Vintage Photo Distress Ink (I think!).

I stamped the sentiment using Coffee Archival and embossed with clear powder. I cut it out using Spellbinders Back to Basics Tags and inked through the die. I cut another couple of tags out - one using brown card and at the emboss stage I added a mask (can't think which one - sorry!) then I inked it with Chipped Sapphire. For the other one I stamped the Justrite Harlequin Script stamp using Chipped Sapphire and then cut it out. I spaced them out and added a Creative Expressions Faux Screw Brad in Antique Copper.

I assembled the card as shown adding a couple of buttons with some baker's Twine tied through them and some dots of Cosmic Shimmer Pearlescent PVA in Choco Brown.

Thanks for stopping by.

Julia.


Thursday, 20 September 2012

Christmas Baubles

Hi Bloggers.

I have another Christmas card for you today. No Spellbinders on it but it does feature the Creative Expressions Christmas Bauble Stamp Set that is on the shows today and it has the same technique on the background as one of the demos I'm planning to do. The demo will be of one Sue's card which is featured on her blog here. Sue gives such a good explanation of how the technique is achieved that I suggest you pop over there and have a read.

Anyway here's my card -


I used Pesto, Stonewashed, Stream and Pool Alcohol Inks for my background. I sprinkled Gold Mica Powder on top from the Metallics Set. I also added some Gold Glitter from the Cosmic Shimmer Festive Brights Glitter Set.

I stamped some baubles from the stamp set using Cobalt Archival and embossed with Cosmic Shimmer Clear Embossing Powder. I cut them out with scissors leaving a small white border around the edges. I wrapped some Baker's Twine from the Primary Set over the back of the card in 3 places and 'hung' my baubles from it. Looking at it while I type this, I may add a twine bow to each of them.


I stamped the sentiment from the same stamp set using the Cobalt Archival and embossed with clear powder. I cut it out with my trimmer and rounded the edges with a punch. I cut 2 x Spellbinders Fancy Framed Tags Two (oops I lied! There is a Spellbinders die cut on here. Forgot about that one!) out of black card. I cut one end off each of them and joined them together to make a mat for my sentiment.


I finished the card off with some dots of Cosmic Shimmer Pearlescent PVA in Olympic Gold.

Hope you can join me later - 12noon on Ideal World and 4pm and 7pm on Create & Craft.

Thanks for stopping by.

Julia.

Wednesday, 19 September 2012

Happy Christmas

Hi Bloggers.

Back to Christmas as Sue has some shows scheduled today which include the Heirloom Ornament die and the bauble stamp used in this card so I thought it would be appropriate to share it with you.


For the background, I randomly stamped a swirl from the Creative Expressions Beaded Elements Stamp Set using Perfect Medium. I added some Cosmic Shimmer Black Sparkle Embossing Powder and heat set.

I stamped the bauble from the Creative Expressions Christmas Bauble Stamp Set using Jet Black Archival and embossed with Cosmic Shimmer Clear Embossing Powder. I cut it out with scissors leaving a small white border all round the edge. I threaded an Idea-ology Bauble onto some black Baker's Twine from the Primary Set, tied a bow and added it to the top of the bauble.

I cut a black bauble using the Spellbinders 2011 Heirloom Bauble die set. At the emboss stage I added the Couture Creations Hedged Maze Embossing Folder. I wrapped some Baker's Twine around to the back of the card, added my black bauble die cut and then my stamped bauble.


I stamped the sentiment from the Creative Expressions Let it Snow Stamp Set again using Jet Black Archival and embossed with clear powder. I cut it out using Spellbinders Ribbon Banners. I cut another banner out of black card and at the emboss stage I added the Hedged Maze Folder again. I glued it to the back of the stamped banner offsetting it slightly. (sorry photo is blurred!)


I pressed a couple of Creative Expressions Decorative Metal Corners into Perfect Medium, sprinkled with Cosmic Shimmer Silver Shine Metallic Embossing Powder and heat set. Incidentally, if you find this particular corner too big for your project then you can easily trim them down with scissors.


I finished the card off with some dots of Cosmic Shimmer Pearlescent PVA in Silver Lustre.

Sue's shows are scheduled for 8am and 11am on Create & Craft and then 3pm on Ideal World. I take over tomorrow with shows at 12noon on Ideal World and 4pm and 7pm on Create & Craft.

Thanks for stopping by.

Julia.

Monday, 17 September 2012

Friends Fill Your Life

Hi Bloggers.

Another card with an Autumnal feel today.


For the background, I spritzed through the Leaves Mask with Cosmic Shimmer Tarnished Gold Vintage Mister. I stamped the sentiment from the Creative Expressions Heartfelt Sentiments Stamp Set using Coffee Archival and embossed with Cosmic Shimmer Clear Embossing Powder. I cut it out using Spellbinders Matting Basics A and inked through the die with Vintage Photo Distress Ink. I cut some leaves out of handmade paper using the Spellbinders Little Leaf Sets Die Set. I tied a messy bow using 2 lengths of American Seam Binding in London Tan. I threaded some Baker's Twine from the Primary Set through a button from my stash and tied a bow. I added it to my American Seam Binding Bow using Cosmic Shimmer Dries Clear Glue.


I cut the largest of the Fancy Weave Dies out of brown card and snipped one side of it off to use as a border. I added a couple of Art Deco Metal Corners securing with Cosmic Shimmer Glue.


I finished the card off with some dots of Cosmic Shimmer Pearlescent PVA in Choco Brown.

Thanks for stopping by.

Julia.