Hi Bloggers.
I thought the sentiment on today's card was appropriate for New Year's Eve.
The backing paper is once again from the Teresa Collins 8 x 8 Paper Pad, covered with a Self Adhesive Sheet and then Micro Beads.
The cupcakes are from the Couture Creations Party Time 3 in 1 Set, stamped using Coffee Archival and embossed with Cosmic Shimmer Clear Embossing Powder. I cut it out using the corresponding die in the set. I stamped the little bow from the set using Magenta Hue Archival and embossed with Clear Powder. I cut it out using the die in the set. I cut a Spellbinders 5 x 7 Elegant Labels 28 out of Raspberry Card. I cut the largest of the dies out of Roast Coffee Card and at the emboss stage added the embossing folder from the Party Time set.
I stamped the sentiment from the set using Coffee Archival and embossed with Clear Powder. I cut it out using Justrite Vintage Labels Four.
I made the flowers using a stamp from the Couture Creations Pattern Quilt 3 in 1 Set, stamped 3 times for each using Coffee Archival. The leaves are cut using the Heartfelt Creations Sweet Juliet Die Set.
I assembled the card as shown adding some dots of Cosmic Shimmer Pearlescent PVA in Dark Bronze around the edges.
I'll be back tomorrow with a Sneak Peak from Thursday's Shows.
Thanks for stopping by.
Julia.
Tuesday 31 December 2013
Monday 30 December 2013
Thinking of You
Hi Bloggers.
Here's today's card -
For the background, I covered a piece of paper from the Teresa Collins 8 x 8 Paper Pad with a DS Adhesive Sheet and added Glass Micro Beads.
I stamped the sentiment from the Heartfelt Creations Beautiful Juliet Stamp Set using Perfect Medium and embossed with Cosmic Shimmer Silver Shine Detail Powder. I cut it out with scissors. I cut a Spellbinders Labels 25 out of another paper from the Teresa Collins Pad and a pretty frame out of Coconut White Card using a couple of dies from the Spellbinders Majestic Labels 25 die set, inking through the die with Dried Marigold Distress Ink.
I made a flower using the Heartfelt Creations Sweet Juliet Die Set and a Teresa Collins Paper. I cut and shaped some flowers using the Heartfelt Creations Tattered Florals Die Set from the same paper I had cut the Labels 25. I cut some more from the Sweet Juliet Die Set but didn't shape them, just popped them at the back of the layered flower as is. Finally I cut some leaves from the Sweet Juliet Die Set and inked through the die with Dried Marigold.
I assembled the card as shown adding some Cream Pearls in the Corners and some dots of Cosmic Shimmer Pearlescent PVA in White around the edges.
Thanks for stopping by.
Julia.
Sunday 29 December 2013
Just For You
Hi Bloggers.
Here's today's card -
For the background, I stamped the Creative Expressions Butterfly Corner in the top right hand corner of a piece of Milk Card using Dried Marigold Distress Ink. I laid the Elegance Border along the bottom section of the card and inked through the mask with Dried Marigold. I then ran it through the Grand Calibur with the Couture Creations Thinking of You Embossing Folder. I ran it through a second time to extend the design and inked around the edges with Dried Marigold.
I stamped the Creative Expressions Bejewelled Bag using Jet Black Archival and embossed with Cosmic Shimmer Clear Embossing Powder. I stamped the sentiment from the same set just below the bag and embossed in the same way. I coloured in using Mango Orange and Summer Green Mica Powders from the Cosmic Shimmer Circus Brights Mica Spray Set and Copper Mica Powder from the Cosmic Shimmer Metallics Mica Spray Set. I cut it out using Spellbinders Pearl Effects and inked through the die with dried Marigold. I added some Cream Pearls to the beaded section of the bag.
I made a flower out of a couple of papers from the Teresa Collins 8 x 8 Paper Pad and the Heartfelt Creations Posy Patch Die Set, adding a Cream Pearl to the centre. I cut a couple of leaves out using the Heartfelt Creations Classic Leaf Die Set.
I assembled the card as shown adding a Cream Pearl to each corner and some dots of Cosmic Shimmer Pearlecent PVA in White around the edges.
Thanks for stopping by.
Julia.
Saturday 28 December 2013
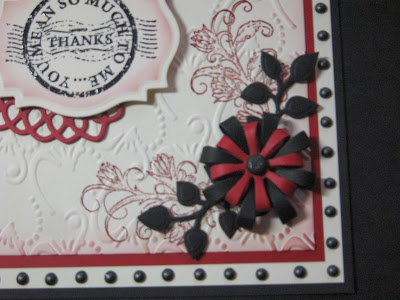
Thanks
Hi Bloggers.
Here's today's card -
For the background, I stamped the corner stamp from the Heartfelt Creations Juliet Spray stamp set using Aged Mahogany Distress Ink and embossed with Cosmic Shimmer Clear Embossing Powder. I ran it through the Grand Calibur with the Creative Expressions Cascading Hearts A4 Embossing Folder and inked around the edges with Aged Mahogany Distress Ink.
I made 2 flowers using the Heartfelt Creations Sweet Juliet Die Set and also cut some leaves from the sames die set.
I stamped the sentiment from the Heartfelt Creations Moments With You Stamp Set using Jet Black Archival and embossed with Clear Powder. I cut it out using Spellbinders Labels 18 and inked through the die with Aged Mahogany. I cut a Spellbinders Lace Hearts out of Rich Red Card.
I assembled the card as hown adding a couple of Creative Expressions Victorian Metal corners and some dots of Cosmic Shimmer Pearlescent PVA in Black Pearl around the edges.
Thanks for stopping by.
Julia.
Friday 27 December 2013
Life is better with you in it
Hi Bloggers.
Here's today's card -
For the background, I stamped the Creative Expressions Wrought Iron Corner in each corner using Perfect Medium and embossed with Cosmic Shimmer Gold Detail Embossing Powder. I then ran it through the Grand Calibur with the Couture Creations Thinking of You Embossing Folder. I ran it through a second time to extend the design.
I stamped the sentiment from the Heartfelt Creations Timeless Sentiments Stamp Set using Perfect Medium and embossed with Gold Detail Powder. I cut it out using Spellbinders Pearl Effects and cut a Spellinders Fancy Postage Edge Die out of Soft Gold Card.
I tied a bow using 2 lengths of Champagne Silky Crush Ribbon and added a Vintage Metal Button.
I assembled the card as shown adding some dots of Cosmic Shimmer Pearlescent PVA in Golden Pearl around the edges.
Thanks for stopping by.
Julia.
Thursday 26 December 2013
Distress Ink Pads now just £2.50!
Hi Bloggers.
Just to let you know that I have reduced the price of in stock Distress Ink Pads in my Amazon Store to just £2.50 each. You can see the ones I have in stock here. Not sure what is going on with some of the Amazon pics on these but I will fullfill orders according to the name of the ink pads (hope that makes sense). Offer is available till 31st January 2014 or while stocks last.
There are still a few Couture Creations Embossing Folders available at £2.99 each. You can see all the in stock Couture Creations Folders here (some are not included in the sale). Again offer available till 31st January or while stocks last.
Postage is £2.70 for the first item and just 10p extra for each extra item.
Please scroll down to the previous post to see today's card.
All for now.
Julia.
Thinking of You
Hi Bloggers.
Here's today's card -
For the background, I applied some drops of Cranberry, Ginger and Sunset Orange Alcohol Ink to an Alcohol Ink Applicator Tool and inked all over a piece of Heat Emboss Acetate. Once dry, I dusted both sides with my Anti Static Bag (dusting both sides means that any stray embossing powder does not stick to the acetate). I stamped the Justrite Sweet Lace Background onto the side that hadn't been inked using Perfect Medium and embossed with Cosmic Shimmer Gold Detail Embossing Powder. I stamped and embossed again to extend the design then mounted the piece onto a piece of Coconut White Card.
I stamped the sentiment from the Justrite Large Elegant Sentiments Clear Stamp Set using Perfect Medium and embossed with Gold Detail Powder. I cut it out using Spellbinders Decorative Labels 28 and inked through the die with Antique Linen Distress Ink. I inked up another piece of acetate with the Alcohol Inks and die cut another Decorative Labels 28 and then cut another out of Soft Gold Card.
I tied a bow using 2 lengths of Champagne Silky Crush Ribbon and added a Vintage Metal Button.
I assembled the card as shown adding an 8mm Cream Pearl to each corner.
Thanks for stopping by.
Julia.
Wednesday 25 December 2013
Sent with Cheer
Hi Bloggers.
Happy Christmas Everyone!
Here's today's card -
For the background, I used Sue's Shaving Foam Technique which you can see here. I used Chipped Sapphire and Victorian Velvet Re-inkers. I randomly stamped one of the baubles from the Justrite Vintage Christmas Ornaments Stamp Set using Cobalt Archival.
I stamped the sentiment and the frame from the Justrite Christmas Vintage Labels Four Stamp Set using Cobalt Archival. I cut it out using Justrite Vintage Labels Four Dies and inked through the die with Tumbled Glass Distress Ink.
I tied a bow using 2 lengths of Navy Silky Crush Ribbon. I cut a couple of snowflakes using Spellbinders Snowflake Pendant 2012, inked the edges with Tumbled Glass and added an 8mm White Pearl.
I assembled the card as shown adding some more White Pearls to the corners and some dots of Cosmic Shimmer Pearlescent PVA in Cobalt around the edges.
Thanks for stopping by.
Julia.
Tuesday 24 December 2013
To the World
Hi Bloggers.
Here's today's card -
For the background, I dabbed Cosmic Shimmer Flake & Glitter Glue over the Justrite Sweet Lace Background Stamp and stamped onto some Coconut White Card. While the glue was becoming clear, I cleaned off my stamp with a Grime Boss. I covered the stamped area with Cosmic Shimmer Silver Chrome Polished Silk Glitter.
I stamped the sentiment from the Heartfelt Creations Timeless Sentiments Stamp Set using Perfect Medium and embossed with Cosmic Shimmer Silver Shine Detail Powder. I cut it out using a couple of dies from the Spellbinders Majestic Labels 25 die set and inked through the die with Dusty Concord. I cut the corresponding Spellbinders Labels 25 out of Mauve card.
I popped a piece of Double Sided Self Adhesive Sheet onto some card and cut one of the Sweet Juliet dies. I peeled off the backing and added some Silver Chrome Polished Silk Glitter. I cut another Sweet Juliet die out of White felt from the Vintage Felt Pack and made a flower. I cut some leaves out of Mauve Card using the same die set.
I assembled the card as shown adding some dots of Cosmic Shimmer Pearlescent PVA in Cosmic Pearl around the edges.
Thanks for stopping by.
Julia.
Monday 23 December 2013
Thank You
Hi Bloggers.
Here's today's card -
The background is simply a piece of Milk Card run through the Grand Calibur with the Couture Creations My Garden Embossing Folder. I ran it through a second time to extend the design.
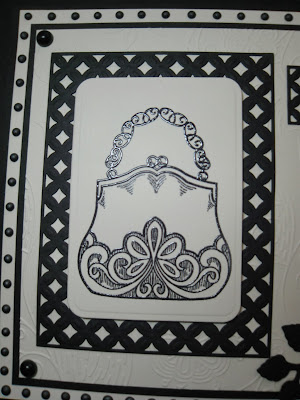
I stamped the Creative Expressions Bijou Bag using Jet Black Archival and embossed with Cosmic Shimmer Clear Embossing Powder. I cut it out using Spellbinders Curved Matting Basics B and cut a Spellbinders Diamond Effects out of Black Card.
I stamped the sentiment that comes with the Bijou Bag, again using Jet Black Archival and embossed with Clear Powder. I cut it out using Spellbinders Curved Matting Basics A and cut another Spellbinders Diamond Effects out of Black Card.
I made some flowers using the Heartfelt Creations Posy Patch Die Set and a couple of papers from the Teresa Collins 8 x 8 Paper Pad. I cut some leaves out of Black Card using the Heartfelt Creations Classic Leaf Die Set.
I assembled the card as shown adding some 8mm Black Pearls and some dots of Cosmic Shimmer Pearlescent PVA in Black Pearl around the edges.
Thanks for stopping by.
Julia.
Sunday 22 December 2013
40% Discount on selected Couture Creations Embossing Folders
Hi Bloggers.
Just to let you know that there's 40% off selected Couture Creations Embossing Folders in my Amazon Store from now until 31st January 2014. To see them all click here.
Postage is £2.70 for your first item and just 10p extra for each extra item.
All for now.
Please scroll down to the previous post to see today's card.
Julia.
Crystal Panels
Hi Bloggers.
Here's today's card featuring the Caught in Crystal Technique that you can see a tutorial of on Sue's Blog here.
I've used Cosmic Shimmer Clear Lacquer Varnish instead of 3d Crystal Lacquer. I used Ginger, Cranberry and Sunset Orange Alcohol Inks, a little Pale Gold Mica Powder from the Cosmic Shimmer Metallics Mica Spray Set and a little Penny Copper Cosmic Shimmer Polished Silk Glitter. Once dry, I cut 3 panels and mounted them on some Rich Red Card.
The back background is a piece of Coconut White Card run through the Grand Calibur with the Couture Creations Happy Birthday Embossing Folder. I ran it through a second time to extend the design and inked around the edges with Aged Mahogany Distress Ink.
I stamped the sentiment and the frame from the Justrite Large Elegant Sentiments Clear Stamp Set using Jet Back Archival. I cut it out using Justrite Vintage Labels Four and inked through the die with Aged Mahogany Distress Ink. I cut a fancy mat out of Black Card using Spellbinders Majestic Labels 25.
I tied a bow using 2 lengths of Black Silky Crush Ribbon and added a Crystal Sparkler.
I assembled the card as shown adding an 8mm Black Pearl in each corner and some dots of Cosmic Shimmer Pearlescent PVA in Black Pearl around the edges.
Thanks for stopping by.
Julia.
Saturday 21 December 2013
Purse-onally, I think you're the best!
Hi Bloggers.
Here's today's card -
Another easy peasy card!
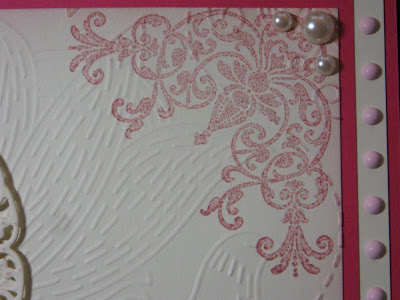
For the background, I stamped the Creative Expressions Wrought Iron Corner Stamp in the top right-hand corner of a piece of Milk Card using Victorian Velvet Distress Ink. I then ran it through the Grand Calibur with the Couture Creations My Garden Embossing Folder. I ran it through a second time to extend the design and inked around the edges with Victorian Velvet.
I stamped the Rose Blossom Purse using Jet Black Archival and embossed with Cosmic Shimmer Clear Embossing Powder. I cut it out using Spellbinders Stately Circles and inked through the die with Victorian Velvet. I coloured in the roses with a mix of Rose Hue Mica Powder from the Cosmic Shimmer Circus Brights Mica Spray Set and Pearlescent Mica Powder from the Cosmic Shimmer Metallics Mica Spray Set. I coloured in the leaves using Summer Green Mica Powder from the Crcus Brights Mica Spray Set.
I stamped the sentiment that comes with the Rose Blossom Purse using Jet Black Archival and embossed with Cosmic Shimmer Clear Embossing Powder. I cut it out using Spellbinders Fancy Postage Edge and inked through the die with Victorian Velvet.
I assembled the card as shown adding some Cream Pearls to the corners and some dots of Cosmic Shimmer Pastel PVA in Pastel Pink around the edges.
Thanks for stopping by.
Julia.
Subscribe to:
Posts (Atom)