Saturday 30 November 2013

A Recovery Wish For You and Amazon Store Stock Updates

Hi Bloggers.

Here's today's card -

For the background, I used Milk Card. I randomly stamped the flower spray from the Heartfelt Creations Recovery Wishes Stamp Set using Faded Jeans Distress Ink. I made sure the ink was dry and then ran it through the Grand Calibur with the Spellbinders Twisted Hearts M-Bossabilities Folder. I ran it through a second time to extend the design (repeating pattern so easy to line up) and then inked around the edges with Faded Jeans using Cut n Dry Foam. I wrapped a piece of Cream Crochet Ribbon around just below the centre.

I stamped the sentiment from the same stamp set using Jet Black Archival and embossed with Cosmic Shimmer Clear Embossing Powder. I cut it out using Spellbinders Labels 18 and inked through the die with Faded Jeans. I dotted a little CS Flake & Glitter Glue on the sprays on the image and added Cosmic Shimmer Crystal Aurora Sparkle Glitter. I cut the largest of the Spellbinders Pearl Effects Dies out of Periwinkle Card and inked through the die with Faded Jeans.

 I cut a couple of Heartfelt Creations Posy Patch flowers out of Milk Card and spritzed them with Marine Ultra Mica Powder from the Cosmic Shimmer Shimmering Luxury Mica Spray Set. I made a flower and cut some leaves using the Heartfelt Creations Sweet Juliet Die Set.

I assembled the card as shown adding an 8mm Cream Pearl to 3 of the corners and some dots of Cosmic Shimmer Pearlescent PVA in White around the edges.

I have some new embellishments in my Amazon Store -

Crystal Sparklers
Vintage Metal Buttons
Crystal Sparklers are now back in stock
Also back in stock is the CS Flake & Glitter Glue. Ribbon has been selling well lately so I've re-stocked that too.

Don't forget - you can clink on the links (products in blue in the text) to go straight to the products in my store. Alternatively, click on Amazon in the top bar of this blog to take you to my storefront.

All for now.

Thanks for stopping by.

Julia.

Friday 29 November 2013

Purple Tones

Hi Bloggers.

Joan has not come forward to claim the Blog Candy prize so I have made the draw again. The new winner is -

Marilyn Mcnama!!

Please email me at juliawattscrafts@gmail.com with your addy and I'll pop your prize in the post.

Here's today's card -

For the background, I used Coconut White Card. I randomly inked through the Squared Mask with Dusty Concord Distress Ink using Cut n Dry Foam. I then repeated the process with the Filigree Mask and Seedless Preserves Distress Ink. With the stamp in my hand I randomly stamped the Heartfelt Creations Burnished Keys Stamp using Dusty Concord. I made sure that the ink was dry and then ran it through the Grand Calibur with the Couture Creations Cheerful Embossing Folder. I ran it through a second time to extend the design. I then rubbed Pearl Moon Gilding Wax all over. Once dry I buffed it up with a dry wetwipe and inked around the edges with Dusty Concord.

I stamped the image from the Heartfelt Creations Keys and Roses Stamp Set using Jet Black Archival and embossed with Cosmic Shimmer Clear Embossing Powder. I coloured it in using Lapis Lavender Mica Powder from the Cosmic Shimmer Summer Shades Mica Spray Set and Apple Green Mica Powder from the Cosmic Shimmer Luscious Greens Mica Spray Set. I cut it our using Spellbinders Classic Squares Large and inked through the die with Dusty Concord. I stamped the main image again and embossed using Clear Powder. Using the template I had made for the Heartfelt Creations Burnished Key die, I lined the relevant key shape up over the key in the image. I slotted the Burnished Key die in place and secured with removable tape. I then ran it through the Grand Calibur to cut and emboss. Use this technique if you don't want to cut out the full set of keys. I cut a mat out of Heather Card using Spellbinders Grand Squares and Spellbinders Gold Squares One.

I made some flowers out of Heather Card and felt from the Vintage Felt Pack using the Heartfelt Creations Sweet Juliet Die Set. I cut some leaves using the same die set.

I assembled the card as shown adding an 8mm White Pearl in each corner and some dots of Cosmic Shimmer Pearlescent PVA in White around the edges.

Thanks for stopping by.

Julia.

Thursday 28 November 2013

Sweet Memories with You

Hi Bloggers.

I'm adding new items onto ebay daily so click on the bar above is you'd care to have a look. I've also added some items for sale in the Beadwork section.

Here's today's card -

For the background, I used Milk Card. I stamped the Heartfelt Creations Script Keys Background twice using Dried Marigold Distress Ink. I made sure the ink was dry ran it through the Grand Calibur with the Couture Creations Large Hepburn Embossing Folder. I ran it through a second time to extend the design and then rubbed Enchanted Gold Gilding Wax all over the surface. Once dry, I buffed it up using a dry wetwipe and inked around the edges with Dried Marigold.

I stamped the image from the Heartfelt Creations Floral Keys & Locket Stamp Set using Jet Black Archival and embossed with Cosmic Shimmer Clear Embossing Powder. I cut it out using Spellbinders Labels 18 and inked through the die with Dried Marigold. I coloured in using Jade Teal Mica Powder from the Cosmic Shimmer Luscious Greens Mica Spray Set and Warm Peach Mica Powder from the Cosmic Shimmer Morning Sunlight Mica Spray Set. I already had a corresponding key cut out (I'd stamped the Burnished keys stamp and cut out with the Burnished Keys die). I coloured in parts of the key using a little Olympic Gold Mica Powder (from the Morning Sunlight Set) mixed with a little Vintage Photo Distress Ink. I layered this key on top of the image using 3d Foam. I cut 2 Spellbinders Majestic Labels 25 dies out of Soft Gold Card.


I made a flower out of a couple of papers from the Teresa Collins 8 x 8 Paper Pad using the Heartfelt Creations Sweet Juliet Die. I used another paper to cut out a couple of Heartfelt Creations Posy Patch flowers. I cut some leaves out of Soft Gold Card using the Sweet Juliet Die Set.

I assembled the card as shown adding some Cream Pearls in the corners and some dots of Cosmic Shimmer Pearlescent PVA in Golden Pearl around the edges.

Thanks for stopping by.

Julia.

Wednesday 27 November 2013

You are Such a Blessing to Me

Hi Bloggers.

Before I share today's card, I'd just like to let you know that I'm having a bit of a clear out and have started putting some stuff on ebay. If you'd like to have a look, click on the eBay link in the bar above.

Here's today's card - a bit of a vintage feel to this one -

For the background on this one, I used one of the 6 x 6 designs in the Heartfelt Creations Antiquity 12 x 12 Paper Pad. I ran it through the Grand Calibur with the Couture Creations Cheerful Embossing Folder. I ran it through a second time to extend the design. I then rubbed Cast Bronze Gilding Wax all over. Once dry, I buffed it up using a dry wetwipe to make it shine a little more and inked around the edges with Vintage Photo and Aged Mahogany Distress Inks using Cut n Dry Foam.

I stamped the main image from the Heartfelt Creations Blessing to Me Stamp Set twice using Jet Black Archival and embossed with Cosmic Shimmer Clear Embossing Powder. On one of them I placed a Spellbinders Standard Circles Large Die over the top of the circular part of the design (I actually used a template for accuracy) and ran it through the Grand Calibur. I inked through the die with Vintage Photo and Aged Mahogany. I cut the other image out using Spellbinders Pearl Effects and inked through the die with Vintage Photo and Aged Mahogany. On both images, I coloured the leaves using Jade Teal Mica Powder from the Cosmic Shimmer Luscious Greens Mica Spray Set. I mounted the cicular piece on top of the complete image using 3d Foam Pads.

I cut the largest of the Spellbinders Pearl Effects Dies out of Chestnut Card. At the emboss stage, I added the Ivy Mask.

I cut a Spellbinders Lace Hearts out of another background paper from the Antiquity Pad and inked through the die with Vintage Photo and Aged Mahogany.

I made a flower out of another paper using the Heartfelt Creations Sweet Juliet Die Set and cut some leaves out of Chestnut Card using the same set.

I assembled the card as shown adding a couple of Victorian Corners and some dots of Cosmic Shimmer Pearlescent PVA in Black Pearl around the edges.

Thanks for stopping by.

Julia.

Tuesday 26 November 2013

Moments with You

Hi Bloggers.

I did the draw for the blog candy yesterday afternoon. It hasn't been claimed yet - please check the previous post to see if you're the winner.

Here's today's card -

Another easy peasy card.

The background is simply a piece of Coconut White Card run through the Grand Calibur with Sue's Cascading Hearts A4 Embossing Folder. I mounted it onto Rich Red Card and then wrapped a piece of Champagne Silky Crush Ribbon around the centre.

I mounted one of the card panels from the Heartfelt Creations Antiquity 12 x 12 Paper Pad onto some Rich Red Card. I stamped the circlular sentiment from the Heartfelt Creations Moments with You Stamp Set using Jet Black Archival and embossed with Cosmic Shimmer Clear Embossing Powder .I cut it out using Spellbinders Standard Circles Large and inked through the die with Aged Mahogany.

I made a flower using the Heartfelt Creations Sweet Juliet Die Set and added it to a bow made with 2 lengths of Champagne Silky Crush Ribbon.

I assembled the card as shown adding an 8mm Black Pearl to each corner and some dots of Cosmic Shimmer Pearlescent PVA in Black Pearl around the edges.

Thanks for stopping by.

Julia.

Monday 25 November 2013

Blog Candy Winner

Hi Bloggers.

I've drawn a name at random and the winner of the Heartfelt Creations Sand & Sea Stamp set is .........

JOAN

Please email me at juliawattscrafts@gmail.com with your postal address and I'll pop it in the post to you.

All for now.

Julia.

Sweet Memories

Hi Bloggers.

Thanks for all your comments and emails for the shows yesterday - I'm glad you liked the new Heartfelt Creations collections, they are really lovely.

Here's today's card -

I cut a frame out of Coconut White Card using Spellbinders 5 x 7 Matting Basics B and Spellbinders Majestic Labels 25.

I stamped the Heartfelt Creations Script Key Background onto Black Card using Perfect Medium and embossed with Cosmic Shimmer Clear Embossing Powder.

 I stamped the image from the Heartfelt Creations Floral Keys & Locket Stamp Set using Jet Black Archival and embossed with Cosmic Shimmer Clear Embossing Powder. I cut it out using Spellbinders Labels 18. 

I stamped the Heartfelt Creations Burnished Key stamp using Jet Black Archival and cut it out using the Burnished Key Die. I added the corresponding key on top of the one in the image using 3d Foam.

I tied a bow using Black Crochet Ribbon. I made a flower out of Coconut White Card and felt from the Vintage Felt Pack using the Hearfelt Creations Sweet Juliet Die Set.

I assembled the card as shown adding some dots of Cosmic Shimmer Pearlescent PVA in White around the edges.

I've just noticed that we've topped the 1100 followers mark. I'll draw for the candy later today so please check back to see if you've won!

Thanks for stopping by.

Julia.

Sunday 24 November 2013

A Two-Fer!

Hi Bloggers.

I have shows today on Create & Craft at 12noon (2 hours with Nigel) and at 5pm (with Dawn).I hope you can join me to see two gorgeous collections from Hearfelt Creations. I'm glad you've enjoyed the 2 sneak peaks I've shared so far. Today I thought I'd share 2 easy peasy cards.

Here's the first one -

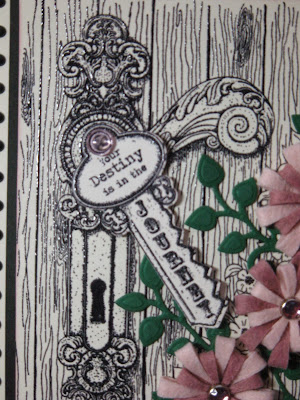
The background is from one stamp - the Heartfelt Creations Floral Doorway and Latch Key Stamp - it's huge! I stamped it using Jet Black Archival and embossed with Cosmic Shimmer Clear Embossing Powder. I inked around the very edges with Victorian Velvet Distress Ink using Cut n Dry Foam.

The key is the same one as I used in yesterday's card, from the Heartfelt Creations Burnished Key Stamp and then cut out using the Heartfelt Creations Burnished Key Die. I mounted it up on 3d Foam and added a Pink Glass Glintz.

All the flowers have been made out of felt from the Vintage Felt Pack using the Heartfelt Creations Sweet Juliet Die Set. The brads are from my stash. The leaves are also from the Sweet Juliet Die Set.

I put some dots of Cosmic Shimmer Pearlescent PVA in Black Pearl around the edges.

Here's the second card -

For the backgound, I ran a piece of Coconut White Card through the Grand Calibur with the Filigree Mask. Leaving the mask in place I inked through with Victorian Velvet Distress Ink. I also inked around the edges of the piece once the mask had been removed.

I stamped the heart stamp from the Heartfelt Creations Journey of Love Keys Stamp Set using Perfect Medium and embossed with Cosmic Shimmer True White Detail Embossing Powder, I cut it out using a die from the Spellbinders Lace Hearts Die Set (gorgeous die set!) and inked through the die with Victorian Velvet.

I assembled the card as shown adding some 8mm White Pearls in the corners and some dots of Cosmic Shimmer Pearlescent PVA in White around the edges.

Tracey Laughton has made a lovely card using the Heartfelt Creations Burnished key Stamp and the Burnished Key Die. Click here to go and have a look at it on her blog.

Thanks for stopping by. See you later!

Julia.

Saturday 23 November 2013

Your Destiny

Hi Bloggers.

Here's today's card featuring the Floral Key Collection from Heartfelt Creations -

For the background, I ran a piece of Coconut White Card through the Grand Calibur with the Spellbinders Twisted Hearts M-Bossabilities Folder. I ran it through a second time to extend the design. I then inked around the edges with Bundled Sage and Peacock Feathers Distress Ink using Cut n Dry Foam.

I stamped the image from the Heartfelt Creations Journey of Love Keys Stamp Set using Jet Black Archival and embossed with Cosmic Shimmer Clear Embossing Powder. I cut it out using Spellbinders Labels 18 and inked through the die with Peacock Feathers and Bundled Sage. I coloured the flowers in using Cosmic Shimmer Marine Ultra and Emerald Ultra Mica Powders from the Shimmering Luxury Set.

I stamped the Heartfelt Creations Burnished Key Stamp using Jet Black Archival and embossed with Cosmic Shimmer Clear Embossing Powder. I used the Heartfelt Creations Burnished Key Die to cut all of the keys out. I used the matching key to the one in the stamped image and used 3d Foam to layer it on top.

I cut some flowers out of the Teresa Collins 8 x 8 Paper Pad using the Heartfelt Creations Posy Patch Dies. I shaped them, layered them up and added a White Pearl to the centre of each. I cut some leaves out using the Heartfelt Creations Sweet Juliet Die Set and added some Faux Suede Leaves.


 I assembled the card as shown adding some Victorian Metal Corners and some dots of Cosmic Pearl Cosmic Shimmer Pearlescent PVA around the edges.

Thanks for stopping by.

Julia.

Friday 22 November 2013

Sneak Peak

Hi Bloggers.

I thought I'd start sharing some cards from the shows I have this coming Sunday. I have 2 lovely collections from Heartfelt Creations on the shows - Sweet Juliet and Floral Key. You can see these collections on the Heartfelt Creations Blog by clicking these links - Sweet Juliet, Floral Key.

Here's todays card -

My background was in 2 pieces. For the top section I stamped the flower spray from the Heartfelt Creations Recovery Wishes Stamp Set using Victorian Velvet Distress Ink. I inked around the edges with a little Bundled Sage Distress Ink.

For the bottom section, I ran the piece of card through the Grand Calibur with the Couture Creations Cheerful Embossing Folder. I inked all over with Bundled Sage Distress Ink using Cut n Dry Foam to make the design pop. Then I rubbed Pearl Moon Gilding Wax all over. Once dry, I buffed it up a little and inked a round the edges with Bundled Sage.

I glued the 2 pieces onto a piece of Soft Gold Card. I hid the join by wrapping a piece of Blue White American Seam Binding and then a piece of White Crochet Ribbon around the centre.

I stamped the Sentiment from the Heartfelt Creations Beautiful Juliet Stamp Set using Perfect Medium and embossed with Cosmic Shimmer True White Detail Embossing Powder. I inked all over using Victorian Velvet Distress Ink and then cut it out using scissors, cuttin right along the Thinking of You section. I cut a Spellbinders Splendid Circle. I cut a Spellbinders Stately Circle and inked through the die on this one with Victorian Velvet.

I tied a bow using White Crochet Ribbon. I made a flower out of felt from the Vintage Pack using both of the dies from the Heartfelt Creations Sweet Juliet Die set and added a sparkly brad from my stash.
I assembled the card as shown adding some White Pearls in the right corners and some dots of Cosmic Shimmer Pearlescent PVA in White around the edges.

I'll be back tomorrow with a Sneak Peak from the Floral Key collection.

Thanks for stopping by.

Julia.