Thursday 31 May 2012

Square Petal Top Box

Hi Bloggers.

Today I thought I'd share a box with you. Spellbinders do a few box templates and they are currently on offer in the Diamond Deals on Create & Craft at the moment while stocks last. All the boxes are really easy to assemble.

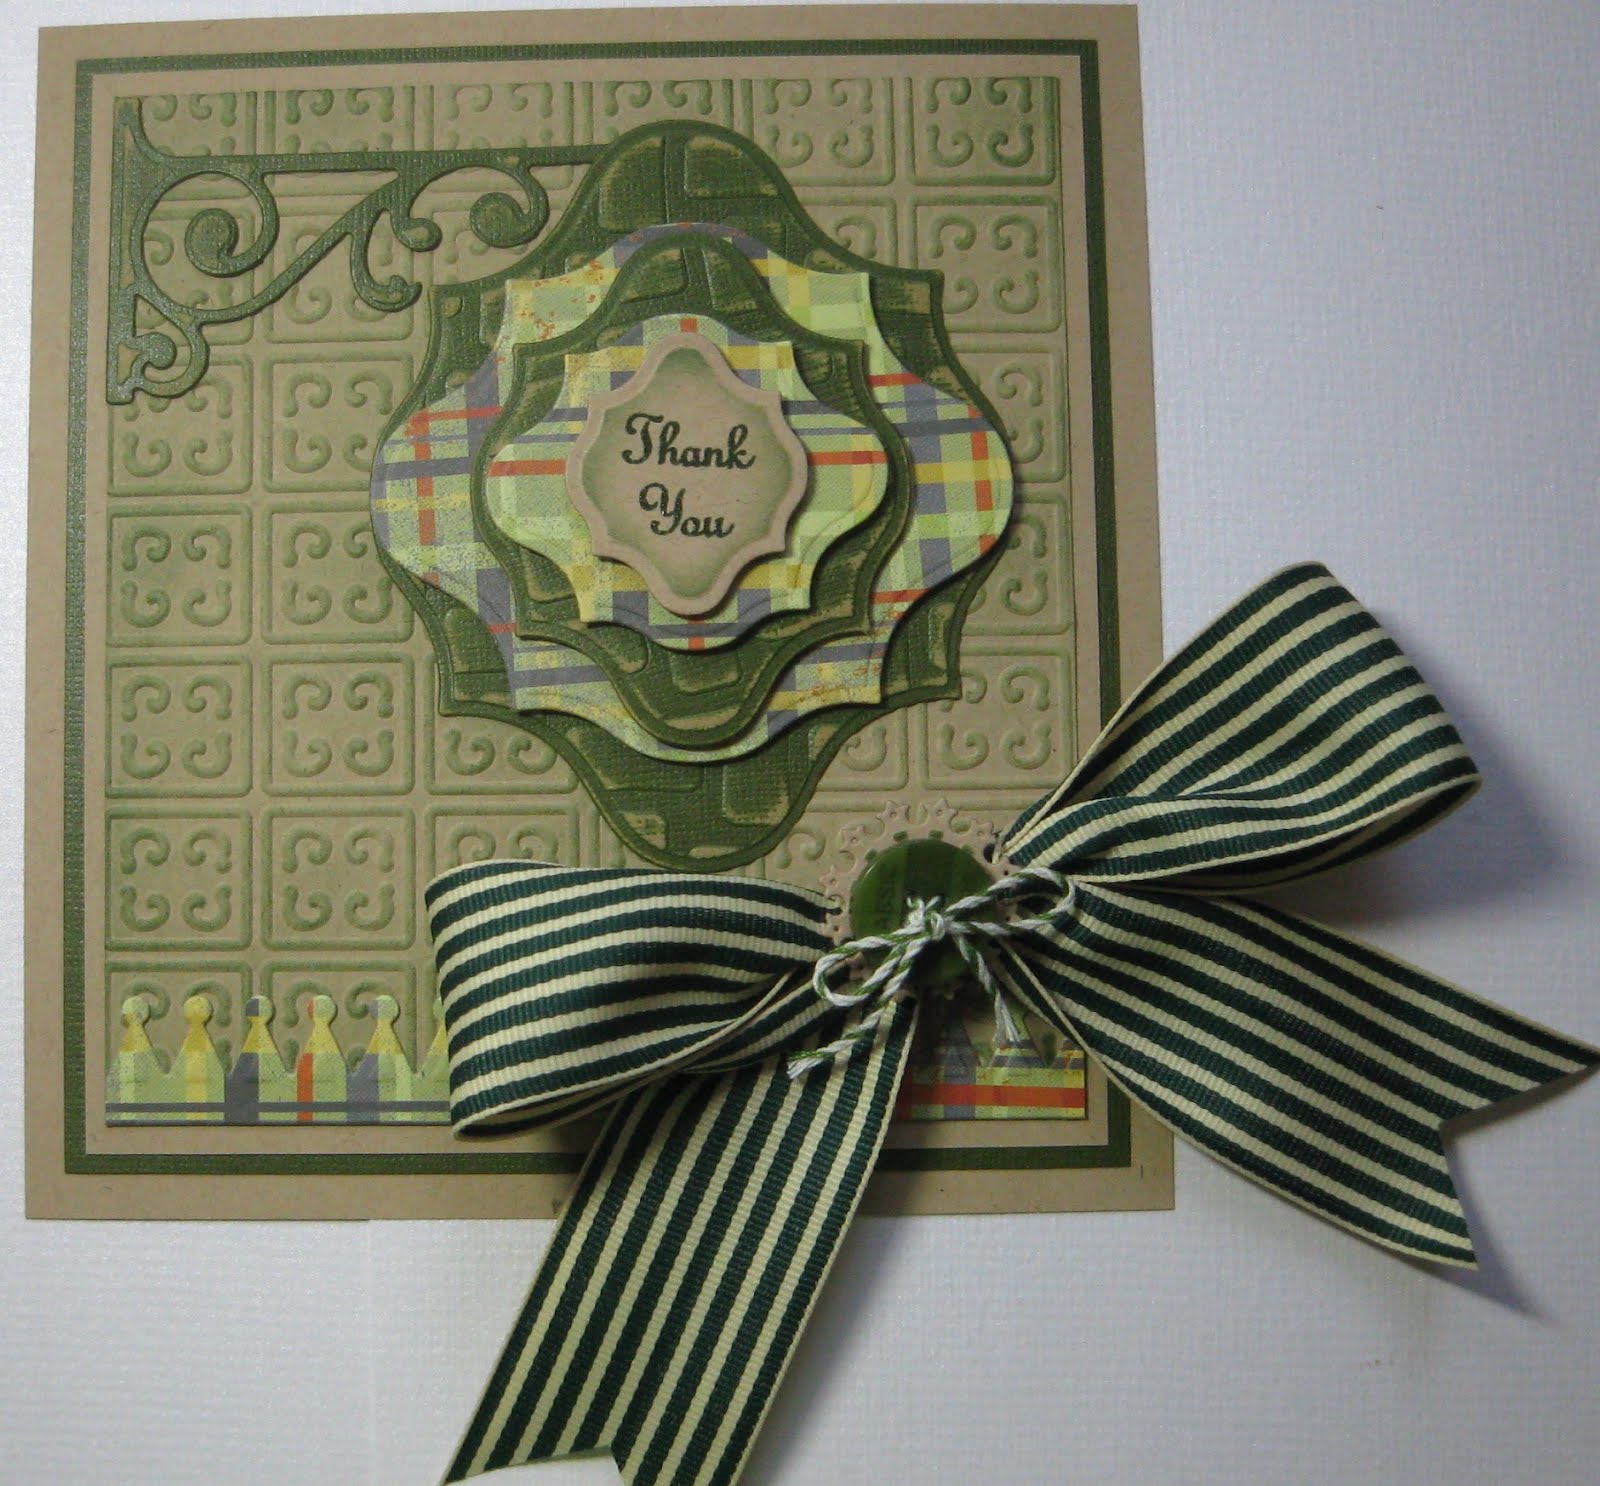
Here's a Square Petal Top Box -


I embossed the white card with the Flower Delight Impressabilities. This is so useful as its A4. This item has sold out on Create & Craft but you may find it at one of these stockists. I glued the box together with Cosmic Shimmer Dries Clear Acrylic Glue which dries really quickly and is really strong - perfect for boxes.

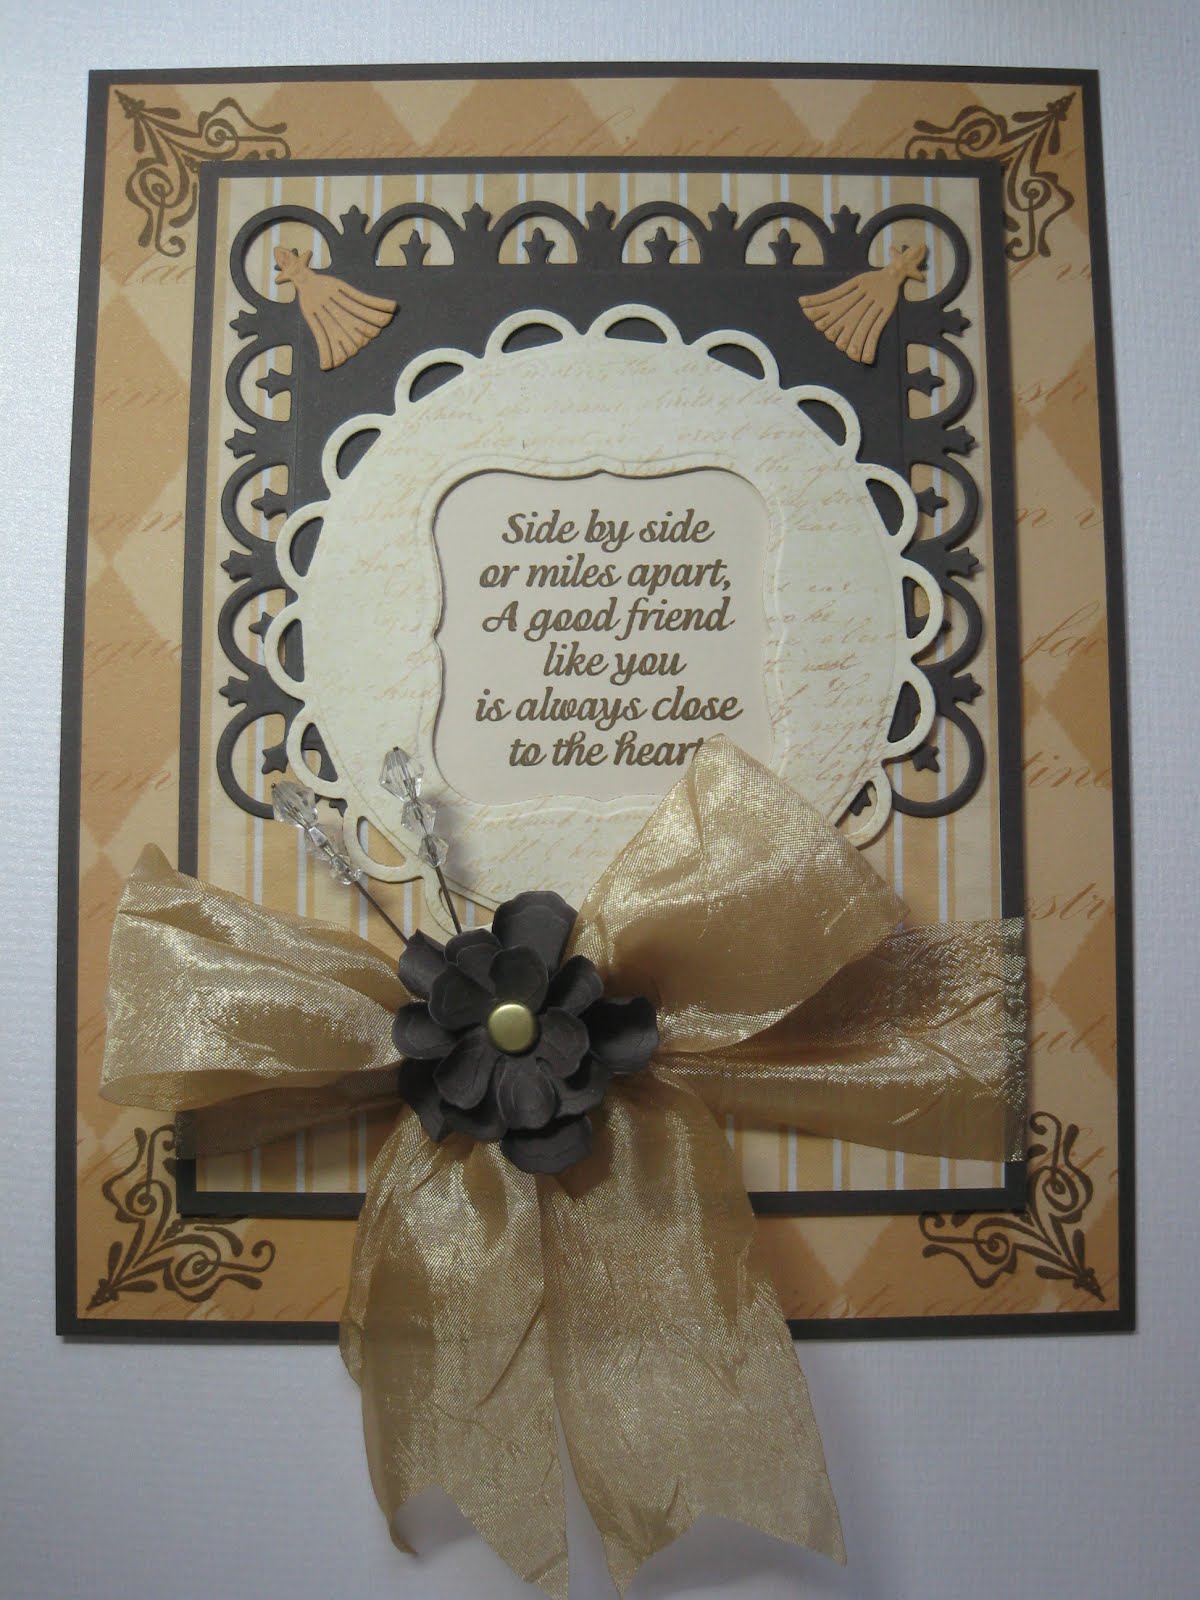
The die comes with some extra bits including a great design to stick on the sides (which I cut from peach card) and a little tag. I stamped the sentiment from the Creative Expressions Kind Thoughts Stamp Set using Jet Black Archival and embossed with Cosmic Shimmer Clear Embossing Powder. I cut it out using the little tag die and inked through the die with Dried Marigold Distress Ink. I added a little Peach Fizz Vintage Ribbon and glued the tag to the top of the box.

This box is a good size when made up - measuring approx 2 1/2 inches x 2 1/2 inches by 1 1/4 inches. As I said, so easy to make and so nice to co-ordinate a box with a card you have made.

Thanks for stopping by.

Julia.

Wednesday 30 May 2012

Sections

Hi Bloggers.

All change - the shows tomorrow have been cancelled and have been re-scheduled for 9th June at 11am and 7pm. The shows on Saturday are still going ahead - at the moment.

Today's card has several sections to it. I'm not quite sure if it works - let me know what you think.


I started by cutting out some motifs from the Spellbinders Damask Motifs die set. I cut 3 in grey and 3 in bright yellow. You don't need to emboss these as all of the embossed detail is in the cut-away sections. I glued them to the top of an A5 piece of white card as shown and added a pearl to the centre of each.


I embossed a piece of white card using the Spellbinders Nobilty M-Bossabilities Folder. I added this to the bottom of my card. I cut a yellow border using the Edgeabilities Classic Postage Stamp and an insert from the Edgeabilities Classic Ric Rac. I cut a grey border using the Edgeabilities Classic Bracket and a different insert from the Edgeabilities Classic Ric Rac. I added these to the bottom of my card.


I wrapped some Silver Vintage Ribbon around my card and added a bow made with 2 lengths of the same ribbon. I threaded some Baker's Twine from the Vintage Set through a yellow ribbon from my stash and added it to the centre of my bow.

I stamped the sentiment from the Creative Expressions Kind Thoughts Stamp Set using Cobalt Archival and embossed with Cosmic Shimmer Clear Embossing Powder. I cut it out using the tag die from the Damask Motifs die set and glued it just below my bow.

Hope you like the card.

Thanks for stopping by.

Julia.

Tuesday 29 May 2012

Side by Side

Hi Bloggers.

Here's another card based on a card made by Sue Wilson. It was a demo for the shows that I did last week but never made it to the counter as most of the dies used on it were early sell outs.


The backing paper is a Creative Expressions Foundations Patterned Paper and I've matted it on to some brown cardstock as shown. I stamped in each corner of the larger piece with an image from the Creative Expressions Vintage Lingerie Stamp Set using Coffee Archival.

I cut the largest of the Spellbinders Fleur De Lis Rectangles out of brown card. I cut the largest of the Lacey Circles out of a patterned paper (My Mind's Eye) but also cut an aperture out of it using Labels One Small. I stamped my sentiment using Coffee Archival but did not emboss it. I popped this behind the aperture in the lacey circle. If I had demonstrated this card I would have inked around the sentiment with some Tea Dye Distress Ink as I think it's a bit pale against the backing paper I chose for the circle.

I cut 2 tassels from the Banner Basics Three die set and popped one in each of the top corners of the Fleur De Lis Rectangle.


I wrapped some Champagne Silky Crush Ribbon around the smaller section of the card and tied a big bow. I made a flower using 3 of the Rose Creations dies and popped a brad in the centre. I added this to the centre of my bow and also added a couple of crystal decorative stick pins.

Hope you like the card.

Thanks for stopping by.

Julia.

Monday 28 May 2012

Friendship

Hi Bloggers.

Today I have another Spellbinders card to share with you.


I cut 2 borders out of cobalt card using the Spellbinders Damask Accents Die Set. I glued them to a panel of marine blue card and ruffled some Limoges Blue Vintage Ribbon down the centre.


I cut 2 of the largest of the FLeur de Lis Rectangles - one from cobalt card and one from marine blue card. I offset them when I added them to my card. I cut a frame from cobalt card using Labels Three - I turned the die for the centre of the frame so it resulted in a more interesting shape. At the emboss stage I added the Houndstooth embossing folder. I cut 2 corners using the Fleur de Lis Accents die set and added one to either side of my frame. I stamped the sentiment from the Creative Expressions Sincere Sentiments stamp set using Cobalt Archival and embossed with Cosmic Shimmer Clear Embossing Powder. I inked around the edges a little with Faded Jeans Distress Ink and popped it behind the aperture in my frame.


I tied a large bow using the Ivory/Royal Blue Grosgrain Ribbon and then added another bow made from 2 lengths of the Limoges Blue Vintage Ribbon. I made a flower using 3 borders cut out of felt using the Banner Basics One die set. I just lined the 3 borders up on my craft sheet, added 12mm Super Sticky Tape to the bottom and made the flower in the same way as the vintage ribbon flower is made in this post on Sue Wilson's Blog.


I assembled the card as shown adding a couple of Decorative Stick Pins to the Grosgrain Bow.

Hope you like the card.

Thanks for stopping by.

Julia

Sunday 27 May 2012

Simple With Sympathy Card

Hi Bloggers.

With Sympathy cards are always quite difficult to make - it's always a sad time and a I always want to give a card as quickly as possible to express sympathy but not bother the bereaved family at such a difficult time.

So, here's a really simple card that says it all really -


I folded an A4 piece of milk card from the neutral card pack in half to make an A5 card blank. With the card still folded, I then placed the largest of the Spellbinders Labels Twenty Five dies against the fold in one half of the card (hope that makes sense!). I made sure that part of the die was off the card next to the fold so that when I put it through my Grand Calibur the fold was mostly intact so I had a card blank. You can get 2 card blanks out of one piece of A4. I inked all around the card blank using Crushed Olive Distress Ink.

Using the next size down of Labels Twenty Five, I then cut out a panel from some patterned paper. I inked around the edges with Crushed Olive while still in the die.

I then cut a Spellbinders Classic Rectangles Large from some different patterned paper and again inked through the die with the Crushed Olive.

I stamped the sentiment from the Creative Expressions Kind Thoughts Stamp set using Olive Archival and embossed with Cosmic Shimmer Clear Embossing Powder. I cut it out using the smallest but one of the Labels Twenty Five dies and inked around the edges with Crushed Olive while still in the die.

I cut a couple of embellishments out of green card using Antique Frames and Accents.

I assembled the layers as shown.

Hope you like the card.

Thanks for stopping by.

Julia.

Saturday 26 May 2012

Wishing you the happiest of birthdays

Hi Bloggers.

First, I'd like to say a BIG thank you to everyone who emailed in to the shows on Tuesday and Wednesday, to all my new followers here on my blog and to the kind messages via text, email and twitter. This is the first post I've written since then as the others were scheduled. I really do appreciate all your support and it's so good to know that you are enjoying my creations - it makes it all worthwhile. I have lots of fun doing the shows. The prep is hard work - it really is. Actually, having to stand nearly all day from 7am till 8pm is pretty hard too! I must say that everyone at the studios is so friendly and helpful and every presenter I've worked with has been brilliant which certainly makes things run very smoothly - most of the time!

I'm scheduled to do more Spellbinders Diamond Deals shows on Thursday 31st May at 3pm, 6pm and 8pm (don't know which channel yet) and Saturday 2nd June at 4pm and 7pm (Create & Craft). Hope you can join me.

Today's card is a Black & White one and was a demo I did on Wednesday on one of the shows with Dean. I had to change a couple of the die because of sell outs.


For the background, I stamped some feathers from the Creative Expressions Vintage Lingerie Stamp Set using Black Soot Distress Ink. I dried it with my heat gun and then popped it through the Grand Calibur with the Couture Creations Constellations Embossing Folder. I put it through a second time to extend the pattern. I then went over the area with the Black Soot Distress Ink using Cut & Dry Foam to make the design pop out more.


I stamped my sentiment from the Kind Thoughts Stamp Set using Black Soot and embossed with Cosmic Shimmer Clear Embossing Powder. I cut it out using Spellbinders Labels Nine (I used Labels Nineteen on the show). I cut a Spellbinders Labels Four Small out of black card. At the emboss stage I added the Fretwork Mask from That Special Touch. The sandwich you need for this is base plate, tan mat, die with card in it with cutting edge face down in to the tan mat, mask, pink embossing plate. I cut a Fleur De Lis motif from the Fleur De Lis Accents set out of white card and inked through the die with black soot while still in the die. I then cut it in half and glued it to the back of the Labels Four die cut at both ends. In the show I used the frame from the Antique Frames and Accents Die Set.


I cut some leaves and a border from the Damask Accents die set I inked through the die on the leaves cut from the white card. Using a scoreboard, I carefully scored along all the peaks and the troughs in the border (hope you get what I mean). I did mountain and valley folds where I had scored and glued the ends together to make a rosette. I put some hi-tack tape on a small Moroccan Motif and added the rosette. I added some Cosmic Shimmer Dries Clear Glue and set aside to dry.

Once the glue was dry I stacked up some foam pads and popped them in the centre. I cut a Ribbon Buckle (I used a Persian Accent on the show), inked through the die with Black Soot and added a button with some Black & White Baker's Twine. I popped all this onto the stack of foam pads.

I assembled the card as shown adding a couple of Decorative Stick Pins and some Cosmic Shimmer White Pearl Pearlescent PVA.

Hope you like the card.

Thanks for stopping by.

Julia

Friday 25 May 2012

Thank You

Hi Bloggers.

Today I'm sharing another card from the Spellbinders shows earlier this week.


For the background, I used a piece of Kraft Card and ran it through the Grand Calibur with the Spellbinders Nobility M-Bossabilities Folder. I coloured it using Olive Archival and Cut & Dry Foam.


I cut a Spellbinders Elegant Post from green Kraftcore and sanded it to reveal some of the core.


Using Spellbinders Labels Thirteen, I cut the largest size and the next but one size out of green Kraftcore card. At the emboss stage I added the Basket Weave Mask from That Special Touch. I sanded the die cuts to reveal some of the core. I then cut the second largest size and the the next but one size to that out of Plaid card (Junkitz). I stamped the sentiment from the Creative Expressions Kind Thoughts Stamp Set onto Kraft Card using the Olive Archival and embossed with Cosmic Shimmer Clear Embossing Powder. I cut it out using the smallest but one of the Labels Thirteen dies and inked with Olive Archival while still in the die. I layered all the Labels Thirteen die cuts up twisting the alternate layers 90 degrees.


I cut a border using Spellbinders Banner Basics One from the plaid card and glued it to the bottom of my card.

I made a large (!) bow out of green/ivory grosgrain ribbon and added it to the bottom of my card (bow may be a tad too large!!). I cut a Ribbon Buckle out of Kraft Card and inked through the die with Olive Archival. I threaded some green baker's twine from the Earthtones set and tied the bow, added it to the ribbon buckle and then popped into the middle of my bow.

Hope you like the card.

Thanks for stopping by.

Julia.

Thursday 24 May 2012

The Happiest People

Hi Bloggers.

Today's card is another using a layout that I grabbed from one of Sue's cards. I love the colour combo on this one - hope you do too.


I started by running a 2" piece of lime green card through the Grand Calibur with the Spellbinders Regal M-Bossability Folder. I cut 2 borders out of white card using the Persian Accents die set. I glued these to the lime green border and attached the border to some creamy yellow card.


I tied a few knots in some cream and some moss green vintage ribbon and threaded them through the Persian borders and secured them at the back of the creamy yellow card.


I stamped the sentiment from the Creative Expressions Sincere Sentiments Stamp Set using Olive Archival and embossed with Cosmic Shimmer Clear Embossing Powder. I cut it out using Labels Twenty-Five and inked with Crushed Olive Distress Ink while still in the die. I cut 2 large motifs out of green card using the Persian Motifs Die Set. I glued them to the back of the sentiment overlapping them in the middle.


I tied a large bow with some green/ivory grosgrain and added another bow on top made with Moss Green and Cream Vintage Ribbon. I made a flower using the border from the Persian Accents set. I cut one border out of cream felt and another out of lime green felt. I made the flower in the same way that you make a ribbon flower using the cream felt first and then the lime green. I added this to my bows and also a couple of Creative Expressions Decorative Stick Pins in White Pearl.

I cut a tiny motif out of white card using the Persian Accents set and popped it in the top right-hand corner.

I finished the card with some dots of Cosmic Shimmer Pearlescent PVA in Golden Pearl around the edges and a dot in the centre of the tiny motif.

Hope you like the card.

Thanks for stopping by.

Julia.

Wednesday 23 May 2012

Of Corsets Your Birthday

Hi Bloggers.

Today's card is a variation on the one in this post. In this card I've used red instead of pink and I've changed some of the dies to fit in with those in the Spellbinders Diamond Deals. This is a scheduled post and I will have hopefully demonstrated this card in the 11pm show last night. Times of the shows today are in this post.


For the background I ran some white card through the Grand Calibur with the Spellbinders Regal M-Bossabilities Folder. I ran it through a second time to extend the pattern.

I stamped the corset from the Creative Expressions Vintage Lingerie Stamp Set using Plum Archival and embossed with Cosmic Shimmer Clear Embossing Powder. I coloured the rose on the corset with Barn Door Distress Ink by popping some on my craft sheet and picking the colour up with a wet paintbrush. I cut the corset out and then ruffled some Basque Red Vintage Ribbon along the bottom edge.

I cut a Spellbinders Splendid Circle out of black card. I cut a Spellbinders Romantic Rectangle out of red card and at the emboss stage I added the Spellbinders Nobility M-Bossabilities Embossing Folder. The sandwich you need for this is - base plate, 2 pieces of card, the folder (must be kept open), the die with the card in it with the cutting edge face up, the tan mat and then the raspberry plate. This is the only time that you should use the tan mat with the raspberry plate and it's very important that the folder is left open and that the cutting edge of the die is facing up into the tan mat.

I cut 2 corners out of black card using the Fleur de Lis Accents die set. I cut one of each of the layers of flowers in the the Rose Creations die set out of white card and inked through the dies with the Barn Door Distress Ink. I curled the edges of the petals and layered them up. I added a pearl gem in the centre. In the demo I used the Carnation Creations die set to fit in with the dies that Ideal World were featuring in the 11pm show.

I cut some 'leaves' out of red and black card from the Damask Accents Die Set. I just love this die set just for these (love the border too). I stamped the sentiment from the same stamp set again using the plum archival and embossed with the clear powder. I cut it out using the tag die that's also in the Damask Accents die set. I inked through the die with Barn Door and added a bow made with some Baker's Twine from the Vintage Set.

I assembled the card as shown and added a couple of Black Pearl Decorative Stick Pins.

Hope you like the card.

Seven shows today!

Thanks for stopping by.

Julia.

Tuesday 22 May 2012

Tres Chic Windows

Hi Bloggers.

Tonight at 9pm I launch the Spellbinders Diamond Deals on Ideal World. I hope you can join me. There's another show at 11pm (way past my bedtime!). Both shows are scheduled to be with Dean - he's sure to keep me on my toes.

Here's today's card -


I cut 3 windows out of creamy yellow card using the Spellbinders Classic Rectangles Large. I placed a strip of acetate behind the windows. I stamped some dressforms from the Creative Expressions Antique Dressforms Stamp Set onto some white card using Coffee Archival and embossed with Cosmic Shimmer Clear Embossing Powder. I cut a border from some Foundations Paper using the Spellbinders Classic Scallop Edgeabilities die and added it to the top of the creamy yellow card.


I stamped the sentiment from the same stamp set again using coffee archival and embossed with the clear powder. I cut it out using Spellbinders Ribbon Tag Trio Three and inked with Tea Dye Distress Ink while still in the die. I threaded some Amber Brown Vintage Ribbon through the tag and wrapped it around the card.


I cut the four smallest of the Rose Creations dies out of white card and inked through the dies with Barn Door Distress Ink. I curled the petals, assembled the flower and popped a pearl in the centre. I cut some leaves out of the green card using the Damask Accents Die Set. I made a second flower and cut another pair of leaves.

I assembled the card as shown and added some dots of Cosmic Shimmer Pearlescent PVA in Golden Pearl.

Hope you can join me this evening.

Thanks for stopping by.

Julia.

Monday 21 May 2012

Grosgrain Rose

Hi Bloggers.

Today's card is rather a busy one. Wasn't quite sure where I was going with it - all I knew was that I wanted to use a frame, an antique dressform and a grosgrain ribbon rose.
I quite like the way it turned out.


For the background, I popped some milk card through the Grand Calibur with the Spellbinders Flower Delight Impressability. I inked it with Faded Jeans Distress Ink to make the design 'pop'. I then randomly stamped some scissors from the Creative Expressions Antique Dressforms Stamp Set using Cobalt Archival.


I cut 2 borders out of milk card using the Edgeabilities Classic Ric Rac for the edge and Classic Scallop for the insert. I threaded some Navy Silky Crush Ribbon through the inserts in the borders and added the borders to my background.


I cut a frame out of cobalt card using a Classic Rectangle large and a Classic Scalloped Rectangle Large. I also cut a corner from the Fleur de Lis Accents set which I glued to the top of the frame. I cut a Persian Motif out of milk card and inked through the die with Faded Jeans Distress Ink. I added this to my frame cutting away the overlap on the inside. I attached all this to the background using 3d foam pads. I stamped the image from the Antique Dressforms stamp set using Cobalt Archival and embossed with Cosmic Shimmer Clear Embossing Powder. I cut the image out leaving a slight border all round and added to the background on the inside of the frame using 3d foam pads.


I made a ribbon rose out of some Royal Blue/Ivory Grosgrain Ribbon. I cut the ribbon in half down the centre and used a piece the length of my craft sheet. Now, this ribbon does not like being cut in half and I was half-way through making my rose when the ribbon split i.e. frayed really badly, but, rather than throw it in the bin (I nearly did) I carried on pulling the frayed edge down on to the sticky tape and continued till the end. It worked! I was very happy that I hadn't thrown it away. I glued the rose to the corner of my card and added some 'leaves' made from the Damask Accents and Persian Accents. For the leaves made from the Persian Accents I just cut the 'arms' off the corner and used those. Incidentally, when you do this you are left with a piece that looks a bit like a bug that you could use on something else.


Finally, I cut another corner out of marine blue card using the Persian Accents and glued that to the top right-hand corner of my card. I also put dots of Cosmic Shimmer Pearlescent PVA in Summer Blue around the edges.

Hope you like the card. Imagine putting a photograph in the frame instead. This is an 8 x 8 card so you could easily use the layout for a scrapbook page. Hope I'm getting you thinking!

Thanks for stopping by.

Julia.

Sunday 20 May 2012

Some People

Hi Bloggers.

The layout of today's card has been taken from a card that Sue Wilson made. I changed a couple of the dies to fit in with the Spellbinders Diamond Deals starting Tuesday evening on Ideal World. I love the saying on this one - another gem from Sue.


I started with a piece of red Kraftcore and ran it through the Grand Calibur with the Couture Creations Heavy Duty Embossing Folder. I ran it through a second time to extend the pattern. I then sanded it to bring out the core. I cut a strip of spotty paper (My Mind's Eye) and added it to some plain Kraft Card with my Heavy Duty Background. I cut a strip of red card and using an insert from the Spellbinders Classic Bracket Edgeabilities added the heart detail. I glued this to a strip of Kraft Card and added it to my background.


I wrapped a piece of black silky crush ribbon around my card and pinched it with a couple of glue dots. I cut 2 of the largest Heart Squares out of black card and added them to my card as shown overlapping them at the points. I stamped the sentiment from the Creative Expressions Kind Thoughts Stamp Set onto Kraft Card using Plum Archival and embossed with Cosmic Shimmer Clear Embossing Powder. I cut it out using Spellbinders Labels Seventeen and inked with Tea Dye Distress Ink while still in the die using Cut & Dry Foam. I cut a larger Labels Seventeen out again from Kraft Card and again I inked with the Tea Dye Ink while still in the die. I mounted these on top of the Heart Squares as shown.


I tied a bow with using black silky crush ribbon and added to the pinched ribbon on my card. I cut a motif out of red card using the Persian Motifs die set. I cut a Ribbon Buckle out of Kraft Card and inked through the die with the Tea Dye Distress Ink. I dyed some Creative Expressions Black & White Baker's Twine with the Tea Dye and tied it in a bow through a black button from my stash. I added these to my bow as shown.

I hope you like the card.

Thanks for stopping by.

Julia.

Saturday 19 May 2012

New Hat

Hi Bloggers.

To even things out, today I have a scrapbook page featuring my daughter. This time, however, it's an 8" x 8" page. You could easily swap the picture of Kathryn for an image and change the text to anything you like.


I started with an 8 x 8 piece of purple card (it's actually colorcore but I haven't used it for the core). I cut a slightly smaller piece of white card and cut an edge using the Spellbinders Classic Scallop Edgeabilities and an insert from the Classic Bracket Edgeabilities. I didn't notice until it was all stuck together that the hearts are upside down! However, it doesn't really matter as some of the hearts on the Heart Square are facing that way too. I cut a piece of decorative paper (Polka Doodles) slightly smaller than the white card and cut the edge using the Classic Bracket and an insert using the Classic Scallop. I inked around the edges with Milled Lavender Distress Ink using Cut & Dry Foam. I would have preferred to use Dusty Concord but that's not in the show. I also inked through the Small Polka Dots Mask with Plum Archival. This does stain the mask but it comes off easily with Blending Solution.


I cut a large Heart Square out of purple card. I popped a Lacey Circle over the area of the photograph I wanted and cut it out - I did not emboss it.


I stained some American Seam Binding with the Milled Lavender Distress Ink (Dusty Concord would have been better) and tied a bow with 2 lengths of it. On top I popped a Persian Motif cut from the purple card, a Ribbon Buckle cut from white card and inked though the die with Milled Lavender and another Ribbon Buckle cut from lavender card.


I stamped 'NEW HAT' using Plum Archival and cut each letter out using Banner Basics Three. I inked through the die again with the Milled Lavender. I glued the title to some Baker's Twine from the Vintage Set. I added a couple of knots to the twine and set it in place on my page with some 3d foam pads.

Hope you like the layout.

Thanks for stopping by.

Julia

Friday 18 May 2012

Show Times and Having a Paddle

Hi Bloggers.

I have the list of shows I'm doing for the Spellbinders Diamond Deals starting 9pm Tuesday.

Tuesday 9pm and 11pm - Ideal World

Wednesday 8am, 10am - Ideal World, 12noon - Create & Craft, 1pm, 3pm (2 hours) - Ideal World, 5pm Create & Craft, 7pm Ideal World

The launch show has started to be populated with product and you can see it here. There are more products to be added as I write this.

Hope you can join me for some of the shows. Goodness knows if I'll be making any sense by the end of Wednesday!

Today I'm sharing a scrapbook page that I've made using some of the dies on the show. It's been ages since I've done a page and I've really enjoyed it.


I started with a 12 x 12 piece of textured card and popped the Grid Mask on top at a jaunty angle. I spritzed with some Cosmic Shimmer Vintage Mist in Patina and then carefully removed the mask.

I cut a piece of Distress ColourCore cardstock in Stormy Sky and ran it through the Grand Calibur with the Couture Creations Heavy Duty Embossing Folder. I ran it through a second time to extend the pattern. I sanded the pattern to reveal the core.


I cut a strip of spotty paper from My Mind's Eye Lost and Found and cut a fancy edge down one side using the Spellbinders Classic Postage Stamp Edgeabilities. I cut the photo of Nathan out using Spellbinders Labels Seventeen.


I stamped my title using Cobalt Archival and cut it out using Spellbinders Large Labels. I inked around the edges with Stormy Sky Distress Ink while still in the die. I cut a post out of the Stormy Sky card using the Spellbinders Elegant Posts and sanded it carefully to reveal some of the embossing. I attached the title to the post with some Creative Expressions Black & White Baker's Twine.


I stamped the letters for 'HAVING A PADDLE' using the Cobalt Archival and cut them out using Spellbinders Banner Basics Three. I inked them with Stormy Sky Distress Ink while still in the die. I attached them to some Black & White Baker's Twine with some Cosmic Shimmer Dries Clear Glue to make a bunting. I attached them to my page with 3D foam pads.

I assembled the page as shown. Hope you like it.

Thanks for stopping by.

Julia.

Thursday 17 May 2012

Mica Rose

Hi Bloggers.

This is the last wedding card I have to share with you - at least for the time being. This card could be for any occasion if you change the sentiment.


I cut a Spellbinders Labels Seventeen out of white card. I dusted it with my anti-static pad and stamped the rose from the Creative Expressions Bride & Groom Stamp Set using Perfect Medium. I dusted some Pink Ultra Mica Powder over the flower and some Golden Pear Mica Powder over the stem and the leaves (both from the Cosmic Shimmer Garden Flora Mica Spray Set). I wiped off the excess with a dry wet wipe. I then went around the edges of the die cut with Perfect Medium using Cut & Dry Foam. I then added some Cosmic Shimmer Aurora Crystal Sparkle Embossing Powder and heat set. I did 2 sides at a time.


For the background, I randomly stamped the heart from the same stamp set using Eco Green Pink Taffeta Dye Ink and then embossed with Cosmic Shimmer Clear Embossing Powder. I did about 4 hearts at a time. I then went around the edges with Perfect Medium and Aurora Crystal Sparkle Embossing Powder as I did with the topper.

I ran a line of 6mm Super Sticky Tape across the background and then ruffled some Pink Vintage Ribbon on top. I added a bow tied with 2 lengths of the Vintage Ribbon, another bow made with 2 lengths of Pink Baker's Twine from the Pastel Set, and a ribbon flower made from the Vintage Ribbon.


I stamped the sentiment from the same stamp set using the Eco Green Black Dye Ink Pad and embossed with the clear powder. I cut it out using the Spellbinders Large Labels, inked around the edges with Perfect Medium and embossed with Aurora Crystal Sparkle Powder as before.

I assembled the card as shown adding a couple of Creative Expressions Decorative Stick Pins.

Hope you like the card.

Thanks for stopping by.

Julia.

Wednesday 16 May 2012

May You Find Joy Forever

Hi Bloggers,

Here's another demo card from Monday's shows. If you changed the sentiment it could be used for any occasion.


For the background, I used a technique that Sue Wilson described to me - I don't know if I got it right but it looked ok to me. I think she calls it faux silk. I used a piece of white card and covered it with watered down school pva. I then popped a piece of tissue paper on top. There were a few creases which was fine. I covered the area again with the glue and then added another piece of tissue paper. I added some more glue on top to make sure it was secure and put it aside to dry. I think this is the stage that Sue normally runs it through the Grand Calibur with an embossing folder but I wanted to used some more products from the show first so I spritzed it with some Tarnished Gold Cosmic Shimmer Vintage Mister. On the show I also stamped some feathers from the Creative Expressions Design Elements stamp set using the Eco Green Yellow Damasque Dye Ink Pad. Then I ran it through the Grand Calibur with the COuture Creations Constellations Embossing Folder. I ran it through a second time to extend the pattern.


I stamped the sentiment from the Bride and Groom Stamp Set using the Eco Green Black Ink Pad and then stamped the frame from the Design Elements Stamp Set over the top. I have cut the middle out of my frame stamp so I can see exactly where the sentiment is that I'm framing. I then added some Cosmic Shimmer Clear Embossing Powder and heat set. The close-up above shows how well the Eco Green Ink embosses. I added a few spots of Cosmic Shimmer Golden Pearl PVA to the flowers on the frame.


I ran some cream crochet ribbon across and down the background and then added some ivory vintage ribbon too. I made a bow using 2 lengths of the ivory vintage ribbon. I spritzed the bow with water and scrunched it up while drying it to give a more shabby appearance (didn't have time to do that in the show). I cut a piece of cream crochet ribbon in half length-ways and added some 12mm super sticky tape. I then rolled it up to make a rolled flower. I glued this to my bow using Cosmic Shimmer Dries Clear Glue and added a couple of Black Decorative Stick Pins.

I finished the card off with some dots of Cosmic Shimmer Golden Pearl PVA around the edges. I suggest you do the separately to your card, leave it to dry and then add your design to it.

Hope you like this card.

Thanks for stopping by.

Julia.

Tuesday 15 May 2012

Wedding Day Wishes

Hi Bloggers.

Thank you so much for your emails to the shows yesterday. I'm sorry that they all weren't read out. Hope you enjoyed the shows. I had a great time. Don't know what to do about my shaky hands though. I'm not nervous at all but my brain doesn't seem to tell my hands that!

Today I'm sharing the card that I demonstrated first in the 6pm show.


I know that it's peach again but I was working within the products on the shows. Besides I do like peach - my bridemaids wore peach so that may be why I picked it for these stamps.

Anyway, back to the card. For the background, I ran a piece of white card through the Grand Calibur with the Heart Confetti Mask from That Special Touch. Keeping the mask in place, I then inked through the mask with the Eco Green Peach Satin Dye Ink Pad using Cut & Dry Foam. Again keeping the mask in place, I spritzed with the Cosmic Shimmer Mister Pearl Mist.


I stamped the image from the Creative Expressions Mr & Mrs Stamp Set using the Peach Satin Dye Ink and then popped some Cosmic Shimmer Aurora Crystal Sparkle Embossing Powder on top and heat set. I cut the image out leaving a small border around it. I made a frame out of peach card using Spellbinders Classic Rectangles Large and Classic Scalloped Rectangles Large.


I ran a piece of white crochet ribbon down the right-hand side of the card ruffled some peach fizz vintage ribbon on top. I added a bow made from 2 lengths of the vintage ribbon. I made a flower from the peach fizz vintage ribbon and some white wrinkle-edge ribbon which I had cut in half. I added this to my bow with a couple of crystal decorative stick pins.


I stamped the sentiment from the Bride & Groom Stamp Set using the Peach Satin ink and embossed with Cosmic Shimmer Clear Embossing Powder. I cut it out using Spellbinders Ribbon Banners Die Set and inked with the Peach Satin while still in the die.

I assembled the card as shown adding some dots of Cosmic Shimmer Pearlescent PVA in White Pearl around the edges.

Hope you like the card.

Thanks for stopping by.

Julia.