Thursday, 14 February 2013

New Products and Re-stocks in my Amazon Store

Hi Bloggers.

I promised to let you know when the stamp sets were back in stock from my last shows and they are now. You can find the Cheers Stamp Set here, the Classic Sentiments stamp set here, the Eco Green Embellishing Flourishes Pre-Cut Stamp Set here and the Newsprint A6 stamp here.

I've also got some stock in ahead of time of the stamp sets and brand new Couture Creations Embossing Folders that will be on my next shows on February 23rd. Just click on the highlighted link to go straight to the product in my Amazon Store.

Party Ladies
Elegant Ladies
Art Collage
Rose Background
Hexagon Script
Passion
One World
Exotic
Turkish Delight
I also have some of the Teal card that Sue loves so much - you can find it here.

All for now.

Julia.


Thinking of you

Hi Bloggers.

This card is really all about the background.

So, for the background, I randomly stamped one of the flowers from the Creative Expressions Artsy Floral Stamp Set using Aged Mahogany Distress Ink, a swirl from the same stamp set using Forest Moss Distress Ink and with the stamp in my hand, the large image from the set using Chipped Sapphire Distress Ink. I dried the ink but being distress ink, it wasn't quite dry enough when I inked through the Fretwork Mask with Pumice Stone Distress Ink. A little of the ink on the stamped images smudged a bit - I quite liked it. I moved the mask to extend the pattern.

I cut a Spellbinders Resplendent Rectangle out of Coconut White Card. At the emboss stage, I added the Fretwork Mask and then inked through the die with Pumice Stone. I added a 5mm White Pearl to each corner of the die cut. I stamped the sentiment from the Artsy Floral Stamp Set using Perfect Medium and embossed with Cosmic Shimmer Silver Shine Metallic Embossing Powder from the Metallics & Darks Set. I cut it out using a smaller Resplendent Rectangle and inked through the die with Pumice Stone. I stamped a butterfly from the Creative Expressions Natures Wonders Stamp Set using Perfect Medium and embossed with Silver Shine Metallic. I cut it out with scissor and then inked it with Aged Mahogany and Forest Moss.

I tied a bow using 2 lengths of White Sheer Wrinkled Edge Ribbon. I pressed a Fancy Pearl Embellishment into a Perfect Medium Ink Pad and then covered with Silver Shine Metallic Embossing Powder. I tapped off the excess, heat set it and added it to the centre of my bow.

I assembled the card as shown adding some dots of Cosmic Shimmer Pearlescent PVA in Silver Lustre around the edges.

Thanks for stopping by.

Julia.

Wednesday, 13 February 2013

For You

Hi Bloggers.

Here's today's card.

For the background, I randomly stamped a heart using Barn Door Distress Ink and a funky flower using Aged Mahogany Distress Ink - both from the Creative Expressions Funky Floral Stamp Set. I then criss-crossed some Cosmic Shimmer Pearlescent PVA in White across it - remember to change the nozzle on the PVA to a Dries Clear Nozzle if trying this. I left it to dry overnight. Once dry, I ran it through the Grand Calibur with the Couture Creations Damask Embossing Folder. I ran it through a second time to extend the pattern and inked around the edges with Aged Mahogany using Cut n Dry Foam.

I put the two word stamps together on my block to form the sentiment and stamped with Perfect Medium. I embossed with Cosmic Shimmer Blue Raspberry Aurora Embossing Powder from the Pinks & Purples Set. I cut it out using Spellbinders Matting Basics B and inked through the die with Aged Mahogany. I mounted it onto some burgundy card cut with a new Spellbinders Locking Loops die.

I cut some more burgundy card using another of the Locking Loops dies and threaded some Cream Silky Crush Ribbon through it and wrapped the ends around my background.

I assembled the card as shown adding some dots of Cosmic Shimmer Pearlescent PVA in Berry Red around the edges.

Thanks for stopping by.

Julia.


Tuesday, 12 February 2013

Wings

Hi Bloggers.

I'm going to be flitting around a bit with samples from the last few sets of shows as I delve into my box of unblogged samples.

Here's today's card -

For the background, I randomly stamped a butterfly from the Creative Expressions Natures Wonders Stamp Set using Chipped Sapphire Distress Ink and the ladybug from the same stamp set using Jet Black Archival. I made sure the ink was dry and then ran it through the Grand Calibur with the Couture Creations Compassionate Embossing Folder. I ran it through a second time to extend the pattern and then inked around the edges with Forest Moss Distress Ink using Cut n Dry Foam.

I stamped the main image from the stamp set using Perfect Medium and embossed with Cosmic Shimmer Blue Watercress Blaze Embossing Powder from the Brights Set. I tore around the edges and then inked with Forest Moss.

I stamped the sentiment from the same stamp set, again using Perfect Medium and embossed with Blue Watercress Blaze. I cut it out using Spellbinders Resplendent Rectangles and inked through the die with Forest Moss.

I pressed a Fancy Pearl Embellishment into Perfect Medium and then sprinkled the Blue Watercress Blaze Embossing Powder over it. I shook off the excess and heat set. I added it to a bow made from White Crochet Ribbon.

I assembled the card as shown adding some dots of Cosmic Shimmer Pearlescent PVA in White around the edges.

Thanks for stopping by.

Julia.


Monday, 11 February 2013

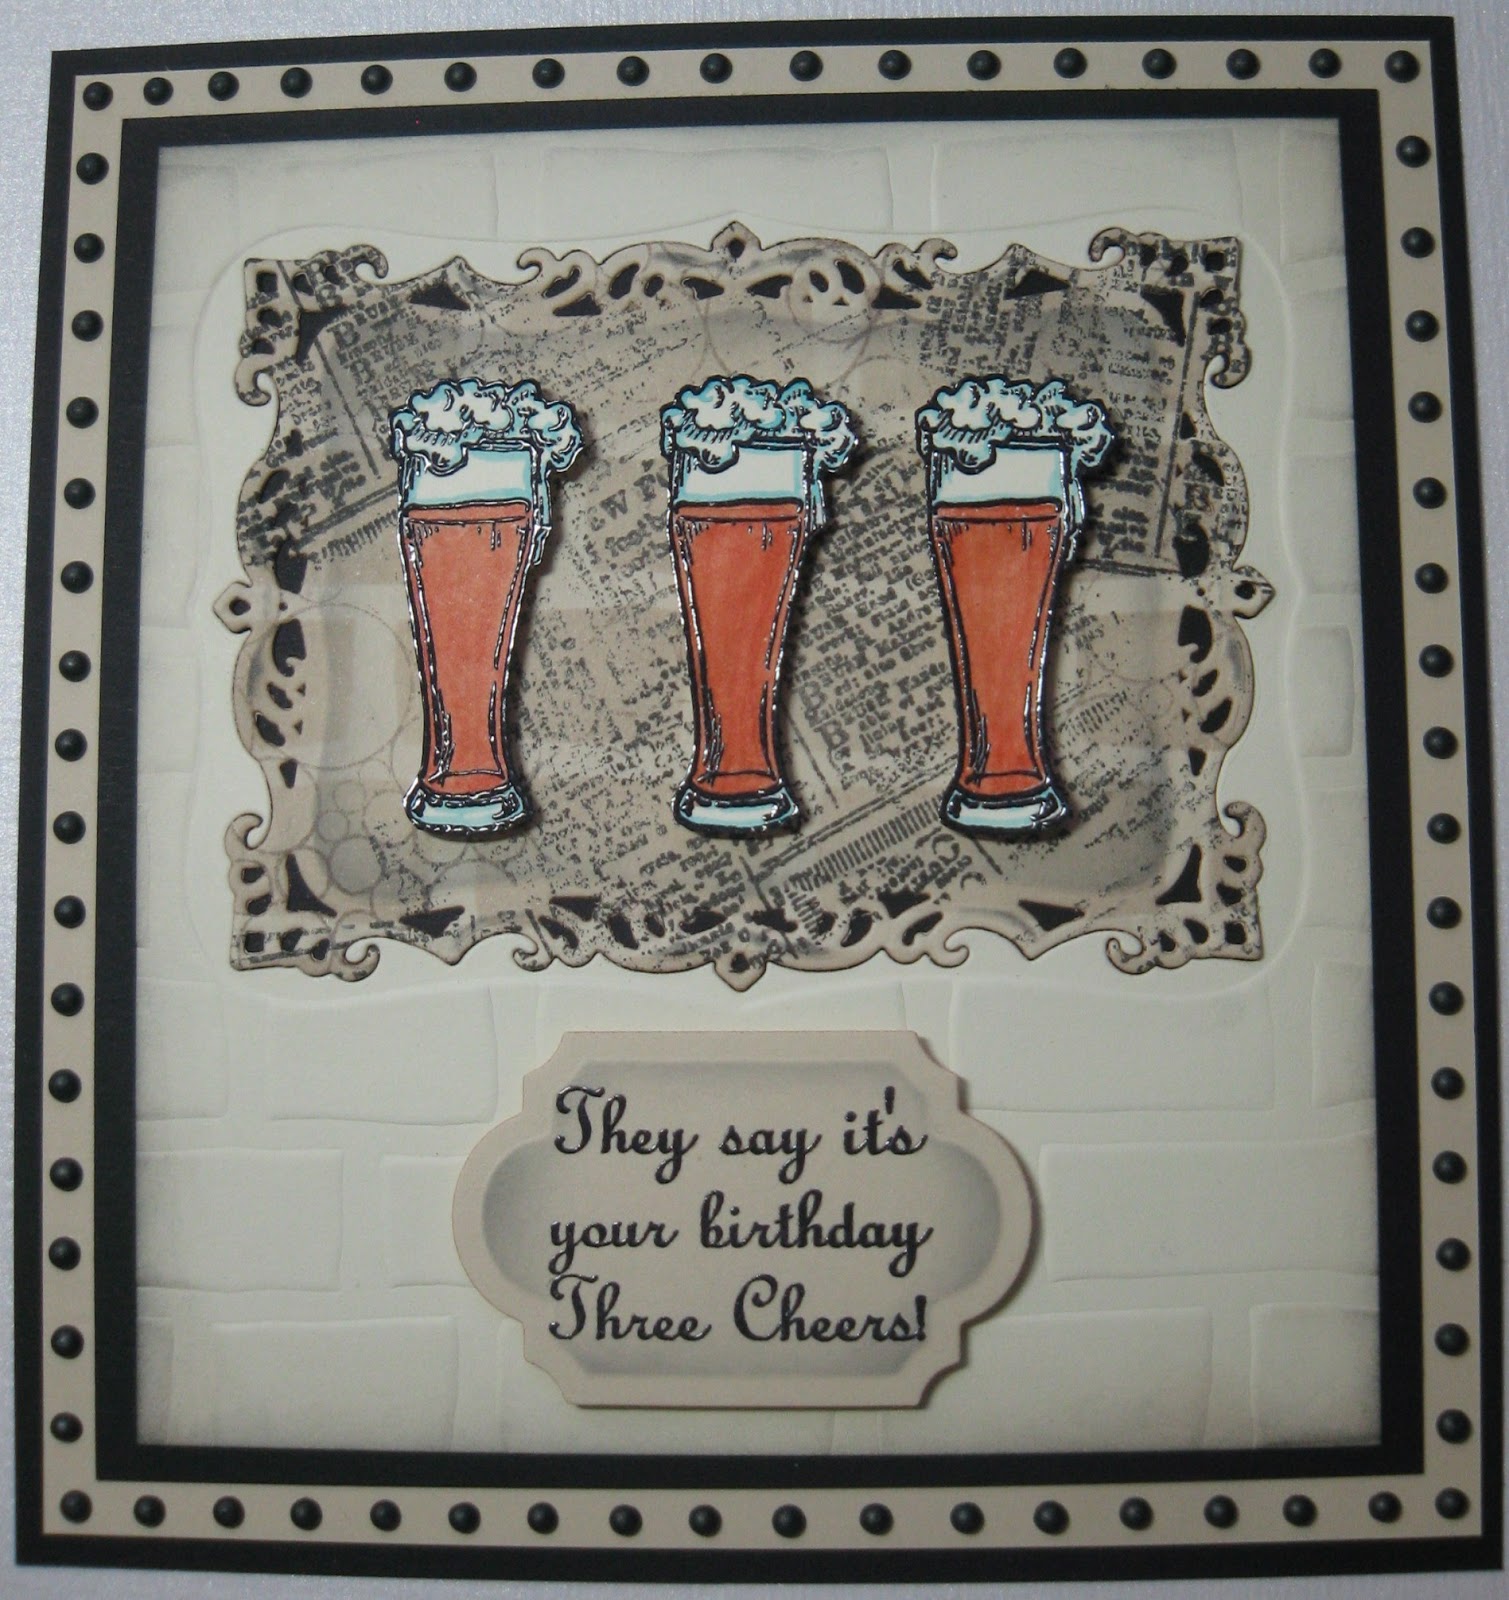
Three Cheers Again!

Hi Bloggers.

Just to let you know that I've ordered some more of the stamp sets from this set of shows so they should be in stock in my Amazon store soon. Will let you know when they arrive.

Another guy card today.

 For the background, I randomly stamped the Newsprint stamp (with it in my hand) using Black Soot Distress Ink. Then I did the same with the Bubbles Stamp using Chipped Sapphire Distress Ink. I made sure the ink was dry and then ran it through the Grand Calibur with the Couture Creations Adagio Embossing Folder. I ran it through a second time to extend the pattern and then inked around the edges with Black Soot using Cut n Dry Foam.

I stamped the Beer Glass from the Creative Expressions Cheers Stamp Set 3 times using Jet Black Archival and embossed with Cosmic Shimmer Clear Embossing Powder. I cut them out using Spellbinders Labels 28 and inked through the die with Chipped Sapphire.

I coloured a piece of Idea-ology Nostalgic Tissue Tape with Stonewashed Alcohol Ink and wrapped it around the background. I stamped the sentiment from the Cheers Stamp Set using Jet Black Archival and embossed with Cosmic Shimmer Clear Embossing Powder. I cut it out using Spellbinders Matting Basics B and inked through the die with Chipped Sapphire.

I assembled the card as shown adding some Antique Silver Faux Screw Brads and some dots of Cosmic Shimmer Pearlescent PVA in White around the edges.

Thanks for stopping by.

Julia.


Sunday, 10 February 2013

You're Absolutely Fabulous!

Hi Bloggers.

A girly card today. Quite simple.

For the background, I ran a piece of Coconut White Card through the Grand Calibur with the Couture Creations Adagio Embossing Folder. I ran it through a second time to extend the pattern and inked around the edges with Aged Mahogany Distress Ink using Cut n Dry Foam.

I cut a frame out of Burgundy Card using the largest 2 dies from the Spellbinders decorative Labels 8 set. I also cut the second smallest die out of Burgundy Card. I stamped the sentiment from the Creative Expressions Classic Sentiments Stamp Set using Jet Black Archival and embossed with clear embossing powder. I cut it out using Spellbinders Labels 28 and inked through the die with Aged Mahogany.

I tied a bow using Ivory/Burgundy Grosgrain Ribbon, added a Red Dazzler and a couple of Crystal Decorative Stick Pins.

I assembled the card as shown adding an 8mm White Pearl to each corner and some dots of Cosmic Shimmer Pearlescent PVA in White around the edges.

Thanks for stopping by.

Julia.


Saturday, 9 February 2013

Green Beer

Hi Bloggers.

It's St. Patrick's Day next month and there's an appropriate sentiment on the Creative Expressions Cheers Stamp Set. Here's one of the green cards I made for the shows last Monday.

For the background, I inked through the Stone Mask with Peeled Paint Distress Ink using Cut n Dry Foam. I then stamped the 'Celebrate' stamp from the Cheers set several times using Peeled Paint. With the stamp in my hand, I randomly stamped the Plaid Stamp using Forest Moss Distress Ink. I made sure the ink was dry and then inked around the edges with Forest Moss using Cut n Dry Foam. I added an Idea-ology Custom Fastener to each corner.

I stamped the pitcher from the Cheers Stamp Set using Jet Black Archival and embossed with Cosmic Shimmer Clear Embossing Powder. I coloured it using Meadow Lime, Soft Moss and Jade Teal Cosmic Shimmer Matt Drawing Inks from the Garden Twist Set. I cut out using Spellbinders Labels 28 and inked through the die with Peeled Paint.

I stamped the sentiment from the same stamp set using Jet Black Archival and embossed with the clear powder. I cut it out using Spellbinders Matting Basics A and inked through the die with Peeled Paint.

I assembled the card as shown adding some dots of Cosmic Shimmer Pearlescent PVA in Black Pearl around the edges.

Thanks for stopping by.

Julia.


Friday, 8 February 2013

Birthday Wishes

Hi Bloggers.

Another feminine card today which was a demo in my first show on Monday.

For the background, I popped a piece of Milk Card inside the Couture Creations Pastorale Embossing Folder. The card was wider than the folder. I ran it through the Grand Calibur. I stamped one of the long thin flourishes from the Embellishing Flourishes Stamp Set along the top and bottom borders using Victorian Velvet Distress Ink. I then inked through the Doodles Daisies Mask with Victorian Velvet using Cut n Dry Foam in the centre section. I inked around the edges of the background by just scraping my foam with Victorian Velvet on it just on the edge of the card. I did the same on my mat pieces.

I stamped the sentiment from the Creative Expressions Classic Sentiments Stamp Set using Jet Black Archival and embossed with Cosmic Shimmer Clear Embossing Powder. I cut it out using Spellbinders Decorative Labels 8 and inked through the die with Victorian Velvet.

I made 2 flowers using Spellbinders Spiral Blossom 4. I removed the die cuts from the die and inked along the edge before rolling. I added a 5mm Cream Pearl to the centre of each flower and a Pearl Swirl.


I tied a bow using Burgundy Grosgrain Ribbon and added a Fancy Pearl Embellishment.
I assembled the card as shown adding some dots of Cosmic Shimmer Pearlescent PVA around the edges.

Thanks for stopping by.

Julia.

Thursday, 7 February 2013

Friends are a Wonderful Gift and Blog Candy draw

Hi Bloggers.

I have noticed that we have exceeded the 600 followers mark so I have drawn a name at random and the winner is ........

Mags!

Please email me at juliawattscrafts@gmail.comand I'll get your prize in the post to you.

Today's card is one of my favourites from the shows on Monday and it was a demo in the 7pm show.

For the background, I inked through the Doodle Daisies Mask with Tumbled Glass Distress Ink using Cut n Dry Foam. Then I stamped one of the larger swirls from the Embellishing Flourishes Stamp Set around the edges using Tumbled Glass. With the stamp in my hand I then randomly stamped the Plaid Stamp again using Tumbled Glass.I made sure the ink was dry and then inked around the edges with Tumbled Glass using Cut n Dry Foam. I wrapped some White Crochet Ribbon around the centre.

I stamped the sentiment from the Classic Sentiments Stamp Set using Jet Black Archival and embossed with Cosmic Shimmer Clear Embossing Powder. I cut it out using Spellbinders Decorative Labels 8 and inked through the die with Tumbled Glass. I cut the next size up out of Foundations Shades Paper and again inked through the die with Tumbled Glass.

I made a flower using Spellbinders Spiral Blossom 4, inking through the die before rolling. I added a Pearl Swirl as a spray coming from the flower rather than adding some leaves or a bow.

I assembled the card as shown adding some Pearls in the corners and some dots of Cosmic Shimmer Pearlescent PVA in White around the edges.

Thanks for stopping by.

Julia.


Wednesday, 6 February 2013

Three Cheers

Hi Bloggers.

As promised, this card is the brother to the one I posted yesterday the reason being that I used the die cut from the aperture in yesterday's card. Couldn't bear to waste it.

Actually, for this card, I found that I had a piece of Milk Card that I had cut the same Decorative Labels 8 die out of. It was just the right size. Lucky me! I popped the die back in the aperture in the Milk Card (so I would keep the lovely debossed edge) and popped it through the Grand Calibur with the Stone Mask using the embossing sandwich (making sure that the cutting edge of the die was going down into my tan mat and my mask was on top). I inked around the edges with Black Soot.

I also popped the die cut back into the die and inked through the die with Black Soot. To see how the die cut pattern was created, please see yesterday's post. I stamped the beer glass from the Creative Expressions Cheers Stamp Set 3 times using Jet Black Archival and embossed with Cosmic Shimmer Clear Embossing Powder. I coloured them in using Cosmic Shimmer Matt Drawing Inks. I used Sea View from the Garden Twist Set for the froth and the glass, Marigold and Umber from the Autumn Shades Set for the beer. I cut the images out with scissors and went around the edges with a black marker pen to hide any white bits.

I stamped the sentiment from the same stamp set using Jet Black Archival and embossed with clear powder. I cut it out using Spellbinders Labels 28 and inked through the die with Black Soot.

I assembled the card as shown adding some dots of Cosmic Shimmer Pearlescent PVA in Black Pearl around the edges.

Thanks for stopping by.

Julia.

Tuesday, 5 February 2013

Beer is Proof

Hi Bloggers.

Thank you so much for your emails and comments here on the blog. I'm glad you enjoy the shows and the samples that I share here on my blog. Your support is much appreciated.

This was my first demo yesterday -

For the background, I inked through the Stone Mask onto some Khaki Card using Pumice Stone Distress Ink using Cut n Dry Foam. Then, with the stamp in my hand, I randomly stamped the Newsprint Stamp using Black Soot Distress Ink. Then using the same method, I stamped the Bubbles Stamp using Pumice Stone Distress Ink. I made sure that all the ink was dry and then I placed the second largest of the Spellbinders Decorative Labels 8 where I wanted it and ran it through the Grand Calibur to create an aperture. I edged around the edges of the background with Black Soot using Cut n Dry Foam.

I placed the background onto a mat of black card and roughly marked where the aperture was on the black card. I dusted the black card with my anti static bag and stamped the Bubbles stamp onto the black card using Perfect Medium. I added Cosmic Shimmer Clear Embossing Powder and heat set. I added the background to black card using 3d foam.

I stamped the sentiment from the Creative Expressions Cheers Stamp Set using Jet Black Archival and embossed with Cosmic Shimmer Clear Embossing Powder. I cut it out using Spellbinders Labels 28 and inked through the die with Black Soot.

I stamped a beer glass from the same stamp set, again using Jet Black Archival and clear powder. I coloured it in using Cosmic Shimmer Matt Drawing Inks. I used Sea View from the Garden Twist Set for the froth and the glass, Marigold and Umber from the Autumn Shades Set for the beer. I cut the image out with scissors and went around the edges with a black marker pen to hide any white bits. (sorry the photo is a bit blurred!)

 I added an Idea-ology Custom Fastener and a couple of Idea-ology Mini Gears.

I assembled the card as shown adding some dots of Cosmic Shimmer Pearlescent PVA in Black Pearl around the edges.

I'm sorry that the Mini Gears and the Custom Fasteners that I used in the card were not on the shows - they were removed from it without us knowing. Unfortunately, I have none in stock. If you wish to purchase the Mini Gears you can see a list of stockists here. If you wish to purchase the Custom Fasteners you can see a list of stockists here.

I'll post the brother to this card tomorrow.

Thanks for stopping by.

Julia.


Monday, 4 February 2013

You're Simply the Best

Hi Bloggers.

Glad you've liked the samples I've shared so far. Just to let you know that the Metal Effect Mask on yesterday's card is not actually on the shows today as I had to cut some products from the show.

Today I have shows on Create & Craft at 3pm (with Martyn) and 7pm (with Dawn). Hope you can join me. Please email in if you have time - it's lovely to see the Spotty Potty nice and full.

Here's today's card. I was planning for it to be a demo but the Small Polka Dots Mask and the Intrinsic Embossing Folder aren't on the show unfortunately.

For the background, I stamped all around the edges with one of the scroll stamps from the Eco Green Crafts Embellishing Flourishes Stamp Set onto some Milk Card using Chipped Sapphire Distress Ink. I made sure the ink was dry and then ran it through the Grand Calibur with the Couture Creations Intrinsic Embossing Folder. I ran it through a second time to extend the pattern (the join is covered by the ribbon). I inked around the edges with Chipped Sapphire using Cut n Dry Foam. I wrapped some Blue/Ivory Grosgrain Ribbon around the centre.

I stamped the sentiment from the Creative Expressions Classic Sentiments Stamp Set using Jet Black Archival and embossed with Cosmic Shimmer Clear Embossing Powder. I cut it out using Spellbinders labels 28 and inked through the die with Chipped Sapphire. I cut the next size up of the Labels 28 and again inked through the die with Chipped Sapphire. I cut the largest size of Spellbinders Decorative Labels 8 out of Cobalt Card. At the emboss stage I added the Small Polka Dots Mask.

I made 2 flowers using Spellbinders Spiral Blossom 4 - 1 out of cobalt card and 1 out of Milk Card where I inked through the die with Chipped Sapphire before rolling. I added some spare bits of Pearl Swirls.

I assembled the card as shown adding a bow made from the Grosgrain Ribbon and some dots of Cosmic Shimmer Pearlescent PVA in White around the edges.

See you at 3pm!

Thanks for stopping by.

Julia.


Sunday, 3 February 2013

Brewing up!

Hi Bloggers.

A male card today from the shows tomorrow.

Busy background on this one - for a change! I started with a piece of Milk Card and I inked through the Metal Effect Mask with Black Soot Distress Ink using Cut n Dry Foam. Using the stamps in my hand I randomly stamped the Newsprint, Plaid and Bubbles stamps using Black Soot. Job done!

I wrapped some Black/Ivory Grosgrain Ribbon around the centre of the card and then stuck some Idea-ology Nostalgic Tissue Tape along the centre. I pierced some holes and added some Idea-ology Custom Fasteners. These are really cool because the brads come blank and you choose a sticker to go on them and then add a bubble sticker if you want to.

I stamped the image from the Creative Expressions Cheers Stamp Set using Jet Black Archival and embossed with Cosmic Shimmer Clear Embossing Powder. I decided not to colour it in. I cut it out using Spellbinders Labels 28 and inked through the die with Black Soot using Cut n Dry Foam. I cut a larger Labels 28 out of black card.

I stamped the sentiment from the same stamp set using Jet Black Archival and embossed with Cosmic Shimmer Clear Embossing Powder. I cut it out using Spellbinders Matting Basics B and inked through the die with Black Soot. I cut a black mat out using Spellbinders Matting Basics A.


I coloured some Creative Expressions Faux Screw Brads using a black promarker and added them to the corners. I assembled the card as shown adding some dots of Cosmic Shimmer Pearlescent PVA in Black Pearl around the edges.

Thanks for stopping by.

Julia.

Saturday, 2 February 2013

Friends Make Every Day Special

Hi Bloggers.

Today I'm sharing a sample from the shows next Monday. I've chosen this one first as it uses some stamps that you would perhaps think of using just on cards for men and, indeed, that was why I chose them as I have the new Creative Expressions Cheers Stamp Set on the show. So, with this card, I want you to look at some of your other stamps that you use on male cards, use them with a feminine colour ink pad and see how they fit with your girly cards? There's a challenge!

Anyhow, here's the card with one of my favourite colour combos at the moment -

I was very good with this card as I used a demo pack I had prepped for a Pick of the Day some time ago and never got to use as we sold out early. It does mean that the background is a bit bigger than I would have liked but does mean that you can see more of it just to illustrate my point about the stamps.

OK, so back to it - for the background I first randomly stamped one of the flourishes from the Eco Green Crafts Embellishing Flourishes Stamp Set onto Coconut White Card using Dried Marigold Distress Ink. This stamp set is great because it comes all cut out and mounted so you're able to use it straight away. Also, the circles in the designs fit the Glass Glintz perfectly. Next, using the stamp in my hand, I randomly stamped the
Plaid A6 Stamp using Tattered Rose Distress Ink. Then, again with the stamp in my hand, I randomly stamped the Newsprint A6 Stamp using Victorian Velvet Distress Ink. This looked lovely but I wanted some texture so I ran it through the Grand Calibur with the Spellbinders Butterfly Kisses M-Bossabilities Folder. I ran it through a second time to extend the pattern - it didn't match up exactly but you can't tell. I then went around the edges with Tattered Rose Distress Ink using Cut n Dry Foam. What do you think? Works, eh?

I stamped the sentiment from the Classic Sentiments Stamp Set using Jet Black Archival and embossed with Cosmic Shimmer Clear Embossing Powder. I cut it out with Spellbinders Labels 28 and inked through the die with Dried Marigold. I cut a Spellbinders Decorative Labels 8 out of peach card, a larger Labels 28 out of Coconut White Card and the largest Decorative Labels 8 out of peach card and inked through the die with Dried Marigold on all of them.

I made 2 flowers out of peach card using Spellbinders Spiral Blossom 4, I inked through the die with Dried Marigold on just 1 of them before rolling. I added some leaves which were in the demo pack I used - they were cut from Spellbinders Botanical Swirls & Accents and French Frills.

I assembled the card as shown adding some Cream Pearls and some dots of Cosmic Shimmer Pearlescent PVA in White around the edges.

Thanks for stopping by.

Julia.


Friday, 1 February 2013

Thinking of You

Hi Bloggers.

Here's today's card -

For the background, I placed the Fretwork Mask over a piece of Coconut White Card which was 5 3/4" square so the mask fitted exactly. I inked through the mask with Dusty Concord Distress Ink using Cut n Dry Foam. I then stamped around the edges using the lovely scroll stamp from the Creative Expressions Artsy Floral Stamp set using Dusty Concord.


I stamped the large image from the Artsy Floral Stamp Set using Perfect Medium and embossed with Cosmic Shimmer Magenta Blaze Aurora Embossing Powder from the Brights Set. I tore around the edges and inked around them with Dusty Concord. I stamped 2 of the coordinating flowers from the Creative Expressions Whimsical Floral Stamp Set again using Perfect Medium and embossed with the Magenta Blaze Aurora Powder. I cut them out with scissors and then inked them with Dusty Concord. I placed them over the top of the flowers on the larger image using 3D foam pads.

I stamped the sentiment from the Artsy Floral Stamp Set using Perfect Medium and embossed with Magenta Blaze Aurora. I cut it out using Spellbinders Resplendent Rectangles and inked through the die with Dusty Concord.
I assembled the card as shown adding some dots of Cosmic Shimmer Pearlescent PVA in White Pearl around the edges.

Thanks for stopping by.

Julia