Tuesday, 12 September 2017

Woodware Christmas Partidge Sneak Peek

Hi Bloggers.

As promised, I have a sneak peek today from Thursday's Woodware shows. I'm snowed under at the moment with the shows this week, Ally Pally at the weekend and the Takeover weekend the weekend after plus everything else I have to do! So, please forgive me as the next few posts will be lacking in narrative.

Anyway, here's your sneak peek -

Products used -
Woodware - Christmas Partridge, Anti-Static Pad
Onyx Black Versafine
Cosmic Shimmer - Matt Clear Embossing Powder
Sakura - Glaze: Red, Hunter Green, Clear, Stardust : Sky, Blue, Silver, Gold
Phill Martin Snowflakes Paper Pad, Stamping Mat
White 5mm Pearls
Card - Coconut White, Black

All new Woodware Christmas stamps are ordered and should be here tomorrow. Stock has been added to my website - you can fine them here.

Thanks for stopping by.

Julia.
www.juliawattscrafts.co.uk
Free card with all website orders over £10 (ask for one in the comments box at checkout).

Monday, 11 September 2017

Paper Cuts Merry Christmas Santa Bauble

Hi Bloggers.

Here's today's card -

For the background, I cut 5 of the snowflakes from the Paper Cuts Snowflake Frame and the little snowflakes from the Paper Cuts Merry Christmas Santa Bauble out of Coconut White Card. I glued all of them (except one) to a piece of Midnight Blue Peal Card and put aside for a few minutes for the glue to dry.

I cut the outer die from the Merry Christmas Santa Bauble Die Set out of Rich Red Card. I cut the outer and inner die plus the Merry Christmas insert out of Coconut White and also the moustache piece. I kept the waste from the face, hat trim and hat bobble. I glued the white santa die cu tto the Rich Red die cut. I scribbled some Tattered Rose Distress Marker onto my Craft Sheet and picked the ink up using a Water Brush. I used this to paint the face and the nose. I glued the face in place.

I added Woodware Fluffy Stuff to the hat bobble, hat trim and moustache and heated. I glued these to my Santa and added 5mm Black Pearls for the eyes. I added my remaining snowflake to the hat and a Baker's Twine Bow.

Going back to my background, I ran it through the Spellbinders Platinum Machine with the Creative Expressions Nordic Tiles Embossing Folder. I matted onto Coconut White Card, Rich Red Card and then another piece of Coconut White Card and added my Santa.

I edged my background with CS Glue and added CS Apple Red Glitterbitz. I completed my card by adding some Apple Red CS Twinkles to the snowflakes.

The winner of the card (plus mystery card) from Freebie Friday on 8th September is.............

PharmacyMichele

Please email me at juliawattscrafts@gmail.com with your address and I'll pop your cards in the post.

I'll be back tomorrow with a sneak peek from my Woodware shows on Thursday.

Thanks for stopping by.

Julia.
www.juliawattscrafts.co.uk
Free card with all website orders over £10 (ask for one in the comments box at checkout).

Sunday, 10 September 2017

Let it Snow

Morning.

Here's today's card -

I cut the bottom section of the Paper Cuts Let it Snow Frame out of Coconut White Card and trimmed away the excess to just leave the sentiment. I also cut 3 of the snowflakes in the set and the snowflake corner from the Paper Cuts Jingle Bells Die Set 4 times. I pressed them all into Clear Perfect Medium, added CS Sea Turtle Embossing Powder and heat set. I added more ink, more powder and heat set again.

I popped a piece of Creative Expressions Double Sided Adhesive Sheet onto Coconut White Card and cut one of Sue Wilson's Double Pierced Background Rectangles from it. I peeled away the other backing sheet, added my sentiment and then added Snow White Opaque Micro Beads to the exposed adhesive. You may find that your sentiment may lift a little if there is embossing powder on the back - just lift it up from around the Micro Beads, add some CS Glue and seat back in place. I glued my extra snowflakes as shown. I matted onto Silver Shine Pearl Card cut from the next sized rectangle in the set.

For the background, I cut a piece of Coconut White Card using a larger die in the rectangles set and embossed using the CE Ice Crystals Embossing Folder. I matted onto Silver Shine Pearl Card cut using the next sized die in the set. I added my snowflake corners.

I added CS Glue around the edges of the sentiment panel and the background and sprinkled CS Iced Snow over. I added CS Polar White Twinkles to the centres of the snowflakes and corners.

Thanks for stopping by.

Julia.
www.juliawattscrafts.co.uk
Free card with all website orders over £10 (ask for one in the comments box at checkout).

Saturday, 9 September 2017

Gilded Elf Tonic

Hi Bloggers.

Here's today's card -

For my background, I cut dies #1 and #3 from Sue Wilson's Holly Lattice Frame into Coconut White Card several times. I popped a piece of CE Double Sided Self Adhesive Sheet on the front and rubbed CS Warm Sunrise Gilding Flakes into the exposed adhesive. I removed the excess with a piece of Rubit Scrubit. I turned the piece over and removed the other backing sheet. I added CS Diamond Sprinkles to the adhesive.

I made a frame using Sue's Double Pierced Squares Set B and added it to my background using 2mm Foam Tape. I matted onto a couple pieces of Coconut White Card.

I popped some CS Flake & Glitter Glue onto a piece of Wax Paper. I picked it up onto a piece of Cut n Dry Foam and used it to 'ink up' the Woodware Elf Tonic Tag. I stamped onto Coconut White Card, leaving the stamp on the card no longer than 3 seconds. I popped the stamp into a bowl of water to soak the glue off. I find this is the best way to clean the stamps.

I added CS Warm Sunrise Gilding Flakes to my stamped tag. I removed the excess using a piece of Rubit Scrubit. I cut it out using die #5 from Sue's Holly Lattice Frame Stamp Set.

I popped some more Double Sided Self Adhesive Sheet onto Coconut White Card. I cut 2 sets of inner poinsettia flowers from Sue's Poinsettia Cluster out of it and cut the outer die out of Coconut White Card twice. I glued the inners to the outers with a little dot in the centre of each flower and added a cluster to opposite corners of my frame.


I completed my card by adding a 5mm White Pearl to the centre of each flower in the clusters.

Thanks for stopping by.

Julia.
www.juliawattscrafts.co.uk
Free card with all website orders over £10 (ask for one in the comments box at checkout).


Friday, 8 September 2017

Freebie Friday Two-fer

Hi Bloggers.

It's Friday - again! Where did the last week go?

As promised, this week's Freebie Card is the one I messed up a bit on the last Woodware shows that I did.

You can read how the card should have been made in this post.

As the title of this post suggests, there are 2 cards on offer this week but I'm not going to show you the second one, I'm just going to pop an extra card in the envelope to the winner this week.

Leave a lovely comment below to go into the draw to win it. I will announce the winner on Monday. Be sure to pop back to see if you have won.

Please note : Only comments left below will go into the draw. Comments made on the original post will not count. Information given on the original post was correct at the time that post was published. 

Thanks for stopping by.

Julia.
www.juliawattscrafts.co.uk
Free card with all website orders over £10 (ask for one in the comments box at checkout).

Thursday, 7 September 2017

Red and Green Glitterbitz Baubles

Hi Bloggers.

Had a great day at CE HQ yesterday - lots of cool techniques learned by all!

Here's today's card -

For the background, I embossed a piece of Coconut White Card using the Creative Expressions Nordic Tiles Embossing Folder. I matted onto Rich Red Card, Brunswick Green Card and another piece of Coconut White.

I popped a piece of Creative Expressions Double Sided Self Adhesive Sheet onto a piece of Coconut White Card. I cut both of the outer dies from the Paper Cuts Season's Greetings Bauble Duo Die Set out of it.

I cut the turtle doves pair of dies from the bauble die set out of Rich Red Card. I removed the backing sheet from the plain bauble, trimmed a little from around the edges and added my decorative die cut. I added Cosmic Shimmer Hunter Green Glitterbitz to the exposed adhesive.

I cut the season's greetings pair of dies from the bauble die set out of Brunswick Green Card. I removed the backing sheet from the plain bauble, trimmed a little from around the edges and added my decorative die cut. I added Cosmic Shimmer Apple Red Glitterbitz to the exposed adhesive.

I added some Baker's Twine through the tops of the baubles and secured at the back of my background, adding my baubles to my background using CE Mounting Cushion. I added a Baker's Twine bow to each bauble.

I cut the holly corner from the Paper Cuts Turtle Doves Die Set out of Brunswick Green Card 4 times and added them to the corners of my background. I finished my card by adding some Apple Red CS Twinkles to the holly corners.

Lisa Horton is continuing with her One Day Special on Hochanda today with her first ever die release. Her shows are at 9am, 1pm and 5pm. I'm offering 10% discount on my website on items from the shows - you can find them here. Offer applies till midnight tonight. Discount will be applied automatically at checkout.

I picked up my order of new colours of Distress Oxides yesterday - all pre-orders will be posted out today.

Thanks for stopping by.

Julia.
www.juliawattscrafts.co.uk
Free card with all website orders over £10 (ask for one in the comments box at checkout).


Wednesday, 6 September 2017

Art Deco Snowflake 3D Bauble

Hi Bloggers.

I'm up at Creative Expresions HQ today running a Chalk Cloud masterclass - should be great fun!

Here's today's card -

I started by making the 3D element. I cut dies #1,#3 and #4 together from Sue Wilson's Art Deco Snowflake Die Set out of Antique Gold Pearl Card 5 times. I scored and folded each of then down the middle and then glued them together, half to half. Instead of sticking the final pair together (which you can do if you want to make a bauble for the tree - remember to add some twine before glueing) I cut die #4 from the set out of Rich Red Card, added a ittle Metallic Baker's Twine and glued by 3D element to it.

For the background, I embossed a piece of Milk Card using the Creative Expressions Shimmering Stars Embossing Folder. I dusted it with an Anti-Static Pad and then edged with Clear Perfect Medium Pen using my Tim Holtz Ruler. I added Ruby Slippers CS Brilliant Sparkle Embossing Powder and set using a Low Speed Heat Tool.

I cut Sue's Checkerboard Poinsettia Border out of Antique Gold Pearl Card. I trimmed it and matted onto Rich Red Card. I stamped the sentiment from the CE Santa's Sentiments Stamp Set onto Milk Card using Clear Perfect Medium and embossed with CS Gold Detail Embossing Powder. I cut it out using Sue's Pierced Flags and cut the next sized die out of Rich Red Card. I cut the single poinsettia from Sue's Poinsettia Flourish & Corner Die Set out of Rich Red Card twice and added them to the end of my sentiment flag.

I cut the corner from Sue's Poinsettia Flourish & Corner Die Set out of Rich Red Card twice and the single poinsettia once and added them to the top part of my card as shown.

Lisa Horton is launching a One Day Special on Hochanda today at 6pm with her first ever die release. She's mega excited and I can't blame - her designs are just lovely. The reindeers are my favourites -

I'm offering 10% discount on my website on items from the shows - you can find them here. Offer applies till midnight tomorrow night. Discount will be applied automatically at checkout.

Thanks for stopping by.

Julia.
www.juliawattscrafts.co.uk
Free card with all website orders over £10 (ask for one in the comments box at checkout).

Tuesday, 5 September 2017

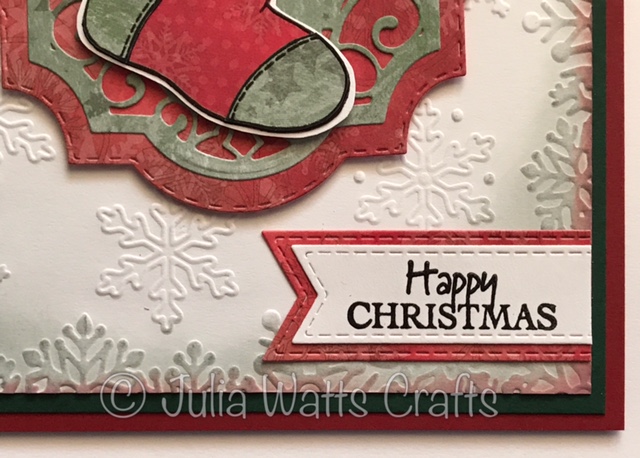
Stuffed Stocking from Santa

Hi Bloggers.

Here's today's card -

For the background, I embossed a piece of Coconut White Card using the Creative Expressions Frosted Window Embossing Folder. I went around the edges, first with Iced Spruce Distress Oxide and then with Fired Brick Distress Oxide using a Smoothie. I matted onto Brunswick Green Card, Rich Rich Card and Coconut White Card.

I stamped one of the stockings from the Woodware The Stuffed Stockings Stamp Set onto Coconut White Card using Onyx Black Versafine Ink and embossed with Cosmic Shimmer Matt Clear Embossing Powder. I also stamped the little tag in the same stamp set. I stamped and embossed the stocking twice more - on 2 different papers from Lisa Horton's Christmas Wishes Paper Pad.

I coloured the toys in the stocking using various Distress Oxides - Faded Jeans, Peeled Paint, Fired Brick and Broken China by swiping some ink onto my Craft Sheet and picking it up with a Water Brush. I cut the stocking and the tag out leaving a thin white border. I cut the stocking pieces out of the patterned papers and added them to my main image.

I cut dies #1, #3 and #4 together from Sue Wilson's Holly Lattice Frame Die Set out of patterned paper and die #5 from the same set out of another paper. I glued the 2 die cuts together and added my stocking and tag using Foam Pads. I added a little Glossy Accents to the car windows.

I stamped the sentiment from the Woodware Little Festive Branch Stamp Set using Versafine Ink and embossed with Matt Clear Embossing Powder. I cut it out using Sue's Stitched Flags and cut the next sized die out of some of the red patterned paper used before.

I completed my card by adding an 8mm White Pearl to the corners.

Thanks for stopping by.

Julia.
www.juliawattscrafts.co.uk
Free card with all website orders over £10 (ask for one in the comments box at checkout).

Monday, 4 September 2017

Let it Snow Frame

Hi Bloggers.

Here's today's card -

For the background, I drizzled some CS Glue onto a piece of Heat Emboss Acetate. I misted it with water and spread the glue around using my fingers. I then sprinkled Cosmic Shimmer Pixie Powders over - I used Midnight Blue, Aqua Lagoon, Pewter and White Pearl. I made sure that all the glue was covered. I misted with a little more water and then sprinkled over some Sparkle Star CS Diamond Frost. I scrunched up a piece of White Tissue Paper. I opened it out and added it to my background, patting it down using a piece of Kitchen Roll. I put it aside to dry - approx an hour.

I made a frame out of Coconut White Card using Sue Wilson's Double Pierced Rectangles and Double Pierced Rectangles Set B.

Once my background was dry, I added my frame using 2mm Foam Tape, trimming away the excess. I matted onto a couple of pieces of Coconut White Card.

I cut the Paper Cuts Let it Snow Frame and the snowflakes in the set out of Coconut White Card and added it to my background using CS Glue in a Woodware Fine Tip Glue Applicator.

I added some of the extra snowflakes. I popped a piece of CE Double Sided Self Adhesive Sheet onto a piece of Coconut White Card and cut the snowflakes. I peeled away the backing and added CS Sparkle Star Diamond Frost. I added these snowflakes to my frame/background. I added some White Pearls to the centre of some of the snowflakes.

I cut the snowflake corner from the Paper Cuts Jingle Bells Die Set out of my card with the self adhesive sheet on it 4 times and added CS Sparkle Star Diamond Frost to it. I added them to the corners of my frame adding a White Pearl to the centre of each one.

The winner of the card from Freebie Friday on 1st September is .....................

SuzzieQ

Please email me at juliawattscrafts@gmail.com with your address and I'll pop your card in the post.

Just before I go, I have some workshop updates -

This Wednesday, I am running a Chalk Cloud Masterclass at CE HQ in Kettering. We will also be looking at Distress Oxides (hopefully the new colours too) so you can compare. This is a workshop that will be packed with techniques. It runs 10am till 4pm. There are just 3 spaces left - you can book here.

I am also running a Christmas Stamping Workshop on Wednesday 27th September (again up at CE HQ). The projects aren't 100% set in stone (it depends if I make anything that I think is cooler over the next couple of weeks). We will be aiming to complete 4-6 projects on the day.Bookings are now being taken for this one here.

My own Christmas themed workshop in Yardley Gobion is on Saturday 30th September. It will be a mix of die cutting and stamping on this one. Again, I haven't 100% decided what the projects are but there will be up to 6 of them. We are definately doing the one below but there will be a choice of background techniques to use and there will be a whole host of dies to choose from to make the background. You can book for this one here.

The workshop in Yardley Gobion on 28th October with myself and Leonie Pujol is nearly full with just 7 spaces up for grabs. We haven't set the projects for this one yet but it is going to be inky with lots of stamping. Don't miss out on this opportunity to spend a day with probably the bubbliest Craft Personality in the World! You can book here.

Thanks for stopping by.

Julia.
www.juliawattscrafts.co.uk
Free card with all website orders over £10 (ask for one in the comments box at checkout).

Sunday, 3 September 2017

Gingerbread Cookie

Hi Bloggers.

I had a lovely day at Amelia's Crafts in Studley yesterday. Lovely store if you're in the area anytime, it's well worth a visit.

Here's today's card -

I started by stamping the Creative Expressions Gingerbread Cookie Stamps to Die For onto Milk Card using Onyx Black Versafine Ink. I stamped the sentiment from the Creative Expressions Santa's Sentiments Stamp Set in the centre. I cut out using the largest die in Sue Wilson's Scalloped Snowflake Frame Die Set.

I coloured the gingerbread men in by adding some Terracotta CS Chalk Cloud to my Craft Sheet and picking it up with a Water Brush. I coloured the ribbons on the image with Rich Crimson Intense Pigment Stain - I popped a drop in a Palette and picked it up with the tip of a Water Brush. I added the buttons using Christmas Red Stickles.

I cut the largest die in the Scalloped Snowlake Frame again but this time out of Rich Red Card. I cut the largest die in Sue's Looped Snowflake Frame out of Antique Gold Pearl Card and stacked all my die cuts up.


For the background, I ran a piece of Milk Card through the Spellbinders Platinum Machine with the Gingerbread Men Mask. Leaving the mask in place, I inked through it with Terracotta CS Chalk Cloud using a  Smoothie. I removed the mask and inked around the edges with Terracotta Chalk Cloud. I matted onto Rich Red Card and then Antique Gold Pearl Card.

I cut the corner from Sue's Poinsettia Flourish and Corner Die Set out of Rich Red Card 4 times and added them to the corners of my background using CS Glue in a Woodware Fine Tip Glue Applicator.

Thanks for stopping by.

Julia.
www.juliawattscrafts.co.uk
Free card with all website orders over £10 (ask for one in the comments box at checkout).

Saturday, 2 September 2017

Warm Wishes to You

Hi Bloggers.

Here's today's card -

I started by stamping the bear from the Woodware Self Portrait Stamp Set onto Coconut White Card using Faded Jeans Distress Oxide. I pulled some of the colour out using a Water Brush. I popped it inside the Creative Expressions Sparkle Flakes Embossing Folder, positioning the image around the snowflakes as shown. I coloured the nose using Vintage Photo Distress Oxide using a Water Brush and embossed with CS Matt Clear Embossing Powder. I coloured the scarf using Fired Brick Distress Oxide.

I edged with Faded Jeans Distress Oxide using a Smoothie. I edged a piece of paper from Lisa Horton's Christmas Wishes Paper Pad with Faded Jeans Oxide and popped both pieces onto a Coconut White Card blank.

I popped CS Glue around the edges of the image panel and then added CS Iced Crystal.

I stamped the little paws with Faded Jeans Oxide and pulled the colour out again.

I cut a tag and ring out of Coconut White Card using Sue Wilson's Pierced Tags Die Set. I edged with Faded Jeans Oxide and stamped the sentiment from the Self Portrait Stamp Set using the same ink. I pressed the ring into Fired Brick Distress Oxide, added CS Matt Clear Embossing Powder and heat set. I added it to my tag using CS Glue in a Woodware Fine Tip Applicator.

I swiped some Faded Jeans Oxide onto my Craft Sheet. I misted with water and dragged a piece of Blue White American Seam Binding through it. I cleaned my Craft Sheet, added Fired Brick Oxide, misted with water. I dragged my ribbon through it. I dried it using my Heat Tool and added it to my tag.

Some of you may remember that when I demoed this card on Hochanda, I messed it up a bit by stamping the polar bear in black. I promised to give that card away - I haven't forgotten. It may appear on Freebie Friday very soon. 😊

Thanks for stopping by.

Julia.
www.juliawattscrafts.co.uk
Free card with all website orders over £10 (ask for one in the comments box at checkout).

Friday, 1 September 2017

Freebie Friday

Hi Bloggers.

Here's today's card that needs a new home -

You can read how this card was made in this post.

Leave a lovely comment below to go into the draw to win it. I will announce the winner on Monday. Be sure to pop back to see if you have won. Last week's card has not been claimed yet - it's not sufficient to just comment on the blog if you've won, I need to have an email from you with your address.

Please note : Only comments left below will go into the draw. Comments made on the original post will not count. Information given on the original post was correct at the time that post was published.

I'm heading over to Hochanda this morning to do some filming with some of my CE Teamies (I'll say no more!). I may not get any post out today and tomorrow I'm demoing at Amelia's Crafts in Studley so we're looking at Monday for orders to go out, I think. For those of you who have pre-ordered Distress Oxides from me, I am told they are due at Creative Expressions tomorrow so hopefully they will be on their way to you middle of next week.

Thanks for stopping by.

Julia.
www.juliawattscrafts.co.uk
Free card with all website orders over £10 (ask for one in the comments box at checkout).