Showing posts with label Distress Oxide. Show all posts

Tuesday, 19 December 2017

Garden Themed Shadow Box

Hi Bloggers.

Here's today's card -

Another workshop card so just an ingredients list again.

Products used -

A4 Embossing Folder – Leafy Quad
Cosmic Shimmer Pixie Powders – Burnt Orange, Bronze Blush, Straw Yellow
Vintage Photo Distress Marker
Card – Coconut White, Slate Grey, Ginger


Lisa Horton is launching a new One Day Special at 6pm today with lots of Spellbinders dies. I only have the card in stock on my website from the shows but I am offering 10% off that. You can find it here. Please enter LISAHORTON in the discount code box at checkout to activate your discount. Offer valid till midnight tomorrow night or while stocks last. Lisa has another show at 8pm tonight and then more shows at 9am, 1pm and 5pm tomorrow.

Although we don't have the dies that Lisa is using on our website, we do have lots of other Spellbinders dies at reduced prices in our Clearance Section here and in our Pre-Loved Section here.

Thanks for stopping by.

Julia.
www.juliawattscrafts.co.uk

Free card with all website orders over £10 (Add a note to your order in your cart).

Wednesday, 13 December 2017

Wooden Garden Cart

Hi Bloggers.

Here's today's card -

The background on this one is actually made up from waste ink on my Craft Sheet and on a mini stencil. The waste ink that was mopped up from my Craft Sheet was Vintage Photo and Fired Brick Distress Oxides. I had inked through the Creative Expressions Vintage Diamond Mini Stencil with Vintage Photo Oxide on another project I misted the stencil with water and pressed it into my card - you canjust make it out on the background. I edged my background with Vintage Photo Distress Oxide using a Smoothie. I matted onto Dark Roast Coffee Card and then Coconut White Card.

I cut the Wooden Garden Cart out of Cinnamon Card twice. I inked through the die on one of them with Vintage Photo Distress Oxide. I cut away the top section of the inked one so that I could slot my veggies in. On the other one, I cut away the handles and the wheel, just to make it earier to layer up.

I cut some vegetables out of Coconut White Card using the Wooden Garden Cart Die Set. I coloured them using Pixie Powders - Burnt Orange, Lava Red and Pale Olive.

I added my veg to the cart and added the top layer using small pieces of CE Mounting Cushion.

I cut the sentiment from the Life is a Garden Die Set out of Cinnamon Card and out of Dark Roast Coffee Card. I trimmed the bottom of the swirl off and glued the 2 die cuts together, offsetting them to create a drop shadow.

I misted a piece of Coconut White Card with water. I sprinkled Burnt Orange, Straw Yellow and Bronze Blush Pixie Powders over and put aside to dry. Once dry, I cut a pair of Sycamore Branch out of it and the little leaves in the set out of it a couple of times.


Thanks for stopping by.

Julia.
www.juliawattscrafts.co.uk

Friday, 8 December 2017

Freebie Friday

Hi Bloggers.

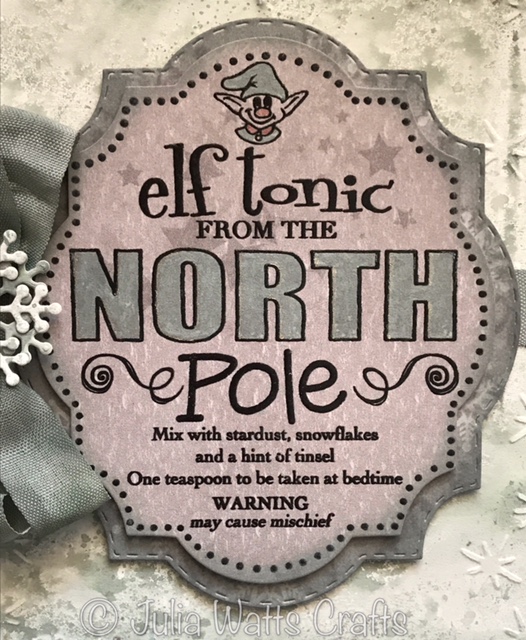
It's Freebie Friday again. Here's this week's Christmas Card that needs a new home -

I don't think that this card has actually been blogged, at least I can't find it. So, here's a list of products used -

Woodware - Elf Tonic Tag
Iced Spruce Distress Oxide
Onyx Black Versafine
CS Matt Clear Embossing Powder
Sue Wilson Dies - Holly Lattice Frame, Looped Snowflake Frame
Lisa Horton Christmas Wishes 8 x 8 Paper Pad
Creative Expressions Sparkle Flakes Embossing Folder
Sakura Clear Star Stardust Pen
Water Brush
Blue White American Seam Binding
CS Iced Crystals Glitter Jewels
5mm White Pearls
Card - Coconut White, Black


Leave a lovely comment below to go into the draw to win it. I will announce the winner on Monday. Be sure to pop back to see if you have won.

Please note : Only comments left below will go into the draw. Comments made on the original post will not count. Information given on the original post was correct at the time that post was published.

I've just received stock of some lovely Lavinia stamps. These stamps are absolutely gorgeous. I've stocked a selection of fairies, foliage and the Fairy House which I just couldn't resist. You can find them all here.


Thanks for stopping by.

Julia.
www.juliawattscrafts.co.uk

Wednesday, 6 December 2017

3 simple ways with the Linear Leaf Background

Hi Bloggers.

I have 3 simple cards for you today featuring the Linear Leaf Background.

These cards came about as a result of creating this background -

My background was created by misting some Tangy Tangerine and Bright Sunshine Phill Martin Misters onto a Craft Sheet. I sprinkled a little Straw Yellow and Burnt Orange Pixie Powder and misted with a little water. I then dipped a piece of Coconut White Card into it several times and put aside to dry.

I cut the Linear Leaf Background into a piece of Black Card leaving a good-sized border around the edges.I then spritzed through it onto my background in a couple of places using Phill Martin CS Bright Sunshine Mister. While the ink was still wet, I turned my card mask over and printed onto a piece of Coconut White Card. Once this print was dry, I cut it out using the Double Stitched Rectangles. I went around the edges with Fossilized Amber Distress Oxide using a Smoothie. I matted onto Dark Roast Coffee Card and then Coconut White.

I cut my sentiment out of Dark Roast Coffee Card using the Mix & Match Friendship Die Set and added it to my card using CS Glue in a Woodware Fine Tip Glue Applicator.


This is the second card I created -

Going back to my orange misted background, I placed my Black Card Linear Leaf Mask over where I had misted before and sprinkled some Bronze Blush CS Pixie Powder over. Leaving my mask in place, I misted with water. I removed the mask and placed it on the other side of my background, added more Pixie Powder and misted again. While the card mask was still wet, I turned my card mask over and printed onto a piece of Coconut White Card. Once this print was dry, I cut it out using the Double Stitched Rectangles. I went around the edges with Vintage Photo Distress Oxide using a Smoothie. I matted onto Dark Roast Coffee Card and then Coconut White.

Once again, I cut my sentiment out of Dark Roast Coffee Card using the Mix & Match Friendship Die Set and added it to my card using CS Glue in a Woodware Fine Tip Glue Applicator.

 This is the final card I made in this batch -

Now, because Pixie Powders have Mica Powder in them, you can see them on Black Card. Bronze Blush has kind of a verdigris look to it on Black Card - very pretty! For this card, once my Black Card Mask was dry, I cut it out using the Double Stitched Rectangles. I added a piece of CE Double Sided Self Adhesive Sheet onto the back. I turned it back to the front and added Verdigris CS Gilding Flakes to the exposed adhesive. I removed the excess using a piece of Rubit Scrubit. I matted onto Coconut White Card and then Black Card.

I cut a Stitched Flag out of Coconut White Card and my sentiment out of Black Card using the Mix & Match Friendship Die Set again.

I cut an outer flower die from the Sunflower Bouquet Die Set out of more of my Black Card with Bronze Blush Pixie Powder on it. I added a little Double Sided Self Adhesive Sheet to some Coconut White Card and added Verdigris Gilding Flakes to it. I cut a sunflower centre from it. I cut a couple of sunflower leaves out of Coconut White Card.

There you go - 3 quick cards! I'll share the card with my orange background soon.

Don't forget - Over on my website I'm offering 30% off all the items in the Christmas Category. You can find them here. Please enter CHRISTMAS in the discount code box at checkout to activate your discount. Offer applies till midnight on Monday 18th December or while stocks last. Stop by the Clearance section when you visit too - lots of bargains in there!

Thanks for stopping by.

Julia.
www.juliawattscrafts.co.uk

Thursday, 30 November 2017

One Day Special Shows Continue today

Hi Bloggers.

One Day Special shows continue today at 9am, 1pm and 5pm. Hope you can join me.

Here's today's card -

For the background, I've used the CE Bark Embossing Folder (the one you get in the One Day Special Bundle) and embossed a piece of Coconut White Card. It's easy to extend the design on this folder as it's quite a random design.

I cut the frame from the Celebrations Shadow Box Die Set out of Coconut White Card and glued it on top of my embossed background.

I made a frame out of Coconut White Card using dies #3 and #5 from the Stitched Square Peg Board Die Set. I added it to my background using Woodware Foam Tape and then matted onto a couple of pieces of Coconut White Card.

I cut the top section from the Majestic Tree Die Set out of Forest Card twice, inking though the die with Vintage Photo Distress Oxide. I cut the trunk section out of Cinnamon Card and again inked through the die with Vintage Photo Oxide.

I cut the sentiment from the Life is a Garden Die Set out of Cinnamon Card. I added some hearts from the Bushel Basket Die Set cut from Rich Red Card.

I cut 3 sizes of flower from the Sunflower Bouquet Die Set out of Coconut White Card. I painted them using Straw Yellow Pixie Powder. Once dry, I shaped them using a Woodware Shaping Tool and a Moulding Mat. I cut some leaves out of Coconut White Card using the same die set and painted them with Pale Olive Pixie Powder. I popped a little CE Double Sided Self Adhesive Sheet onto a piece of Dark Roast Coffee Card and cut 3 flower centres. I peeled away the backing and added Medium Clear Glass Micro Beads.

I completed my card by adding an 8mm White Pearl to each corner of my frame.

I'm offering 10% discount on items from the shows on my website. You can find them here. Please enter JULIAWATTS in the discount code box at checkout to activate the discount. Offer applies till midnight tonight or while stocks last.

I have loaded photos of the samples from the shows to the Gallery Section of this Blog and to my Julia Watts Crafts Facebook Page.

Thanks for stopping by.

Julia.
www.juliawattscrafts.co.uk

Monday, 20 November 2017

Industrial Chic and Oxides

Hi Bloggers.

I have one last sample featuring dies from the Industrial Chic Collection (I do actually have one more but that's for my workshop on Saturday).

For the background, I started by scrunching up a piece of Coconut White Card. I opened it out an touched the peaks of the card with Frayed Burlap Distress Oxide. I misted with water and left it a couple of minutes for the ink to move a little. I then ironed it with my Encaustic Iron to flatten out my card and stop the ink from moving any more. I used the crackle stamp from Lisa Horton's Textures  Stamp Set and stamped it several times on my background using Frayed Burlap Oxide. I distressed the edges of my background with a Woodware Edge Crimper and then edged with Frayed Burlap Oxide using a Smoothie. I matted onto Black Card and then Coconut White Card.

I cut die #1 from the Industrial Chic Background into a strip of Chestnut Card twice. I glued it to a piece of Black Card and then trimmed to fit my background. I glued it in place.

I cut die #3 from the Industrial Chic Frame & Tag Die Set out of Black Card and the Ransom Note Birthday Die out of Chestnut Card.

I completed my card by adding some elements from the Industrial Chic Mixed Essentials cut from Chestnut and Black Card.

Thanks for stopping by.

Julia.
www.juliawattscrafts.co.uk