Hi Bloggers.
Happy New Year to you all!
A bit of a two-fer for you today as I have included the card I demoed at the bottom of this post -
For the background, I stamped one of the images from the Festive Flurry Celebrations Stamp Set onto Coconut White Card several times using Jet Black Archival. I then misted quite closely with Scarlet Sunrise CS Ink Spray Mist.
I cut the largest 2 dies in the Portuguese Background Die Set into a piece of Coconut White Card. I added a Double Pierced Background Rectangle to cut them out. I misted a piece of Coconut White Card with Scarlet Sunrise Mister. I glued it to the back of my frame. I slotted die #5 back into the frame and cut. I added to my background using Woodware Foam Tape.
I matted onto a piece of Coconut White Card then Black Card and then another piece of Coconut White.
I made up a cocktail glass using the 3D Cosmopolitan Die Set. I added CS Glue and CS Crystal Chips Glitter Jewels to the top of the Acetate on the glass.
I stamped the sentiment from the Cheers to You Stamp Set using Jet Black Archival. I cut it out using the Pierced Flags Die Set, switching the 'v' of the flag to make it double-ended.
Here's the version I made on air - I had to improvise a bit as we'd sold out of the Cheers to You Stamp Set and I had made this card with Milk Card rather than Coconut White so had to stamp onto a piece of misted card. The frame is made using the Double Stitched Rectangles, the banner from the Stitched Flags, the sentiment is from Lisa's Festive Flurry Celebrations Stamp Set and I've used Marigold CS Ink Spray Mist -
Thanks for stopping by.
Julia.
www.juliawattscrafts.co.uk
Free card with all website orders over £10 (Add a note to your order in your cart).
Showing posts with label Lisa Horton. Show all posts
Monday, 1 January 2018
Friday, 8 December 2017
Freebie Friday
Hi Bloggers.
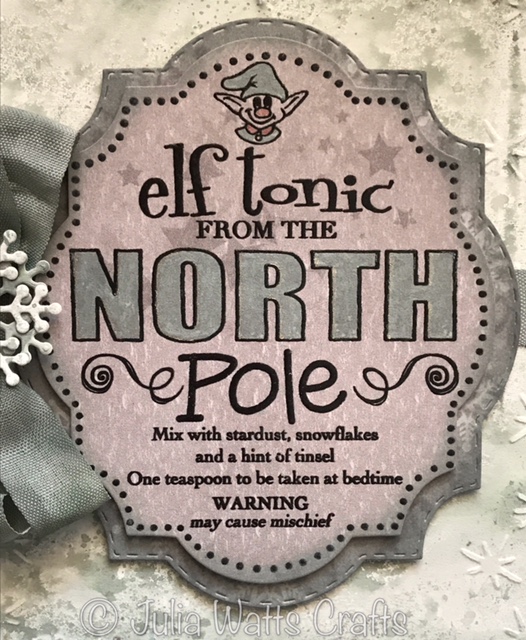
It's Freebie Friday again. Here's this week's Christmas Card that needs a new home -
I don't think that this card has actually been blogged, at least I can't find it. So, here's a list of products used -
Woodware - Elf Tonic Tag
Iced Spruce Distress Oxide
Onyx Black Versafine
CS Matt Clear Embossing Powder
Sue Wilson Dies - Holly Lattice Frame, Looped Snowflake Frame
Lisa Horton Christmas Wishes 8 x 8 Paper Pad
Creative Expressions Sparkle Flakes Embossing Folder
Sakura Clear Star Stardust Pen
Water Brush
Blue White American Seam Binding
CS Iced Crystals Glitter Jewels
5mm White Pearls
Card - Coconut White, Black
Leave a lovely comment below to go into the draw to win it. I will announce the winner on Monday. Be sure to pop back to see if you have won.
Please note : Only comments left below will go into the draw. Comments made on the original post will not count. Information given on the original post was correct at the time that post was published.
I've just received stock of some lovely Lavinia stamps. These stamps are absolutely gorgeous. I've stocked a selection of fairies, foliage and the Fairy House which I just couldn't resist. You can find them all here.
Thanks for stopping by.
Julia.
www.juliawattscrafts.co.uk
It's Freebie Friday again. Here's this week's Christmas Card that needs a new home -
I don't think that this card has actually been blogged, at least I can't find it. So, here's a list of products used -
Woodware - Elf Tonic Tag
Iced Spruce Distress Oxide
Onyx Black Versafine
CS Matt Clear Embossing Powder
Sue Wilson Dies - Holly Lattice Frame, Looped Snowflake Frame
Lisa Horton Christmas Wishes 8 x 8 Paper Pad
Creative Expressions Sparkle Flakes Embossing Folder
Sakura Clear Star Stardust Pen
Water Brush
Blue White American Seam Binding
CS Iced Crystals Glitter Jewels
5mm White Pearls
Card - Coconut White, Black
Leave a lovely comment below to go into the draw to win it. I will announce the winner on Monday. Be sure to pop back to see if you have won.
Please note : Only comments left below will go into the draw. Comments made on the original post will not count. Information given on the original post was correct at the time that post was published.
I've just received stock of some lovely Lavinia stamps. These stamps are absolutely gorgeous. I've stocked a selection of fairies, foliage and the Fairy House which I just couldn't resist. You can find them all here.
Thanks for stopping by.
Julia.
www.juliawattscrafts.co.uk
Monday, 20 November 2017
Industrial Chic and Oxides
Hi Bloggers.
I have one last sample featuring dies from the Industrial Chic Collection (I do actually have one more but that's for my workshop on Saturday).
For the background, I started by scrunching up a piece of Coconut White Card. I opened it out an touched the peaks of the card with Frayed Burlap Distress Oxide. I misted with water and left it a couple of minutes for the ink to move a little. I then ironed it with my Encaustic Iron to flatten out my card and stop the ink from moving any more. I used the crackle stamp from Lisa Horton's Textures Stamp Set and stamped it several times on my background using Frayed Burlap Oxide. I distressed the edges of my background with a Woodware Edge Crimper and then edged with Frayed Burlap Oxide using a Smoothie. I matted onto Black Card and then Coconut White Card.
I cut die #1 from the Industrial Chic Background into a strip of Chestnut Card twice. I glued it to a piece of Black Card and then trimmed to fit my background. I glued it in place.
I cut die #3 from the Industrial Chic Frame & Tag Die Set out of Black Card and the Ransom Note Birthday Die out of Chestnut Card.
I completed my card by adding some elements from the Industrial Chic Mixed Essentials cut from Chestnut and Black Card.
Thanks for stopping by.
Julia.
www.juliawattscrafts.co.uk
I have one last sample featuring dies from the Industrial Chic Collection (I do actually have one more but that's for my workshop on Saturday).
For the background, I started by scrunching up a piece of Coconut White Card. I opened it out an touched the peaks of the card with Frayed Burlap Distress Oxide. I misted with water and left it a couple of minutes for the ink to move a little. I then ironed it with my Encaustic Iron to flatten out my card and stop the ink from moving any more. I used the crackle stamp from Lisa Horton's Textures Stamp Set and stamped it several times on my background using Frayed Burlap Oxide. I distressed the edges of my background with a Woodware Edge Crimper and then edged with Frayed Burlap Oxide using a Smoothie. I matted onto Black Card and then Coconut White Card.
I cut die #1 from the Industrial Chic Background into a strip of Chestnut Card twice. I glued it to a piece of Black Card and then trimmed to fit my background. I glued it in place.
I cut die #3 from the Industrial Chic Frame & Tag Die Set out of Black Card and the Ransom Note Birthday Die out of Chestnut Card.
I completed my card by adding some elements from the Industrial Chic Mixed Essentials cut from Chestnut and Black Card.
Thanks for stopping by.
Julia.
www.juliawattscrafts.co.uk
Saturday, 18 November 2017
Industrial Chic One Day Special continues today
Hi Bloggers.
Back from a great beady week - I will share some photos next week, after I've had chance to take some pics. Unfortunately, our cat, Smokey, died on Tuesday. It was very sudden. A neighbour found her and brought her round to our house. The vet thinks that she had a heart attack. Totally unexpected as she was very healthy, very active and only 10 years old 😿. I've put a couple of pics of Smokey at the end of this post.
Lisa Horton continues with her One Day Special on Hochanda today with Sue Wilson's Industrial Chic Collection with shows at 9am, 1pm and 5pm.
Here's another card that I made featuring the dies -
The background was one that I made as a demo at the recent workshop I ran with Leonie Pujol.
I dusted a piece of Coconut White Card with an Anti-Static Pad. I stamped some of the stamps from the Woodware Pocket Watches Stamp Set using Onyx Black Versafine Ink. I added CS Matt Clear Embossing Powder and heat set. I misted a little CS Phill Martin Misters in Sunshine Yellow, Lime Burst and Purple Paradise onto my background. I dabbed off excess ink with a little Kitchen Roll which also transferred a little of the ink to other areas. I inked around the edges with CS Lime Burst Colour Cloud using a Smoothie. I misted a little of the Purple Paradise Mister onto my Craft Sheet and picked it up with a paint brush to colour the butterflies. I repeated the process with Lime Burst and coloured some of the areas on the pocket watches. I matted onto Black Card and then Coconut White.
I cut the sentiment from the Inspirational Words die set out of Black Gloss Card.
I cut the Industrial Chic Swirl out of Black Gloss Card.
I cut the head from the Industrial Chic Mixed Essentials out of Black Gloss Card.
I'm offering 10% off items from Lisa's shows on my website. You can find them here. Please enter STEAMPUNK in the discount code box at checkout to activate your discount. Offer valid till midnight tonight or while stocks last.
Thanks for stopping by.
Julia.
www.juliawattscrafts.co.uk
Back from a great beady week - I will share some photos next week, after I've had chance to take some pics. Unfortunately, our cat, Smokey, died on Tuesday. It was very sudden. A neighbour found her and brought her round to our house. The vet thinks that she had a heart attack. Totally unexpected as she was very healthy, very active and only 10 years old 😿. I've put a couple of pics of Smokey at the end of this post.
Lisa Horton continues with her One Day Special on Hochanda today with Sue Wilson's Industrial Chic Collection with shows at 9am, 1pm and 5pm.
Here's another card that I made featuring the dies -
The background was one that I made as a demo at the recent workshop I ran with Leonie Pujol.
I dusted a piece of Coconut White Card with an Anti-Static Pad. I stamped some of the stamps from the Woodware Pocket Watches Stamp Set using Onyx Black Versafine Ink. I added CS Matt Clear Embossing Powder and heat set. I misted a little CS Phill Martin Misters in Sunshine Yellow, Lime Burst and Purple Paradise onto my background. I dabbed off excess ink with a little Kitchen Roll which also transferred a little of the ink to other areas. I inked around the edges with CS Lime Burst Colour Cloud using a Smoothie. I misted a little of the Purple Paradise Mister onto my Craft Sheet and picked it up with a paint brush to colour the butterflies. I repeated the process with Lime Burst and coloured some of the areas on the pocket watches. I matted onto Black Card and then Coconut White.
I cut the sentiment from the Inspirational Words die set out of Black Gloss Card.
I cut the Industrial Chic Swirl out of Black Gloss Card.
I cut the head from the Industrial Chic Mixed Essentials out of Black Gloss Card.
I'm offering 10% off items from Lisa's shows on my website. You can find them here. Please enter STEAMPUNK in the discount code box at checkout to activate your discount. Offer valid till midnight tonight or while stocks last.
Thanks for stopping by.
Julia.
www.juliawattscrafts.co.uk
Friday, 17 November 2017
Lisa Horton One Day Special Shows on Hochanda today
Hi Bloggers.
Lisa Horton is launching a new One Day Special on Hochanda at 6pm. I have made a few samples for the shows so I'm sharing one today -
The background has been created by mopping up waste Distress Oxide Inks. Whatever ink was left on my Craft Sheet has been misted with water and picked up onto a piece of Milk Card. The colours on there are Broken China, Fired Brick and Vintage Photo.
I stamped some cogs from an old very loved stamp set from Creative Expressions Stamp Set called Vintage Inventor using Fired Brick and Vintage Photo Distress Oxide. I placed the Creative Expressions Vintage Diamond Mini Stencil on the bottom right of my background and spread some CS Clear Texture Paste through it. I repeated this in the top left hand side and put aside to dry.
I wondered if the Distress Oxide Ink would ride to the surface of the Texture Paste but it did not - this could have been because the background ink had been really dry (from a demo). If it had just been made then perhaps some of the ink might have moved in the Texture Paste? Something to try!
Once my Texture Paste was dry, I placed the Mini Stencil back on top and inked through with Vintage Photo Distress Oxide to make the design a bit more prominent.
I went around the edges with a Woodware Edge Crimper and then edged with Vintage Photo and Fired Brick Distress Oxides. I matted onto Black Card and then Milk Card.
I cut dies #2 and #3 together from the Industrial Chic Background out of Milk Card twice.
I cut the largest die in the Industrial Chic Frame & Tag Die Set out of Chestnut Card. I cut the Ransom Note Birthday Die out of some more of my mopped up ink card.
I painted a Flourish Pop-em with Tarnished Silver CS Shimmer Paint. I added Marigold CS Metallic Lustre Paint - I added a good thick coat. I heated it and it bubbled a bit. I then added some Chocolate Gold CS Metallic Lustre Paint - again quite a thick coat. I heated it and it bubbled some more. Looks good, doesn't it?
I cut a few of the dies from the Industrial Chic Mixed Essentials Die Set out of Black Gloss Card.
I'm offering 10% off items from the shows on my website. You can find them here. Please enter STEAMPUNK in the discount code box at checkout to activate your discount. Offer valid till midnight tomorrow night or while stocks last. Lisa has another show at 8pm tonight and then more shows at 9am, 1pm and 5pm tomorrow.
Thanks for stopping by.
Julia.
www.juliawattscrafts.co.uk
Lisa Horton is launching a new One Day Special on Hochanda at 6pm. I have made a few samples for the shows so I'm sharing one today -
The background has been created by mopping up waste Distress Oxide Inks. Whatever ink was left on my Craft Sheet has been misted with water and picked up onto a piece of Milk Card. The colours on there are Broken China, Fired Brick and Vintage Photo.
I stamped some cogs from an old very loved stamp set from Creative Expressions Stamp Set called Vintage Inventor using Fired Brick and Vintage Photo Distress Oxide. I placed the Creative Expressions Vintage Diamond Mini Stencil on the bottom right of my background and spread some CS Clear Texture Paste through it. I repeated this in the top left hand side and put aside to dry.
I wondered if the Distress Oxide Ink would ride to the surface of the Texture Paste but it did not - this could have been because the background ink had been really dry (from a demo). If it had just been made then perhaps some of the ink might have moved in the Texture Paste? Something to try!
Once my Texture Paste was dry, I placed the Mini Stencil back on top and inked through with Vintage Photo Distress Oxide to make the design a bit more prominent.
I went around the edges with a Woodware Edge Crimper and then edged with Vintage Photo and Fired Brick Distress Oxides. I matted onto Black Card and then Milk Card.
I cut dies #2 and #3 together from the Industrial Chic Background out of Milk Card twice.
I cut the largest die in the Industrial Chic Frame & Tag Die Set out of Chestnut Card. I cut the Ransom Note Birthday Die out of some more of my mopped up ink card.
I painted a Flourish Pop-em with Tarnished Silver CS Shimmer Paint. I added Marigold CS Metallic Lustre Paint - I added a good thick coat. I heated it and it bubbled a bit. I then added some Chocolate Gold CS Metallic Lustre Paint - again quite a thick coat. I heated it and it bubbled some more. Looks good, doesn't it?
I cut a few of the dies from the Industrial Chic Mixed Essentials Die Set out of Black Gloss Card.
I'm offering 10% off items from the shows on my website. You can find them here. Please enter STEAMPUNK in the discount code box at checkout to activate your discount. Offer valid till midnight tomorrow night or while stocks last. Lisa has another show at 8pm tonight and then more shows at 9am, 1pm and 5pm tomorrow.
Thanks for stopping by.
Julia.
www.juliawattscrafts.co.uk
Wednesday, 15 November 2017
Woven 3 Die Christmas Card
Hi Bloggers.
I have a Christmas Card with a woven background for you today.
For the weave on this one, I cut the Classic Weaving Die out of Milk Card, I cut the Intermediate Weaving Die out of Rich Red Card and the Striped Weaving Die out of Antique Gold Pearl Card. I cut the Red and the Gold die cuts in half lengthways. I then glued the 2 Red pieces together offsetting them to fill in the gaps. I cut them into pieces that were 2 strips wide. I also glued the 2 Gold pieces together offsetting them to fill in the gaps. I cut them into pieces that were 4 strips wide.
4 strips of a Striped die cut = the width of 1 Classic and 2 strips of an Intermediate die cut = the width of 1 Classic. So, here, we basically have a 1 x 1 Classic weave in terms of how quick and easy it is.
As you can see, I have woven 2 strips of Red Intermediate through the Milk Classic then 4 strips of Gold Striped through and so on until my weave was complete.
I made a frame out of Milk Card using Sue Wilson's Scalloped Lattice Frames Set B and added it to my woven background using Woodware Foam Tape. I matted onto Milk, Rich Red, Antique Gold Pearl and another piece of Milk Card.
I cut the sentiment out of Rich Red and Antique Gold Pearl Card using Lisa Horton's Christmas Wishes Die Set.
I cut the Poinsettia Cluster Die Set out of Rich Red and Antique Gold Pearl Card and added a 5mm Cream Pearl to the centre of the flowers.
Thanks for stopping by.
Julia.
www.juliawattscrafts.co.uk
I have a Christmas Card with a woven background for you today.
For the weave on this one, I cut the Classic Weaving Die out of Milk Card, I cut the Intermediate Weaving Die out of Rich Red Card and the Striped Weaving Die out of Antique Gold Pearl Card. I cut the Red and the Gold die cuts in half lengthways. I then glued the 2 Red pieces together offsetting them to fill in the gaps. I cut them into pieces that were 2 strips wide. I also glued the 2 Gold pieces together offsetting them to fill in the gaps. I cut them into pieces that were 4 strips wide.
4 strips of a Striped die cut = the width of 1 Classic and 2 strips of an Intermediate die cut = the width of 1 Classic. So, here, we basically have a 1 x 1 Classic weave in terms of how quick and easy it is.
As you can see, I have woven 2 strips of Red Intermediate through the Milk Classic then 4 strips of Gold Striped through and so on until my weave was complete.
I cut the sentiment out of Rich Red and Antique Gold Pearl Card using Lisa Horton's Christmas Wishes Die Set.
I cut the Poinsettia Cluster Die Set out of Rich Red and Antique Gold Pearl Card and added a 5mm Cream Pearl to the centre of the flowers.
Thanks for stopping by.
Julia.
www.juliawattscrafts.co.uk
Saturday, 14 October 2017
Jolly Tag with Clear Ultra Thick Embossing Crystals and Crystal Drops
Hi Bloggers.
A series of quickie posts over the next week or so as I'm heading off to Norfolk today for a workshop in Sheringham tomorrow, then I have 5 days beading and then head down to the New Forest for a workshop in Lyndhusrt next Saturday. I'm not sure if the Wifi will be kind where I am so I have scheduled quickie posts and will add more info if I get chance.
Please note : orders placed on my website during the next week will not be posted out until Monday 23rd October onwards. Special order items will take a little longer than usual. Apologies for any inconvenience caused.
Here's today's project -
Products used -
Wendy Vecchi Art Parts - Tag Toppers & The Guys, Studio 490 Stamp Set - Parisian Art
Distress Oxides - Faded Jeans & Broken China
Cosmic Shimmer - White Gesso, Acrylic Mixed Media Paint - Chelsea Blue, Glitterbitz - Turquoise, Diamond Frost - Sparkle Star, Clear Ultra Thick Embossing Crystals, Crystal Drops - Teal
That Special Touch Mask - Wavy
Lisa Horton - Christmas Wishes Die Set
Efcolor Stove
Coconut White Card
Blue White American Seam Binding
Lisa Horton is launching a new One Day Special on Hochanda today at 6pm with some lovely Sue Wilson dies. I'm offering 10% discount on items I have in stock on my website from the shows, You can find them here. You need to enter code LISAHORTON in the discount code box at checkout. Offer applies till midnight tomorrow night or while stocks last.
Thanks for stopping by.
Julia.
www.juliawattscrafts.co.uk
A series of quickie posts over the next week or so as I'm heading off to Norfolk today for a workshop in Sheringham tomorrow, then I have 5 days beading and then head down to the New Forest for a workshop in Lyndhusrt next Saturday. I'm not sure if the Wifi will be kind where I am so I have scheduled quickie posts and will add more info if I get chance.
Please note : orders placed on my website during the next week will not be posted out until Monday 23rd October onwards. Special order items will take a little longer than usual. Apologies for any inconvenience caused.
Here's today's project -
Wendy Vecchi Art Parts - Tag Toppers & The Guys, Studio 490 Stamp Set - Parisian Art
Distress Oxides - Faded Jeans & Broken China
Cosmic Shimmer - White Gesso, Acrylic Mixed Media Paint - Chelsea Blue, Glitterbitz - Turquoise, Diamond Frost - Sparkle Star, Clear Ultra Thick Embossing Crystals, Crystal Drops - Teal
That Special Touch Mask - Wavy
Lisa Horton - Christmas Wishes Die Set
Efcolor Stove
Coconut White Card
Blue White American Seam Binding
Lisa Horton is launching a new One Day Special on Hochanda today at 6pm with some lovely Sue Wilson dies. I'm offering 10% discount on items I have in stock on my website from the shows, You can find them here. You need to enter code LISAHORTON in the discount code box at checkout. Offer applies till midnight tomorrow night or while stocks last.
Thanks for stopping by.
Julia.
www.juliawattscrafts.co.uk
Sunday, 8 October 2017
Easy Peasy Glitterbitz Snow Globe Scene
Hi Bloggers.
I had a great day yesterday with lots of good friends at Domino Crafts.
Here's today's card -
I started by popping a piece of CE Double Sided Self Adhesive Sheet onto Coconut White Card. I cut the outer die from Sue Wilson's Santa's Reindeer Snow Globe Scene from it. I trimmed just a little from around the edges. I cut both of the dies from the set out of Brunswick Green Card. I peeled away the backing from the adhesive on my plain die cut and added my decorative die cut. I added CS Apple Red Glitterbitz to the exposed adhesive.
I embossed a piece of card using the Creative Expressions Tied Holly Embossing Folder. I edged it with Fired Brick Distress Oxide using a Smoothie. I matted onto Brunswick Green Card and then Rich Red Card.
I wrapped a piece of Baker's Twine from the back of the card to the frontand then added my Snow Globe Scene. I tied a bow out of Baker's Twine and glued it to the top of the Scene to make it look loke a bauble. I added 3mm White Pearls to the snowflakes. I matted my card onto another piece of Coconut White Card.
I popped some more DS Adhesive Sheet onto some Coconut White Card. I peeled away the backing sheet and added Apple Red Glitterbitz. I cut the sentiment from Lisa Horton's Stylish Script Season's Greetings Die Set from it.
Thanks for stopping by.
Julia.
www.juliawattscrafts.co.uk
I had a great day yesterday with lots of good friends at Domino Crafts.
Here's today's card -
I started by popping a piece of CE Double Sided Self Adhesive Sheet onto Coconut White Card. I cut the outer die from Sue Wilson's Santa's Reindeer Snow Globe Scene from it. I trimmed just a little from around the edges. I cut both of the dies from the set out of Brunswick Green Card. I peeled away the backing from the adhesive on my plain die cut and added my decorative die cut. I added CS Apple Red Glitterbitz to the exposed adhesive.
I embossed a piece of card using the Creative Expressions Tied Holly Embossing Folder. I edged it with Fired Brick Distress Oxide using a Smoothie. I matted onto Brunswick Green Card and then Rich Red Card.
I wrapped a piece of Baker's Twine from the back of the card to the frontand then added my Snow Globe Scene. I tied a bow out of Baker's Twine and glued it to the top of the Scene to make it look loke a bauble. I added 3mm White Pearls to the snowflakes. I matted my card onto another piece of Coconut White Card.
I popped some more DS Adhesive Sheet onto some Coconut White Card. I peeled away the backing sheet and added Apple Red Glitterbitz. I cut the sentiment from Lisa Horton's Stylish Script Season's Greetings Die Set from it.
Thanks for stopping by.
Julia.
www.juliawattscrafts.co.uk
Tuesday, 3 October 2017
Season's Greetings with a bit of sparkle
Hi Bloggers.
Here's today's card -
For my background, I spread some CS Phill Martin Platinum Sparkle Texture Paste through The Snow is Falling Mask and put aside to dry (under and hour).
I cut both of the dies from Sue Wilson's Here Comes Santa Snow Globe Scene together out of Coconut White Card. I popped a piece of Double Sided Self Adhesive Sheet onto Coconut White Card and cut the outer die only from it. I trimmed away just a little from the edges, peeled away the backing and added my decorative die cut. I added Midnight Sparkle CS Glitterbitz to the exposed adhesive. I cut a Double Pierced Circle out of Black Card which was just large enough to pop out behind my santa piece.
I cut the sentiment from Lisa Horton's Stylish Script : Season's Greetings Die Set out of Coconut White and Black Card. I glued them together, offsetting them slightly to create a drop shadow.
Once my background was dry, I matted onto Black Card and then Coconut White Card I edged my background with CS Glue and added CS Crystal Stars Glitter Jewels.
Thanks for stopping by.
Julia.
www.juliawattscrafts.co.uk
Here's today's card -
For my background, I spread some CS Phill Martin Platinum Sparkle Texture Paste through The Snow is Falling Mask and put aside to dry (under and hour).
I cut both of the dies from Sue Wilson's Here Comes Santa Snow Globe Scene together out of Coconut White Card. I popped a piece of Double Sided Self Adhesive Sheet onto Coconut White Card and cut the outer die only from it. I trimmed away just a little from the edges, peeled away the backing and added my decorative die cut. I added Midnight Sparkle CS Glitterbitz to the exposed adhesive. I cut a Double Pierced Circle out of Black Card which was just large enough to pop out behind my santa piece.
I cut the sentiment from Lisa Horton's Stylish Script : Season's Greetings Die Set out of Coconut White and Black Card. I glued them together, offsetting them slightly to create a drop shadow.
Once my background was dry, I matted onto Black Card and then Coconut White Card I edged my background with CS Glue and added CS Crystal Stars Glitter Jewels.
Thanks for stopping by.
Julia.
www.juliawattscrafts.co.uk
Monday, 2 October 2017
Woven Background with some of Lisa Horton's Dies
Hi Bloggers.
I spent most of yesterday trying to fix some of the problems with my new website. Not completely there yet but I think I have made some progress and I've added a couple of new features. The prices are now displayed including VAT (yay!). There's now a Wishlist feature, you can request an email if a product comes back in stock and you can now purchase Gift Vouchers - tell your family about that one! I am still working on re-instating international shipping and the navigation is still an outstanding fix - it all takes time which is still in short supply this month.
I thought I'd share this card today for Helen who is a regular attendee of my local workshops -
For the weave, I cut the Sue Wilson's Intermediate Weaving Die out of Tan Card twice and the Striped Weaving Die out of Deep Blue Card twice. I glued one of the Deep Blue die cuts on top of one of the Tan ones at the ends only, offsetting them to fill in the gaps. I wove a tan strip from the Intermediate through my base and then a pair of strips from my blue strips. I repeated this pattern all the way across.
I made a frame out of Tan Card using dies #2 and #4 from Sue's Scalloped Lattice Frames Set B. I added it to my woven background using Woodware 2mm Foam Tape. I matted onto Deep Blue and then Tan Card.
I cut the reindeers out of Chestnut, Deep Blue, Rich Red, Black and Milk Card using Lisa Horton's Reindeer Pals Die Set.
I cut the sleigh and parcels out of Deep Blue and Tan Card using Lisa's Sleigh Die Set.
I cut the sentiment out of Rich Red Card using Lisa's Season's Greetings Die Set.
The winner of the card from Freebie Friday on 29th September is .................................
I spent most of yesterday trying to fix some of the problems with my new website. Not completely there yet but I think I have made some progress and I've added a couple of new features. The prices are now displayed including VAT (yay!). There's now a Wishlist feature, you can request an email if a product comes back in stock and you can now purchase Gift Vouchers - tell your family about that one! I am still working on re-instating international shipping and the navigation is still an outstanding fix - it all takes time which is still in short supply this month.
I thought I'd share this card today for Helen who is a regular attendee of my local workshops -
For the weave, I cut the Sue Wilson's Intermediate Weaving Die out of Tan Card twice and the Striped Weaving Die out of Deep Blue Card twice. I glued one of the Deep Blue die cuts on top of one of the Tan ones at the ends only, offsetting them to fill in the gaps. I wove a tan strip from the Intermediate through my base and then a pair of strips from my blue strips. I repeated this pattern all the way across.
I made a frame out of Tan Card using dies #2 and #4 from Sue's Scalloped Lattice Frames Set B. I added it to my woven background using Woodware 2mm Foam Tape. I matted onto Deep Blue and then Tan Card.
I cut the reindeers out of Chestnut, Deep Blue, Rich Red, Black and Milk Card using Lisa Horton's Reindeer Pals Die Set.
I cut the sleigh and parcels out of Deep Blue and Tan Card using Lisa's Sleigh Die Set.
I cut the sentiment out of Rich Red Card using Lisa's Season's Greetings Die Set.
The winner of the card from Freebie Friday on 29th September is .................................
julsthomas
Please email me at juliawattscrafts@gmail.com with your address and I'll pop your card in the post.
Thanks for stopping by.
Julia.
www.juliawattscrafts.co.uk
Julia.
www.juliawattscrafts.co.uk
Subscribe to:
Posts (Atom)


