Showing posts with label Stamps to Die For. Show all posts

Thursday, 14 December 2017

Julia's Sunflower Posy

Hi Bloggers.

Here's today's card -

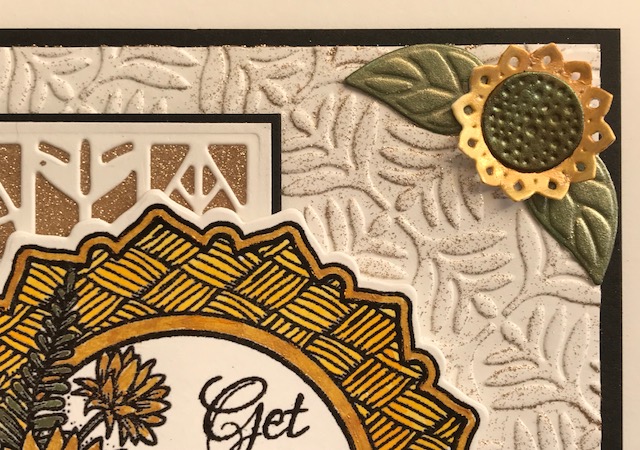
For the background on this one, I embossed a piece of Coconut White Card using the Creative Expressions Leafy Quad Embossing Folder. I added CS Golden Sand Glitter Kiss lightly all over. I matted onto Black Card and then onto Coconut White Card.

I cut the Linear Leaf Background into a piece of Coconut White Card. I added a piece of CE Double Sided Self Adhesive Sheet to the back. I turned it over and added CS Golden Sand Polished Silk Glitter to the exposed adhesive. I matted onto Black Card and added to my background using CE Mounting Cushion.

I stamped the CE Julia's Sunflower Posy onto a piece of Coconut White Card using Onyx Black Versafine Ink. I stamped the sentiment from the CE Petite Lavish Sentiments Stamp Set. I added CS Clear Embossing Powder and heat set. I coloured in using CS Pixie Powders - I used Straw Yellow, Bronze Blush and Pale Olive. I also used Bright Sunshine CS Phill Martin Ink Spray Mist on the basketweave on the image. I cut it out using the largest die in the Julia Die Set.


I cut some flowers and leaves out of Coconut White Card using the Sunflower Bouquet Die Set. I painted then with Pixie Powders - Pale Olive on the leaves, Straw Yellow on main part of the flower and Bronze Blush on the Centres of the flowers. I shaped them a little and added them to the corners of my card.

I completed my card by adding a 5mm White Pearl to the left hand corners.

Francoise Read is launching a new One Day Special at 6pm today with her latest stamp release - there are some real beauties in there! I'm offering 10% off items from the shows on my website. You can find them here. Please enter FRANCOISE in the discount code box at checkout to activate your discount. Offer valid till midnight tomorrow night or while stocks last. Francoise has another show at 8pm tonight and then more shows at 9am, 1pm and 5pm tomorrow.


Don't forget that I'm still offering 30% discount on all items in our Christmas section (here) till midnight on 18th December. Enter CHRISTMAS in the discount code box at checkout to activate your discount.

Thanks for stopping by.

Julia.
www.juliawattscrafts.co.uk

Tuesday, 12 December 2017

Julia's Magnolia Circle with Linear Leaf Background

Hi Bloggers.

Here's today's card -

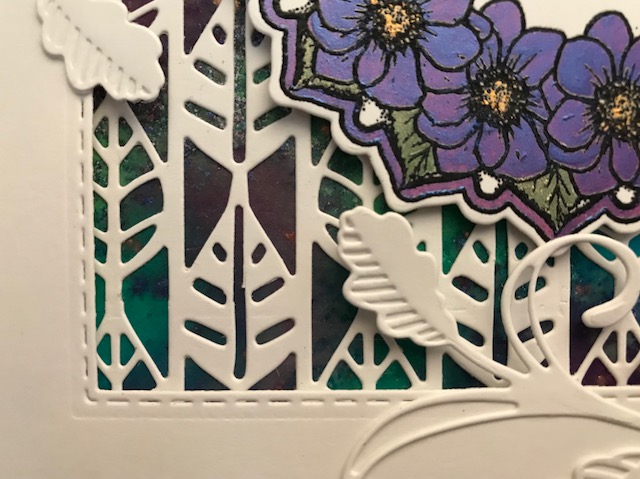
For the background, I misted a piece of Watercolour Card with Phill Martin CS Misters in Electric Blue, Lime Burst and Purple Paradise. There was a little bit of Pixie Powder from somewhere that ended up on my background too - I was fine with that. I put aside to dry.

I cut the Linear Leaf Background into a piece of Coconut White Card, extending it widthways and lengthways as described in this post.

Once my misted background was dry, I added my Linear Leaf Background. I made a frame using dies #2 and #4 from the Stitched Square Peg Board Die Set and added it to my backgrounds using Woodware Foam Tape. I matted onto a couple of pieces of Coconut White Card.


I stamped the Julia's Magnolia Circle Stamp to Die For onto Coconut White Card using Onyx Black Versafine. I stamped the sentiment from the Petite Lavish Sentiments. I added CS Clear Detail Embossing Powder and heat set. I coloured in using Pixie Powders - Aubergine Dream, Straw Yellow and Pale Olive. I cut out using the largest die in the Julia Die Set.

I cut some leaves out of Coconut White Card using the Oak Leaf Swag Die Set. I made some flowers out of some more of my misted background and Coconut White Card using the Spiral Flower Die Set.


Lisa Horton has shows on Hochanda today at 11am, 4pm and 7pm. I don't have many of the items on the shows, but those I do have can be found here. There's 10% discount on them for today only. Please enter LISAHORTON in the discount code box at checkout to activate your discount.

Don't forget you tell your family that we do gift vouchers if they're struggling to come up with gift ideas for you!

Thanks for stopping by.

Julia.
www.juliawattscrafts.co.uk

Sunday, 10 December 2017

Pretty in Pink Julia's Magnolia Circle

Hi Bloggers.

Here's today's card -

I stamped the Julia's Magnolia Circle onto Coconut White Card using Onyx Black Versafine. I stamped the sentiment from the Petite Lavish Sentiments Stamp Set. I added CS Clear Embossing Powder and heat set.

I coloured in using Lush Pink CS Phill Martin Ink Mister, Pale Olive and Bronze Blush CS Pixie Powders. I cut it out using the largest die in the Julia die set. I cut dies #4 and #5 from the Julia Die Set out of Coconut White Card twice. I added them to the back of my stamped piece.

I embossed a piece of Black Card using the CE Fauna Embossing Folder. I matted onto Coconut White Card cut using the Stitched Square Peg Board Die Set, then onto Black Card and finally another piece of Coconut White Card.

I misted a piece of Blue White American Seam Binding with Lush Pink Mister - I wanted it patchy, not completely covered. I dried it using my Heat Tool, tied a little bow and added an 8mm White Pearl to the centre of the bow.

I completed my card by adding a 5mm White Pearl to the corners of my embossed background.

Phill Martin is continuing with his One Day Special on Hochanda today with shows at 9am, 1pm and 5pm. I'm offering 10% off items from the shows on my website. You can find them here. Please enter PHILLMARTIN in the discount code box at checkout to activate your discount. Offer valid till midnight tonight or while stocks last.

Thanks for stopping by.

Julia.
www.juliawattscrafts.co.uk

Thursday, 7 December 2017

Another Julia Background

Hi Bloggers.

Here's today's card -

For the lacy background on this one, I used the smallest die in the Julia Die Set and cut it lots of times into a piece of Coconut White Card. For the coloured background behind it, I used a piece of Watercolour Card. I misted it with Bright Sunshine and Tangy Tangerine CS Phill Martin Misters.I sprinkled over some Straw Yellow and Burnt Orange CS Pixie Powders and misted with water. I moved some of the excess ink around using a piece of Kitchen Roll, taking care not to remove too much of the mica powder contained in the Pixie Powder.

Once my Mister/Pixie Background was dry, I glued my Julia Backround to it. I made a frame using dies #2 and #4 from the Stitched Square Peg Board Die Set and added it to my backgrounds using Woodware Foam Tape. I matted onto a couple of pieces of Coconut White Card.

I stamped the Julia's Sunflower Posy Stamp onto Coconut White Card using Onyx Black Versafine Ink. I stamped the sentiment from the CE Petite Lavish Sentiments Stamp Set. I added CS Clear Embossing Powder and heat set.

I coloured in using CS Phill Martin Misters in Bright Sunshine, Tangy Tangerine and Lime Burst - I just misted a little on to my Craft Sheet and picked it up with a Paint Brush. I mixed Tangy Tangerine with a little Lime Burst for the centre of the flowers. I cut the design out using the largest die in the Julia Die Set.

I created another background with Lime Burst Mister and Pale Olive and Bronze Blush Pixie Powders. Once dry, I cut out a pair of Oak Leaf Swags.

I cut 3 sizes of flower from the Sunflower Bouquet Die Set out of some of my orange mister/pixie background that I had left over. For the centres of the flowers, I popped a little CE Double Sided Self Adhesive Sheet onto a piece of Dark Roast Coffee Card and cut 3 flower centres. I peeled away the backing and added Medium Clear Glass Micro Beads. I cut some sunflower leaves out of Forest Card.

I completed my card by adding an 8mm White Pearl to the corners of my frame.

Thanks for stopping by.

Julia.
www.juliawattscrafts.co.uk


Sunday, 3 September 2017

Gingerbread Cookie

Hi Bloggers.

I had a lovely day at Amelia's Crafts in Studley yesterday. Lovely store if you're in the area anytime, it's well worth a visit.

Here's today's card -

I started by stamping the Creative Expressions Gingerbread Cookie Stamps to Die For onto Milk Card using Onyx Black Versafine Ink. I stamped the sentiment from the Creative Expressions Santa's Sentiments Stamp Set in the centre. I cut out using the largest die in Sue Wilson's Scalloped Snowflake Frame Die Set.

I coloured the gingerbread men in by adding some Terracotta CS Chalk Cloud to my Craft Sheet and picking it up with a Water Brush. I coloured the ribbons on the image with Rich Crimson Intense Pigment Stain - I popped a drop in a Palette and picked it up with the tip of a Water Brush. I added the buttons using Christmas Red Stickles.

I cut the largest die in the Scalloped Snowlake Frame again but this time out of Rich Red Card. I cut the largest die in Sue's Looped Snowflake Frame out of Antique Gold Pearl Card and stacked all my die cuts up.


For the background, I ran a piece of Milk Card through the Spellbinders Platinum Machine with the Gingerbread Men Mask. Leaving the mask in place, I inked through it with Terracotta CS Chalk Cloud using a  Smoothie. I removed the mask and inked around the edges with Terracotta Chalk Cloud. I matted onto Rich Red Card and then Antique Gold Pearl Card.

I cut the corner from Sue's Poinsettia Flourish and Corner Die Set out of Rich Red Card 4 times and added them to the corners of my background using CS Glue in a Woodware Fine Tip Glue Applicator.

Thanks for stopping by.

Julia.
www.juliawattscrafts.co.uk
Free card with all website orders over £10 (ask for one in the comments box at checkout).

Tuesday, 29 August 2017

There's no place like home for Christmas

Hi Bloggers.

Here's today's card -

For the background, I spread Cosmic Shimmer Polar White Sparkle Texture Paste through the Nordic Mask onto Coconut White Card and put aside to dry ( a couple of hours).

I made a frame out of Coconut White Card using Sue Wilson's Double Pierced Squares Set B. I added my frame to my background (once dry) using 2mm Woodware Foam Tape and trimmed away the excess. I matted onto Rich Red Card, Brunswick Green Card and another piece of Coconut White Card.

I stamped the Creative Expressions Holly Coronet Stamp to Die For onto Coconut White Card using Onyx Black Versafine Ink and embossed with CS Clear Detail Embossing Powder. I coloured in using Lava Red, Rich Gold and Peacock Green Pixie Powders using a Water Brush. I cut out using the largest die in Sue's Art Deco Snowflake Die Set.

I stamped the sentiment from the Creative Expressions Santa's Sentiments Stamp Set using Versafine Ink and embossed with CS Clear Detail Embossing Powder. I cut it out using die #2 from the same set. I edged with the Versafine Ink.

I cut the largest die in Sue's Scalloped Snowflake Frame out of Rich Red Card and the largest die from Sue's Looped Snowflake Frame out of Brunswick Green Card. I stacked all my die cuts up using CE Mounting Cushion and added them to my background.

I cut the holly border from Sue's Poinsettia Flourish & Corner Die Set out of Brunswick Green Card 4 times and added them to 2 of the corners on my frame. I pressed two 8mm Pearls into Clear Perfect Medium. I added CS Ruby Slippers Brilliant Sparkle Embossing Powder and heat set. I added more Perfect Medium, more embossing powder and heat set again. I added them to my corners.

I have loaded all of the September Release of Sue Wilson Dies to my website for pre-orders. You can find them here. Orders will be dispatched 13th September onwards.

Thanks for stopping by.

Julia.
www.juliawattscrafts.co.uk
Free card with all website orders over £10 (ask for one in the comments box at checkout).

Friday, 30 June 2017

Freebie Friday

Hi Bloggers.

Here's this week's card that needs a new home -

You can read how this card was made here.

Leave a lovely comment below to go into the draw to win it. I will announce the winner on Monday. Be sure to pop back to see if you have won.

Please note : Only comments left below will go into the draw. Comments made on the original post will not count. Information given on the original post was correct at the time that post was published.

Thanks for stopping by.

Julia.
www.juliawattscrafts.co.uk
Free card with all website orders over £10 (ask for one in the comments box at checkout).
Deal of the Day today (30th June) - D
esigns by John Lockwood - Birthday Seasons Clear Stamp Set only £7.99!

Monday, 12 June 2017

One Day Special Shows on Hochanda today

Hi Bloggers.

I'm launching a new One Day Special on Hochanda today at 6pm (please note new time) with some more Sue Wilson Dies from the April release. There's another show at 8pm today (not on Freeview but available on Sky, Freesat and online).

Here's today's card -

I started by dusting a piece of Coconut White Card with ans Anti-Static Pad. I stamped the CE Black Orchid Stamp to Die For using Clear Perfect Medium and embossed with CS Denim Brilliant Sparkle Embossing Powder. I cut it out using die #4 from Sue's Bali Die Set. I stamped the sentiment from the CE Petite Lavish Sentiments Stamp Set using Cobalt Archival. I cut it out using die #2 from Sue's Indonesian Background Die Set. I cut a mat out of Midnight Blue Pearl Card using die #2 from Sue's Sumatra Die Set.

I cut die #3 and #5 together from Sue's Sumatra Die Set out of Midnight Blue Pearl Card and die #4 from the same set out of Silver Mirror Card. I glued the Mirror Die Cut behind the Midnight Blue one and then cut in half. I added it to the back of my stamped piece.

I cut die #7 from Sue's Double Pierced Squares Set B out of Coconut White Card and out of Silver Mirror Card. I cut die #5 from Sue's Indondesian Background out of the Coconut White piece. I glued this to the Silver Mirror piece. I matted onto Midnight Blue Card (with a wide border), then Silver Mirror and then Coconut White. I added my topper section and a 5mm White Pearl to each corner.

Many thanks to Sandra, Tina and Lorna for sending samples in for the shows. Their cards are on view in the Gallery Section of this blog and on my Julia Watts Crafts Facebook Page.

I'm offering 10% discount on items from the shows. You can find them here. Please be aware that some of them are special order items (shown in the item description) and orders containing those items will be dispatched in 7-10 days (to be honest, I may not be able to get any orders posted out till Thursday this week anyway as I'm at Hochanda for the next 3 days). Offer applies till midnight tomorrow night. Discount will be applied automatically at checkout.

The winner of the card from Freebie Friday on 9th June is........................................

Carolyn B

Please email me at juliawattscrafts@gmail.com with your address and I'll pop your card in the post.

Hope you can tune in later.

Thanks for stopping by.

Julia.
www.juliawattscrafts.co.uk
Free card with all website orders over £10 (ask for one in the comments box at checkout).
Deal of the Day today (12th June) - S
pellbinders Wooden Fence only £3.60!
 

Sunday, 5 February 2017

Belated Birthday Wishes

Hi Bloggers.

Here's today's card -

I've been using up some demo bits again on this card.

For the background, I spread some CS Clear Texture Paste through the Triangular Mask onto Coconut White Card. Leaving the mask in place, I sprinkled some CS Mica Powders over - I used Graceful Pink, Graceful Lilac and Graceful Mint. I removed the mask and put aside to dry.

Once dry, I made a frame out of Coconut White Card using Sue Wilson's Double Pierced Squares and Double Pierced Squares Set B. I added it to my background using 3D Foam Tape and trimmed away the excess using scissors.

I stamped the Creative Expressions Garden Song Stamp onto Coconut White Card using Jet Black Archival. I coloured in using Colour Clouds - I used Pretty In Pink, Lilac Whisper and Chic Moss. I cut out using the largest die in Sue's Bora Bora Die Set.

I coloured a piece of Coconut White Card with Pretty in Pink Colour Cloud using a Smoothie. I cut 3 sizes of Sue's Orange Blossom Complete Petals out of it twice. I cut the corresponding Orange Blossom Open Petals out of Coconut White Card. I added a little glue to the centres of the pink die cuts only and added the white open die cuts. I shaped them a little and made my flowers adding an 8mm White Pearl to the centres. I cut a pair of leaves out of Coconut White Card using Lace Edged Leaves.

I completed my card by adding a couple of Coconut White Card mats and an 8mm Pink Dazzler from the Pink Dazzler Collection to the corners of my frame.

Phill Martin is continuing with his One Day Special on Hochanda today with shows at 9am, 12noon, 4pm and 7pm. I'm offering 10% discount on items I have in stock on my website from the shows. You can find them here. Offer applies till midnight tonight or while stocks last. Discount will be applied at checkout.

Thanks for stopping by.

Julia.
www.juliawattscrafts.co.uk
Free card with all website orders over £10 (ask for one in the comments box at checkout).

Deal of the Day today (5th February) - Creative Expressions Large Embossing Folder - Blossom Brocade only £6.99!