Hi Bloggers.
Here's today's card -
The background on this one is one of my favourite techniques with Pixie Powders. To recap - I used a piece of Heat Emboss Acetate. I added CS Glue, spritzed with water and spread the glue all over using my finger. I then added Cosmic Shimmer Pixie Powders in Aqua Lagoon, Golden Mint and Ancient Copper so that all the glue was covered. I spritzed with a little more water and then added CS Frosty Dawn Diamond Frost.
I scrunched up a piece of White Tissue Paper, opened it out and added
it to my background. I dabbed it down using a piece of Kitchen Roll and
put aside to dry.
I cut dies #3 and #4 together from the Scattered Leaves Background into a piece of Coconut White Card. I added a die from the Pierced Background Rectangle Die Set and cut. I trimmed by background to fit behind the the die cut and glued into place. I waited a while for the glue to set and then slotted die #3 in the centre and cut. I matted onto a couple of pieces of Coconut White Card using a couple of layers of CE Mounting Cushion.
I cut dies #1 and #2 together out of Coconut White Card and added the remaining piece of my acetate background behind it. I glued it in place in the aperture of my frame.
I stamped the sentiment from the Creative Expressions Petite Lavish Sentiments Stamp Set onto Coconut White Card using Vivid Chartreuse Archival Ink. I cut it out using Pierced Flags. I shaped it and tucked it into the side of my frame.
I have loaded the Milton Keynes Workshops for 2018 onto my website. Guests this year include Leonie Pujol, Lisa Horton, Francoise Read, Jane Gill and Phill Martin. I'll be doing a few workshops on my own including one purely on background techniques. You can find all the workshops here.
Yesterday, I added quite a few products to the pre-loved section of my website - you can find them here. Also, just to give you a heads up - out Big Sale ends tomorrow at 5pm. You can see hundreds of items at reduced prices here.
Thanks for stopping by.
Julia.
www.juliawattscrafts.co.uk
Showing posts with label Diamond Frost. Show all posts
Tuesday, 2 January 2018
Thursday, 16 November 2017
Industrial Chic Sneak Peek
Hi Bloggers.
Lisa Horton is launching a new One Day Special on Hochanda tomorrow with the first set of dies from Sue Wilson's November Release. I had a little time so I have made some samples for the shows. I thought I would share one with you today -
My background was one that I created at a demo. I used a piece of Heat Emboss Acetate. I added some CS Glue to it. I misted with water and used my finger to spread the glue all over. I then sprinkled CS Pixies Powders all over, completely covering all of the glue. If I remember correctly, I used Aqua Lagoon, Purple Violet, Candy Pink and Pewter. I misted lightly with water and then sprinkled some CS Sparkle Star Diamond Frost and CS Silver Chrome Glitterbitz over. I scrunched up a piece of White Tissue Paper, opened it out and added it to my background. I pressed it down carefully with a piece of Kitchen Roll and then put it aside to dry (a couple of hours).
I made a frame out of Coconut White Card using Sue's Double Pierced Squares. Once my background was dry, I added my frame using Woodware Foam Tape. I matted onto a couple of pieces of Coconut White Card.
I cut the Industrial Chic Corner out of Steel Pearl Card twice and glued them to my background, tucking them inside my frame.
I cut the butterfly from the Industrial Chic Butterfly & Dragonfly Die Set out of Coconut White Card. I shaped it and glued it to my background, securing at the body and antenae only.
I cut a couple of the words from the Inspirational Words die set out of Black Gloss Card and added them to my frame as shown.
Thanks for stopping by.
Julia.
www.juliawattscrafts.co.uk
Thursday, 2 November 2017
Blue and White Intermediate and Striped Weave
Hi Bloggers.
Here's today's card -
For the weave on this one, I cut the Intermediate Weaving Die out of Coconut White Card once and the Striped Weaving Die out of Sky Blue Card. I cut the Striped die cuts into pairs and wove them through the White Intermediate die cut.
I made a frame out of Coconut White Card using the Scalloped Lattice Frames Set B and added it to my woven background using Woodware 2mm Foam Tape, trimming away the excess. I matted onto Coconut White, then Sky Blue and then another piece of Coconut White Card.
I cut the Birthday Wishes Die out of Sky Blue Card. I popped a piece of CE DS Self Adhesive Sheet onto a piece of Coconut White Card. I cut the oval die from the Thank You die set from it. I peeled away the backing sheet and added my sentiment. I added CS Sparkle Star Diamond Frost to the rest of the exposed adhesive.
I cut some leaves out of Coconut White Card using the Spring Foliage Die Set and made some flowers out of Sky Blue Card using just the open petal dies from the Striped Nasturtium Die Set.
I completed my card by adding a 5mm White Pearl to the centre of the flowers.
Thanks for stopping by.
Julia.
www.juliawattscrafts.co.uk
Saturday, 21 October 2017
Let it Snow Frame
Hi Bloggers.
Here's today's card -
Products used -
Paper Cuts - Let it Snow Frame, Jingle Bells (corners)
Creative Expressions - Double Sided Self Adhesive Sheet, Falling Snow Embossing Folder, Self Adhesive Pearls - White 3mm & 5mm
Cosmic Shimmer Diamond Frost - Sparkle Star
Sue Wilson - Double Pierced Rectangles A & B
Card - Coconut White & Cobalt
Thanks for stopping by.
Julia.
www.juliawattscrafts.co.uk
Thursday, 12 October 2017
Petite Petal Striplet
Hi Bloggers.
Here's today's card -
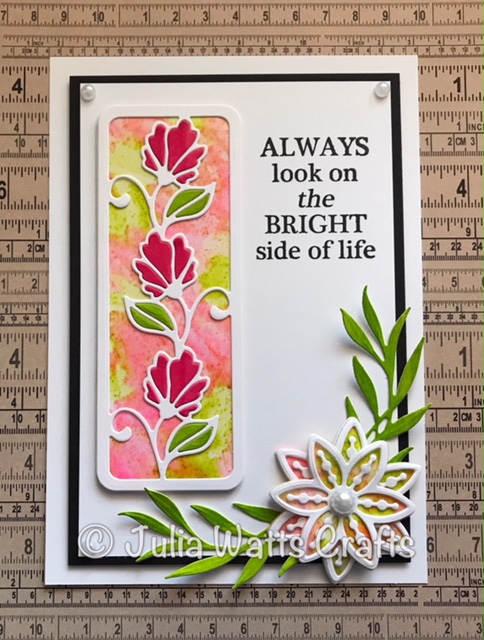
I started by creating an acetate background. I popped a little CS Clear Varnish Lacquer onto my Craft Sheet. I added a drop of CS Rose Pink Intense Pigment Stain and a little CS Frosty Dawn Diamond Frost. I added it to a piece of Heat Emboss Acetate in patches. I added some more Varnish Lacquer to my Craft Sheet and this time added Citrus Lime Intense Pigment Stain and Aurora Sparkle Diamond Frost. I added this to the gaps in my Acetate and then moved both colours around a little so that the while area was covered and put aside to dry (about 20 mins).
I cut both dies from Sue Wilson's Petite Petal Striplet out of Coconut White Card. I cut the outer die out of my Acetate background and out of Coconut White Card. I glued my decorative die cut on top of the acetate and then onto the Coconut White piece.
I popped a little Rose Pink Intense Pigment Stain onto my Craft Sheet and brushed it onto a piece of Coconut White Card. I did the same with Citrus Lime Intense Pigment Stain. I cut the striplet from the both and used the fall away pieces for the flowers and leaves on my striplet panel.
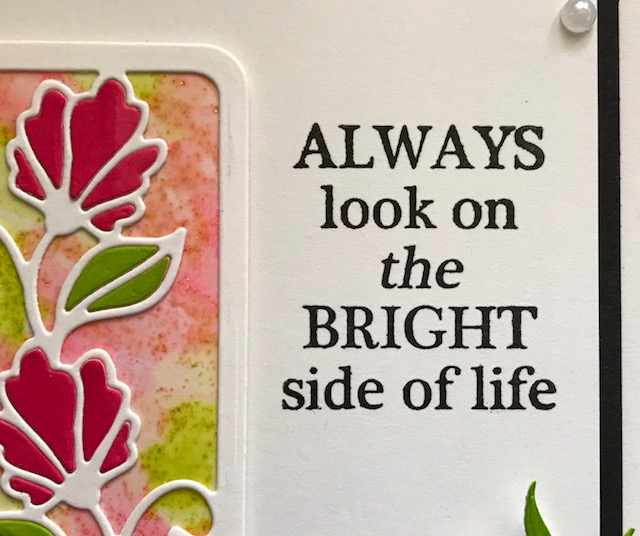
I stamped the sentiment from the Woodware On the Bright Side Stamp Set onto a Piece of Coconut White Card using Onyx Black Versafine Ink. I matted onto Black Card and then Coconut White Card. I added my striplet panel using CE Mounting Cushion.
I cut the largest 2 pairs of dies from Sue's Pinwheel Floral Die Set out of Coconut White Card. I cut the outer dies only out of my Acetate background and out of Coconut White Card. I glued the pieces for each size together and made my flower adding an 8mm White Pearl to the centre.
I cut a pair of leaves using Sue's Windswept Grasses Die Set out of my card that I coloured with the Citrus Lime Intense Pigment Stain.
I completed my card by adding a 5mm White Pearl to the corners.
Thanks for stopping by.
Julia.
www.juliawattscrafts.co.uk
Monday, 4 September 2017
Let it Snow Frame
Hi Bloggers.
Here's today's card -
For the background, I drizzled some CS Glue onto a piece of Heat Emboss Acetate. I misted it with water and spread the glue around using my fingers. I then sprinkled Cosmic Shimmer Pixie Powders over - I used Midnight Blue, Aqua Lagoon, Pewter and White Pearl. I made sure that all the glue was covered. I misted with a little more water and then sprinkled over some Sparkle Star CS Diamond Frost. I scrunched up a piece of White Tissue Paper. I opened it out and added it to my background, patting it down using a piece of Kitchen Roll. I put it aside to dry - approx an hour.
I made a frame out of Coconut White Card using Sue Wilson's Double Pierced Rectangles and Double Pierced Rectangles Set B.
Once my background was dry, I added my frame using 2mm Foam Tape, trimming away the excess. I matted onto a couple of pieces of Coconut White Card.
I cut the Paper Cuts Let it Snow Frame and the snowflakes in the set out of Coconut White Card and added it to my background using CS Glue in a Woodware Fine Tip Glue Applicator.
I added some of the extra snowflakes. I popped a piece of CE Double Sided Self Adhesive Sheet onto a piece of Coconut White Card and cut the snowflakes. I peeled away the backing and added CS Sparkle Star Diamond Frost. I added these snowflakes to my frame/background. I added some White Pearls to the centre of some of the snowflakes.
I cut the snowflake corner from the Paper Cuts Jingle Bells Die Set out of my card with the self adhesive sheet on it 4 times and added CS Sparkle Star Diamond Frost to it. I added them to the corners of my frame adding a White Pearl to the centre of each one.
The winner of the card from Freebie Friday on 1st September is .....................
Please email me at juliawattscrafts@gmail.com with your address and I'll pop your card in the post.
Just before I go, I have some workshop updates -
This Wednesday, I am running a Chalk Cloud Masterclass at CE HQ in Kettering. We will also be looking at Distress Oxides (hopefully the new colours too) so you can compare. This is a workshop that will be packed with techniques. It runs 10am till 4pm. There are just 3 spaces left - you can book here.
I am also running a Christmas Stamping Workshop on Wednesday 27th September (again up at CE HQ). The projects aren't 100% set in stone (it depends if I make anything that I think is cooler over the next couple of weeks). We will be aiming to complete 4-6 projects on the day.Bookings are now being taken for this one here.
My own Christmas themed workshop in Yardley Gobion is on Saturday 30th September. It will be a mix of die cutting and stamping on this one. Again, I haven't 100% decided what the projects are but there will be up to 6 of them. We are definately doing the one below but there will be a choice of background techniques to use and there will be a whole host of dies to choose from to make the background. You can book for this one here.
The workshop in Yardley Gobion on 28th October with myself and Leonie Pujol is nearly full with just 7 spaces up for grabs. We haven't set the projects for this one yet but it is going to be inky with lots of stamping. Don't miss out on this opportunity to spend a day with probably the bubbliest Craft Personality in the World! You can book here.
Thanks for stopping by.
Julia.
www.juliawattscrafts.co.uk
Free card with all website orders over £10 (ask for one in the comments box at checkout).
Here's today's card -
For the background, I drizzled some CS Glue onto a piece of Heat Emboss Acetate. I misted it with water and spread the glue around using my fingers. I then sprinkled Cosmic Shimmer Pixie Powders over - I used Midnight Blue, Aqua Lagoon, Pewter and White Pearl. I made sure that all the glue was covered. I misted with a little more water and then sprinkled over some Sparkle Star CS Diamond Frost. I scrunched up a piece of White Tissue Paper. I opened it out and added it to my background, patting it down using a piece of Kitchen Roll. I put it aside to dry - approx an hour.
I made a frame out of Coconut White Card using Sue Wilson's Double Pierced Rectangles and Double Pierced Rectangles Set B.
Once my background was dry, I added my frame using 2mm Foam Tape, trimming away the excess. I matted onto a couple of pieces of Coconut White Card.
I cut the Paper Cuts Let it Snow Frame and the snowflakes in the set out of Coconut White Card and added it to my background using CS Glue in a Woodware Fine Tip Glue Applicator.
I added some of the extra snowflakes. I popped a piece of CE Double Sided Self Adhesive Sheet onto a piece of Coconut White Card and cut the snowflakes. I peeled away the backing and added CS Sparkle Star Diamond Frost. I added these snowflakes to my frame/background. I added some White Pearls to the centre of some of the snowflakes.
I cut the snowflake corner from the Paper Cuts Jingle Bells Die Set out of my card with the self adhesive sheet on it 4 times and added CS Sparkle Star Diamond Frost to it. I added them to the corners of my frame adding a White Pearl to the centre of each one.
The winner of the card from Freebie Friday on 1st September is .....................
SuzzieQ
Please email me at juliawattscrafts@gmail.com with your address and I'll pop your card in the post.
Just before I go, I have some workshop updates -
This Wednesday, I am running a Chalk Cloud Masterclass at CE HQ in Kettering. We will also be looking at Distress Oxides (hopefully the new colours too) so you can compare. This is a workshop that will be packed with techniques. It runs 10am till 4pm. There are just 3 spaces left - you can book here.
I am also running a Christmas Stamping Workshop on Wednesday 27th September (again up at CE HQ). The projects aren't 100% set in stone (it depends if I make anything that I think is cooler over the next couple of weeks). We will be aiming to complete 4-6 projects on the day.Bookings are now being taken for this one here.
My own Christmas themed workshop in Yardley Gobion is on Saturday 30th September. It will be a mix of die cutting and stamping on this one. Again, I haven't 100% decided what the projects are but there will be up to 6 of them. We are definately doing the one below but there will be a choice of background techniques to use and there will be a whole host of dies to choose from to make the background. You can book for this one here.
The workshop in Yardley Gobion on 28th October with myself and Leonie Pujol is nearly full with just 7 spaces up for grabs. We haven't set the projects for this one yet but it is going to be inky with lots of stamping. Don't miss out on this opportunity to spend a day with probably the bubbliest Craft Personality in the World! You can book here.
Thanks for stopping by.
Julia.
www.juliawattscrafts.co.uk
Free card with all website orders over £10 (ask for one in the comments box at checkout).
Monday, 14 August 2017
Stained Glass Poinsettia Star
Hi Bloggers.
Here's today's card -
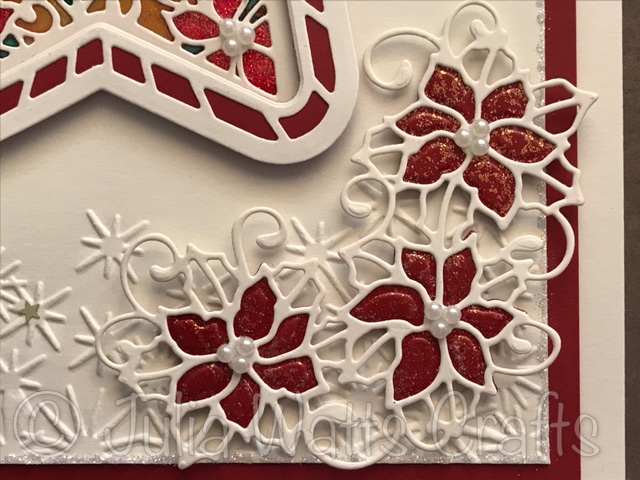
For the background, I embossed a piece of Milk Card using the Creative Expressions Sparkle Flakes Embossing Folder. I matted onto Rich Red Card and then another piece of Milk Card. I added CS Glue around the edges of my background and then sprinkled CS Frosty Dawn Diamond Frost over. I added a spot of Quickie Glue to the centre of some of the stars in the background and popped CS Golden Stars Glitter Jewels on top.
I cut the inner die from Sue Wilson's Poinsettia Star Die Set into 2 pieces of Milk Card. I sandwiched a piece of Acetate between them using Quickie Glue - it's important to make sure that EVERY line on the die cuts in secured to the Acetate.
Working on the back, I popped some CS Clear Varnish Lacquer onto my Craft Sheet. I added one drop of CS Rich Crimson Intense Pigment Stain to it and mixed well using a Paint Brush. I then added CS Frosty Dawn Diamond Frost and mixed again. I used this to colour the Poinsettia's on my Acetate. It's better to add a really good amount, to fill the area enclosed by the die cut. I cleaned my brush and then added more Lacquer to my Craft Sheet. This time I added a drop of Emerald Intense Pigment Stain and mixed well. I used this to colour the leaves. Finally, I added some Lacquer to my Craft Sheet and mixed in some CS Rich Gold Pixie Powder. I used this to colour in all the remaining areas. I put this aside to dry - approx 2 hours. The glitter used on flowers falls to the bottom, which is actually what we want as that means it's all at the front.
I cut the largest die in Sue's Radiating Star Die Set out of Rich Red Card. I cut the largest 2 dies from the same set out of Milk Card and glued the 2 die cuts together. I left them a while for the glue to set and then added die 3 from the same set and cut. This created my frame. I added some thin strips of 2mm Foam Tape. Once my Poinsettia Star piece was dry, I added my frame and trimmed away the excess. I added some 3mm Pearls to the centres of the flowers.
I added some Clear Varnish Lacquer to my Craft Sheet and mixed in some Frosty Dawn Diamond Frost. I painted this onto a piece of Rich Red Card using a Wide Brush and put aside to dry (approx 20 mins). Once dry, I cut the flowers from Sue's Poinsettia Cluster twice. I cut the outer die from the same set out of Milk Card twice. I added some 3mm Pearls to the centre of the flowers.
I'm up at Creative Expressions for a meeting today so will be unable to send out any website orders. I will get to them tomorrow.
There have been a couple of new releases. Firstly, new masks from That Special Touch - you can find them here. I think this one will be the most popular -
Also new Cosmic Shimmer Gliiterbitz - a new glitter in 16 colours. You can find them here.
The winner of the card from Freebie Friday on 11th August is ....................................
Please email me at juliawattscrafts@gmail.com with your address and I'll pop your card in the post.
I'll be back tomorrow with a sneak peek from the Woodware shows I have on Thursday.
Thanks for stopping by.
Julia.
www.juliawattscrafts.co.uk
Free card with all website orders over £10 (ask for one in the comments box at checkout).
Here's today's card -
For the background, I embossed a piece of Milk Card using the Creative Expressions Sparkle Flakes Embossing Folder. I matted onto Rich Red Card and then another piece of Milk Card. I added CS Glue around the edges of my background and then sprinkled CS Frosty Dawn Diamond Frost over. I added a spot of Quickie Glue to the centre of some of the stars in the background and popped CS Golden Stars Glitter Jewels on top.
I cut the inner die from Sue Wilson's Poinsettia Star Die Set into 2 pieces of Milk Card. I sandwiched a piece of Acetate between them using Quickie Glue - it's important to make sure that EVERY line on the die cuts in secured to the Acetate.
Working on the back, I popped some CS Clear Varnish Lacquer onto my Craft Sheet. I added one drop of CS Rich Crimson Intense Pigment Stain to it and mixed well using a Paint Brush. I then added CS Frosty Dawn Diamond Frost and mixed again. I used this to colour the Poinsettia's on my Acetate. It's better to add a really good amount, to fill the area enclosed by the die cut. I cleaned my brush and then added more Lacquer to my Craft Sheet. This time I added a drop of Emerald Intense Pigment Stain and mixed well. I used this to colour the leaves. Finally, I added some Lacquer to my Craft Sheet and mixed in some CS Rich Gold Pixie Powder. I used this to colour in all the remaining areas. I put this aside to dry - approx 2 hours. The glitter used on flowers falls to the bottom, which is actually what we want as that means it's all at the front.
I cut the largest die in Sue's Radiating Star Die Set out of Rich Red Card. I cut the largest 2 dies from the same set out of Milk Card and glued the 2 die cuts together. I left them a while for the glue to set and then added die 3 from the same set and cut. This created my frame. I added some thin strips of 2mm Foam Tape. Once my Poinsettia Star piece was dry, I added my frame and trimmed away the excess. I added some 3mm Pearls to the centres of the flowers.
I added some Clear Varnish Lacquer to my Craft Sheet and mixed in some Frosty Dawn Diamond Frost. I painted this onto a piece of Rich Red Card using a Wide Brush and put aside to dry (approx 20 mins). Once dry, I cut the flowers from Sue's Poinsettia Cluster twice. I cut the outer die from the same set out of Milk Card twice. I added some 3mm Pearls to the centre of the flowers.
I'm up at Creative Expressions for a meeting today so will be unable to send out any website orders. I will get to them tomorrow.
There have been a couple of new releases. Firstly, new masks from That Special Touch - you can find them here. I think this one will be the most popular -
Also new Cosmic Shimmer Gliiterbitz - a new glitter in 16 colours. You can find them here.
The winner of the card from Freebie Friday on 11th August is ....................................
June Fletcher
Please email me at juliawattscrafts@gmail.com with your address and I'll pop your card in the post.
I'll be back tomorrow with a sneak peek from the Woodware shows I have on Thursday.
Thanks for stopping by.
Julia.
www.juliawattscrafts.co.uk
Free card with all website orders over £10 (ask for one in the comments box at checkout).
Sunday, 9 July 2017
Sparkle on your birthday
Hi Bloggers.
Here's today's card -
I started by misting a piece of Coconut White Card with water, I sprinkled over CS Pixie Powders over. I made the background at Ally Pally and can't quite remember what colours I used. I think it's Aubergine Dream and Golden Mint.
Once dry, I cut it out using Sue Wilson's Essential Rectangles. I dusted with an Anti-Static Bag and stamped the image and the sentiment from the Woodware Mini Bubble Bloom : Annie Stamp Set using Clear Perfect Medium and embossed with CS Black Detail Embossing Powder.
I popped some CS Golden Mint Pixie Powder into a Palette and used a Water Brush to paint the leaves on the image. I used Mango Blaze and Burnt Orange Pixie Powders to colour in some of the circles . I added Quickie Glue to the smallest circles. Once the glue was clear, I added CS Frosty Dawn Diamond Frost.
I matted onto Black Card and then onto a Coconut White Card blank.
Thanks for stopping by.
Julia.
www.juliawattscrafts.co.uk
Free card with all website orders over £10 (ask for one in the comments box at checkout).
Deal of the Day today (9th July) - Designs by John Lockwood - Mediterranean Trellis A6 Background Stamp only £4.99!
Thursday, 29 June 2017
It's Your Day!
Hi Bloggers.
Here's today's card -
I started ny dusting a piece of Heat Emboss Acetate with an Anti-Static Bag. I stamped the image and the sentiment from the Woodware Five in a Row Stamp Set using Clear Perfect Medium and embossed with CS True White Detail Embossing Powder. Working on the back, I started to colour in. I used a mix of Pixie Powder and CS Clear Varnish Lacquer. I used Golden Mint, Burnt Orange, Plum Twist and Mango Blaze. I added CS Frosty Dawn Diamond Frost to the Mango Blaze Sections. I managed to colour it all in one session as I was pushed for time but I would not usuall do this - I would wait for each section to dry before doing the next. Also, make sure you put it to dry on a level surface - mine wasn't quite level and the Burnt Orange and Mango Blaze sections merged a little but I'm ok with that.
I made a frame out of Coconut White Card using Sue Wilson's Double Piereced Rectangles and Double Pierced Rectangles Set B. Once my image was dry, I added my frame using 2mm 3D Foam Tape.
I embossed a piece of Coconut White Card with the Creative Expressions Raindrops 8 x 8 Embossing Folder. I added my framed piece using 1mm 3D Foam Tape.
I completed my card by matting onto a couple of pieces of Coconut White Card.
Thanks for stopping by.
Julia.
www.juliawattscrafts.co.uk
Free card with all website orders over £10 (ask for one in the comments box at checkout).
Deal of the Day today (29th June) - Creative Expressions Stamps to Die For - You're so Sweet only £2.99!
Saturday, 24 June 2017
Best Wishes
Hi Bloggers.
Here's today's card -
I used a piece of Watercolour Card. I added a little CS Aqua Lagoon Pixie Powder to a Mister Bottle with some water and gave it a good mix. I spritzed over my card and blotted off with Kitchen Roll.I repeated the process with CS Peacock Green Pixie Powder. This is a very pale background as I did not use very much PP - just what I wanted.
I stamped the image from the Woodware Fresh as a Daisy Stamp Set using Onyx Black Versafine Ink. I coloured in using CS Colour Clouds - I used Decadent Teal, Decadent Denim and Decadent Bamboo. I dabbed a little into the lids of the pots and picked up with a Water Brush.
I stamped the sentiment from the Woodware Lilac Spray Stamp Set, again using Versafine Ink.
I edged my card with Decadent Denim Colour Cloud using a Smoothie. I matted onto Black Card and then onto a Coconut White Card blank.
I popped a little CS Clear Varnish Lacquer onto my Craft Sheet and mixed in a little CS Sparkle Diamond Frost and added it to the centres of my flowers.
I finished my card by adding some drops of CS Black Pearl 3D Accents (PVA).
Distress Oxides and Re-inkers are back in stock on my website now here. Phill Martin's new smaller 9 x 9 Stamping Mat is in stock here. There are lots of goodies on my website - do have a browse if you have time.
Heading over to Yardley Gobion today for our Powertex Workshop - really looking forward to that.
Thanks for stopping by.
Julia.
www.juliawattscrafts.co.uk
Free card with all website orders over £10 (ask for one in the comments box at checkout).
Deal of the Day today (24th June) - Phill Martin Sentimentally Yours - Mini Baroque Inspirational Sentiments only £7.99!
Subscribe to:
Posts (Atom)