Wednesday, 13 June 2012

All change!

Hi Bloggers.

I'm afraid my stamping show on June 25th has been postponed till some time in July. Sam's show on 18th June has been cancelled so she's now doing her show on 25th instead which is just fine because it looks like I'm going to be helping Sue out with some of her Spellbinders shows next Friday (22nd). I don't know times yet but I'll update the details in the sidebar as soon as I know.

Today I'm sharing another card I've made for the Ethel & Murray stamping shows. Hopefully, this will appeal to more people than the post on Monday did as it's a great man card.


I stamped the image from the Creative Expressions Fore Stamp Set using Coffee Archival and embossed with Cosmic Shimmer Clear Embossing Powder. I coloured the image in using a selection of Cosmic Shimmer Matt Drawing Inks.


I stamped the sentiment from the same stamp set again using the Coffee Archival and embossed with the clear powder. I cut the sentiment and the mats out using Spellbinders Labels Four and Labels Four Small. I inked the sentiment with Faded Jeans Distress Ink and Cut & Dry Foam while still in the die.


I cut a border from some Foundations Blue Dot and Dash Paper using Spellbinders Edgeabilities Classic Bracket. I cut an insert into the border using the Edgeabilities Classic Ric Rac. The background paper is also a Foundations Dot and Dash Paper but is the reverse side.


I assembled the card as shown adding a few buttons from my stash.

Hope you like the card.

Thanks for stopping by.

Julia.

Tuesday, 12 June 2012

Labels Thirteen

Hi Bloggers.

A mixed bag of comments from the post yesterday which is what I expected. It is good to know that even if you didn't like the image or the colour of the background, there was still something there that you could perhaps get a little inspiration from. The Radiant Embossing Folder used in yesterday's post is one from last month's release from Couture Creations. I'm hoping that it will be on the show on 25th June.

Today's card should appeal to more of you. It features the frame that I cut from Spellbinders Labels Thirteen towards the end of the 7pm show on Saturday. Usually, die cuts from the shows end up in a big bag of bits and pieces that I may use sometime but never do - I think we've all got one of those. But, this frame was so lovely and I knew what I could do with it so I made this card. It was so quick to make but I think it's quite elegant.


Just to re-cap, the frame was cut from the largest of the Labels Thirteen dies, I missed the next 2 sizes and used the one after that to cut the inside edge of the frame. I used pearlescent ivory card. At the emboss stage I added the Small Polka Dots Mask making sure that the cutting edge of the die was going into my tan mat and the mask was placed on top.


I stamped the sentiment from the Creative Expressions Bride & Groom Stamp Set using Coffee Archival and embossed with Cosmic Shimmer Clear Embossing Powder. I cut it out using the next size up of Labels Thirteen to the one I used for the centre of my frame. I didn't bother to emboss it as the edge was going to be hidden.

For the background I popped the Couture Creations Cultivated Embossing Folder through the Grand Calibur with some white card. I put it though a second time to extend the pattern. I then inked all over with Eco Green Yellow Damasque Dye Ink using Cut & Dry Foam.


I added some of the new Guipure Duchess Lace in Cream, which is available via Creative Expressions Stockist, along the side of the background. This is such a pretty lace - just a little really adds a special touch to your project. I then added some 6mm super sticky tape along the inside edge of it and ruffled some cream Vintage Ribbon along it. I tied a bow using 2 lengths of the cream ribbon and added it to the ruffled border. I made a flower out of the ivory pearlescent card using 2 of the smaller dies from the Spellbinders Rose Creations die set. I popped a pearl in the centre and added it to my bow.


I finished the card off with a couple of Decorative Stick Pins in Cream Pearl and some dots of Cosmic Shimmer Pearlescent PVA in Golden Pearl.

Hope you like the card.

Thanks for stopping by.

Julia.

Monday, 11 June 2012

Something a bit different

Hi Bloggers.

First, thank you for your lovely comments about the shows on Saturday. Sometimes I worry that I'm having a bit too much fun and not getting on with the demos but they do wind me up a bit especially the chap upstairs who kept putting music on every time I used the Grand Calibur in the 7pm show. And I did have to use it a lot as the show (well, actually all the shows) were heavy on demos rather than looking at all the products on sale. He did that last week too. I think that'll be his thing whenever he works on a show that I'm doing. Something to look forward to!

Today I'm giving you a sneeky peek of the kind of thing I'll be doing on my stamping shows later this month. I'm doing the latest batch of Ethel & Murray stamps from Sue Wilson's RubberNecker stable. They were first released last year hand have been on Create & Craft once before.

Some of you may find this card a bit dark - I'm not sure if I like it myself or not.

This is Ethel. Her tattoo is a bit saggy as she's getting on a bit. Poor thing!


I started with the background. I ran a piece of Kraftcore card though the Grand Calibur with the Couture Creations Radiant Embossing Folder. I ran it through a second time to extend the pattern. I sanded it to make the design stand out a bit more. You can see the background a bit better in some of the close-ups below.

I stamped Ethel from the Creative Expressions Ethel & Friends Stamp Set using Cobalt Archival and embossed with Cosmic Shimmer Clear Embossing Powder. I cut her out using Spellbinders Labels Four Small and inked through the die with Faded Jeans Distress Ink using Cut & Dry Foam. I cut a mount out of cobalt card using Labels Four.

I cut a couple of Elegant Posts out of cobalt card, chopped off the end bits and glued them either side of my background. I popped Ethel on her mount in the middle.

I stamped the sentiment from the same stamp set again using the Cobalt Archival and embossed with the clear powder. I cut it out using Spellbinder Ribbon Banners and inked through the die with Faded Jeans.


For the border at the top, I cut a border out of Foundations Dot and Dash Paper using the Edgeabilities Classic Bracket, a border out of the Edgeabilities Classic Ric Rac and then another border out of bright blue card using the Classic Bracket again. I added a few blue gems across the top. I glued these together with Cosmic Shimmer Glue and then mounted them onto my card using 3d foam.


I tied a bow using 2 lengths of Royal Blue American Seam Binding. I added a Playhouse Posie to the centre and then a navy button with some Baker's Twine from the Vintage Set. I added a couple of pins from the Playhouse and Sassy sets that I'm hoping to have on the show.


I finished the card off with some dots of Cosmic Shimmer Summer Blue Pearlescent PVA around the edges.

If nothing else, I hope this card shows that you can make a card with a stamped image without colouring it in.

Thanks for stopping by.

Julia.

Sunday, 10 June 2012

A couple more boxes to share

Hi Bloggers.

Thanks to everyone who watched the shows yesterday and took the time to email in. Sorry all the emails weren't read out.

Today I thought I'd share another couple of Hexagon Pinwheel Top Boxes that I knocked up Friday afternoon after reading your comments on that day's post.

The first is made with ivory pearlescent card so I think would be suitable for a wedding. I have embossed the embellishments panels with the Couture Creations Wild Poinsettia Embossing Folder.


The second is a Christmas Tree ornament as suggested by Cornish Emma on Friday's Post - thank you, Emma. I have made 2 boxes out of beautiful Shimmerlux Card available from Creative Expressions Stockists. Instead of using the panels provided in the die set, I have embellished each panel with a snowflake cut from Spellbinders Create-a-Flake and inked through the die with Faded Jeans Distress Ink.


I folded some Baker's Twine from the Vintage Set in half and secured it behind one of the boxes with some super sticky tape. I then glued the 2 boxes together back-to-back with Cosmic Shimmer Dries Clear Glue. Sorry about the quality of this pic.


Thanks for stopping by.

Julia.

Saturday, 9 June 2012

Winner of Demo Card

Hi Bloggers,

Nearly forgot to do the draw for the demo card - thanks for reminding me Wilma.

The winner is........

No. 6 - Hazel

Please email me at juliawattscrafts@gmail.com with your snail mail address and I'll get the card off to you.

Loved reading your Top 3 dies - it is hard picking them. I think my top 3 are - Foliage, Damask Accents and Floral Ovals. But it may be different tomorrow!

Today's card post is below this post.

Thanks for stopping by.

Julia

Our Friendship is Tailormade

Hi Bloggers,

Today I'm sharing this card which I am hoping to demonstrate in the 7pm show today -


For the background I added some Tea Dye Distress Ink to one side of the Couture Creations Constellation Embossing Folder. I then placed a piece of white card on the clean side of the folder and closed it. I brayered over the top of the folder to transfer the ink to the card. I added some Cosmic Shimmer Clear Embossing Powder and heat set. I then put it inside the Couture Creations Wild Poinsettia Embossing Folder and put it through the Grand Calibur. I used Scattered Straw Distress Ink and Cut & Dry Foam to make the Wild Poinsettia design 'pop' out. Hopefully, the cameras at the studio will be able to show this up well as it looks really good up close. I've shared this technique before in this post and this post. There's a slight difference in the older posts as I used a mask in the 2nd stage rather than another embossing folder as I did here.

I used 2 dies from the Spellbinders Labels One Small set to cut out a frame from the top of the background. I put the frame aside to use on another project.

I stamped the image from the Creative Expressions Antique Dressforms Stamp Set onto khaki card using Coffee Archival and embossed with Cosmic Shimmer Clear Embossing Powder. I cut it out leaving a small border all the way round.

I stamped the sentiment from the same same set again using Coffee Archival and embossed with clear powder. I cut it out using Ribbon Tags Trio Three and inked with Tea Dye while still in the die. I threaded some Amber Brown Vintage Ribbon through the sentiment and secured it at the back of the background.

I cut a border out of Foundations Paper using Banner Basics Three and added it to the top of the background.

I cut a couple of Elegant Posts out of brown card and popped them either side of my Labels One die cut.

I assembled the card as shown adding some Cosmic Shimmer Golden Pearl Pearlescent PVA in the spaces in the Banner Basics Border and all around the edges.

Hope you can join me today at 11am, 1pm and 7pm on Create & Craft.

Thanks for stopping by.

Julia.

Friday, 8 June 2012

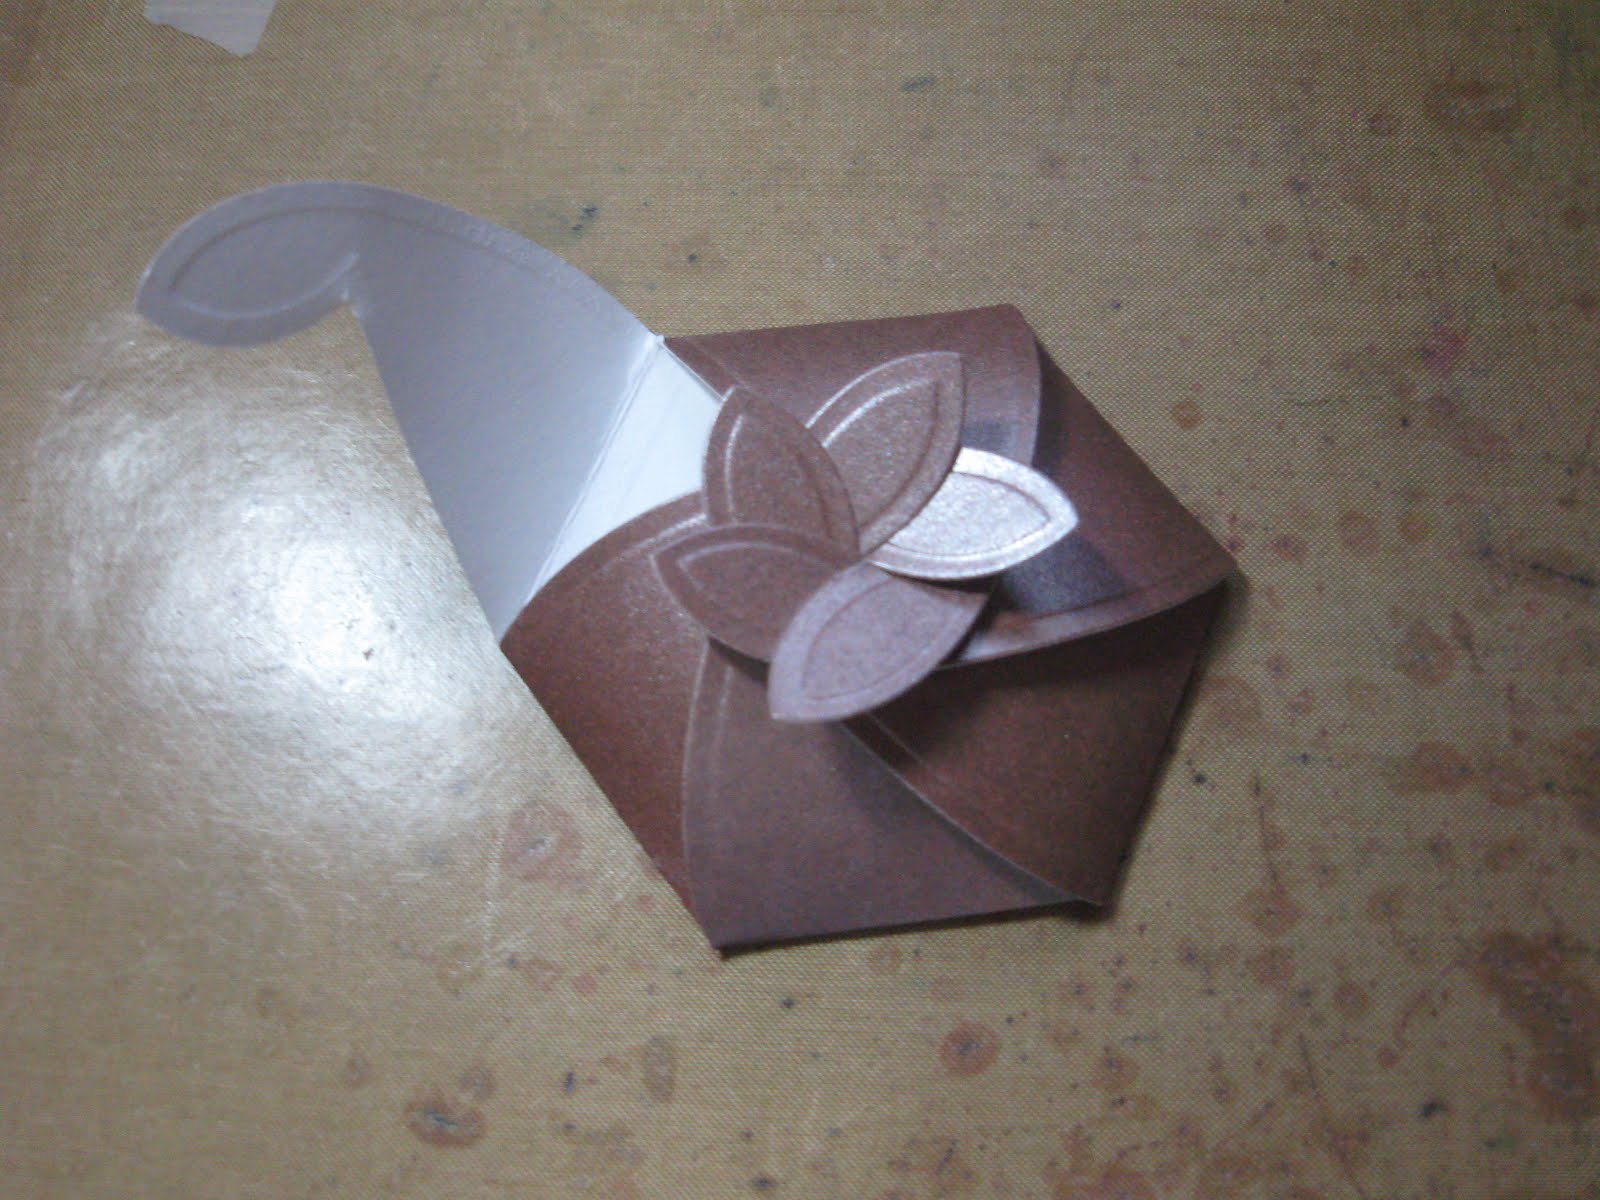
Hexagon Pinwheel Top Box

Hi Bloggers.

Today I thought I'd share some boxes with you. The Hexagon Pinwheel Top Box is on the shows tomorrow. I'm really quite fond of this box as it needs no glue in its simplest form.

When it comes out of the Grand Calibur, having been cut and then embossed, you just need to fold along all the embossed lines.


Hold two of the sides together


Then slot the 3rd piece under the 'petal' of the other 2


Slot the 4th piece under the 'petal' of the other 3


Slot the 5th piece under the 'petal of the other 4


Finally, slot the 6th piece under the petal of the other 5. Make sure the bottom part of this piece slides under the bottom part of the first piece.


So that's it in it's simplest form. I can see this being gorgeous in white or ivory pearlescent card for wedding favours. Can you image how much money you would save or earn if you made these for a wedding?

The die pack also comes with 6 panels to stick on each side and a tag.

Here's some other versions -


In the one above I used some Creative Expressions double-sided patterned paper. I cut the embellishment panels from the other side of the paper. Hoping to have this paper on my next stamping show on 25th June.


In the one above I added the Couture Creations Houndstooth Embossing Folder at the emboss stage for the embellishment panels.


On the last one I added panels of patterned paper (think it's Basic Grey - only had a scrap left) as the embellishment for a Christmas box. I also stamped a sentiment and used the little tag die in the set to cut it out. I finished it off with a little Moss Green Vintage Ribbon.

Hope you like this little box too. It measures approx 7.5cm across the base.

Thanks for stopping by.

Julia.

Thursday, 7 June 2012

Tri-fold Dressforms

Hi Bloggers.

Today's card is a variation of the one in this post. The difference between them is the colour (obviously), the dies used and the embossing folder. I doubt if I'll get to demo this as it just uses a couple of dies but I thought I'd share it so you can see it in a different colour.


The two side panels are the same size and the middle panel is slightly larger. This seemed to work well with the blue version so I went for the same layout with this one.

The fancy edge at the top of the card is created using the Spellbinders Edgeabilities Classic Bracket with a decorative insert from the Classic Ric Rac Edgeabilities. The border at the bottom is created using another insert from the Classic Ric Rac Edgeabilities. I inked all over with Tea Dye Distress Ink using Cut & Dry Foam.

I ran 3 pieces of milk card through the Grand Calibur with the Couture Creations Houndstooth Embossing Folder and inked with Tea Dye. I mounted these onto rust card and added them to my card base.

I stamped three of the dressforms from the Creative Expressions Antique Dressforms Stamp Set onto milk card using Coffee Archival and embossed with Cosmic Shimmer Clear Embossing Powder. I cut each one out leaving a border around - makes it easier to cut out. I popped one on to each panel using 3D foam.

I stamped the sentiment from the same stamp set using Coffee Archival and embossed with clear powder. I cut the sentiment into 3 lines and put one on each panel.

Finally, I threaded some Baker's Twine from the Earthtones Set through the holes in the top and added two bows.

Do you prefer the blue or the brown version?

Christine has the Edgeabilities dies on her shows on Create & Craft today at 11am and 4pm. Join her for more inspiration on these and other Spellbinders dies.

Don't forget that you can still leave a comment for the chance to win a demo card on this post.

Thanks for stopping by.

Julia.

Wednesday, 6 June 2012

Tres Chic Easel Card

Morning Bloggers.

Today I'm sharing a simple easel card made with Spellbinders Labels Twenty -Five and the Creative Expressions Antique Dressforms Stamp Set.


For the base card, I folded a piece of milk A4 card in half and put the largest of the Labels Twenty-Five dies so that one edge was overhanging the fold so that it didn't cut in that place. I then ran it through the Grand Calibur a couple of times so that it cut through both layers. I then scored the top half of the card approximately half way and folded.

I cut another piece of milk card from the largest of the dies and inked through the die with Plum Archival using Cut & Dry Foam.

I cut the next smallest size of Labels Twenty-Five from some patterned paper (My Mind's Eye).

I stamped the image from the Antique Dressforms Stamp Set using Plum Archival and embossed with Cosmic Shimmer Clear Embossing Powder. I cut it out using Labels Four and inked through the die with the Plum Archival.

I stamped the sentiment from the same stamp set again using the Plum Archival and embossed with the clear powder. I cut it out using Ribbon Tags Trio Three and inked through the die with the Plum Archival.

I assembled the card as shown.

There's another simple easel card made using Labels Twenty-Five in this post.

Don't forget to comment on yesterday's post for the chance to win a demo card.

Thanks for stopping by.

Julia.

Tuesday, 5 June 2012

Demo Card to Give Away

Hi Bloggers.

There was no draw for this card in the first show last Saturday. I messed up cutting the borders a bit so this card is destined for recycling unless someone wants it. If you'd like it please become a follower (if not already) and leave a comment below. Let's make things a bit more interesting - we all have our favourite Spellbinder dies so I'd like you to tell me what yours is on your comment. And, because it hard to name just one, you can tell me your top 3.

I look forward to finding out what your faves are. I'll draw a name on Friday at 7pm.

Here's the card (hides embarrassment!)


Thanks for stopping by.

Julia

Monday, 4 June 2012

Happy Birthday Sue

Hi Bloggers.

Today is Sue Wilson's birthday. She's away visiting her mom in Florida at the moment so I haven't been able to send her a card but his post is dedicated to her as it's a revamp of the card she made in this post. Happy Birthday Sue!


On my version I have used milk card from the Neutral Card Pack. I have embossed the panels using the Couture Creations Wild Poinsettia Embossing Folder. I added some dots of Cosmic Shimmer Golden Pearl PVA to the centre of the flowers.


My cascading flowers are made from the Spellbinders Rose Creations die set.


The sentiment is from the Creative Expressions Sincere Sentiments stamp set and I've cut it out using Spellbinders Labels Four. I inked through the die with Milled Lavender Distress Ink.

Hope you like my version.

Thanks for stopping by.

Julia.

Sunday, 3 June 2012

Ooh La La in Black & White

Hi Bloggers.

Thank you to everyone who watched the shows yesterday and to those of you who took the time to email in. Your support is much appreciated. I had a great couple of shows with Genevieve and Jacqui - I hope you enjoyed them.

Today I'm sharing another black and white card. I just love the definition you seem to get from these colours.


For the background I stamped 'Ooh La La!' and a corner motif from the Creative Expressions Vintage Lingerie Stamp Set randomly over a piece of white card using Black Soot Distress Ink. Then I used the Spellbinders Nobility M-Bossability Folder with my Grand Calibur. I ran it through a second time to extend the pattern. I went over the whole area with Black Soot Distress Ink using Cut & Dry Foam.


I cut an insert into a strip of black card using the Edgeabilities Classic Postage Stamp. I threaded some black & white baker's twine through it and added it to my background. I tied a bow using 2 lengths of the Baker's Twine and added it to my border. I cut 2 tassels from Banner Basics Three and added them below my bow.


I cut an Elegant Post from black card and added it to the top left-hand corner of my card. I cut a Labels One Small out of white card and at the emboss stage I added the Basket Wave Mask from That Special Touch. I inked with Black Soot while still in the die. I hung this from my post securing with 3d foam pads. I stamped the corset (my favourite) from the Vintage Lingerie Stamp Set using Jet Black Archival and embossed with Cosmic Shimmer Clear Embossing Powder. I cut it out and added it to the Labels One die cut.

I finished the card off with some dots of Cosmic Shimmer White Pearl PVA.

Hope you like the card.

Thanks for stopping by.

Julia.

Saturday, 2 June 2012

Friendship Part 2

Hi Bloggers.

Today's card is a variation of the card in this post. I thought it was worth sharing as I'm hoping to demonstrate in the first show today at 4pm and it shows how the original layout can be adapted to the dies that are still available in Create & Craft's Spellbinders Diamond Deals.


I cut 2 borders out of cobalt card using the Spellbinders Edgeabilities Classic Ric Rac for the edge and Classic Postage Stamp for the insert. I glued them to a panel of marine blue card and ruffled some Limoges Blue Vintage Ribbon down the centre.


I used the largest Labels Twenty-Five to cut some cobalt card. At the emboss stage I added the Couture Creations Wild Poinsettia Embossing Folder. The sandwich you need for this is base plate, approx 15 sheets of copy paper, embossing folder - MUST BE OPEN, die with card in it with the cutting edge UP, tan mat, Creative Expressions Embossing Plate. Do not close the folder as the die will cut into it and do make sure the cutting edge is face up away from the folder and into the tan mat.

I used Labels Thirteen with Labels Three on the inside to cut a frame from marine blue card. At the emboss stage I added the Small Polka Dots Mask. The sandwich you need with your Grand Calibur is base plate, tan mat, die with card in it with the cutting edge going into your tan mat, mask, pink embossing plate. I do it this way so I can see where the pattern of the mask is going to be on my die cut. It doesn't matter if the base plate or the pink plate is on the bottom. You must make sure the cutting edge of the die is away from your mask and going into the tan mat.

I cut 4 motifs out of pearlescent silver card using the Damask Motifs die set and added one to each side of my frame. I stamped the sentiment from the Creative Expressions Sincere Sentiments stamp set using Cobalt Archival and embossed with Cosmic Shimmer Clear Embossing Powder. I inked around the edges a little with Faded Jeans Distress Ink and popped it behind the aperture in my frame.


I tied a large bow using Ivory/Royal Blue Grosgrain Ribbon and then added another bow made from 2 lengths of the Limoges Blue Vintage Ribbon. To top it off I added another bow made with 2 lengths of Baker's Twine from the Vintage Set. I made a flower using 3 borders cut out of felt using the Banner Basics One die set. I just lined the 3 borders up on my craft sheet, added 12mm Super Sticky Tape to the bottom and made the flower in the same way as the vintage ribbon flower is made in this post on Sue Wilson's Blog. I cut 2 tassels out of cobalt card using Banner Basics One and glued them below the flower on my bow.


I assembled the card as shown adding some dots of Cosmic Shimmer Pearlescent PVA in Summer Blue around the edges.

Hope you can join me today at 4pm and 7pm on Create & Craft.

Thanks for stopping by.

Julia

Friday, 1 June 2012

Of Corsets Your Birthday Again!

Hi Bloggers.

Today I'm sharing this card -


I stamped the image from the Creative Expressions Vintage Lingerie Stamp Set using Plum Archival and embossed with Cosmic Shimmer Clear Embossing Powder. I cut the image out with scissors.

I cut a Spellbinders Labels Nineteen out of burgundy card. At the emboss stage I added the Couture Creations Houndstooth Embossing Folder. The Grand Calibur sandwich you need for this is base plate, approx 15 sheets copy paper (or a few sheets of card), embossing folder, die with card in it with cutting edge FACE UP - DO NOT CLOSE the folder, tan mat, Creative Expressions Embossing Plate.


I cut 4 Damask Motifs out of milk card and attached them at the back of the Labels Nineteen die cut. I cut a couple of Elegant Posts out of black card. I trimmed off the long bit from each and then used the swirly bits to 'hold hands' with the Damask Motifs. I added this to some pretty polka dot backing paper from My Mind's Eye Lost and Found.


I stamped my sentiment from the same stamp set and cut it our using Ribbon Tags Trio Three. I threaded some Black Silky Crush Ribbon through it and secured it to the back of my card.

I assembled the card as shown and added some dots of Cosmic Shimmer Pearlescent PVA in Black Pearl around the edge.

Hope you like the card.

Thanks for stopping by.

Julia.

Thursday, 31 May 2012

Square Petal Top Box

Hi Bloggers.

Today I thought I'd share a box with you. Spellbinders do a few box templates and they are currently on offer in the Diamond Deals on Create & Craft at the moment while stocks last. All the boxes are really easy to assemble.

Here's a Square Petal Top Box -


I embossed the white card with the Flower Delight Impressabilities. This is so useful as its A4. This item has sold out on Create & Craft but you may find it at one of these stockists. I glued the box together with Cosmic Shimmer Dries Clear Acrylic Glue which dries really quickly and is really strong - perfect for boxes.

The die comes with some extra bits including a great design to stick on the sides (which I cut from peach card) and a little tag. I stamped the sentiment from the Creative Expressions Kind Thoughts Stamp Set using Jet Black Archival and embossed with Cosmic Shimmer Clear Embossing Powder. I cut it out using the little tag die and inked through the die with Dried Marigold Distress Ink. I added a little Peach Fizz Vintage Ribbon and glued the tag to the top of the box.

This box is a good size when made up - measuring approx 2 1/2 inches x 2 1/2 inches by 1 1/4 inches. As I said, so easy to make and so nice to co-ordinate a box with a card you have made.

Thanks for stopping by.

Julia.

Wednesday, 30 May 2012

Sections

Hi Bloggers.

All change - the shows tomorrow have been cancelled and have been re-scheduled for 9th June at 11am and 7pm. The shows on Saturday are still going ahead - at the moment.

Today's card has several sections to it. I'm not quite sure if it works - let me know what you think.


I started by cutting out some motifs from the Spellbinders Damask Motifs die set. I cut 3 in grey and 3 in bright yellow. You don't need to emboss these as all of the embossed detail is in the cut-away sections. I glued them to the top of an A5 piece of white card as shown and added a pearl to the centre of each.


I embossed a piece of white card using the Spellbinders Nobilty M-Bossabilities Folder. I added this to the bottom of my card. I cut a yellow border using the Edgeabilities Classic Postage Stamp and an insert from the Edgeabilities Classic Ric Rac. I cut a grey border using the Edgeabilities Classic Bracket and a different insert from the Edgeabilities Classic Ric Rac. I added these to the bottom of my card.


I wrapped some Silver Vintage Ribbon around my card and added a bow made with 2 lengths of the same ribbon. I threaded some Baker's Twine from the Vintage Set through a yellow ribbon from my stash and added it to the centre of my bow.

I stamped the sentiment from the Creative Expressions Kind Thoughts Stamp Set using Cobalt Archival and embossed with Cosmic Shimmer Clear Embossing Powder. I cut it out using the tag die from the Damask Motifs die set and glued it just below my bow.

Hope you like the card.

Thanks for stopping by.

Julia.

Tuesday, 29 May 2012

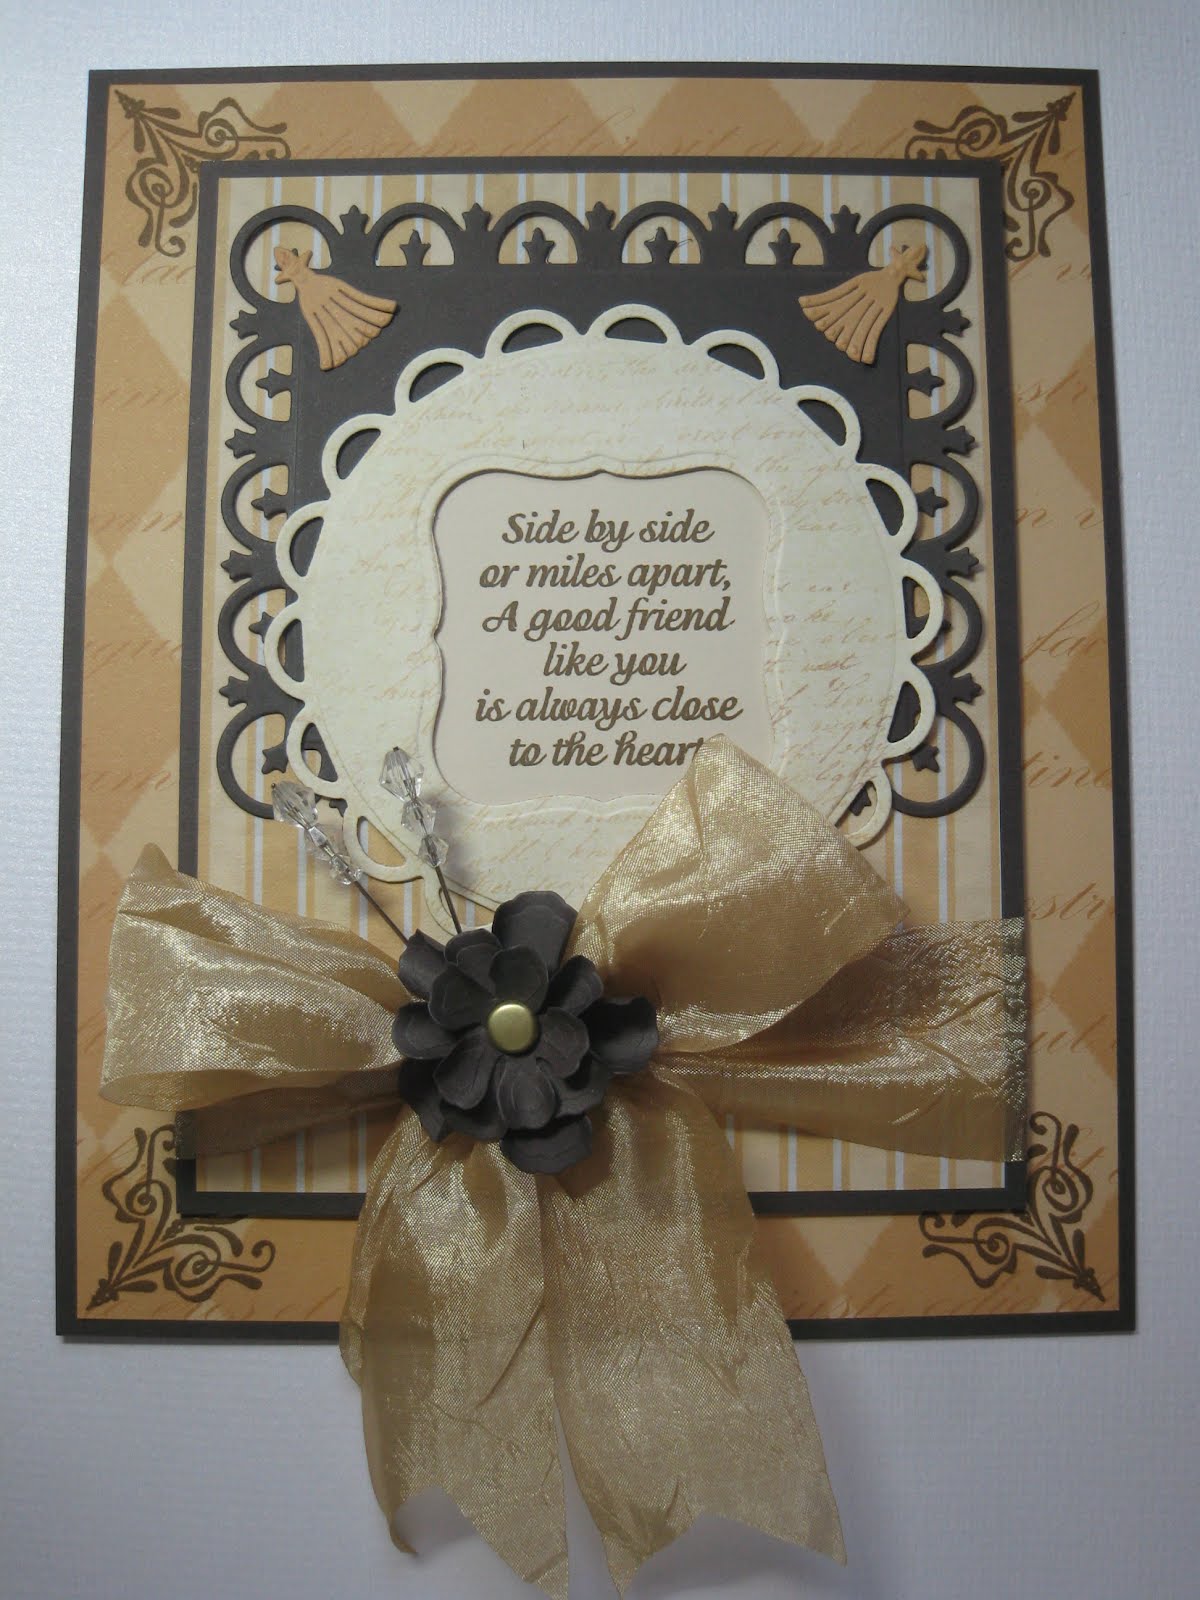
Side by Side

Hi Bloggers.

Here's another card based on a card made by Sue Wilson. It was a demo for the shows that I did last week but never made it to the counter as most of the dies used on it were early sell outs.


The backing paper is a Creative Expressions Foundations Patterned Paper and I've matted it on to some brown cardstock as shown. I stamped in each corner of the larger piece with an image from the Creative Expressions Vintage Lingerie Stamp Set using Coffee Archival.

I cut the largest of the Spellbinders Fleur De Lis Rectangles out of brown card. I cut the largest of the Lacey Circles out of a patterned paper (My Mind's Eye) but also cut an aperture out of it using Labels One Small. I stamped my sentiment using Coffee Archival but did not emboss it. I popped this behind the aperture in the lacey circle. If I had demonstrated this card I would have inked around the sentiment with some Tea Dye Distress Ink as I think it's a bit pale against the backing paper I chose for the circle.

I cut 2 tassels from the Banner Basics Three die set and popped one in each of the top corners of the Fleur De Lis Rectangle.


I wrapped some Champagne Silky Crush Ribbon around the smaller section of the card and tied a big bow. I made a flower using 3 of the Rose Creations dies and popped a brad in the centre. I added this to the centre of my bow and also added a couple of crystal decorative stick pins.

Hope you like the card.

Thanks for stopping by.

Julia.

Monday, 28 May 2012

Friendship

Hi Bloggers.

Today I have another Spellbinders card to share with you.


I cut 2 borders out of cobalt card using the Spellbinders Damask Accents Die Set. I glued them to a panel of marine blue card and ruffled some Limoges Blue Vintage Ribbon down the centre.


I cut 2 of the largest of the FLeur de Lis Rectangles - one from cobalt card and one from marine blue card. I offset them when I added them to my card. I cut a frame from cobalt card using Labels Three - I turned the die for the centre of the frame so it resulted in a more interesting shape. At the emboss stage I added the Houndstooth embossing folder. I cut 2 corners using the Fleur de Lis Accents die set and added one to either side of my frame. I stamped the sentiment from the Creative Expressions Sincere Sentiments stamp set using Cobalt Archival and embossed with Cosmic Shimmer Clear Embossing Powder. I inked around the edges a little with Faded Jeans Distress Ink and popped it behind the aperture in my frame.


I tied a large bow using the Ivory/Royal Blue Grosgrain Ribbon and then added another bow made from 2 lengths of the Limoges Blue Vintage Ribbon. I made a flower using 3 borders cut out of felt using the Banner Basics One die set. I just lined the 3 borders up on my craft sheet, added 12mm Super Sticky Tape to the bottom and made the flower in the same way as the vintage ribbon flower is made in this post on Sue Wilson's Blog.


I assembled the card as shown adding a couple of Decorative Stick Pins to the Grosgrain Bow.

Hope you like the card.

Thanks for stopping by.

Julia