Showing posts with label Steampunk. Show all posts

Sunday, 19 November 2017

Discover Industrial Chic

Hi Bloggers.

I have another card to share with you featuring Sue Wilson's Industrial Chic Collction -

The background was leftover from a demo I did and is made from Watercolour Card with some Misters and Masks. I've cut it to size using a die from Sue Wilson's Double Stitched Rectangles Die Set and matted onto Black Card and then Coconut White Card.

I cut die #3 from the Industrial Chic Background Die Set out of of piece of Coconut White Card and added it t my background.

I stamped the gorgeous Mr. Vintage Inventor onto Coconut White Card using Onyx Black Versfine Ink. I cut him out using scissors leaving a thin border around him. I cut the wings from the Industrial Chic Mixed Essentials Die Set out of Steel Pearl Card and glued them behind my man. I added him to the centre of my frame using CE Mounting Cushion.

I cut the sentiment from the Inspirational Words Die Set out of Steel Pearl Card and added him to my card using glue and a little CE Mounting Cushion.

Thank you for all your kind comments and messages about Smokey.

Thanks for stopping by.

Julia.
www.juliawattscrafts.co.uk

Saturday, 18 November 2017

Industrial Chic One Day Special continues today

Hi Bloggers.

Back from a great beady week - I will share some photos next week, after I've had chance to take some pics. Unfortunately, our cat, Smokey, died on Tuesday. It was very sudden. A neighbour found her and brought her round to our house. The vet thinks that she had a heart attack. Totally unexpected as she was very healthy, very active and only 10 years old 😿. I've put a couple of pics of Smokey at the end of this post.

Lisa Horton continues with her One Day Special on Hochanda today with Sue Wilson's Industrial Chic Collection with shows at 9am, 1pm and 5pm.

Here's another card that I made featuring the dies -

The background was one that I made as a demo at the recent workshop I ran with Leonie Pujol.

I dusted a piece of Coconut White Card with an Anti-Static Pad. I stamped some of the stamps from the Woodware Pocket Watches Stamp Set using Onyx Black Versafine Ink. I added CS Matt Clear Embossing Powder and heat set. I misted a little CS Phill Martin Misters in Sunshine Yellow, Lime Burst and Purple Paradise onto my background. I dabbed off excess ink with a little Kitchen Roll which also transferred a little of the ink to other areas. I inked around the edges with CS Lime Burst Colour Cloud using a Smoothie. I misted a little of the Purple Paradise Mister onto my Craft Sheet and picked it up with a paint brush to colour the butterflies. I repeated the process with Lime Burst and coloured some of the areas on the pocket watches. I matted onto Black Card and then Coconut White.

I cut the sentiment from the Inspirational Words die set out of Black Gloss Card.

I cut the Industrial Chic Swirl out of Black Gloss Card.

I cut the head from the Industrial Chic Mixed Essentials out of Black Gloss Card.

I'm offering 10% off items from Lisa's shows on my website. You can find them here. Please enter STEAMPUNK in the discount code box at checkout to activate your discount. Offer valid till midnight tonight or while stocks last.


Thanks for stopping by.

Julia.
www.juliawattscrafts.co.uk

Thursday, 16 November 2017

Industrial Chic Sneak Peek

Hi Bloggers.

Lisa Horton is launching a new One Day Special on Hochanda tomorrow with the first set of dies from Sue Wilson's November Release. I had a little time so I have made some samples for the shows. I thought I would share one with you today -

My background was one that I created at a demo. I used a piece of Heat Emboss Acetate. I added some CS Glue to it. I misted with water and used my finger to spread the glue all over. I then sprinkled CS Pixies Powders all over, completely covering all of the glue. If I remember correctly, I used Aqua Lagoon, Purple Violet, Candy Pink and Pewter. I misted lightly with water and then sprinkled some CS Sparkle Star Diamond Frost and CS Silver Chrome Glitterbitz over. I scrunched up a piece of White Tissue Paper, opened it out and added it to my background. I pressed it down carefully with a piece of Kitchen Roll and then put it aside to dry (a couple of hours).

I made a frame out of Coconut White Card using Sue's Double Pierced Squares. Once my background was dry, I added my frame using Woodware Foam Tape. I matted onto a couple of pieces of Coconut White Card.

I cut the Industrial Chic Corner out of Steel Pearl Card twice and glued them to my background, tucking them inside my frame.

I cut the butterfly from the Industrial Chic Butterfly & Dragonfly Die Set out of Coconut White Card. I shaped it and glued it to my background, securing at the body and antenae only.

I cut a couple of the words from the Inspirational Words die set out of Black Gloss Card and added them to my frame as shown.

Thanks for stopping by.

Julia.
www.juliawattscrafts.co.uk


Sunday, 29 April 2012

Purple and Blue

Hi Bloggers.

Today's card has a very similar layout to this post but there are a couple of different techniques on it.


I stamped the shoe from the Creative Expressions Steampunk Shoes Stamp Set using Blue Violet Archival Ink and embossed with Cosmic Shimmer Clear Embossing Powder. I inked around the edges of the panel with Dusty Concord Distress Ink and matted it on to some purple card.

For the larger background behind the shoe, I inked up a square piece of white card with Dusty Concord and Faded Jeans Distress Ink. I distressed the edges with my scissors and inked again with the Faded Jeans. I popped some Midnight Blue Mica Powder from the Cosmic Shimmer Dark Dusks Mica Powder Setinto a clean chinese container and added a good amount of water. I then popped a couple of beads into it a shook it around a bit to pick up the paint. I put the inked card into a larger container and dropped the beads on top and swirled them around. I repeated the process with the Antique Lilac Mica Powder from the same set.

Next I made the grid background. I inked up the Grid Mask with Perfect Medium. I popped a piece of purple card on top and ran it through my Grand Calibur. The ink transferred to the debossed pattern. I dusted some of the Midnight Blue mica powder over the top and. I tore the edges of the panel and added a little more perfect medium using Cut & Dry foam and again dusted with the mica powder.

I stamped the sentiment from the same stamp set again using the Blue Violet Archival and embossed with the clear powder. I cut it out using Spellbinders Fancy Tags and inked with Dusty Concord while still in the die.

I dipped some screw brads into the Perfect Medium and then the clear embossing powder (it's handy if you have tool with a crocodile clip). Then I dipped it into the mica powder and heated again. The mica sunk below the embossing powder. I repeated again until I was happy with the colour. I did 4 with Midnight Blue and 2 with Antique Lilac.

I assembled the card as shown. Hope you like it.

Thanks for stopping by.

Julia.

Saturday, 28 April 2012

Demo Tag to Give Away

Hi Bloggers,

Today I'm sharing the final demo piece from the shows on Tuesday. It's a tag and I made it so I could demo the techniques used in this post.


For the background, I used the Grid Mask. I inked through it with Rusty Hinge and Mustard Seed Distress Ink using Cut & Dry Foam. I really love the mosaic effect you get from this mask. I then randomly stamped some circles using a mister bottle top and the Rusty Hinge Distress Ink.

I stamped the stem of the flower with the chain from the Steampunk Shoes Stamp Set using Sepia Archival. I did not emboss it.

I stamped 2 of each of the 4 different small tickets from the Creative Expressions Tickets Stamp Set using Perfect Medium and embossed with Cosmic Shimmer Bright Gold Metallic Embossing Powder. I coloured the edges of the tickets with the Copper Mica Powder from the Cosmic Shimmer Metallics Mica Spray Set. I cut them all out.

I stacked the tickets up and pierced a hole through them all. I added a Creative Expressions Faux Screw Brad in Antique Gold and fanned the tickets out to look like a flower. I added 3D foam pads of the back and added the flower to the top of a chain stem.

I stamped some keys from the Creative Expressions Mechanical Handbags Stamp Set onto some card, which had been spritzed with Cosmic Shimmer Acrylic Misting Inks, using Perfect Medium and I embossed them with the gold powder. I cut them out and added them to the chain stems to make my 'leaves'.

I stamped the sentiment from the Steampunk Shoes Stamp Set using Sepia Archival. I did not emboss it. I cut it out line by line and glued it to my tag using Cosmic Shimmer Dries Clear Glue.


I dyed some American Seam Binding first with Mustard Seed and then with Rusty Hinge Distress Ink (drying after each one). I added a little copper mica powder to the Rusty Hinge to give it a little sparkle. I added this to my tag.

Hope you enjoyed this demo if you watched. I didn't finish the tag during the show but I've finished it now and it's up for grabs. If you'd like to be in with a chance of winning it, simply become a follower (if you're not already) and leave a comment on this post. I'll draw a winner on Monday morning.

Thanks for stopping by.

Julia

Friday, 27 April 2012

Paper Rosette Tutorial

Hi Bloggers,

I've had a request from a lady who attended the Creative Expressions Workshop we did at the Create & Craft weekend at Hayling Island. She asked if I could remind her how we made the flower rosette that was on our card. So, I've made another video tutorial. The die set we used was from Spellbinders Parisian Accents.

This is the card that Maria and Lynne designed for the workshop. It's gorgeous, isn't it?


We used two of Sam Poole's new stamp sets - Steampunk Dreams and Steampunk Flowers.

I hope you find the tutorial useful.


Thanks for stopping by.

Julia

Thursday, 26 April 2012

Steampunk Mask

Hi Bloggers.

Today I'm sharing another demo card from the shows on Tuesday.


For the background, I ran the Steampunk Mask through the Grand Calibur with a piece of ivory card. I then inked all over with Rusty Hinge Distress Ink and Cut & Dry Foam. I stamped some cogs from the Creative Expressions Mechanical Handbags Stamp Set using Sepia Archival and embossed with Cosmic Shimmer Clear Embossing Powder. I cut them out using a craft knife and added them to the steampunk background with Creative Expressions Faux Screw Brads in Antique Copper and some Idea-ology Mini Fasteners.

I stamped the shoe image from the Creative Expressions Steampunk Shoes Stamp Set using Sepia Archival and embossed with Creative Expressions Clear Embossing Powder. I cut the image out using scissors and a craft knife.

I cut a mat out of rust card using Spellbinders Labels Thirteen. At the emboss stage I added the Couture Creations Replacements Embossing Folder. I did not close the folder as the die would damage it. However, the sandwich is too thin with the folder open so I added some sheets of copy paper to bulk it out. In the show I used Idea-ology Kraft Glassine Paper instead of the rust card.

I assembled the card as shown (no sentiment on this one) and added some dots of Cosmic Shimmer Pearlescent PVA in Choco Brown (love this new colour!).

Hope you like the card and enjoyed the demo if you watched.

Thanks for stopping by.

Julia.

Wednesday, 25 April 2012

A demo card from yesterday

Hi Bloggers.

Thanks to everyone who watched the shows yesterday. They were really fun. Today I'm sharing the card I did as the first demo in the 5pm show yesterday.


I started with a square piece of ivory card. I scrunched it up and opened it out again. I ran a Tea Dye Distress Ink Pad over the top. It settled on the peaks. I then spritzed with some water, waited a few minutes and then ironed flat with my encaustic iron. I picked this technique up from Tim Holtz. Next I splatted some Old Paper, Tea Dye and Pumice Stone Distress Stains. I remembered seeing Dawn Bibby once stamping a large background stamp without using an acrylic block so I did this with the Creative Expressions Clocks Stamp and the Creative Expressions Scattered Words Stamp using Sepia Archival. I then spritzed the background with Dark Bronze Mica Powder (from the Cosmic Shimmer Metallics Mica Spray Set) which I had mixed with some water in the spritzer bottle provided in the set.


I stamped the image from the Creative Expressions Mechanical Handbags Stamp Set using Sepia Archival and embossed with Cosmic Shimmer Clear Embossing Powder. I coloured it using the Pumice Stone Distress Stain and then cut it out.

I scrunched up a piece of Idea-ology Kraft Glassine Paper, opened it out and then tore it to a size suitable to put the handbag on.


I stamped 3 of the small tickets from the Creative Expressions Tickets Stamp Set using the Sepia Archival and embossed with the clear powder. I coloured the edges of the tickets in with Cosmic Shimmer Dark Bronze Mica Powder. I dyed some silver staples with Latte Alcohol Ink and used then to attach the tickets to the background.


I inked up the sentiment with Perfect Medium and brushed some Pale Gold Mica Powder from the Metallics set onto the inked stamp. I melted some Cosmic Shimmer Vintage Metal Ultra Thick Embossing Powder and poured it onto my craft sheet. I then stamped into the UT with the sentiment stamp. I left it for a little while and then removed the stamp.

I assembled the card as shown adding a Creative Expressions Faux Screw Brad in Antique Copper in each corner. In the demo card I had added some dots of Cosmic Shimmer Golden Pearl Pearlescent PVA.

Hope you like the card.

Thanks for stopping by.

Julia

Tuesday, 24 April 2012

Ist Demo Card today

Hi Bloggers.

As the title suggests this should be my first demo today on Create & Craft at 11am with Lottie.


This card uses a bunch of techniques that I've just before. I thought it would be cool to show them in little snippets in a demo.

I stamped the shoe from the Creative Expressions Steampunk Shoes Stamp Set using Plum Archival and embossed with Cosmic Shimmer Clear Embossing Powder. I coloured it in using Dark Cherry Mica Powder from the Cosmic Shimmer Dark Dusks Mica Spray Set. It looks quite messy in the photo but in the correct light it really shines.

For the background immediately behind the shoe I inked up a 4" square piece of white card with Barn Door and Aged Mahogany Distress Ink. I dusted all over with Silver Lustre Mica Powder from the Cosmic Shimmer Metallics Mica Spray Set. I then stamped the bolts from the same stamp set using Perfect Medium. It's important to clean and dry the stamp between each use so that the ink pad does not become contaminated. I repeated stamping randomly over the areas that would be visible. I then dusted over the stamped bolts with Deep Plum Mica Powder from the Dark Dusks set. I distressed the edges of the panel with my scissors and then inked with Aged Mahogany Distress Ink - I may decide to do that first in the demo as it removes the mica from around the edges of the panel and ends up on the Cut & Dry Foam and the ink pad!

For the burgundy background panel, I inked up the Woodgrain Mask with Perfect Medium. I placed the burgundy card on top and then ran it through the Grand Calibur. The ink transferred to the debossed pattern. I then dusted with Dusky Pink Mica Powder from the Dark Dusks det. I tore the card till it was the required size.

For the large white background, I ran a piece of white card through the Grand Calibur with the Couture Creations Houndstooth Embossing Folder. I ran it through a second time to extend the pattern. I inked around the edges with Aged Mahogany Distress Ink.

I stamped the sentiment using Plum Archival and embossed with clear powder. I cut it out using Spellbinder Fancy Tags and inked with Aged Mahogany while still in the die.

I assembled the card as shown adding a few Creative Expressions Faux Screw Brads in Antique Silver and some dots of Cosmic Shimmer Pearlescent PVA in Silver Lustre around the edges.

Hope you like the card.

Thank for stopping by and I hope you'll tune in to Create & Craft at 11am and 5pm today. Emails welcome.

Julia

Monday, 23 April 2012

Handbag shaped card

Hi Bloggers.

I'm off to Peterborough early tomorrow to do Create & Craft Shows at 11am with Lottie and 5pm with Dean.

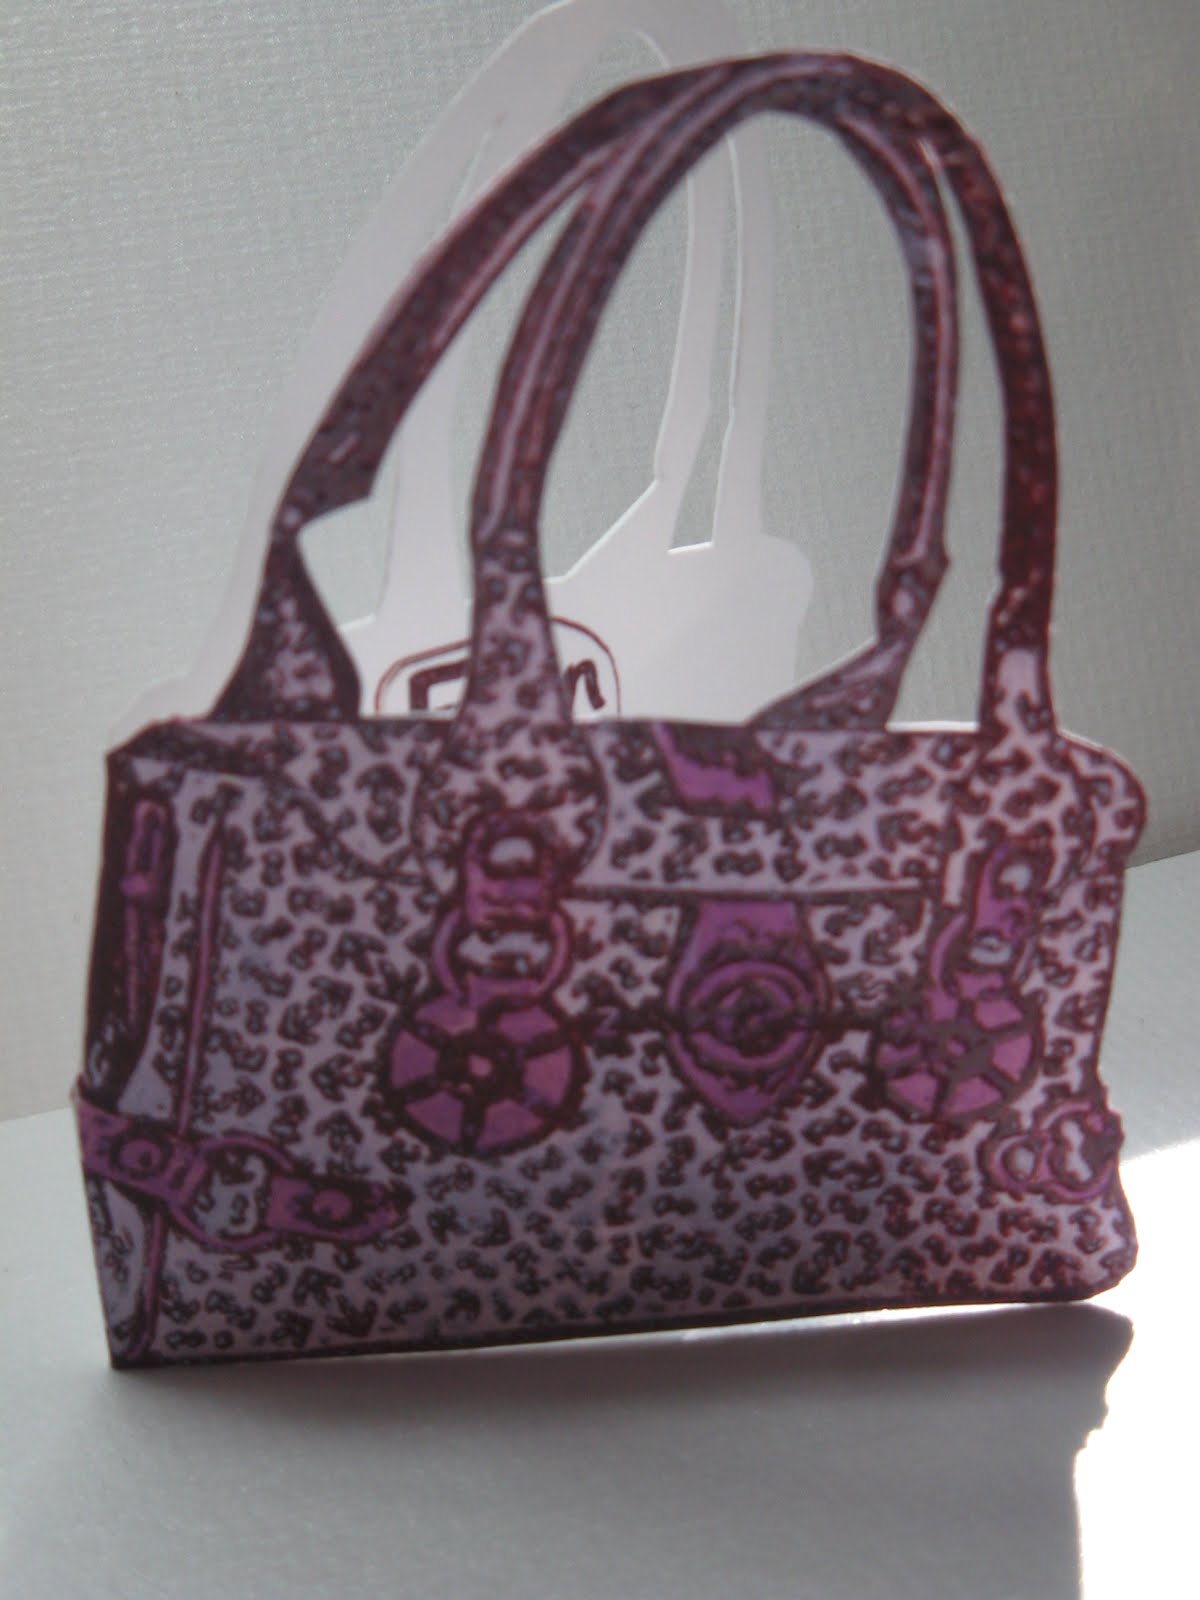
I couldn't resist sharing this diddy little shaped card made with the Creative Expressions Mechanical Handbags stamp set. Such a cute little card for a note or a little invite.


I folded a piece of A5 white card in half and then stamped the handbag just over the fold so the very left-hand side of it was missing. I stamped using Plum Archival and embossed using Cosmic Shimmer Clear Embossing Powder. I cut out the handbag through both pieces of card with scissors and a craft knife.

I coloured the image in with Dusky Pink and Dark Cherry mica powders from the Cosmic Shimmer Dark Dusks Mica Spray Set.


I stamped the sentiment from the same stamp set on a separate piece of card again using the Plum Archival and embossed with the clear powder. I cut it out and edged it with a fine liner.

Hope you like this little offering. Sorry for the poor quality of the photos on this - the sun was shining into my craft room when they were taken.

Thanks for stopping by.

Julia.

Sunday, 22 April 2012

A Simple Tag

Hi Bloggers.

Today I've been forced into the new Blogger and I don't like it! I'm one of those people who struggle a bit when software and layouts change and it's taken me a while to find where everything is - must be something to do with age I think.

Anyway, today I'm sharing a very simple tag.


I inked up one side of the Steampunk Mask (will be getting some in my Amazon Store soon) with Perfect Medium. I popped my tag face down on to the inked area and ran it through my Grand Calibur. The ink transferred to the debossed pattern. I then added some Cosmic Shimmer Clear Embossing Powder and heat set it. Next, (as per Ali Reeve) I added a generous dusting of Dark Bronze Mica Powder (from the Cosmic Shimmer Metallics Mica Spray Set) and heated it again. The Mica sinks in to the melted embossing powder - cool, eh?

I stamped the sentiment from the Creative Expressions Mechanical Handbags Stamp Set using Sepia Archival and embossed with clear powder. I distressed the edges of the tag and my sentiment with my scissors and then added Tea Dye Distress Ink using Cut & Dry Foam.


I dyed some Cotton Hemp Ribbon using Tea Dye Distress Stain and then stamped some cogs onto it using Sepia Archival. I added some Creative Expressions Faux Screw Brads in Antique Copper to couple of the mask cogs and the tag was complete.

Hope you like it.

Thanks for stopping by.

Julia

Saturday, 21 April 2012

Be Unique

Hi Bloggers,

Today I'm sharing this card made with the Creative Expressions Steampunk Shoes Stamp Set designed by Sam Poole.


I made this card when I first got the stamp set a couple of months and I'm a bit uncertain as to how I made the background so here's my best guess!

I inked up a piece of white card with Faded Jeans Distress Ink. I also 'stamped' with the ink pad across the card. I then misted it with Antique Rose and Patina Cosmic Shimmer Vintage Mists. I made sure the background was dry and then dusted it with my anti-static bag. I inked the Cogs Mask with Perfect Medium and popped my background face down onto it. I ran this through the Grand Calibur. The ink transferred to the deboss. I then brushed Silver Lustre Mica Powder from the Metallics Mica Spray Set all over the pattern.

I stamped the shoes using Jet Black Archival onto some white card I had spritzed with the Antique Rose and Patina Vintage Mists. I embossed with Cosmic Shimmer Clear Embossing Powder. I added a bit of colour to the shoes using Denim Cosmic Shimmer Drawing Ink. I added some Creative Expressions Faux Screw Brads in Antique Silver

I inked up some Cotton Hemp Ribbon with the Faded Jeans Distress Ink and stamped some bolts onto it using Jet Black Archival. I tied 2 lengths of it into a bow and added an Idea-ology Sprocket Gear and Game Spinner.

I melted some Cosmic Shimmer UT Vintage Luna White and then poured it onto my craft sheet. I inked up the sentiment with Jet Black Archival and stamped into the UT.

I assembled the card as shown. Hope you like it.

Thanks for stopping by.

Julia

Wednesday, 18 April 2012

Monochromatic

Hi Bloggers,

Today's card has a bit of a messy background but I think it suits the card.


I stamped the background with the Creative Expressions A6 Clocks Stamp and the Creative Expressions A6 Scattered Words stamp (both designed by Sam Poole) using Jet Black Archival. I dried it a little with my heat gun and then popped it through the Grand Calibur with the Couture Creations Houndstooth Embossing Folder. I passed it through a second time to extend the pattern.

I stamped the image from the Creative Expressions Mechanical Handbags Stamp Set (also designed by Sam) onto black card using Perfect Medium. I then added some Cosmic Shimmer True White embossing powder and heat set it. I cut it out using Spellbinders Labels Seventeen.

I stamped the sentiment from the handbags stamp set using Perfect Medium and embossed with the Cosmic Shimmer True White Embossing Powder.

I wrapped some American Seam Binding in Chalk White around the background and the first black mat layer. I then tied a bow with 3 lengths of the same ribbon and added it as shown.

I cut a cog from black card using the Spellbinders Sprightly Sprockets. I stamped a cog from the handbags stamp set on to black card using Perfect Medium and embossed with the True White. I cut it out and glued it on top of the die cut cog. I added a Black Glass Glintz to the centre and added this to my bow. I finished off with a couple of Creative Expressions Black Decorative Stick Pins.

Hope you like the card.

Thanks for stopping by.

Julia.

Tuesday, 17 April 2012

Life is about creating yourself

Hi Bloggers.

Today I'm sharing another card made using one of my favourite layouts with lots of Spellbinder dies.


You can see other cards made using this layout here and here.

For the background, I stamped the sentiment from the Creative Expressions Steampunk Shoes Stamp Set all over a piece of white card using Jet Black Archival. I then ran it through the Grand Calibur with the Spellbinders M-Bossibilities Folder - Regal. I ran it through a second time to extend the pattern.

I cut the largest of the Romantic Rectangles out of pink card and added the Metal Effect Mask at the embossing step. (if you do this, remember to keep the cutting edge of the die away from the mask.)

I cut the largest of the Splendid Circles out of black card and 2 corners from the Lattice Accents set (also in black). I cut 2 leaves from the Damask Accents set in pink and 2 in black.

I stamped the shoe from the stamp set using Jet Black Archival and embossed with Cosmic Shimmer Clear Embossing Powder. I coloured the shoe in with Dark Cherry and Dusky Pink mica powders from the Cosmic Shimmer Dark Dusks Mica Spray Set (just pop a little powder on your craft sheet or tile and add a little water to create a paint). I cut the shoe out and added it to the die-cut Splendid Circle.


I stamped the sentiment from the Creative Expressions Mechanical Handbags Stamp Set again using Jet Black Archival and embossed with clear powder. I cut the sentiment up into lines and popped 2 of them on to the Romantic Rectangles die cut.


I made a flower out of felt (which I bought from Sam Poole) using Spellbinders Spiral Blossom One. I made another flower out of pink card using Spellbinders Spiral Blossom Two. My third flower was made out of black card using Spellbinders Sprial Blossom Three.


I assembled the card as shown.

Hope you like it. Thanks for stopping by.

Julia

Sunday, 15 April 2012

Silver Shine Metallic

Hi Bloggers,

Today's card is a very simple one made using the Creative Expressions Mechanical Handbags Stamp Set.


I stamped the image onto black card using Perfect Medium and embossed with Cosmic Shimmer Silver Shine Metallic Embossing Powder. I mounted the image on to some matt silver card and added an Idea-ology Sprocket Gear and a Game Spinner to the design.

I stamped the sentiment which is from the Creative Expressions Steampunk Shoes Stamp Set again using the Perfect Medium Ink Pad and embossed with the Silver Shine Metallic Embossing Powder.

For the background, I inked through the Metal Effect Mask with the Perfect Medium and then embossed with the Silver Shine Metallic Powder. The background is larger than the mask but it's easy to line the pattern up to extend it.

I added a Creative Expressions Faux Screw Brad in Antique Silver to each corner of the metal effect background and assembled the card as shown.

Told you it was simple! Hope you like it.

Thanks for stopping by.

Julia.

Friday, 13 April 2012

Just the Ticket!

Hi Bloggers.

This card was inspired by this post by Sam Poole in as much as I've used the chain stamp from the Creative Expressions Steampunk Shoes Stamp Set for the stems of the flowers.


I created the background by inking through the Grid Mask on to grey card with Dusty Concord Distress Ink and Cut & Dry Foam. I like the way it looks like a mosaic with the different shades of the ink. I used the top of a Distress Stain bottle to stamp some circles randomly over the background with the Dusty Concord Distress Ink.

Next I stamped the chain stems using the the chain stamp from the Steampunk Shoes Stamp Set using Jet Black Archival.

I stamped 6 of each of the 4 different small tickets from the Creative Expressions A6 Tickets Stamp Set (also designed by Sam) again using the Jet Black Archival but this time I embossed with Cosmic Shimmer Clear Embossing Powder. I coloured the edges of half of them with the Lilac Dawn Mica Powder and half with the Antique Lilac Mica Powder (both from the Cosmic Shimmer Dawn Dusks Mica Spray Set). I cut them all out.

Using 2 of each design (8 tickets in total), I stacked them up and pierced a hole through them all. I added a Creative Expressions Faux Screw Brad in Antique Silver and fanned the tickets out to look like a flower. I added 3D foam pads of the back and added the flower to the top of a chain stem. I repeated this twice more.


I had some left off paper which I had spritzed with some Cosmic Shimmer Acrylic Misting Inks and it just happened to have some green on it! So, I stamped some keys from the Creative Expressions Mechanical Handbags Stamp Set using Jet Black Archival and I embossed them with the clear powder. I cut them out and added them to the chain stems to make my 'leaves'.

I stamped the sentiment from the Mechanical Handbags set on to some white card using Jet Black Archival and embossed with the clear powder. I cut it into the 4 separate lines and added them to my card.

I really enjoyed making this card. I hope you like it.

I'm off the Ally Pally today. I'll be demonstrating On Saturday and Sunday on the Creative Expressions stand (right at the back) along with Leonie Pujol, Hels Sheridan and Sam Poole. Sue Wilson will also be there demonstrating on her RubberNecker stand (right by the entrance). If you're going, do pop and say hello.

Thanks for stopping by.

Julia.

Thursday, 12 April 2012

Winged Shoe

Hi Bloggers.

We're back to shoes today and another card made using the Creative Expressions Steampunk Shoes Stamp Set designed by Sam Poole.


I stamped the image on to white card using Plum Archival and embossed with Cosmic Shimmer Clear Embossing Powder. I cut it out with scissors and a craft knife, removing the 'wings' from the back of the shoe. I made some new wings from some Cosmic Shimmer Heat Bondable Film in Aurora Sparkle and some Cosmic Shimmer Heat Bondable Fibres in Summer Blush which I bonded together using my encaustic iron and then I cut out a butterfly from the Spellbinders Wonderful Wings die set.

For the background, I inked up the Woodgrain Mask with Perfect Medium. I popped a piece of white card on top of the mask and ran it through the Grand Calibur. The ink transferred to the debossed areas on the card. I then added some some Dark Cherry Mica Powder from the Cosmic Shimmer Dark Dusks Mica Spray Set.

I stamped 8 small tickets (2 of each design) from the Creative Expressions Tickets Stamp Set using Plum Archival and embossed with clear powder. I cut them out and added a Creative Expressions Faux Screw Brad in Antique Copper through all the tickets. I splayed the tickets out so that they looked like a flower and popped some 3D foam on the back to keep them in place.

I cut a Spellbinders Lattice Motif and some leaves from the Spellbinders Foliage Die Set out of burgundy card.

I assembled the card as shown and added a bit of faux stitching around the edges.

Let me now what you think as I'm not entirely happy with this card. I may add a few more leaves to it and/or pop some screw brads in the corners. There's such a fine line between finishing a card and over-doing it, don't you think?

Thanks for stopping by.

Julia.

Saturday, 7 April 2012

Shrink Plastic Shoes

Hi Bloggers.

Couldn't resist sharing this card with you today. It's one of the samples I'm made for my next show on Create & Craft. It's black & white which I love as it means I don't have to do any colouring!


I sanded some white shrink plastic and stamped the three shoes from the Creative Expressions Steampunk Shoes Stamp Set using Jet Black Archival. I actually put it aside to dry so I could do something else.

For the background I inked through the Metal Effect Mask with Black Soot Distress Ink using Cut & Dry Foam. As Distress Ink stays wet for a while I was able to sprinkle some Cosmic Shimmer Clear Embossing Powder over the top and heat set it. I did re-apply the ink and the embossing powder to create more of a tile effect. I then edged the whole piece with a little Black Soot.


I cut 2 pieces of white using the Spellbinders Labels One Small and 1 piece from black. Each time, at the emboss stage, I added the Woodgrain Mask. Remember to keep the cutting edge of the die away from the mask.

I stamped the sentiment from the same stamp set using Jet Black Archival and embossed with the clear powder. I cut it out using Spellbinders Fancy Tags and inked with Black Soot while still in the die.

I carefully cut out my shoes from the shrink plastic leaving a small white border all around the edge. I also made sure that I didn't go far up the heel as experience tells me that little thin bits can be a problem. I used my heat gun on a low setting to shrink the shoes and flattened each one with an acrylic block.

I assembled the card as shown and added a Black Glass Glintz in each corner.

Hope you like the card.

Thanks for stopping by.

Julia.

Friday, 2 March 2012

Winged Dress Form

Hi Bloggers,

Today I'm sharing another card made with the new Antique Dressforms Stamp Set from Creative Expressions.


As soon as I saw this stamp set I thought it would be really cool to add some wings to the images.

I stamped one of the dress forms twice in plum archival ink and embossed with Cosmic Shimmer Clear Embossing Powder. One of the images I cut out using Spellbinders Labels Twenty and I inked with Aged Mahogany Distress Ink
while still in the die. I cut out the body of the other image.

I ironed together two pieces of Cosmic Shimmer Heat Bondable Film in Aqua Sparkle with some pink Cosmic Shimmer Heat Bondable Fibres from the Summer Bluch Set in between them. I then cut out one of the butterflies from the Spellbinders Wonderful Wings Die Set. I passed it through the machine twice. You have to tease the bits out of the die cut a bit as the fibres are a bit tough. You get lovely shimmery wings though so it's worth the effort. I glued the wings to the dress form on the Labels Twenty die cut and then glued the cut out dress form right over the top.


I stamped the sentiment from the same stamp set again using the plum archival ink and embossed with the clear powder. I cut it out using a Spellbinders double-ended tag die and inked with Aged Mahogany while still in the die. I added a couple of brads at each end.

For the background I inked up That Special Touch Trellis Mask with Perfect Medium. I placed some burgundy card on top and ran it through the Grand Calibur. The ink transferred to the debossed side. I brushed some Cosmic Shimmer Red Bronze Mica Powder from the Metallics Mica Spray Set all over. It clung to where the perfect medium was.

I inked up Some American Seam Binding with Aged Mahogany Distress Ink (you should have seen my fingers!). I scrunched it up and left it over night to dry.

I ran some white card through the Grand Calibur with the Creative Expressions Floral Embossing Folder. I inked up 4 of the flowers on both sides with Aged Mahogany and cut them out. I added a little more ink to hide the white edges. I made a 3D flower and added it to the tatty bow that I tied with my dry dyed American Seam Binding.


I assembled the card as shown and added some faux stitching around the edges.

Hope you like the card.

Thanks for stopping by.

Julia.

Wednesday, 29 February 2012

Beaded Handbag

Hi Bloggers,

Something a bit different to share today. This card has been made with Sam Poole's new Mechanical Handbags Stamp Set from Creative Expressions. I do like red, black and white together.


I stamped the handbag using Jet Black Archival and embossed with Cosmic Shimmer Clear Embossing Powder.

I cut the handbag out and removed the ruler fringing also. I added some colour with some Barn Door Distress Ink. I pieced 5 holes on each side of the bottom of the handbag and threaded some beads on. I tried to be quite random but there was always a black chip as the last but one bead and a seed bead below it.

For the large background I randomly stamped the lipstick from the stamp set all over some white card using Jet Black Archival (I did not emboss them). I added the lipstick colour using Barn Door.

I embossed a piece of black card using the Couture Creations Replacements Embossing Folder.

I cut a Spellbinder Fleur de Lys Square out of red card. When I ran it through the machine to emboss, I added the That Special Touch Woodgrain Mask. I really like the effect you get from this.

I stamped the sentiment from the stamp set using Jet Black Archival and embossed with clear powder. I cut it out using Spellbinders Lacy Ovals and inked with Barn Door while still in the die.

I dyed some American Seam Binding with Barn Door Distress Ink.I really crumpled it up when drying it. In fact I left it over night to dry - all scrunched up.

When dry I added some beads to the ribbon. I saw this in Craft Focus Magazine and thought it looked really cool so I thought I'd try it. You need to do a few running stitches then add 2-3 beads and then do a few more running stitches. Continue until you have the length required. It does use quite a bit of ribbon and does take a while to do - so be warned!

I tied a bow with some dyed ribbon and sewed some beads in the centre.

I assembled the card as shown and did some faux stitching around the edges with a White Inkssentials Pen.

Hope you like it. It was really fun to make.

Thanks for stopping by.

Julia.