Showing posts with label Poinsettia. Show all posts

Wednesday, 15 November 2017

Woven 3 Die Christmas Card

Hi Bloggers.

I have a Christmas Card with a woven background for you today.

For the weave on this one, I cut the Classic Weaving Die out of Milk Card, I cut the Intermediate Weaving Die out of Rich Red Card and the Striped Weaving Die out of Antique Gold Pearl Card. I cut the Red and the Gold die cuts in half lengthways. I then glued the 2 Red pieces together offsetting them to fill in the gaps. I cut them into pieces that were 2 strips wide. I also glued the 2 Gold pieces together offsetting them to fill in the gaps. I cut them into pieces that were 4 strips wide.

4 strips of a Striped die cut = the width of 1 Classic and 2 strips of an Intermediate die cut = the width of 1 Classic. So, here, we basically have a 1 x 1 Classic weave in terms of how quick and easy it is.

As you can see, I have woven 2 strips of Red Intermediate through the Milk Classic then 4 strips of Gold Striped through and so on until my weave was complete.

I made a frame out of Milk Card using Sue Wilson's Scalloped Lattice Frames Set B and added it to my woven background using Woodware Foam Tape. I matted onto Milk, Rich Red, Antique Gold Pearl and another piece of Milk Card.

I cut the sentiment out of Rich Red and Antique Gold Pearl Card using Lisa Horton's Christmas Wishes Die Set.

I cut the Poinsettia Cluster Die Set out of Rich Red and Antique Gold Pearl Card and added a 5mm Cream Pearl to the centre of the flowers.

Thanks for stopping by.

Julia.
www.juliawattscrafts.co.uk

Monday, 16 October 2017

Pretty Blue & White woven Christmas Card

Hi Bloggers.

Here's today's card -

I started by popping the Nordic Christmas Mask onto a piece of Sky Blue Card. I spread CS Phill Martin Platinum Sparkle Texture Paste through it. I removed the mask, cleaned it and put my background aside to dry (a couple of hours). I repeated the process on another piece of Sky Blue Card.

Once my backgrounds were dry, I cut the Sue Wilson's Classic Weaving Die from it. I cut Sue's Intermediate Weaving Die out of Coconut White Card twice. I wove single strips of the Intermediate Die Cut through the Sky Blue Classic One.

I made a frame out of Coconut White Card using Sue's Scalloped Lattice Frames Set B and added it to my woven background using 2mm Foam Tape, trimming away the excess using scissors. I matted onto Sky Blue Card and then Coconut White Card.

I popped a piece of CE Double Sided Self Adhesive Sheet onto a piece of Sky Blue Card. I cut the outer die from Sue's Snowman Snow Globe Scene. I trimmed a little from around the edges. I cut both of the dies out of Coconut White Card. I removed the backing sheet and put both die cuts together. I added Sparkle Star CS Diamond Frost to the exposed adhesive.

I cut some poinsettias out of my other background piece using Sue's Classic Poinsettia Die Set. I added CS Glue and CS Silver Chrome Glitterbitz to the centres.

I cut Sue's Holly Swirl out of Coconut White Card twice and both dies in the Berry Bough Set out of Sky Blue Card twice.


The winner of the card from Freebie Friday on 13th October is ...............

Jan on the Fosse

Please email me at juliawattscrafts@gmail.com with your address and I'll pop your card in the post next week.

Thanks for stopping by.

Julia.
www.juliawattscrafts.co.uk

Tuesday, 26 September 2017

Glitterbitz and Weaving

Hi Bloggers.

Here's today's card -

I made this card at Ally Pally - I love the Glitterbitz with the Classic Weaving Die.

I added a piece of CE Double Self Adhesive Sheet to a piece of Coconut White Card. I measured the amount needed to cut the Classic Weaving Die, removed the backing and added Silver Chrome CS Glitterbitz. I then cut the Classic Weaving Die from it.

I cut the Intermediate Weaving Die from Coconut White Card twice and glued the 2 die cuts together at the ends only, offsetting them to fill in the gaps. I then wove these through the Classic die cut in pairs - remember 2 x Intermediate =1 x Classic in width so this ia a quick weave.

I added a frame made from Coconut White Card using dies #2 and #4 from Sue's Scalloped Lattice Frame Die Set B and Woodware 2mm Foam Tape. I trimmed away the excess and matted onto Silver Shine Pearl Card cut using die #5 from the Scalloped Lattice Frame set and then onto another piece of Coconut White.

I cut the outer die from Sue's Here Comes Santa Die Set from the DS Adhesive on card and then both dies together our of Coconut White Card. I trimmed the edge all around the DS die cut to make life easier and peeled away the backing sheet. I added my decorative die cut and then Silver Chrome Glitterbitz.

I added some foliage cut from Coconut White and Silver Shine Pearl Card using Sue's Pine Twig and Berry Bough Die Sets. I added a poinsettia made using Sue's Classic Poinsettia Die Set. I popped some CS Glue in the centre and added Silver Chrome Glitterbitz.

Thanks for stopping by.

Julia.
www.juliawattscrafts.co.uk
Free card with all website orders over £10 (ask for one in the comments box at checkout).

Thursday, 21 September 2017

Snow Globe Takeover Sneak Peek

Hi Bloggers.

Here's your sneak peek for today -

 
Products used -
Sue Wilson Dies - Snowglobe, Cottage Snow Globe Scene, Classic Poinsettia, Berry Bough, Pine Twigs
Creative Expressions - Snow Globe Sentiments, Circle Treat Cups, Snow White Micro Beads, Card : Coconut White, Sky Blue, Midnight Blue Pearl, 8mm White Pearls, Mounting Cushion
Onyx Black Versafine
That Special Touch - The Snow is Falling
Cosmic Shimmer -  Iced Flake, Sparkle Star Diamond Frost, Glue
Woodware - Stamp Press, Fine Tip Glue Applicator, Paper Shaping Tool
Phill Martin - Stamping Mat, CS Platinum Sparkle Texture Paste


Website Update - not there yet but there is progress, I can now see products! Fingers crossed, it will be back tomorrow.

Thanks for stopping by.

Julia.
www.juliawattscrafts.co.uk
Free card with all website orders over £10 (ask for one in the comments box at checkout).

Wednesday, 30 August 2017

Santa Sprinkles Shaker Card

Hi Bloggers.

Here's today's card -

For the background, I used a paper from Lisa Horton's Christmas Wishes Paper Pad. I matted onto Rich Red Card and then onto Milk Card.

I dusted a piece of Heat Emboss Acetate with an Anti-Static Pad and stamped the Woodware Santa Sprinkles Tag using Fired Brick Distress Oxide. I added CS Matt Clear Embossing Powder and heat set. I cut it out using die #5 from Sue Wilson's Holly Lattice Frame Die Set. I cut a pice of Milk Card using the same die. I added a very fine line of 3mm Foam Tape around the edges of my stamped image on the back of my Acetate, making sure there were no gaps in the foam tape. I added some CS Golden Stars and CS Iced Crystals and added the Milk die cut to seal them in. I cut die #4 from Sue's Holly Lattice Frame with die #4 from Sue's Noelle Frame out of Rich Red Card and glued it to the front of my shaker tag,

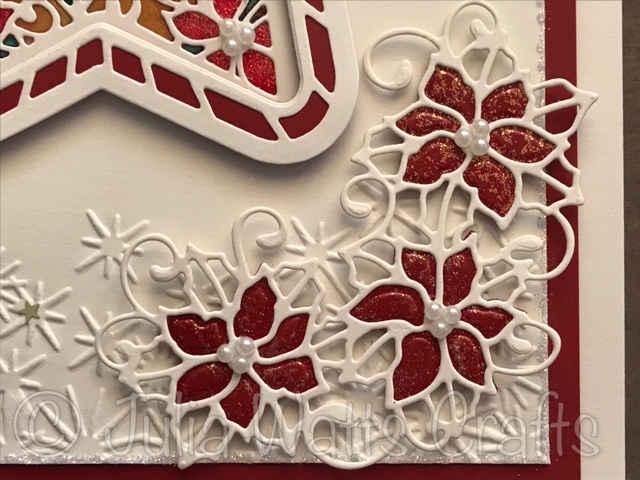
I stamped the sentiment from the Woodware Little Festive Branch Stamp Set onto Milk Card using Fired Brick Oxide and embossed with CS Matt Clear Embossing Powder. I cut it out using Sue's Stitched Flags and cut a mat out of Rich Red Card using the next sized die in the set. I shaped it and popped it onto my card with a couple of Foam Pads in the centre to keep the shape. I cut the single poinsettia from Sue's Poinsettia Flourish & Corner Die Set out of Rich Red and added some dots of Sakura Clear Star Pen.

I cut the corner Sue's Poinsettia Flourish & Corner Die Set out of Rich Red and added some dots of Sakura Clear Star Pen.

Thanks for stopping by.

Julia.
www.juliawattscrafts.co.uk
Free card with all website orders over £10 (ask for one in the comments box at checkout).

Monday, 14 August 2017

Stained Glass Poinsettia Star

Hi Bloggers.

Here's today's card -

For the background, I embossed a piece of Milk Card using the Creative Expressions Sparkle Flakes Embossing Folder. I matted onto Rich Red Card and then another piece of Milk Card. I added CS Glue around the edges of my background and then sprinkled CS Frosty Dawn Diamond Frost over. I added a spot of Quickie Glue to the centre of some of the stars in the background and popped CS Golden Stars Glitter Jewels on top.

I cut the inner die from Sue Wilson's Poinsettia Star Die Set into 2 pieces of Milk Card. I sandwiched a piece of Acetate between them using Quickie Glue - it's important to make sure that EVERY line on the die cuts in secured to the Acetate.

Working on the back, I popped some CS Clear Varnish Lacquer onto my Craft Sheet. I added one drop of CS Rich Crimson Intense Pigment Stain to it and mixed well using a Paint Brush. I then added CS Frosty Dawn Diamond Frost and mixed again. I used this to colour the Poinsettia's on my Acetate. It's better to add a really good amount, to fill the area enclosed by the die cut. I cleaned my brush and then added more Lacquer to my Craft Sheet. This time I added a drop of Emerald Intense Pigment Stain and mixed well. I used this to colour the leaves. Finally, I added some Lacquer to my Craft Sheet and mixed in some CS Rich Gold Pixie Powder. I used this to colour in all the remaining areas. I put this aside to dry - approx 2 hours. The glitter used on flowers falls to the bottom, which is actually what we want as that means it's all at the front.

I cut the largest die in Sue's Radiating Star Die Set out of Rich Red Card. I cut the largest 2 dies from the same set out of Milk Card and glued the 2 die cuts together. I left them a while for the glue to set and then added die 3 from the same set and cut. This created my frame. I added some thin strips of 2mm Foam Tape. Once my Poinsettia Star piece was dry, I added my frame and trimmed away the excess. I added some 3mm Pearls to the centres of the flowers.

I added some Clear Varnish Lacquer to my Craft Sheet and mixed in some Frosty Dawn Diamond Frost. I painted this onto a piece of Rich Red Card using a Wide Brush and put aside to dry (approx 20 mins). Once dry, I cut the flowers from Sue's Poinsettia Cluster twice. I cut the outer die from the same set out of Milk Card twice. I added some 3mm Pearls to the centre of the flowers.

I'm up at Creative Expressions for a meeting today so will be unable to send out any website orders. I will get to them tomorrow.

There have been a couple of new releases. Firstly, new masks from That Special Touch - you can find them here. I think this one will be the most popular -

Also new Cosmic Shimmer Gliiterbitz - a new glitter in 16 colours. You can find them here.

The winner of the card from Freebie Friday on 11th August is ....................................

June Fletcher

Please email me at juliawattscrafts@gmail.com with your address and I'll pop your card in the post.

I'll be back tomorrow with a sneak peek from the Woodware shows I have on Thursday.

Thanks for stopping by.

Julia.
www.juliawattscrafts.co.uk
Free card with all website orders over £10 (ask for one in the comments box at checkout).

Sunday, 13 August 2017

Poinsettia Easel Card

Hi Bloggers.

Here's today's card -

This is actually an easel card -

I started by creating my card blank. I folded a piece of Milk Card in half and trimmed it to 5 1/2" square. I scored one side of the card 2 3/4"in.

For the front (top) of my card. I trimmed another piece of Milk Card to 5 1/2" square. I matted a piece of Brunswick Green onto it. I added this to the front flap of my card.

I cut another piece of Milk Card - to 5 1/4" square. I popped the Holly Background Mask on top and inked through it with Subtle Sage CS Chalk Cloud using a Smoothie. I then inked around the edges with Subtle Sage. I added this to the front of my card.

I stamped the Poinsettia Coronet onto Milk Card using Onyx Black Versafine Ink. I stamped the sentiment from the Creative Expressions Santa's Sentiments Stamp Set in the centre.

I coloured in using Subtle Sage and Terracotta Chalk Clouds by adding a little ink to my Craft Sheet and picking it up with a Water Brush. I added a little Clear Star Stardust Pen to the centre of the flower. I cut the image out using the largest die in Sue Wilson's Art Deco Snowflake Die Set. I cut a mat out of Brunswick Green Card using the largest die in Sue's Scalloped Snowflake Frame Die Set.


I cut the corner from Sue's Poinsettia Flourish & Corner Die Set out of Brunswick Green Card 4 times. I arranged the die cuts around the edges of the background, making them 'hold hands'.

I cut the single Poinsettia from the same set out of Milk Card 4 times. I pounced Terracotta CS Chalk Cloud onto them using a Smoothie. I added some spots of Clear Star Stardust Pen.

I created another Holly Background Mask background and matted onto Brunswick Green Card. I added this to the base of my card.

I cut the poinsettia border from Sue's Poinsettia Flourish & Corner Die Set out of Brunswick Green Card. I added a little 2mm Foam Tape and added to my base as a stopper. I cut the single poinsettia out of Milk Card. I inked it with Terracotta Chalk Cloud. I added some dots of Clear Star Stardust Pen and added it to my stopper.

Phill Martin is continuing with his One Day Special on Hochanda today with shows at 7am (Netherlands), 9am, 1pm and 5pm. I'm offering 10% discount on items from the shows. You can find them here. Offer applies till midnight tonight or while stocks last. Discount will be applied automatically at checkout.

Thanks for stopping by.

Julia.
www.juliawattscrafts.co.uk
Free card with all website orders over £10 (ask for one in the comments box at checkout).

Wednesday, 9 August 2017

One Day Special on Hochanda today

Hi Bloggers.

Today's the day when I launch a new One Day Special on Hochanda with Festive Dies from Sue Wilson. I'm really looking forward to it. I hope you can join me.

Here's today's card -

I started by creating my caught in crystal style background. I used a piece of Heat Emboss Acetate. I added CS Glue, spritzed with water and spread the glue all over using my finger. I then added Cosmic Shimmer Pixie Powders in Peacock Green, Lava Red and Rich Gold so that all the glue was covered. I spritzed with a little more water and then added CS Aurora Sparkle Diamond Frost. I scrunched up a piece of White Tissue Paper, opened it out and added it to my background. I dabbed it down using a piece of Kitchen Roll and put aside to dry.

I cut die #1 from Sue Wilson's Poinsettia Star into a piece of Milk Card several times.

Once my Caught in Crystal background was dry, I glued my Poinsettia Star background to it. I made a frame out of Milk Card using Sue's Doubled Piercd Squares Set B. I added it to my backgrounds using 2mm Foam Tape and trimmed away the excess. I matted onto a couple of pieces of Milk Card.

I stamped the sentiment from Creative Expressions Santa's Sentiments Stamp Set using Onyx Black Versafine Ink. I cut it out using Sue's Pierced Flags.

I cut the outer die from Sue's Poinsettia Cluster out of Milk Card. I cut the inner flower die out of some more of my Caught in Crystal Background. I added a Cream 5mm Pearl to centre of each flower.

I completed my card by adding an 8mm Cream Pearl to each corner of my frame.

I have uploaded photos of the samples from the shows to the Gallery Section of this Blog and to my Julia Watts Crafts Facebook Page.

Shows are at 6pm and 8pm today (the 8pm show is not on Freeview but it's on Freesat and Sky and you can slo watch online at hochanda.com and they usually stream live on facebook). Shows continue tomorrow at 7am (Netherlands and hochanda.nl), 9am, 1pm and 5pm.

I'm offering 10% discount on items from the shows on my website. You can find them here. Offer applies till midnight tomorrow night or while stocks last. Discount will be applied automatically at checkout.

Thanks for stopping by.

Julia.
www.juliawattscrafts.co.uk
Free card with all website orders over £10 (ask for one in the comments box at checkout).

Saturday, 22 July 2017

Pink Poinsettia Stained Glass Window

Hi Bloggers.

I'm running my workshop locally in Milton Keynes today. Really looking forward to sharing some really cool techniques with some gorgeous products.

I thought I would share a Poinsettia Stained Glass Window in a slightly different colourway to the norm -

I've used Cosmic Shimmer Clear Varnish Lacquer with CS Intense Pigment Stains, CS Pixie Powders and CS Frosty Dawn Diamond Frost.

I started by cutting Sue Wilson's Poinsettia Stained Glass Window Die out of Coconut White Card twice. I trimmed one of them to be slightly smaller than the other,

I added Quickie Glue over every line on the back of the larger die cut and ran a thin line of CS Glue around the outside edge using a Woodware Fine Tip Glue Applicator. I popped it onto a piece of Acetate which was slightly smaller than my die cut. I pressed down firmly to make sure that it was stuck really well.

I applied Quickie Glue over every line on the front of my other die cut. Once again, I added a thin line of CS Glue around the outside edge. I popped this onto the back of the Acetate, lining the image up with the first die cut. It's really important to make sure that all of the lines are well stuck to the Acetate as the colour is applied to the back.

So, working on the back, I popped some CS Clear Varnish Lacquer onto my Craft Sheet. I added some CS Candy Pink Pixie Powder and mixed well. I then added CS Frosty Dawn Diamond Frost and mixed well. I used this to colour the Poinsettias by dabbing a good quantity of the coloured lacquer into the areas shown.

For the 'leaves' I added a drop of Citrus Lime CS Intense Pigment Stain to some CS Clear Varnish Lacquer and mixed well. I then added some Frosty Dawn Diamond Frost.

The centres of the Poinsettias are Rich Gold CS Pixie Powder added to the Clear Varnish Lacquer.

I know it's not really showing up very well but the background areas are filled in with just Frosty Dawn Diamond Frost mixed with the Clear Varnish Lacquer. This pic shows it off a bit better -

I coloured the frame of the window with the same colours as the main image.

I added a piece of Coconut White Card behind my piece once it was dry. I them matted onto Baby Pink Card, Coconut White Card and popped onto a Coconut White Card blank.

Thanks for stopping by.

Julia.
www.juliawattscrafts.co.uk
Free card with all website orders over £10 (ask for one in the comments box at checkout).
Deal of the Day today (22nd July) - Sue Wilson B
elgian Collection - Brussels only £11.99!