Hi Bloggers.
Just to answer a few questions -
I've ordered lots and they should be here by middle of next week latest.
£4.99 each plus £2.30 p&p (10p extra p&p for any additional items ordered at the same time) and will be available in my Amazon Store.
I cannot take pre-orders - sorry.
I will post on my blog as soon as I have them.
I'm glad you're all so fired up about it!
All for now.
Julia.
Wednesday, 14 November 2012


Project Book Update
Hi Bloggers.
Just to let you know that I have placed an order for the project book so I will hopefully have them by the middle of next week. They will be £4.99 each plus p&p. Here's a pic of the front cover just to wet your appetite!
 I'll let you know as soon as they arrive.
All for now.
Julia.
Just to let you know that I have placed an order for the project book so I will hopefully have them by the middle of next week. They will be £4.99 each plus p&p. Here's a pic of the front cover just to wet your appetite!
All for now.
Julia.
Merry Christmas
Hi Bloggers.
Many of you will have watched Hels Sheridan launch a load of new Tim Holtz products on Ideal World last night. I've had some of the stamps a while now and just haven't had a chance to play with them but the other night I got them out, I faffed around a lot and after about 4 hours I came up with this card. The image and the background were quick and easy but the other bits were where I faffed - adding bits, swapping bits, you know what I mean!
 For the background, I randomly stamped the stars from the Stampers Anonymous Christmas Time Stamp Set (CMS141) using Iced Spruce Distress Ink. I made sure the ink was dry and then popped it through the Grand Calibur with the Couture Creations Intrinsic Embossing Folder. I ran it though a second time to extend the pattern - it is not a repeating pattern but is so busy that you can't see the join especially if using large toppers (by the way, there has been a re-run of this folder so I'll be getting some more in my Amazon Store soon hopefully). I inked all around the edges with Iced Spruce using Cut n Dry Foam.
I stamped the snowman from the Stampers Anonymous Christmas Blueprint Stamp Set (CMS135) using Iced Spruce Distress Ink. I made sure the ink was dry and then coloured in using Tea Green and Grey Green Promarkers. I cut it out using Spellbinders Matting Basics B and inked through the die with Iced Spruce.
 I stamped the sentiment from the Stampers Anonymous Mini Holidays 4 Stamp Set (CMS142) again using the Iced Spruce Distress Ink. I cut it out using Spellbinders Fancy Framed Tags One, inked through the die with Iced Spruce and added a couple of brads.
 I cut the largest of the Spellbinders Fancy Postage Edge dies out of Kraftcore Card (Nostalgic Collection No. 14). At the emboss stage I added the Polka Dots Mask. I tied a bow out of 3 lengths of American Seam Binding (I think it's turquoise but not sure). I tied some Baker's Twine from the Vintage Set through a Polka Dot Button that I got from Sam Pool here and added it to my bow.
 I assembled the card as shown adding a Pearl Swirl- no PVA dots on this one as I had run out of Kraftcore card and hadn't anything else that toned in properly.
I do hope you try some of these stamps - they really are a joy to work with, top quality red rubber and already mounted and cut out ready to use.
Don't miss Hels' other shows today on Create & Craft and Ideal World (details on her blog).
Thanks for stopping by.
Julia.
Many of you will have watched Hels Sheridan launch a load of new Tim Holtz products on Ideal World last night. I've had some of the stamps a while now and just haven't had a chance to play with them but the other night I got them out, I faffed around a lot and after about 4 hours I came up with this card. The image and the background were quick and easy but the other bits were where I faffed - adding bits, swapping bits, you know what I mean!

I stamped the snowman from the Stampers Anonymous Christmas Blueprint Stamp Set (CMS135) using Iced Spruce Distress Ink. I made sure the ink was dry and then coloured in using Tea Green and Grey Green Promarkers. I cut it out using Spellbinders Matting Basics B and inked through the die with Iced Spruce.


I do hope you try some of these stamps - they really are a joy to work with, top quality red rubber and already mounted and cut out ready to use.
Don't miss Hels' other shows today on Create & Craft and Ideal World (details on her blog).
Thanks for stopping by.
Julia.
Tuesday, 13 November 2012
New Products, New Blog Candy and Project Book
Hi Bloggers.
I've popped some new products in my Amazon Store.
New Stamp Sets -
Vintage Vixens
 Steampunk Sirens
 Masquerade
 I now have a selection of Silky Crush Ribbon and Sheer Wrinkled Edge Ribbon which are available in 5 yard rolls. There's organza, gingham, ric-rac, crochet ribbon, sheer iridescent ribbon and vintage ribbon available in my ebay store.
I have added a few of my favourite Cosmic Shimmer Vintage Misters in Egyptian Blue, Antique Rose, Tarnished Gold and Patina.
Remember the beautiful Caught in Crystal Technique that Sue does and I demoed in one of her recent Christmas Shows? Well, I have the Cosmic Shimmer Clear Varnish Lacquer that we used for that in stock now.
I also have the very popular Wax Paper that makes releasing card from your intricate Spellbinders dies so much easier (there's a funny picture on frogs on the listing at the moment - hopefully that will be gone by the time this post goes live!).
I am not planning to stock Adirondack Dye ink pads as Amazon seem to out of the blue withdraw the facility for me to sell certain ones. The same goes for the archival. All of a sudden, without notice my listing becomes inactive and I'm no longer able to sell it. It happened with the Distress Markers and some Spellbinders dies too. If you're having difficulty getting some products please feel free to email me at juliawattscrafts@gmail.com. As long as you have a Paypal account and as long as the item is in stock at the warehouse then I should be able to help you out. I won't be stocking card anymore as it costs me too much to post out when more than one pack is ordered - sorry about that. The peach card that I used in yesterday's post is called Light Apricot and is from Creative Expressions.
The Project Book that Sue mentioned in her post today is due in at the warehouse today so I should be receiving some shortly. Yes, I do have a project in there - only one though. The selection panel were really tough and most of my designs were rejected. Will have to try harder! What I have seen of it so far is beautifully done with gorgeous photos and clear step by step instructions.
You may have noticed that I have popped up some new blog candy for when we reach 600 followers - Dear Old Dad Spellbinders Die Set from the summer release. A fun die set for guys cards.
All for now.
Julia.
I've popped some new products in my Amazon Store.
New Stamp Sets -
Vintage Vixens
I have added a few of my favourite Cosmic Shimmer Vintage Misters in Egyptian Blue, Antique Rose, Tarnished Gold and Patina.
Remember the beautiful Caught in Crystal Technique that Sue does and I demoed in one of her recent Christmas Shows? Well, I have the Cosmic Shimmer Clear Varnish Lacquer that we used for that in stock now.
I also have the very popular Wax Paper that makes releasing card from your intricate Spellbinders dies so much easier (there's a funny picture on frogs on the listing at the moment - hopefully that will be gone by the time this post goes live!).
I am not planning to stock Adirondack Dye ink pads as Amazon seem to out of the blue withdraw the facility for me to sell certain ones. The same goes for the archival. All of a sudden, without notice my listing becomes inactive and I'm no longer able to sell it. It happened with the Distress Markers and some Spellbinders dies too. If you're having difficulty getting some products please feel free to email me at juliawattscrafts@gmail.com. As long as you have a Paypal account and as long as the item is in stock at the warehouse then I should be able to help you out. I won't be stocking card anymore as it costs me too much to post out when more than one pack is ordered - sorry about that. The peach card that I used in yesterday's post is called Light Apricot and is from Creative Expressions.
The Project Book that Sue mentioned in her post today is due in at the warehouse today so I should be receiving some shortly. Yes, I do have a project in there - only one though. The selection panel were really tough and most of my designs were rejected. Will have to try harder! What I have seen of it so far is beautifully done with gorgeous photos and clear step by step instructions.
You may have noticed that I have popped up some new blog candy for when we reach 600 followers - Dear Old Dad Spellbinders Die Set from the summer release. A fun die set for guys cards.
All for now.
Julia.
Hello
Hi Bloggers.
This is the card that I messed up when I demoed it last week so I thought I'd explain how it should be done here!
 So, first I cut the aperture out of Foundations patterned paper using the backing die from the Spellbinders CFT Puzzle Effect Die Set. After I had embossed it, I left the die in place and then placed the piece over a larger piece of Foundations Shades Paper. I placed the corresponding CFT die inside the aperture, secured it and then removed the aperture piece including the backing die (this is what I forgot to do in the demo). I ran the CFT die through the Grand Calibur, embossed it and the folded and tucked in the appropriate places.
I cut 2 of the little corner style pieces out of Foundations Shades paper using the CFT Diamond Strips & Accents die set, folded and tucked them and then put them together securing with a brad.
 I cut 3 corners using the French Frills die set and 3 curves using the Puzzle Effect die set and added them as shown.
 I stamped the sentiment from the Creative Expressions Trees of Imagination Stamp Set using Jet Black Archival and embossed with Cosmic Shimmer Clear Embossing Powder. I cut it out using the tag die from the Diamond Strips & Accents die set and folded and tucked.
 I assembled the card as shown and added some dots of Cosmic Shimmer Pearlescent PVA in Silver Lustre around the edges.
Thanks for stopping by.
Julia.
This is the card that I messed up when I demoed it last week so I thought I'd explain how it should be done here!

I cut 2 of the little corner style pieces out of Foundations Shades paper using the CFT Diamond Strips & Accents die set, folded and tucked them and then put them together securing with a brad.


Thanks for stopping by.
Julia.
Monday, 12 November 2012
There are always Flowers
Hi Bloggers.
Back to peach today.
 For the background, I ran some white card through the Grand Calibur with the Couture Creations Lovingly Baroque Embossing Folder. I ran it through a second time to extend the pattern and then edged it with Peach Bellini Adirondack Dye Ink using Cut n Dry Foam.
I cut 3 of the Grand Decorative Ovals - the smallest from peach card and at the emboss stage I added the Small Polka Dots Mask, the next size up from white card and the next size from peach card. I inked through the die on all of them with Peach Bellini.
 I stamped the sentiment from the Thoughtful Sentiments Stamp Set using Jet Black Archival and embossed with Cosmic Shimmer Clear Embossing Powder. I cut it out using Spellbinders Labels 28 and inked through the die with Peach Bellini.
 I made 2 flowers out of peach card using Spellbinders Spiral Blossom Four - I inked through the die with Peach Bellini on one of them prior to folding. I cut some leaves out using the French Frills and Botanical Swirls & Accents die sets. I inked through the die with Peach Bellini. I used some leftover bits from some pearl swirls as leaves too.
 I assembled the card as shown adding some pearls in each corner, a pearl swirl and some dots of Cosmic Shimmer Pearlescent PVA in White around the edges.
Thanks for stopping by.
Julia.
Back to peach today.

I cut 3 of the Grand Decorative Ovals - the smallest from peach card and at the emboss stage I added the Small Polka Dots Mask, the next size up from white card and the next size from peach card. I inked through the die on all of them with Peach Bellini.


Thanks for stopping by.
Julia.
Sunday, 11 November 2012
Life is not Measured
Hi Bloggers.
I've used the layout on this card many times with various dies. It's one of Sue's layouts. I love the sentiment on this one. I'm sure I've heard it in a movie but can't think which one.
 The background is made by running some Kraftcore card through the Grand Calibur with the Spellbinders A4 M-Bossabilities Garden Lattice Folder. I sanded it to reveal the core. I cut a panel of Milk card and randomly stamped one of the swirls from the Creative Expressions Mini Swirl Stamp Set using Jet Black Archival. I inked around the edges of the panel with Caramel Adirondack Dye Ink using Cut n Dry Foam.
I cut 2 Octagon Cut, Fold & Tuck borders out of black card using the Octagon Strips and Accents die set. I folded and tucked them and then glued them to a narrow panel of Milk Card.
 I stamped the sentiment from the Creative Expressions Fanciful Phrases Stamp Set using Jet Black Archival and embossed with Creative Expressions Clear Embossing Powder. I cut it out using Labels 28 and inked through the die with Caramel Ink. I cut the next size up and inked through the die on that one too. I cut 2 x Scalloped Labels One out of black card. At the emboss stage I added the Delicate Mask.
 I assembled the 3 background sections on to some black card and then wrapped some black silky crush ribbon around it. I made a large bow using 2 lengths of the same ribbon. I cut a small motif out of Kraftcore using the Botanical Swirls & Accents die set. I sanded it to reveal the core, popped it on top of my bow and then added a Black Dazzler. I also added a couple of Black Pearl Decorative Stick Pins.
 I assembled the rest of the card as shown adding some 5mm Black Pearls in the top right hand corner and some dots of Cosmic Shimmer Pearlescent PVA in Black Pearl around the edges.
Thanks for stopping by.
Julia.
I've used the layout on this card many times with various dies. It's one of Sue's layouts. I love the sentiment on this one. I'm sure I've heard it in a movie but can't think which one.

I cut 2 Octagon Cut, Fold & Tuck borders out of black card using the Octagon Strips and Accents die set. I folded and tucked them and then glued them to a narrow panel of Milk Card.


Thanks for stopping by.
Julia.
Saturday, 10 November 2012
Inspire
Hi Bloggers.
Another blue card today. I really like the Adirondack Aqua Dye Ink Pad.
 For the background, I popped a piece of coconut white card through the Grand Calibur with the Couture Creations Annalee Embossing Folder. The card was just a little wider than the folder. I inked around the edges with the Aqua ink using Cut n Dry Foam.
I cut a border from white card using the Spellbinders Octagon Strips and Accents die set (I just used the backing die and not the Cut, Fold & Tuck insert). At the emboss stage, I added the Small Polka Dots Mask. I then inked through the die with the Aqua ink.
I cut the dressmakers dummy from the French Frills die set twice - once out of white card and once out of Foundations paper. I inked through the die with Aqua on both of them. I used the stand cut from white card and the bodice cut from Foundations Paper for this card.
I stamped the sentiment from the Creative Expressions Thoughtful Sentiments Stamp Set using Jet Black Archival and embossed with Cosmic Shimmer Clear Embossing Powder. I cut it out using Labels 28 and inked through the die with Aqua.
 I cut 6 of the 3rd size up of the Exquisite Circles dies - 3 from one side of double-sided Foundations Paper and 3 from the other side of the paper. I lined them up on my craft sheet and spritzed them with water. I then scrunched each one up and then unfolded them all. I stacked them on top of each other alternating the light shade with the darker shade die cut. I put a brad through the centre and then starting with the top layer, scrunched each layer up towards the centre. When I had finished, I pulled them apart slightly and then put it aside to dry. Once dry, they're pretty solid. I cut a couple of leaves from the Foundations Paper using the Botanical Swirls & Accents die set.
 I assembled the card as shown adding some Pearl Swirls and some dots of Cosmic Shimmer Pearlescent PVA in White around the edges.
Thanks for stopping by.
Julia.
Another blue card today. I really like the Adirondack Aqua Dye Ink Pad.

I cut a border from white card using the Spellbinders Octagon Strips and Accents die set (I just used the backing die and not the Cut, Fold & Tuck insert). At the emboss stage, I added the Small Polka Dots Mask. I then inked through the die with the Aqua ink.
I cut the dressmakers dummy from the French Frills die set twice - once out of white card and once out of Foundations paper. I inked through the die with Aqua on both of them. I used the stand cut from white card and the bodice cut from Foundations Paper for this card.
I stamped the sentiment from the Creative Expressions Thoughtful Sentiments Stamp Set using Jet Black Archival and embossed with Cosmic Shimmer Clear Embossing Powder. I cut it out using Labels 28 and inked through the die with Aqua.


Thanks for stopping by.
Julia.
Friday, 9 November 2012
We've reached 500 followers
Hi Bloggers.
We've passed the 500 followers mark so I have drawn a name out for the hat for the Keyboard Icons Spellbinders die set.
And the winner is ............
We've passed the 500 followers mark so I have drawn a name out for the hat for the Keyboard Icons Spellbinders die set.
And the winner is ............
Classylady42
Congratulations! Please email me at juliawattscrafts@gmail.com with your address and I'll get your prize out to you.
I'll post some more candy soon.
All for now.
Julia.
It's time to Bloom
Hi Bloggers.
Thanks for all the comments yesterday. No rest for me though. I've just been given the Toolshed show on Sunday 18th November so yesterday I started prepping that. I also had a lot of orders to catch up on from my Amazon Store and I had to go food shopping.
Here's today's card.
 For the background, I spritzed some Milk Card with Cosmic Shimmer Tarnished Gold Vintage Mister. I dried it with my heat tool and then randomly stamped a flower from the Creative Expressions Whimsical Floral Stamp Set using Peach Bellini Adirondack Dye Ink and a swirl from the same stamp set using Caramel Adirondack Dye Ink. I made sure that the ink was dry and then popped it inside the Couture Creations Lovingly Baroque Embossing Folder and through the Grand Calibur. I ran it through a second time to extend the pattern and then inked around the edges with Caramel ink.
I cut the smallest of the Spellbinders Grand Decorative Ovals One out of Milk Card. At the embossing stage I added the Small Polka Dots Mask. I inked through the die with Caramel ink. I cut the dressmaker's dummy from the Spellbinders French Frills die set out of Foundations Double-sided Paper - once on one side of the paper and once on the other side of the paper. I inked through the die on both of them with Caramel ink. The idea was to use a different outer to the inner of the dummy - you get a spare set for another card.
 I stamped the sentiment from the Creative Expressions Whimsical Floral Stamp Set using Caramel ink and embossed with Cosmic Shimmer Clear Embossing Powder. I cut it out using Spellbinders Labels 28 and inked through the die with Caramel.
 I made 3 flowers using Spellbinders Spiral Blossom 4 - one I spritzed with Tarnished Gold before cutting and then inked with Peach Bellini before rolling up, another I inked through the die with Caramel ink before rolling and the last one I made from Foundations paper. I cut some leaves from the Foundations paper using the Spellbinders Botanical Swirls & Accents die set and the French Frills die set.
 I assembled the card as shown adding some dots of Cosmic Shimmer Pearlescent PVA in Olympic Gold around the edges.
Thanks for stopping by.
Julia.
Thanks for all the comments yesterday. No rest for me though. I've just been given the Toolshed show on Sunday 18th November so yesterday I started prepping that. I also had a lot of orders to catch up on from my Amazon Store and I had to go food shopping.
Here's today's card.

I cut the smallest of the Spellbinders Grand Decorative Ovals One out of Milk Card. At the embossing stage I added the Small Polka Dots Mask. I inked through the die with Caramel ink. I cut the dressmaker's dummy from the Spellbinders French Frills die set out of Foundations Double-sided Paper - once on one side of the paper and once on the other side of the paper. I inked through the die on both of them with Caramel ink. The idea was to use a different outer to the inner of the dummy - you get a spare set for another card.


Thanks for stopping by.
Julia.
Thursday, 8 November 2012
Live in the Moment
Hi Bloggers.
Whew! What a busy couple of days. I really didn't expect the Pick of the Day to sell out so quickly. I'm only sorry that I didn't get to do more demos and show you more of the fab Creative Expressions products that I had on the show. Thank you so much for all your emails and comments her on the blog. Much appreciated as always.
Here's today's card which was a demo I didn't get to do -
 I started by running some Milk card through the Grand Calibur with the Spellbinders A4 Garden Lattice M-Bossabilities Folder. I cut the second largest of the Spellbinders Grand Decorative Circles One out of black card. I cut the next smallest size out of milk card and at the emboss stage I added the other side of the Garden Lattice M-Bossabilities Folder.
 I stamped the sentiment from the Creative Expressions Trees of Imagination Stamp Set using Jet Black Archival and embossed with Cosmic Shimmer Clear Embossing Powder. I cut it out using the largest 2 sizes of the Spellbinders Exquisite Circles dies nested together. The outer piece slots over the points of the inner piece. I cut a Scalloped Labels One out of black card.
 I tied a bow using 2 lengths of black Silky Crush Ribbon. I cut a motif out of cream card using the Spellbinders Botanical Swirls & Accents die set, popped a Black Dazzler on top and added it to my bow. I also added a couple of Black Pearl Decorative Stick Pins.
 I assembled the card as shown and adding some Black Pearls in the corners and some dots of Cosmic Shimmer Pearlescent PVA in Black Pearl.
Thanks for stopping by.
Julia.
Whew! What a busy couple of days. I really didn't expect the Pick of the Day to sell out so quickly. I'm only sorry that I didn't get to do more demos and show you more of the fab Creative Expressions products that I had on the show. Thank you so much for all your emails and comments her on the blog. Much appreciated as always.
Here's today's card which was a demo I didn't get to do -


Thanks for stopping by.
Julia.
Wednesday, 7 November 2012
Just Because
Hi Bloggers.
Hope you enjoyed the shows yesterday - 8 more today! First one is at 8am on Ideal World with Zoe.
Here's today's card -
 For the background, I spritzed through the Leaves Mask with Cosmic Shimmer Egyptian Blue Vintage Mister. I dried it with my heat tool and then randomly stamped one of the swirls from the Creative Expressions Mini Swirl Stamp Set using Aqua Adirondack Dye Ink Pad.
I cut the smallest of the Spellbinders Grand Decorative Ovals out of white card. At the emboss stage I added the Couture Creations Alora Embossing Folder. I inked through the die with the Aqua ink. I cut the Eiffel Tower from the Spellbinders French Frills die set out of pale blue card.
 I stamped the sentiment from the Creative Expressions Trees of Imagination Stamp Set using Jet Black Archival and embossed with Cosmic Shimmer Clear Embossing Powder. I cut it out using the tag die from the French Frills set and inked through the die with Aqua.

 I assembled the card as shown adding some dots of Cosmic Shimmer Pearlescent PVA in Summer Blue around the edges.
Hope you can join me for some of the shows today (details in the left-hand sidebar).
Thanks for stopping by.
Julia.
Hope you enjoyed the shows yesterday - 8 more today! First one is at 8am on Ideal World with Zoe.
Here's today's card -

I cut the smallest of the Spellbinders Grand Decorative Ovals out of white card. At the emboss stage I added the Couture Creations Alora Embossing Folder. I inked through the die with the Aqua ink. I cut the Eiffel Tower from the Spellbinders French Frills die set out of pale blue card.


I tied a bow using 2 lengths of White Sheer Wrinkle Edge Ribbon and added a Frosted Blue Dazzler and a couple of White Pearl Decorative Stick Pins.

Hope you can join me for some of the shows today (details in the left-hand sidebar).
Thanks for stopping by.
Julia.
Tuesday, 6 November 2012
You are one of Life's Treasures
Hi Bloggers.
Tonight I'll be launching the Spellbinders Pick of the Day on Ideal World at 9pm. This is one of the demos I have prepped for the shows but as yet I still haven't decided which demo to start with! I have Dennice for both shows this evening. I haven't worked with her before so it will be interesting to see how the shows go.
 For the background, I ran some Coconut White Card through the Grand Calibur with the Spellbinders A4 Garden Lattice M-Bossabilities Folder. I inked around the edges with Shell Pink Adirondack Dye Ink Pad using Cut n Dry Foam.
I cut 2 corners out of grey card using the Spellbinders Botanical Swirls & Accents die set.
 I cut 2 base corners out of grey card using the Spellbinders Cut, Fold & Tuck Octagon Strips & Accents die set. I then cut 2 of the corner Cut, Fold & Tucks from the same die set out of pink card. I folded and tucked the pink die cuts and then glued them in place over the grey bases. I cut 2 of the circular motifs from the same die set out of white card and inked through the die with the Shell Pink Ink. I folded and tucked them and added a 3mm White Pearl in the centre of each.
 I stamped the sentiment from the Creative Expressions Whimsical Floral Stamp Set using Jet Black Archival and embossed with Cosmic Shimmer Clear Embossing Powder. I cut it out using Spellbinders Labels 28 and inked through the die with Shell Pink. I also cut the next size up of Labels 28 and again inked through the die with Shell Pink. I cut 2 x Scalloped Labels One out of pink card and at the emboss stage I added the Small Polka Dots Mask.

I assembled the card as shown adding some Self Adhesive Pearl Swirls, some 5mm White Pearls to the Octagon corners and some dots of Cosmic Shimmer Pearlescent PVA in Vintage Pink around the edges.
Hope you can join me for some of the shows (full list in the left-hand sidebar).
Thanks for stopping by.
Julia.
Tonight I'll be launching the Spellbinders Pick of the Day on Ideal World at 9pm. This is one of the demos I have prepped for the shows but as yet I still haven't decided which demo to start with! I have Dennice for both shows this evening. I haven't worked with her before so it will be interesting to see how the shows go.

I cut 2 corners out of grey card using the Spellbinders Botanical Swirls & Accents die set.


I assembled the card as shown adding some Self Adhesive Pearl Swirls, some 5mm White Pearls to the Octagon corners and some dots of Cosmic Shimmer Pearlescent PVA in Vintage Pink around the edges.
Hope you can join me for some of the shows (full list in the left-hand sidebar).
Thanks for stopping by.
Julia.
Monday, 5 November 2012
Because I Care
Hi Bloggers.
Here's another sample card from this week's Spellbinders Pick of the Day.
 This is quite a simple card but with change of sentiment and/or colour it could be used for any occasion - a 'store cupboard' card, if you like.
The background was made using the Couture Creations Timeless Embossing Folder and some pale blue card through the Grand Calibur. I edged it with Adirondack Aqua Dye Ink using Cut n Dry Foam. I wrapped a piece of Sky Blue American Seam Binding around the centre securing it at the back.
I stamped the sentiment from the Creative Expressions Celebration Stamp Set and cut it out using the largest of the Spellbinders Exquisite Circles and inked through the die with Aqua ink using Cut n Dry Foam.
I cut the frame out of pale blue card using the Spellbinders Botanical Swirls & Accents die set and inked through the die with Aqua.
 I tied a messy bow using 3 lengths of sky blue American Seam Binding and added a Frosted Blue Dazzler.
I assembled the card as shown adding 3 5mm Pearls in White in the top left hand corner and some dots of Cosmic Shimmer Pearlescent PVA in White around the edges.
By the way this blog is being featured in the December issue of Papercraft Inspirations Magazine with the card in this post.
Thanks for stopping by.
Julia.
Here's another sample card from this week's Spellbinders Pick of the Day.

The background was made using the Couture Creations Timeless Embossing Folder and some pale blue card through the Grand Calibur. I edged it with Adirondack Aqua Dye Ink using Cut n Dry Foam. I wrapped a piece of Sky Blue American Seam Binding around the centre securing it at the back.
I stamped the sentiment from the Creative Expressions Celebration Stamp Set and cut it out using the largest of the Spellbinders Exquisite Circles and inked through the die with Aqua ink using Cut n Dry Foam.
I cut the frame out of pale blue card using the Spellbinders Botanical Swirls & Accents die set and inked through the die with Aqua.

I assembled the card as shown adding 3 5mm Pearls in White in the top left hand corner and some dots of Cosmic Shimmer Pearlescent PVA in White around the edges.
By the way this blog is being featured in the December issue of Papercraft Inspirations Magazine with the card in this post.
Thanks for stopping by.
Julia.
Sunday, 4 November 2012
Pick of the Day Sneak Peak
Hi Bloggers.
Today I'm sharing a card I've made for the Pick of the Day starting 9pm on Tuesday on Ideal World. It's not a demo card as it took me ages to make all the flowers. I found once I had started I just kept on adding more. This is definitely OTT on embellishments but once in a while it's fun to do.
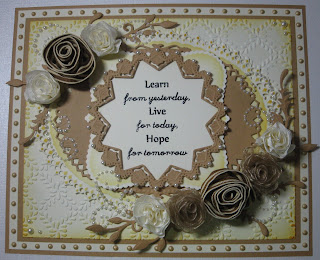 The background is made using the Spellbinders A4 M-bossability Folder Garden Trellis and some Milk Card from the Neutral Card Pack. I'm loving the A4 folders - no fiddling about to get the pattern lined up. I edged the piece with Caramel Adirondack Dye Ink using Cut n Dry Foam.
I cut the third size up of the Grand Decorative Ovals One out of Milk card and inked through the dye with Caramel. I then cut the second size out of tan card.
I stamped the sentiment from the Creative Expressions Thoughtful Sentiments Stamp Set onto Milk card using Jet Black Archival and embossed with Cosmic Shimmer Clear Embossing Powder. I cut it out using Spellbinders Scalloped Labels One and inked through the die with Caramel. I cut the largest 2 dies of the Spellbinders Exquisite Circles nested inside each other out of tan card and added a 3mm white pearl to each point.
 I cut some leaves out of tan card using the Botanical Swirls & Accents die set and the French Frills die set. I made ribbon roses out of Brown/Ivory Grosgrain (cut in half lengthways), Champagne Wrinkle Edge Ribbon (again cut in half lengthways) and Chalk White American Seam Binding.

 I assembled the card as shown adding some Pearl Swirls and some dots of Cosmic Shimmer Pearlescent PVA in Golden Pearl around the edges. I also added some 5mm and 3mm pearls in white to a couple of the corners.
I'll be back tomorrow with another sneak peak.
Thanks for stopping by.
Julia.
Today I'm sharing a card I've made for the Pick of the Day starting 9pm on Tuesday on Ideal World. It's not a demo card as it took me ages to make all the flowers. I found once I had started I just kept on adding more. This is definitely OTT on embellishments but once in a while it's fun to do.

I cut the third size up of the Grand Decorative Ovals One out of Milk card and inked through the dye with Caramel. I then cut the second size out of tan card.
I stamped the sentiment from the Creative Expressions Thoughtful Sentiments Stamp Set onto Milk card using Jet Black Archival and embossed with Cosmic Shimmer Clear Embossing Powder. I cut it out using Spellbinders Scalloped Labels One and inked through the die with Caramel. I cut the largest 2 dies of the Spellbinders Exquisite Circles nested inside each other out of tan card and added a 3mm white pearl to each point.


I'll be back tomorrow with another sneak peak.
Thanks for stopping by.
Julia.
Saturday, 3 November 2012
Yay! Lappy is back!
Hi Bloggers.
I'm happy to report that I have my pc back. I did have to spend a couple of hours at pc world yesterday while they put my data back where it should have been and re-installed my printer.
Here's today's card-

I'm happy to report that I have my pc back. I did have to spend a couple of hours at pc world yesterday while they put my data back where it should have been and re-installed my printer.
Here's today's card-

The images are from Urban Beats, stamped using Jet Black Archival and embossed with clear powder then cut out using Scalloped Labels One. The text is also from Urban Beats and cut out with Labels 28. The background is Creative Expressions Crackle Embossing Folder inked with Stormy Sky Distress Ink. I wrapped some Baker's Twine from the Primary set around the card and added some buttons.
Sorry for brief description but Kathryn is home for the weekend and I want to spend as much time with her as poss.
Thanks for stopping by.
Julia.
Friday, 2 November 2012
Pick of the Day times
Hi Bloggers.
I have the times and channels for Tuesday's Pick of the Day -
Ideal World : Tuesday 9pm and 11pm, Wednesday 8am, 10am, 1pm, 4pm and 7pm
Create & Craft : Wednesday 12noon, 3pm and 5pm
All for now.
Julia.
I have the times and channels for Tuesday's Pick of the Day -
Ideal World : Tuesday 9pm and 11pm, Wednesday 8am, 10am, 1pm, 4pm and 7pm
Create & Craft : Wednesday 12noon, 3pm and 5pm
All for now.
Julia.
Graffiti Wall
PHi Bloggers.
Another post scheduled on the ipad. I may have to go out and buy another machine as I'm getting desperate now.
You may see a few of the samples I've made for the Pick of the Day next Tuesday on a little video on either C & C or Ideal World as a preview. Let me know if you spot them. I'm a bit nervous about letting them out of my sight. I just hope I get them back for the shows!
Today's card was based on one I spotted that Sam had made. I'm not really happy with it. It's a bit flat. Sam's is much better. I thought I'd share it anyway - please be kind!

I stamped the aerosal can from the Urban Life Stamp Set using Jet Black Archival and embossed with Cosmic Shimmer Clear Embossing Powder. I added a couple of Idea-ology Sprocket Gears and a Faux Screw brad. I added the wall to some craft card and drew some lines around it with a black fineliner. I wrapped some black baker's twine around the card and added a button.
I also added some dots of Cosmic Shimmer Pearlescent PVA in Black Pearl around the edges.
Thanks for stopping by.
Julia.
Another post scheduled on the ipad. I may have to go out and buy another machine as I'm getting desperate now.
You may see a few of the samples I've made for the Pick of the Day next Tuesday on a little video on either C & C or Ideal World as a preview. Let me know if you spot them. I'm a bit nervous about letting them out of my sight. I just hope I get them back for the shows!
Today's card was based on one I spotted that Sam had made. I'm not really happy with it. It's a bit flat. Sam's is much better. I thought I'd share it anyway - please be kind!

This card is all about the background. On some white card I spritzed some Dark Spice from the Winter Garden Misting Ink set. I then took the nozzle out of the Black Night Mister and splatted them over the background. I randomly stamped some of the images from the Urban Beats, Urban Life and Silhouette Skateboard stamp sets using various distress inks. I also stamped 'jake 14' from Sam's Vintage Alphabet and Mini Alpha Stamp Sets in Jet Black Archival (I don't know anyone called Jake by the way). I then popped the piece through the Grand Calibur with the Creative Expressions Brick Embossing Folder. I tore around the edges and inked with Pumice Stone Distress Ink using Cut N Dry Foam. I sanded it to reveal the white core of the card.
I stamped the aerosal can from the Urban Life Stamp Set using Jet Black Archival and embossed with Cosmic Shimmer Clear Embossing Powder. I added a couple of Idea-ology Sprocket Gears and a Faux Screw brad. I added the wall to some craft card and drew some lines around it with a black fineliner. I wrapped some black baker's twine around the card and added a button.
I also added some dots of Cosmic Shimmer Pearlescent PVA in Black Pearl around the edges.
Julia.
Thursday, 1 November 2012
Happy Birthday
Hi Bloggers.
Still on the ipad today - waiting to get an update from PC World. So just in case I don't get my laptop back or have problems getting on the web, I thought I'd schedule a post just in case.
Today I have another card made with Sam Poole's Urban Beats Stamp Set.

Still on the ipad today - waiting to get an update from PC World. So just in case I don't get my laptop back or have problems getting on the web, I thought I'd schedule a post just in case.
Today I have another card made with Sam Poole's Urban Beats Stamp Set.

One of my fun backgrounds again - I do hope I'm encouraging you to have a go at these, they are so easy to do. So, I placed the Grid Mask on to some khaki card and spritzed with the Soft Moss Mister from the Winter Garden Set. I removed the mask and dried it with my heat tool. I then randomly stamped the cassette stamp using Old Paper Distress Ink (you can just about see it) and the Music text stamp using Forest moss Distress Ink. I inked all around the edges with Forest Moss Distress Ink using Cut n Dry Foam. I made sure all the ink was dry and then dusted it with an Anti-static bag. I stamped the shooting stars stamp using Jet Black Archival and embossed with Cosmic Shimmer Clear Embossing Powder.
I spritzed some more Soft Moss mister on to some more khaki card, dried it, dusted it with my anti-static bag and stamped the ghetto blaster and the Happy Birthday text (from the Anything is possible stamp set) using Jet Black Archival and embossed with clear powder. I tore around each one and inked around the edges with Forest Moss. I swiped some Barn Door Distress ink onto my craft sheet and picked some colour up with a paint brush and a little water. I coloured the areas of the ghetto blaster as shown.
I assembled the card as shown adding some staples to the top left and bottom corners of my background before adding them to my black mat. I also added some dots of Cosmic Shimmer Pearlescent PVA in Black Pearl around the edges.
Cool, eh?
Thanks for stopping by.
Julia.
Wednesday, 31 October 2012
Simply Fabulous
Hi Bloggers.
Once again, I'm doing this post on the other half's ipad so the photo isn't brilliant and there's only one - but at least I'm able to post a card.
I cheated a bit with this card and used the background of a demo I didn't get to finish on an earlier show.

Once again, I'm doing this post on the other half's ipad so the photo isn't brilliant and there's only one - but at least I'm able to post a card.
I cheated a bit with this card and used the background of a demo I didn't get to finish on an earlier show.

To recap - for the background, I spritzed a piece of Coconut White card with Marigold Cosmic Shimmer Vintage Mister. I then inked through the Floral Vines Mask with Wild Honey Distress Ink, moving the mask around so that the whole area was covered.
I stamped the image from the Stylish Ladies Stamp Set using Jet Black Archival and embossed with Cosmic Shimmer Clear Embossing Powder. I coloured the image in using Cosmic Shimmer Matt Drawing Inks. I also used some of the Pearl Shine from the Metallics Set to colour in the feather headress, the gloves and the dog's lead. I cut the image out using Labels 28 and inked through the die with Wild Honey.
I stamped the sentiment from the same stamp set using Jet Black Archival and embossed with Cosmic Shimmer Clear Embossing Powder. I cut it out using Spellbinders Scalloped Labels One and inked through the die with Wild Honey.
I tied a messy bow using Blue White American Seam Binding and added the flower I had made in the earlier show using the Creative Expressions Floral Embossing Folder. I also added a couple of White Pearl Decorative Stick Pins.
I assembled the card as shown adding some dots of Cosmic Shimmer Pearlescent PVA in White around the edges.
Thanks for stopping by.
Julia.
Subscribe to:
Posts (Atom)