Hi Bloggers.
Just a quickie to let you know that all colours of the Cosmic Shimmer Polished Silk Glitters are now back in stock in my Amazon Store.
I've managed to get some more Basket Weave and Sea Garden A4 Embossing Folders - you can see them here.
I have added a few more of Sue's To Die For ... Pre Cut Stamps and you can find them here.
I've topped up on Ribbon, Couture Creations Embossing Folders, Dazzlers, Embossing Powders and lots more.
If you're quick, you might be lucky enough to grab one of the Ladies Stamp Sets!
All for now.
Julia
Friday, 19 April 2013
Congratulations
Hi Bloggers.
Another ladies card today - this image is also available as a Pre Cut Single and I have it in stock at the moment in my Amazon Store here.
 For the background, I used Coconut White Card. With the stamp in my hand, I randomly stamped the Hexagon Script stamp using Barn Door Distress Ink and then the Rose Background Stamp using Fired Brick Distress Ink. I made sure the ink was dry and then dusted the whole area with an anti-static bag. I stamped the little rose stamp that comes on the Creative Expressions Elegant Ladies Stamp Set, using Perfect Medium, randomly over the background and embossed with Cosmic Shimmer Coral Glow Aurora Embossing Powder from the Brights Set. I inked around the edges of the background with Barn Door using Cut n Dry Foam.
I stamped the image using Jet Black Archival and embossed with Cosmic Shimmer Clear Embossing Powder. I coloured in using Cosmic Shimmer Matt Drawing Inks. I used Marigold and Dark Spice from the Autumn Shades Set, Sunflower from the Summer Fayre Set and Warm Delight from the Skin Tones Set. I cut it out using the smallest of the Spellbinders Grand Decorative Ovals One dies and inked through the die with Barn Door. I cut the largest of the Spellbinders Labels 25 dies. At the emboss stage I added the Couture Creations Turkish Delight Embossing Folder. I inked through the die with Barn Door.
 I stamped the sentiment from the Elegant Ladies Stamp Set using Jet Black Archival and embossed with the clear powder. I cut it out using Spellbinders Card Creator Distressed Edges and inked through the die with Barn Door.
 I tied a bow using 2 lengths of White Silky Crush Ribbon. I added a Red Dazzler and a couple of White Pearl Decorative Stick Pins.
 I assembled the card as shown adding some dots of Cosmic Shimmer Pearlescent PVA in White around the edges.
I think I may share a sneak peak from Tuesday's shows tomorrow.
Thanks for stopping by.
Julia.
Another ladies card today - this image is also available as a Pre Cut Single and I have it in stock at the moment in my Amazon Store here.

I stamped the image using Jet Black Archival and embossed with Cosmic Shimmer Clear Embossing Powder. I coloured in using Cosmic Shimmer Matt Drawing Inks. I used Marigold and Dark Spice from the Autumn Shades Set, Sunflower from the Summer Fayre Set and Warm Delight from the Skin Tones Set. I cut it out using the smallest of the Spellbinders Grand Decorative Ovals One dies and inked through the die with Barn Door. I cut the largest of the Spellbinders Labels 25 dies. At the emboss stage I added the Couture Creations Turkish Delight Embossing Folder. I inked through the die with Barn Door.


I think I may share a sneak peak from Tuesday's shows tomorrow.
Thanks for stopping by.
Julia.
Thursday, 18 April 2013
Rules!
Hi Bloggers.
I still have a few cards to share from the Ladies shows - hope you don't mind.
 For the background, I used Coconut White Card and with the stamp in my hand, I randomly stamped the Rose Background Stamp using Tumbled Glass Distress Ink and then I filled in the gaps with the Art Collage Stamp using Stormy Sky Distress Ink. I made sure the ink was dry and then ran it through the Grand Calibur with the Couture Creations Passion Embossing Folder. I ran it through a second time to extend the pattern and then inked around the edges with Tumbled Glass using Cut n Dry Foam.
I stamped the image from the Creative Expressions Party Ladies Stamp Set using Jet Black Archival and embossed with Cosmic Shimmer Clear Embossing Powder. I coloured in using Cosmic Shimmer Matt drawing Inks. I used Blue Lace and Blue Cotton from the Soft Velvet Set, Umber from the Autumn Shades Set and Cosmic Tone from the Skin Tones Set. I cut it out using Spellbinders Labels 25 and inked through the die with Tumbled Glass.
 I stamped the sentiment from the same stamp set again using the Jet Black Archival and embossed with clear powder. I cut it out with Spellbinders Card Creator Distressed Edges and inked through the die with Tumbled Glass.
 I tied a bow using Blue/White Striped Grosgrain Ribbon and added a Frosted Blue Dazzler.
 I assembled the card as shown adding some dots of Cosmic Shimmer Pearlescent PVA in Summer Blue around the edges.
Thanks for stopping by.
Julia.
I still have a few cards to share from the Ladies shows - hope you don't mind.

I stamped the image from the Creative Expressions Party Ladies Stamp Set using Jet Black Archival and embossed with Cosmic Shimmer Clear Embossing Powder. I coloured in using Cosmic Shimmer Matt drawing Inks. I used Blue Lace and Blue Cotton from the Soft Velvet Set, Umber from the Autumn Shades Set and Cosmic Tone from the Skin Tones Set. I cut it out using Spellbinders Labels 25 and inked through the die with Tumbled Glass.


Thanks for stopping by.
Julia.
Wednesday, 17 April 2013
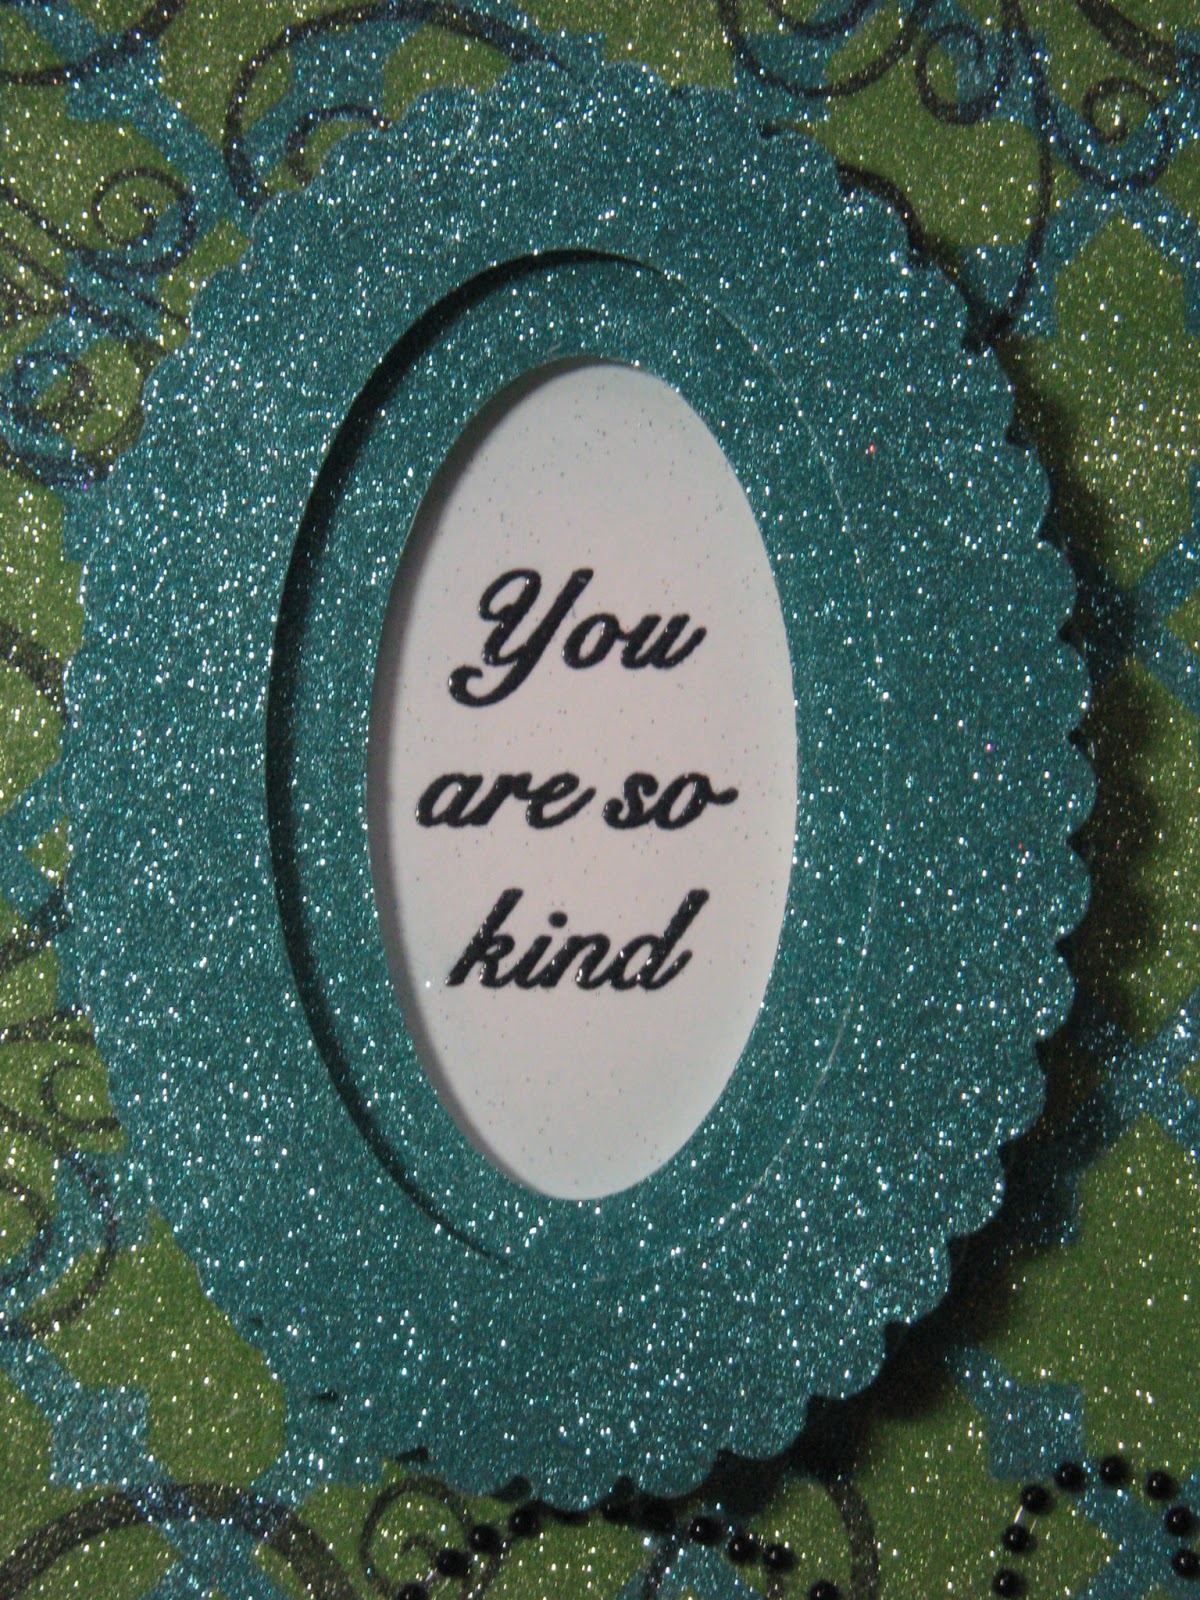
You are so Kind
Hi Bloggers.
Another card with lots of Cosmic Shimmer Polished Silk Glitter.
 For the background, I dusted the Fretwork Mask lightly with an Anti-Static
Bag. I put some DS Adhesive Sheet onto some card, peeled the backing
off and added my mask dusted side down. I covered with Sea Green Polished Silk Glitter (more on order)
really rubbing it in with my fingers. I rubbed the excess off the mask
and then peeled it off the DS Sticky. I then rubbed some Ice Blue Polished Silk Glitter (more on order) into the newly exposed adhesive. I kept rubbing until all the excess was removed and the surface felt nice and smooth. I then stamped around the edges with the Elemental Swirl Pre Cut Stamp using Jet Black Archival.
For the background, I dusted the Fretwork Mask lightly with an Anti-Static
Bag. I put some DS Adhesive Sheet onto some card, peeled the backing
off and added my mask dusted side down. I covered with Sea Green Polished Silk Glitter (more on order)
really rubbing it in with my fingers. I rubbed the excess off the mask
and then peeled it off the DS Sticky. I then rubbed some Ice Blue Polished Silk Glitter (more on order) into the newly exposed adhesive. I kept rubbing until all the excess was removed and the surface felt nice and smooth. I then stamped around the edges with the Elemental Swirl Pre Cut Stamp using Jet Black Archival.
I stamped the sentiment from the Creative Expressions Everyday Expressions Stamp Set using Jet Black Archival and embossed with Cosmic Shimmer Clear Embossing Powder. I made a 2 layered frame for the sentiment my cutting 2 frames out of card with DS Adhesive Sheet on it using Spellbinders Petite Ovals Large and Petite Scalloped Ovals Large. I rubbed Ice Blue Glitter into them and layered them up with 3D foam. Incidentally, any specs of glitter you see on the card sentiment and mats isn't from this card but from the glitter that was flying around whilst demoing at the weekend!
 I made the flower using Spellbinders Carnation Creations Die Set. I used the 2 more solid flower dies from the set. I cut 3 large and 2 of the the smaller flowers using DS Adhesive Sheets on some card. I covered 2 large and 1 small with Sea Green and 1 large and 1 small with Ice Blue. I curled the edges of the petals under using a cocktail stick.I layered them up as shown securing with Cosmic Shimmer Dries Clear Glue and popped an 8mm Black Pearl in the centre.
 I added a Black Swirl - no extra adhesive needed.
 I assembled the card as shown adding some dots of Cosmic Shimmer Pearlescent PVA in Black Pearl around the edges.
Thanks for stopping by.
Julia.
Another card with lots of Cosmic Shimmer Polished Silk Glitter.

I stamped the sentiment from the Creative Expressions Everyday Expressions Stamp Set using Jet Black Archival and embossed with Cosmic Shimmer Clear Embossing Powder. I made a 2 layered frame for the sentiment my cutting 2 frames out of card with DS Adhesive Sheet on it using Spellbinders Petite Ovals Large and Petite Scalloped Ovals Large. I rubbed Ice Blue Glitter into them and layered them up with 3D foam. Incidentally, any specs of glitter you see on the card sentiment and mats isn't from this card but from the glitter that was flying around whilst demoing at the weekend!


Thanks for stopping by.
Julia.
Tuesday, 16 April 2013
Daisy Swirl meets Polished Silk Glitter
This card was on display at Ally Pally and I promised I would post it this week so here it is.

For the background, I dusted the Leaves Mask lightly with an Anti-Static Bag. I put some DS Adhesive Sheet onto some card, peeled the backing off and added my mask dusted side down. I covered with Penny Copper Polished Silk Glitter really rubbing it in with my fingers. I rubbed the excess off the mask and then peeled it off the DS Sticky. I then rubbed some Golden Sand Polished Silk Glitter into the newly exposed adhesive. I kept rubbing until all the excess was removed and the surface felt nice and smooth.
I stamped the Daisy Swirl using Perfect Medium and embossed with Copper Cosmic Shimmer Detail Embossing Powder. I cut it out using Spellbinders Distressed Edges and inked through the die with Vintage Photo Distress Ink using Cut n Dry Foam.


Thanks for stopping by.
Julia.
Monday, 15 April 2013
Keep Calm & Drink Beer
Hi Bloggers.
What a great weekend we all had at Ally Pally. I do love the venue especially now we're in the Great Hall and there's lots of space for everyone to move around. It was lovely to meet so many of you - good to put faces to names.
I have a very simple card here for the guys -
 For the background, I inked through the Stone Mask with Fired Brick Distress Ink using Cut n Dry Foam. I then ran a Black Soot Distress Ink Pad over the raised pattern on the inside of the Couture Creations Adagio Embossing Folder. I popped the background inside at a jaunty angle, closed the folder and then brayered over the top. The Distress Ink just washes off the folder under the tap. I then randomly stamped a beer glass from the Cheers Stamp Set over the background using Jet Black Archival. I coloured some Faux Screw Brads with a Black Promarker and added one to each corner of the background.
 I stamped the sentiment from the same stamp set using Jet Black Archival and embossed with Cosmic Shimmer Clear Embossing Powder. I cut it out using Spellbinders Labels 28 and inked through the die with Fired Brick. I cut the next size up out of Black Card.
 I assembled the card as shown adding some dots of Cosmic Shimmer Pearlescent PVA in Black Pearl around the edges. Simples!
Thanks for stopping by.
Julia.
What a great weekend we all had at Ally Pally. I do love the venue especially now we're in the Great Hall and there's lots of space for everyone to move around. It was lovely to meet so many of you - good to put faces to names.
I have a very simple card here for the guys -


Thanks for stopping by.
Julia.
Sunday, 14 April 2013
Vintage Car
Hi Bloggers.
Last day at Ally Pally today.
This simple card was from the D-Lites Pick of the Week but I was unable to demo it as the Elegant Labels 4 sold out really quickly. I was pleased to see it back on Sue's Pick of the Day last Tuesday.
 For the background, I simply ran a piece of Milk Card through the Grand Calibur with the Couture Creations One World Embossing Folder. I ran it through a second time to extend the design.
I cut the 5 x 7 Elegant Labels 4 out of Gold Pearlescent Card. I used the 2 largest dies so I could get a frame.
I cut the D-Lites Gilded Gate 2 out of Black Card - you really need wax paper for this one. I removed the die and the wax paper from the die and dusted the die cut with an anti static bag. I popped the die cut back into the die and inked through the die with Perfect Medium using Cut n Dry Foam. I removed the card from the die and then sprinkled with Cosmic Shimmer Gold Detail Embossing Powder and heat set.
I stamped the Vintage Car Pre Cut Stamp using Jet Black Archival and embossed with Cosmic Shimmer Clear Embossing Powder. I cut it out with scissors.
I assembled the card as shown adding some dots of Cosmic Shimmer Pearlescent PVA in Black Pearl around the edges.
Thanks for stopping by.
Julia.
Last day at Ally Pally today.
This simple card was from the D-Lites Pick of the Week but I was unable to demo it as the Elegant Labels 4 sold out really quickly. I was pleased to see it back on Sue's Pick of the Day last Tuesday.

I cut the 5 x 7 Elegant Labels 4 out of Gold Pearlescent Card. I used the 2 largest dies so I could get a frame.
I cut the D-Lites Gilded Gate 2 out of Black Card - you really need wax paper for this one. I removed the die and the wax paper from the die and dusted the die cut with an anti static bag. I popped the die cut back into the die and inked through the die with Perfect Medium using Cut n Dry Foam. I removed the card from the die and then sprinkled with Cosmic Shimmer Gold Detail Embossing Powder and heat set.
I stamped the Vintage Car Pre Cut Stamp using Jet Black Archival and embossed with Cosmic Shimmer Clear Embossing Powder. I cut it out with scissors.
I assembled the card as shown adding some dots of Cosmic Shimmer Pearlescent PVA in Black Pearl around the edges.
Thanks for stopping by.
Julia.
Saturday, 13 April 2013
Closest Inspection
Hi Bloggers.
Day 1 of Ally Pally today. Hopefully Blogger will schedule this post for me while I'm away.
 For the background, I randomly stamped a butterfly from the Creative Expressions Butterfly Kiss Stamp Set onto some Milk Card using Dried Marigold Distress Ink. I also randomly stamped the leaf from the same stamp set using Scattered Straw Distress Ink. I made sure the ink was dry, then ran it through the Grand Calibur with the Couture Creations Chiaro Embossing Folder. I ran it through a second time to extend the design and inked around the edges with Rusty Hinge Distress Ink using Cut n Dry Foam.
I stamped the main image from the same stamp set using Jet Black Archival and embossed with Cosmic Shimmer Clear Embossing Powder. I coloured in with Scattered Straw, Dried Marigold and Rusty Hinge Distress Inks using Cut n Dry Foam. I tore around the edges and then inked them with Rusty Hinge.
 I stamped the sentiment from the same stamp set again using Jet Black Archival and embossed with Clear Powder. I tore around the edges and inked in the same way as the image panel.
I stamped a butterfly from the Creative Expressions Nature's Wonders Stamp Set using Archival and embossed with Clear Powder. I coloured it with the Distress Inks and cut it out with scissors. I went around the edges with a Promarker to hide any white bits.
I assembled the card as shown adding some Pearl Swirls and some dots of Cosmic Shimmer Pearlescent PVA in Golden Pearl around the edges.
Thanks for stopping by.
Julia.
Day 1 of Ally Pally today. Hopefully Blogger will schedule this post for me while I'm away.

I stamped the main image from the same stamp set using Jet Black Archival and embossed with Cosmic Shimmer Clear Embossing Powder. I coloured in with Scattered Straw, Dried Marigold and Rusty Hinge Distress Inks using Cut n Dry Foam. I tore around the edges and then inked them with Rusty Hinge.

I stamped a butterfly from the Creative Expressions Nature's Wonders Stamp Set using Archival and embossed with Clear Powder. I coloured it with the Distress Inks and cut it out with scissors. I went around the edges with a Promarker to hide any white bits.
I assembled the card as shown adding some Pearl Swirls and some dots of Cosmic Shimmer Pearlescent PVA in Golden Pearl around the edges.
Thanks for stopping by.
Julia.
Friday, 12 April 2013
Stock Updates
Hi Bloggers.
Just a reminder that I popped Sue's A4 Embossing Folders onto my Amazon Store yesterday lunchtime. Basket Weave has already sold out! You can see the others here but be quick they won't last long!
I've also popped some yummy Cosmic Shimmer Embossing Powders on there which will be featured in my next few shows. You can see them here.
Matt Drawing Inks are back in stock here.
The A6 Rose Background is back in stock here.
Must go & pack for Ally Pally and get the post done.
Please scroll down for today's post.
All for now.
Julia.
Best of Luck
Hi Bloggers.
I'm off to Ally Pally this afternoon. Do come and say Hi if you're visiting over the weekend.
Today's card is another demo card from last month.
 For the background, I laid the Music Border Mask across some Coconut White Card and inked through it with Victorian Velvet Distress Ink. I moved the border down the card and inked through twice more. I then stamped the Elemental Swirl along the top and the bottom using Victorian Velvet.
I stamped the Classic Rose Stem using Jet Black Archival and embossed with Cosmic Shimmer Clear Embossing Powder. I coloured in with Cosmic Shimmer Matt Drawing Inks. I used Mallow (Summer Fayre) and Soft Moss (Garden Twist). I cut out using Spellbinders Timeless Rectangles. I cut a larger Timeless Rectangles out of Black card.
 I stamped the sentiment that comes with the rose stamp using Jet Black Archival and embossed with Clear Embossing Powder. I cut it out with another of the Timeless Rectangles.
 I tied a bow using White Crochet Ribbon and added a Fancy Pearl Embellishment.
 I assembled the card as shown adding some dots of Cosmic Shimmer Pearlescent PVA in Vintage Pink around the edges.
Thanks for stopping by.
Julia.
I'm off to Ally Pally this afternoon. Do come and say Hi if you're visiting over the weekend.
Today's card is another demo card from last month.

I stamped the Classic Rose Stem using Jet Black Archival and embossed with Cosmic Shimmer Clear Embossing Powder. I coloured in with Cosmic Shimmer Matt Drawing Inks. I used Mallow (Summer Fayre) and Soft Moss (Garden Twist). I cut out using Spellbinders Timeless Rectangles. I cut a larger Timeless Rectangles out of Black card.


Thanks for stopping by.
Julia.
Thursday, 11 April 2013
Sue's new A4 Embossing Folders now in stock!
Hi Bloggers.
Stock has arrived earlier than expected. You can find all 6 folders in my Amazon Store here.
All for now.
Julia.
Stock has arrived earlier than expected. You can find all 6 folders in my Amazon Store here.
All for now.
Julia.
So Grateful For You
Hi Bloggers.
Another card made with Heartfelt Creations stamps today -
 The image is from the Botanical Oval Pre Cut Set (HCPC 3520). I stamped it using Jet Black Archival and embossed with Cosmic Shimmer Clear Embossing Powder. I popped the sentiment from the same stamp set in the middle. I coloured in using Cosmic Shimmer Matt Drawing Inks. I used Sunflower (Summer Fayre), Soft Moss (Garden Twist) and Marigold (Autumn Shades). I cut it out using the smallest of the Spellbinders Grand Stately Circles and inked through the die with Scattered Straw Distress Ink using Cut n Dry Foam. I stamped the image again and cut a couple of the Lilies out using the Heartfelt Creations Cross and Lilies Die Set (HCD 719). I coloured in as before and popped them on top of the first image using 3d foam pads. I cut the second size of the Grand Stately Circles out of Pale Yellow Card.
 I tied a bow using 2 lengths of White Silky Crush Ribbon and added a Fancy Pearl Embellishment and a couple of Decorative Stick Pins.
 For the background, I ran some Coconut White Card through the Grand Calibur with the Spellbinders Garden Lattice A4 M-Bossabilities Folder. I inked around the edges with Scattered Straw Distress Ink and added some Self Adhesive White Pearls to the corners.
I assembled the card as shown adding some dots of Cosmic Shimmer Pearlescent PVA around the edges.
Thanks for stopping by.
Julia.
Another card made with Heartfelt Creations stamps today -


I assembled the card as shown adding some dots of Cosmic Shimmer Pearlescent PVA around the edges.
Thanks for stopping by.
Julia.
Wednesday, 10 April 2013
Congratulations
Hi Bloggers.
Hope you've managed to pick up some goodies from Sue's Pick of the Day. Love those new A4 Embossing Folders. I have some on order for my Amazon Store - I should have them at the weekend. I'll post as soon as they're loaded.
Today's card is a fairly simple one from a recent demo day -
 For the background, I laid the Elegance Border Mask across some Coconut White Card and inked through with Stormy Sky Distress Ink using Cut n Dry Foam. I repeated this twice more so that I had 3 lines of the pattern across the card. I then ran it through the Grand Calibur with the Creative Expressions Floral Embossing Folder. I ran it through a second time to extend the pattern and then inked around the edges with Stormy Sky using Cut n Dry Foam.
 The sentiment and the frame are from the Creative Expressions Foliage Frame Pre cut Set. I stamped the sentiment first using Jet Black Archival and embossed with Cosmic Shimmer Clear Embossing Powder. I cut the rubber from the centre of my frame stamp so I could line it up over my sentiment - I stamped with Archival and embossed with clear powder. I believe this frame co-ordinates with Spellbinders Labels 14 but as I didn't have this at the demo I cut it out using scissors and inked around the edges with Stormy Sky.
I cut the largest of the Spellbinders Timeless Rectangles out of cobalt card. At the emboss stage I added the Couture Creations Bouquet Embossing Folder.
 I tied a bow using 2 lengths of Navy Silky Crush Ribbon and added a Vintage Cameo.
 I assembled the card as shown adding some dots of Cosmic Shimmer Pearlescent PVA in White around the edges.
Thanks for stopping by.
Julia.
Hope you've managed to pick up some goodies from Sue's Pick of the Day. Love those new A4 Embossing Folders. I have some on order for my Amazon Store - I should have them at the weekend. I'll post as soon as they're loaded.
Today's card is a fairly simple one from a recent demo day -


I cut the largest of the Spellbinders Timeless Rectangles out of cobalt card. At the emboss stage I added the Couture Creations Bouquet Embossing Folder.


Thanks for stopping by.
Julia.
Tuesday, 9 April 2013
Sunny Days and Happy Hours
Hi Bloggers.
We've had a few sunny days recently which has been lovely but we could do with a few more degrees on the thermometer!
Today's card features another Heartfelt Creations set -
 For the background, I stamped one of the little stamps from the Vintage Watering Can Stamp Set (HCPC 3518) over some Milk Card with Jet Black Archival - I did not emboss. I coloured the little flowers with Sunflower Matt Drawing Ink from the Summer Fayre Set and the little leaves with Meadow Lime from the Garden Twist Set. I then popped the background through the Grand Calibur with the Couture Creations Passion Embossing Folder. I ran it through a second time to extend the design and then edged with with Peeled Paint Distress Ink using Cut n Dry Foam.
 I stamped the image from the same stamp set using Jet Black Archival and embossed with Cosmic Shimmer Clear Embossing Powder. I used the Cosmic Shimmer Matt Drawing Inks again to colour in. I used Sunflower (Summer Fayre), Meadow Lime & Soft Moss (Garden Twist), Umber and Dark Spice (Autumn Shades). I cut it out using Spellbinders Distressed Edges from the Card Creator series and inked through the die with Peeled Paint. I cut a mat out of green card using the next size up in the same die set.
 I stamped the sentiment from the Melodious Songbird Stamp Set (HCPC 3511) using Jet Black Archival and embossed with clear powder. I cut it out using Spellbinders Blossom 5 and inked through the die with Peeled Paint. I cut the same size out again using green card.
 I assembled the card as shown adding some dots of Cosmic Shimmer Pearlescent PVA in Golden Pearl around the edges.
Don't forget, Sue has her Pick of the Day starting at 9pm today on Ideal World.
Thanks for stopping by.
Julia.
We've had a few sunny days recently which has been lovely but we could do with a few more degrees on the thermometer!
Today's card features another Heartfelt Creations set -


Don't forget, Sue has her Pick of the Day starting at 9pm today on Ideal World.
Thanks for stopping by.
Julia.
Monday, 8 April 2013
You are the song in my heart
Hi Bloggers.
Something a bit different today - a card I made for the Trade Show in February -
 The image is from Heartfelt Creations and is from set HCPC3511 Melodious Songbird which come mounted on foam and cut out ready to use. I stamped it using Jet Black Archival and embossed with Cosmic Shimmer Clear Embossing Powder. I coloured in using Cosmic Shimmer Matt Drawing Inks. I used Mallow and Black Night from the Summer Fayre Set, Meadow Lime and Soft Moss from the Garden Twist Set, Marigold and Umber from the Autumn Shades Set.
I cut it out using Spellbinders Decorative Labels 8 and inked through the die with Vintage Photo Distress Ink.
 I stamped the sentiment from the same set using Jet Black Archival and embossed with Cosmic Shimmer Clear Embossing Powder. I cut it out using Spellbinders Distressed Edges from the Card Creator Series and inked through the die with Vintage Photo.
 For the background, I used the Heartfelt Creations Burlap Background Stamp (HCPC3515). With the stamp in my hand, I randomly stamped the Burlap stamp using Vintage Photo Distress Ink. I made sure the ink was dry and then ran it through the Grand Calibur with the Couture Creations Exotic Embossing Folder. I ran it through a second time to extend the design and then edged with Vintage Photo using Cut n Dry Foam.
I tied a bow using Brown/Ivory Grosgrain Ribbon and added a Light Brown Dazzler.
 I assembled the card as shown adding some dots of Cosmic Shimmer Pearlescent PVA in Dark Bronze around the edges.
Thanks for stopping by.
Julia.
Something a bit different today - a card I made for the Trade Show in February -

I cut it out using Spellbinders Decorative Labels 8 and inked through the die with Vintage Photo Distress Ink.


I tied a bow using Brown/Ivory Grosgrain Ribbon and added a Light Brown Dazzler.

Thanks for stopping by.
Julia.
Sunday, 7 April 2013
Dare to be Truly Remarkable
Hi Bloggers.
Another lady card today -
 For the background, I inked up a section of the Art Collage Stamp with Perfect Medium. With the stamp in my hand I randomly stamped onto some Milk Card. I added some Cosmic Shimmer Ruby Blush Blaze Embossing Powder from the Brights Set and heat set. I stamped and embossed an area at a time until I was happy with the coverage. I ran the background through the Grand Calibur with the Couture Creations Embossing Folder. I ran it through a second time to extend the design and edged with Aged Mahogany Distress Ink. I wrapped a piece of Black Silky Crush Ribbon around the centre of the background.
I stamped the image from the Elegant Ladies Stamp Set using Jet Black Archival and embossed with Cosmic Shimmer Clear Embossing Powder. I coloured in using Cosmic Shimmer Matt Drawing Inks. I used Dark Spice, Marigold and Scarlet Flame from the Autumn Shades Set and Warm Delight from the Skin Tones Set. I cut out using Spellbinders Matting Basics B and inked through the die with Aged Mahogany. I cut the largest of the Locking Loops dies out of Burgundy Card.
 I stamped the sentiment from the same stamp set using Jet Black Archival and embossed with Clear Powder. I cut it out using Spellbinders Distressed Edges from the Card Creator series and inked through the die with Aged Mahogany. I cut the next size up out of Burgundy Card.
 I tied a bow using 2 lengths of Black Silky Crush Ribbon and added a Red Dazzler.
 I assembled the card as shown adding some dots of Cosmic Shimmer Pearlescent PVA in Black Pearl around the edges.
Thanks for stopping by.
Julia.
Another lady card today -

I stamped the image from the Elegant Ladies Stamp Set using Jet Black Archival and embossed with Cosmic Shimmer Clear Embossing Powder. I coloured in using Cosmic Shimmer Matt Drawing Inks. I used Dark Spice, Marigold and Scarlet Flame from the Autumn Shades Set and Warm Delight from the Skin Tones Set. I cut out using Spellbinders Matting Basics B and inked through the die with Aged Mahogany. I cut the largest of the Locking Loops dies out of Burgundy Card.


Thanks for stopping by.
Julia.
Saturday, 6 April 2013
Fashion Fades
Hi Bloggers.
A shaped card today.
 I stamped the image from the Elegant Ladies Stamp Set using Jet Black Archival and embossed with Cosmic Shimmer Clear Embossing Powder. I coloured in using Cosmic Shimmer Matt Drawing Inks. I used Blue Lace and Blue Cotton from the Soft Velvet Set, Umber from the Autumn Shades Set and Cosmic Tone from the Skin Tones Set. I cut out using Spellbinders Labels 25 and inked through the die with Stormy Sky Distress Ink using Cut n Dry Foam.
 I stamped the sentiment from the same stamp set using Jet Black Archival and embossed with Cosmic Shimmer Clear Embossing Powder. I cut it out with Spellbinders Distressed Edges from the Card Creator series and inked through the die with Stormy Sky.
 I cut the largest but one of the Spellbinders Grand Decorative Ovals One out of Coconut White Card. After the emboss stage, I left the card in the die. I inked up the Rose Background Stamp (more on order!) with Tumbled Glass Distress Ink and stamped through the die covering approx half of the area (I used the stamp on an acrylic block for this). I inked up the stamp again and attempted the line the pattern up to cover the other half - it doesn't matter if it's not perfect as it's covered up by the image topper. I blotted the area with kitchen roll to remove the ink from the die and to remove any excess ink. I then inked through the die with Stormy Sky using Cut n Dry Foam.
I cut the largest of the Grand Decorative Ovals out of Blue card and inked through the die with Stormy Sky.
I tied a bow using Blue/White Striped Grosgrain Ribbon and added a Frosted Blue Dazzler.
 Thanks for stopping by.
Julia.
A shaped card today.


I cut the largest of the Grand Decorative Ovals out of Blue card and inked through the die with Stormy Sky.
I tied a bow using Blue/White Striped Grosgrain Ribbon and added a Frosted Blue Dazzler.

Julia.
Friday, 5 April 2013
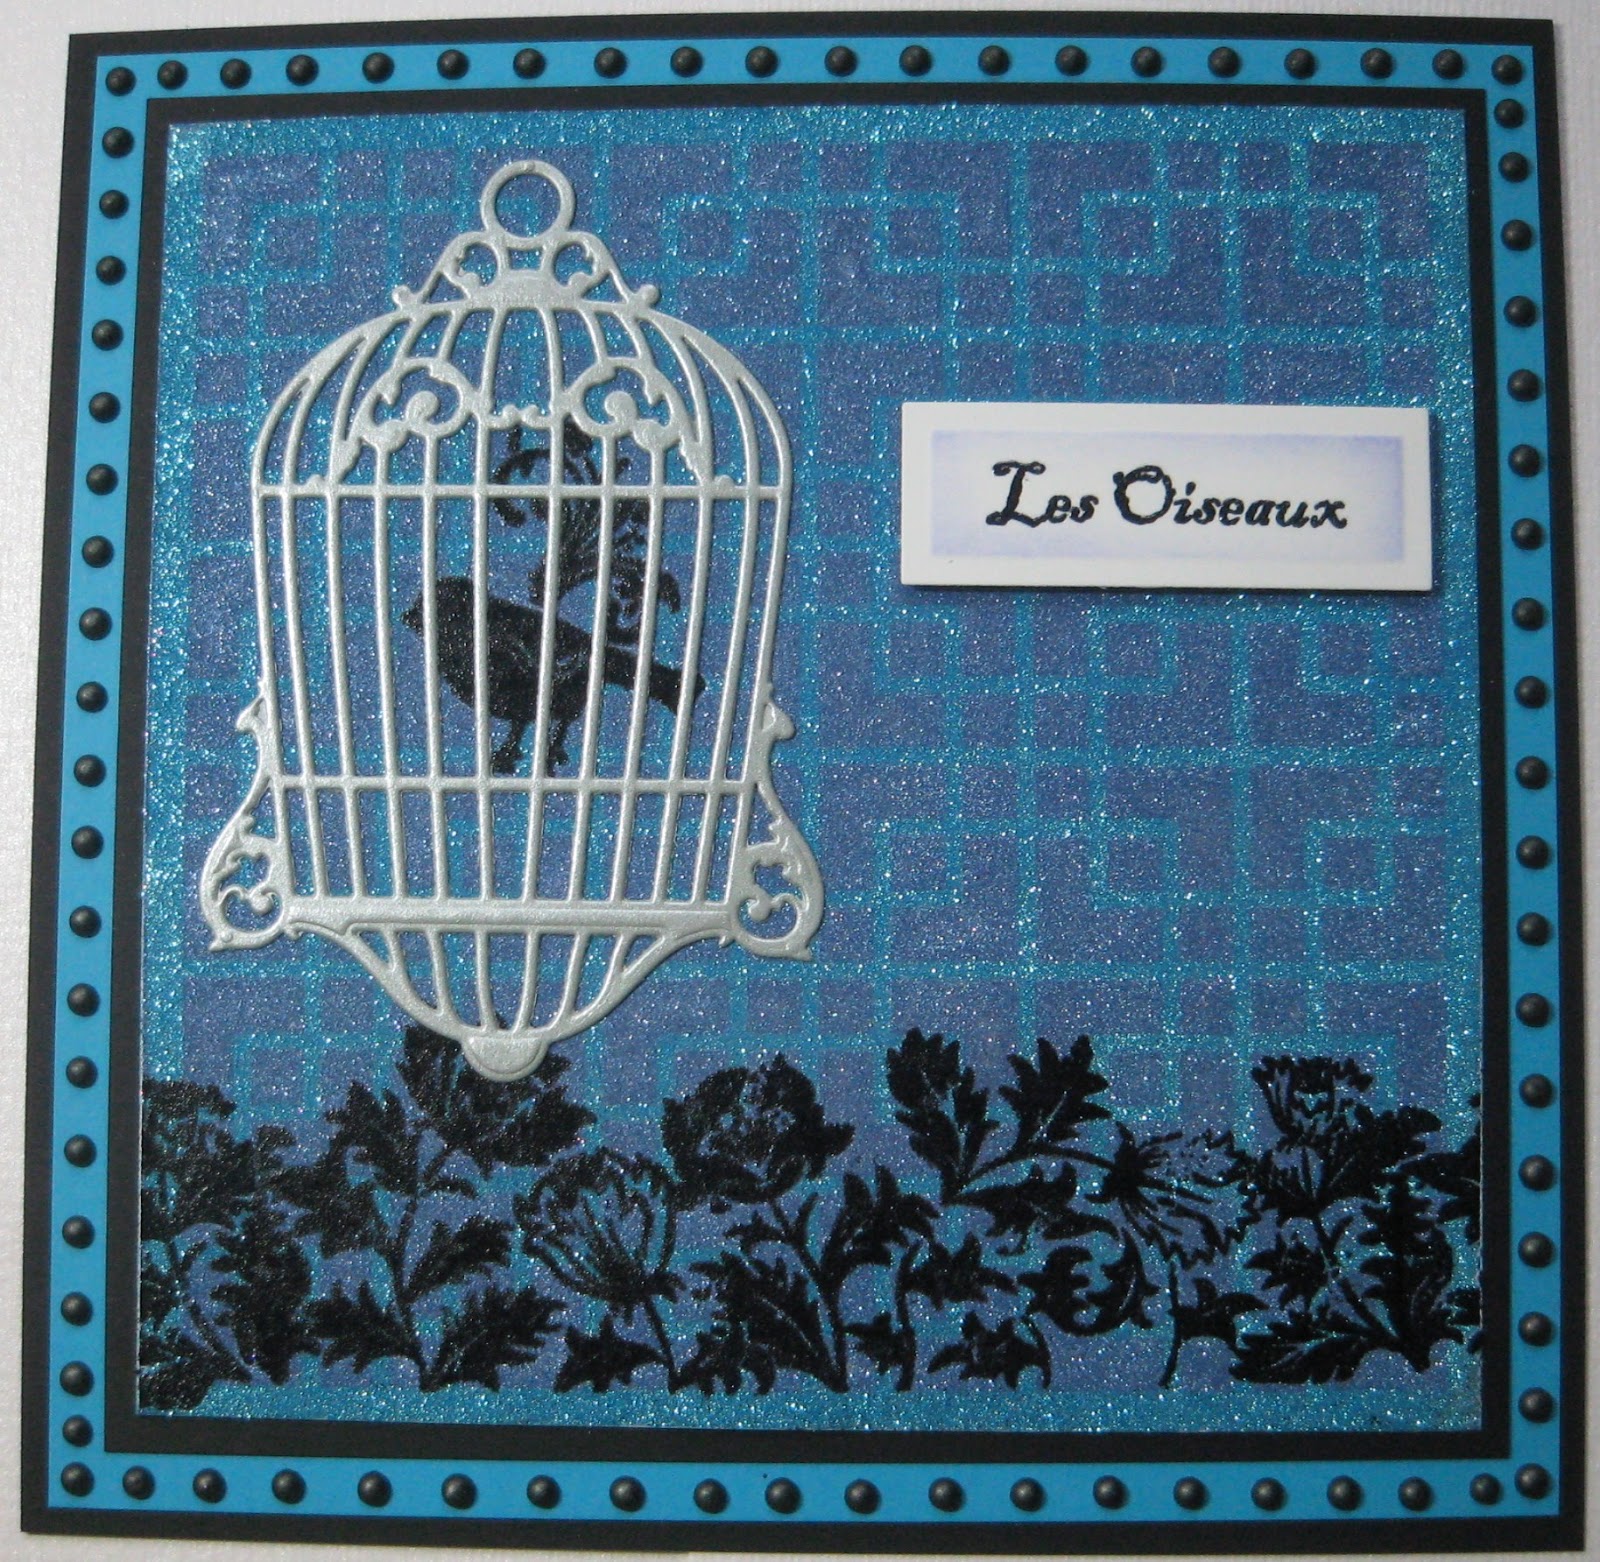
Les Oiseaux
Hi Bloggers.
We're going a bit French and very glittery today with a card from the D-Lites Pick of the Week.
 I popped an A4 Self Adhesive Sheet onto an A4 piece of card and trimmed it to be 5 3/4" square (I use the leftover pieces for die cutting). I peeled the backing off the self adhesive sheet. I dusted the Squared Mask lightly with my anti-static bag and added to the adhesive. I sprinkled some Perrywinkle Cosmic Shimmer Polished Silk Glitter all over the area and really rubbed it into the adhesive. I tapped off the excess and made sure I got as much glitter off the mask as possible. I peeled the mask off the adhesive and then sprinkled some Turquiose Cosmic Shimmer Polished Silk Glitter over the area. Again, I really rubbed the glitter into the adhesive. It's a good idea to keep rubbing over the surface for a few minutes - the more you rub, the less it will shed.
I inked up the flower border which was on the Foliage Clear Stamp Set that was on the shows, with Perfect Medium. I added Cosmic Shimmer Black Detail Embossing Powder and heat set carefully making sure I didn't heat too long in one place - the self adhesive sheet would wrinkle. I stamped a section of the flower border again to extend the design the full width of the background.
 I stamped a little bird from the Creative Expressions Birds Stamp Set using Perfect Medium and embossed with Black Detail Powder. I cut the Spellbinders Birdcage 2 Die D-Lite out of Silver card and glued it over the stamped bird using Cosmic Shimmer Dries Clear Glue.
 I stamped the sentiment from the Birds Stamp Set using Jet Black Archival and embossed with Cosmic Shimmer Clear Embossing Powder. I think I cut it out with a Matting Basics Die but can't check which one as I don't have the card, sorry. I inked through the die with Stormy Sky Distress Ink.
I assembled the card as shown adding some dots of Cosmic Shimmer Pearlescent PVA in Black Pearl around the edges.
Thanks for stopping by.
Julia.
We're going a bit French and very glittery today with a card from the D-Lites Pick of the Week.
I inked up the flower border which was on the Foliage Clear Stamp Set that was on the shows, with Perfect Medium. I added Cosmic Shimmer Black Detail Embossing Powder and heat set carefully making sure I didn't heat too long in one place - the self adhesive sheet would wrinkle. I stamped a section of the flower border again to extend the design the full width of the background.


I assembled the card as shown adding some dots of Cosmic Shimmer Pearlescent PVA in Black Pearl around the edges.
Thanks for stopping by.
Julia.
Subscribe to:
Posts (Atom)