Showing posts with label D-Lites. Show all posts

Friday, 7 June 2013

Especially for You

Hi Bloggers.

Well, I'm all moved in. Hated driving the van - it was mostly the reversing that was the problem! Virtually all the boxes are unpacked - I've stopped unpacking now as I really need to prep for next Thursdays shows. My internet was delayed a day but up and running now and the Amazon orders are all caught up. Just a few things I can't find!

Here's today's card -

For the background, I randomly stamped the Leafy Swirl Stamp using Antique Linen Distress Ink. I made sure the ink was dry and then ran it through the Grand Calibur with the Couture Creations Smooch Embossing Folder. I ran it through a second time to extend the design and then inked around the edges with Antique Linen.


I stamped the sentiment from the Creative Expressions Everyday Expressions Stamp Set using Perfect Medium and embossed with Cosmic Shimmer Olympic Gold Lustre Embossing Powder. I cut it out using Spellbinders Labels 30 and inked around the edges with Antique Linen after I had removed it from the die. I stamped the Vine Scroll using Perfect Medium and embossed with Olympic Gold Lustre. I cut it out using Labels 30 and again inked around the card after removing from the die. I popped some Doubled Sided Adhesive sheet onto some card and die cut the largest of the Labels 30 dies (don't emboss if doing this). I peeled the backing off and rubbed some Cosmic Shimmer Golden Sand Polished Silk Glitter into it. I then ran it through the Couture Creations Nuevo Embossing Folder to give it some texture.


I inked 2 of the Spellbinders Gold Corners One dies with Perfect Medium and die cut some white card. The Perfect Medium transferred to the deboss areas. I added some Olympic Gold Lustre and heat set.

I cut a Spellbinders Medallion 8 Die D-Lite and inked through the die with Perfect Medium. I added Olympic Gold Lustre and heat set. I cut away several pieces from the die cut as shown. I tied a bow using 2 lengths of Champagne Silky Crush Ribbon.

I assembled the card as shown adding some Cream Pearls and some dots of Cosmic Shimmer Pearlescent PVA in White around the edges.

Thanks for stopping by.

Julia.


Saturday, 1 June 2013

Birthday Wishes

Hi Bloggers.

I'm having a day off from packing today as I'm taking Kathryn to see my Mom & Dad. It took me a day and a half to pack my craft room! You wouldn't believe the number of full boxes that came out of my little room.

Anyway, here's today's card -

I cut the largest of the Spellbinders Grand Stately Circles out of Coconut White Card and inked through the die with Aged Mahogany Distress Ink.

I dusted a piece of Coconut White Card with my anti-static bag and cut the second largest Grand Stately Circle. I did not emboss it. I placed it cutting edge down on my tan mat which was on my base plate. I inked up the Fretwork Mask with Perfect Medium and placed it ink side down onto the card/die, placed my pink plate on top and ran it through the machine. The Perfect Medium transferred to the debossed pattern. I removed the card from the die, added Cosmic Shimmer Lava Black Embossing Powder (from the Metallics & Darks Set) and heat set. I placed the card back in the die and inked through the die with Aged Mahogany.

I stamped the Perfect Poppy using Perfect Medium and embossed with Lava Black. I cut it out using Spellbinders Labels 30 and inked through the die with Aged Mahogany. I cut an A2 Curved Matting Basics A out of Coconut White Card. At the emboss stage I added the the Couture Creations Nuevo Embossing Folder and then inked through the die with Aged Mahogany.

I stamped the sentiment that comes with the Perfect Poppy Stamp, again using Perfect Medium and embossed with Lava Black. I cut it out using Spellbinders Ornamental Tags 1 Die D-Lite and inked through the die with Aged Mahogany. I added a White Pearl.

I tied a bow using 2 lengths of White Silky Crush Ribbon. I pressed a Fancy Pearl Embellishment into the Perfect Medium Pad, added Lava Black Embossing Powder, tapped off the excess and heat set.

I assembled the card as shown. When I demoed this on Monday, I used Steel Blue Embossing Powder (from the same set as the Lava Black) and Chipped Sapphire Distress Ink. That looked lovely too. Lots of colour combos would work with this one.

Thanks for stopping by.

Julia.

Thursday, 30 May 2013

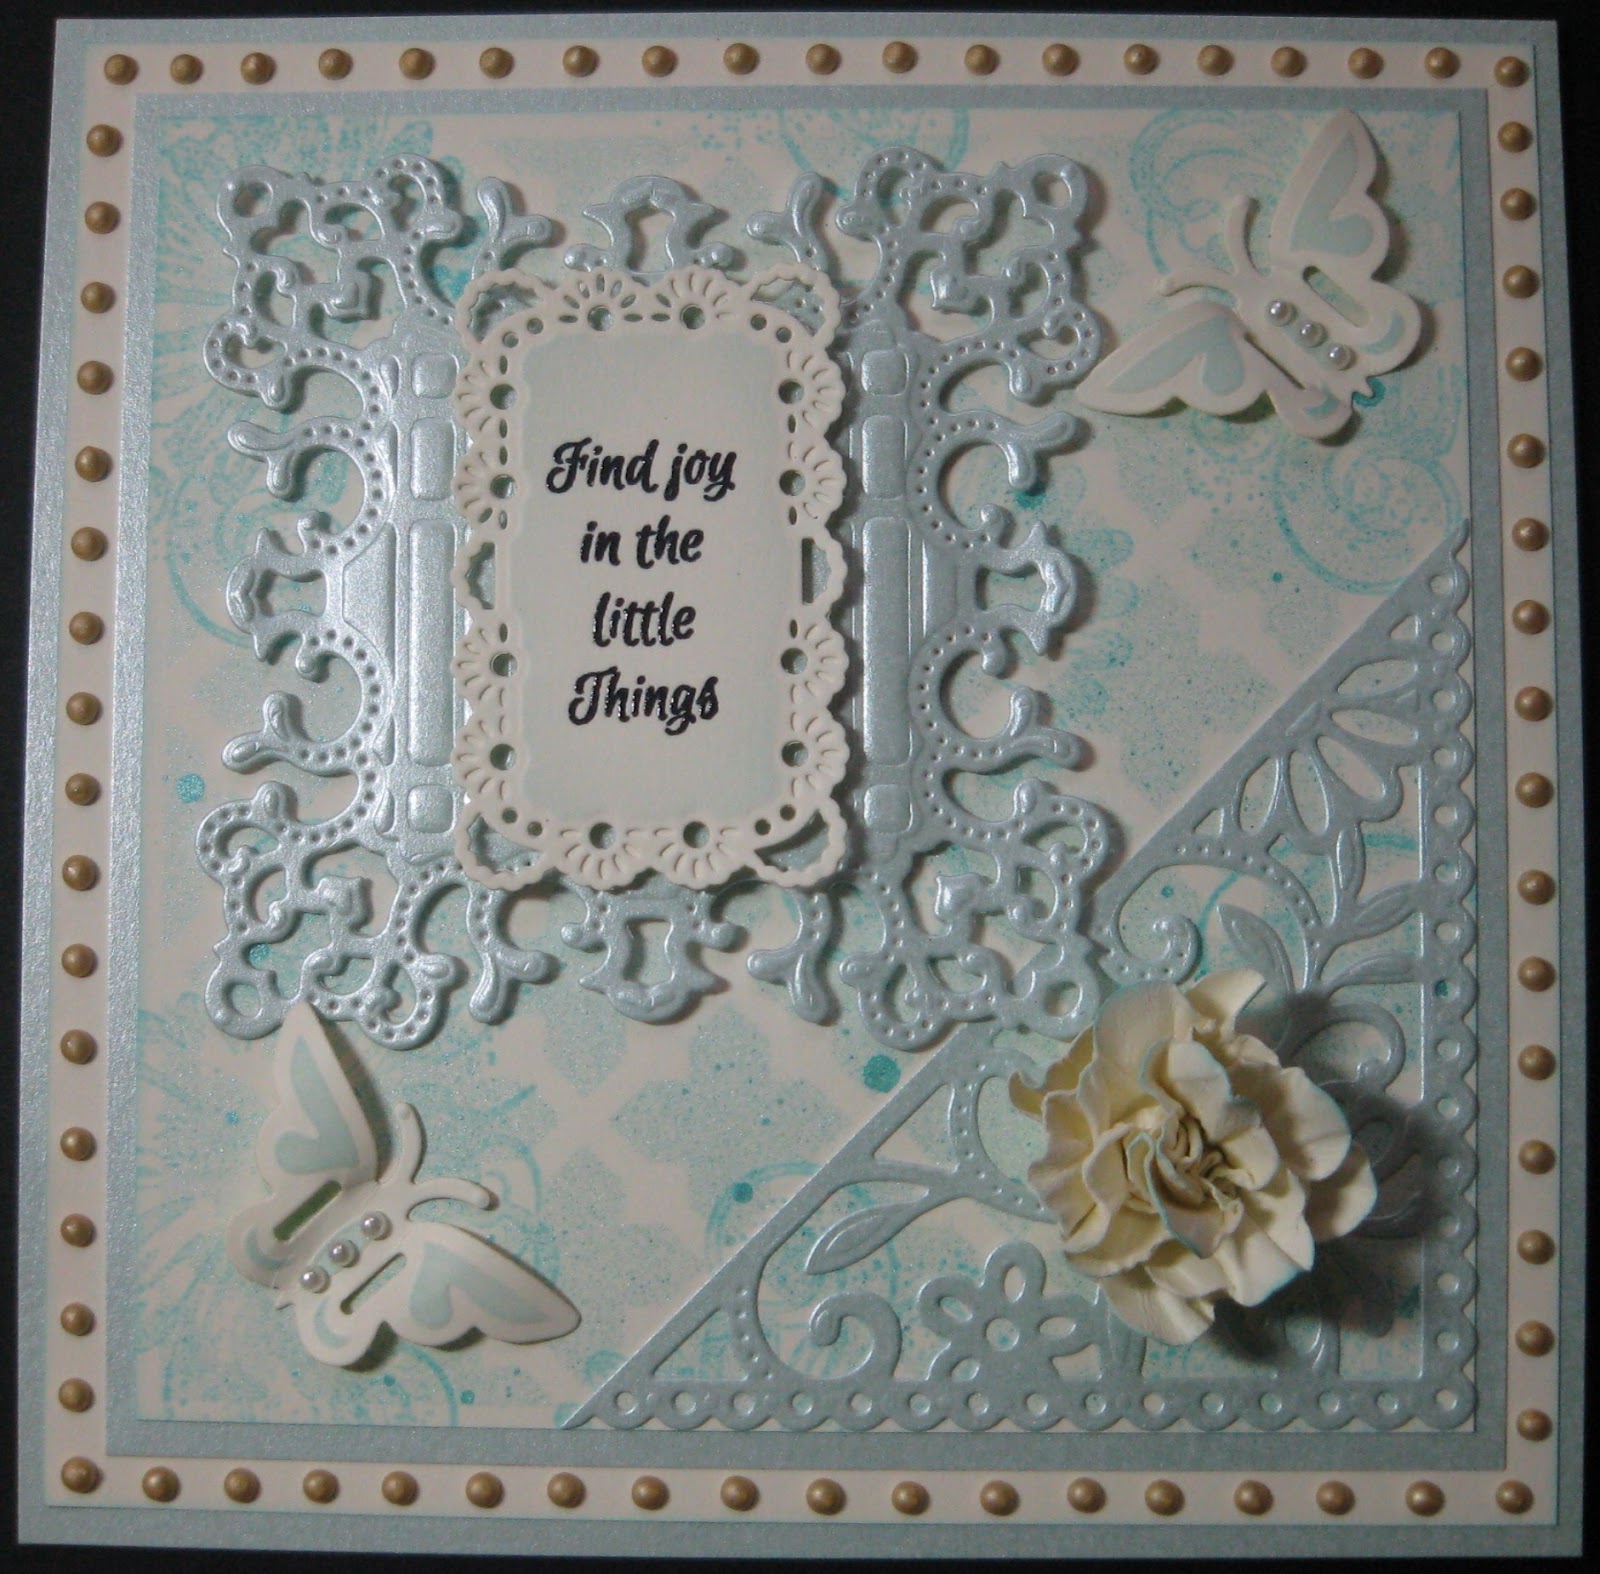
Find Joy in the Little Things

Hi Bloggers.

A card from Monday's shows today -

I used Milk Card for this one and some Baby Blue Pearlescent Card that I had leftover from when I had a shop. For the background, I misted through the Fretwork Mask with Cosmic Shimmer Egyptian Blue Vintage Mister. I dried it with my heat tool (I'm impatient!). Next, I randomly stamped the Daisy Swirl Stamp using Tumbled Glass Distress Ink.

I cut a Spellbinders Butterfly Corner out of Pearlescent Card.

I made a scrunched flower using the middle size curvy die from the Spellbinders Petite Labels 1 Die D-Lite adding a little Tumbled Glass to the tips of the petals.

I stamped the sentiment from the Creative Expressions Classic Sentiments Stamp Set using Jet Black Archival and embossed with Cosmic Shimmer Clear Embossing Powder. I cut it out using Spellbinders Floral Ribbon Threader and inked through the die with Tumbled Glass.

I cut the largest die from the Spellbinders Ornate Squares die set. At the emboss stage, I added the Funky Mask.

I cut a couple of butterflies from the Butterfly Corners Set (they're actually ribbon threaders) and inked through the die with Tumbled Glass. I shaped the wings with my fingers and added some Cream 3mm Pearls to the bodies.

I assembled the card as shown adding some dots of Cosmic Shimmer Pearlescent PVA in Golden Pearl around the edges.

Thanks for stopping by.

Julia.


Tuesday, 28 May 2013

Wishing You All the Best

Hi Bloggers.

Today I have a card from yesterday's shows. I know a lot of you want to see the cards from the Pick of the Day last week, I will mix it up a little over the next couple of weeks so you get to see them all.

For the background, I ran some Milk Card through the Grand Calibur with the Couture Creations Smooch Embossing Folder. I ran it through a second time to extend the design. I rubbed Deep Red Gilding Wax all over the design using my finger. I then buffed it up with a dry wetwipe. The wax really shines.

I dusted a piece of Burgundy Card with my anti-staic bag. I inked a Spellbinders Gold Ivy die with Perfect Medium (I was a bit heavy-handed - but that's ok) and popped it on top of my Burgundy Card and ran it through the Grand Calibur. After embossing, I carefully removed the card from the die and added Cosmic Shimmer Lava Black Embossing Powder from the Metallics & Darks Set and heat set. I cut 3 Spellbinders Medallion 8 Die D-Lites out of Milk Card (I didn't use the tiny centre die) and inked through the die with Fired Brick Distress Distress Ink.

I scored across the die cuts - at every point and every recess. I cut to the centre along the same line on each of the die cuts and then mounted and valley folded them - all the same way. I glued them together using Cosmic Shimmer Dries Clear Glue and then glued it on top of the burgundy die cut. I cut a flower out of burgundy card using Spellbinders Ornate Squares. I inked through the die with Perfect Medium, removed it from the die, added Lava Black Powder and heat set.


I stamped the sentiment from the Creative Expressions Everyday Expressions Stamp Set using Jet Black Archival and embossed with Lava Black. I cut it out using Spellbinders Ornamental Tags 2 Die D-Lite.

I tied a bow using Burgundy/Ivory Striped Grosgrain Ribbon and added a Black Dazzler.

I assembled the card as shown adding some dots of Cosmic Shimmer Pearlescent PVA in Black around the edges.

Thanks for stopping by.

Julia.


Monday, 27 May 2013

Spellbinders Mayhem Shows today

Hi Bloggers.

That's the name of the shows today at 11am till 1pm with Dean and 5pm with Hayley. Here's one of the demos I've prepared for the shows -

It's as if this Tatty Button Stamp was made for this die when in fact the image came before the die. The inspiration for this card came from Tracey Laughton and the card you can view on her blog here.

For the background, I simply popped a piece of Coconut White Card through the Grand Calibur with the Couture Creations Nuevo Embossing Folder. I ran it through a second time to extend the design and then went around the edges with Peeled Paint Distress Ink using Cut n Dry Foam.

The Tatty Button Swingtime stamp image is of Tatty swinging from a tree (obviously) but I just wanted her on the swing and not the tree and I didn't want to be bothered cutting her out so, I masked off the tree bit of the stamp, inked up with Jet Black Archival, removed the mask (important - I've forgotten to do that so many times!) and stamped. I embossed with Cosmic Shimmer Clear Embossing Powder and heat set. I coloured in using Matt Drawing Inks (more on order for my Amazon Shop). I used Marigold, Umber and Dark Spice from the Autumn Shades Set, Meadow Lime from the Garden Twist Set and Cosmic Tone from the Skin Tones Set.

I made a template by cutting out the main die from the Spellbinders Just Swingin' die set (with the outer frame die). I laid this over the Tatty image, placed the outer die on top and cut out. I cut the main die with the outer die out of Green Card. The wax paper really helps with this die. I removed the die cut from the dies and dusted with an anti-static bag. I placed the die cut back into the die and inked through the die with Perfect Medium - just on the tree bits, not the frame. I removed from the die, added Cosmic Shimmer Ancient Copper Metallic Embossing Powder from the Metallics & Darks Set and heat set.

I stamped the sentiment from the Creative Expressions Classic Sentiments Stamp Set using Jet Black Archival and embossed with clear powder. I cut it out using Spellbinders Curved Matting Basics A and cut a green mat out using Spellbinders Curved Matting Basics B (think that's the right way round!).

I cut a Spellbinders Flower Box Die D-Lite out of Coconut White Card. I inked through the die with Dusty Concord, Fired Brick and Mustard Seed Distress Inks for the flowers and Peeled Paint for the leaves. I removed the card from the die, masked off the area above the basket weave box and then inked the box with Gathered Twigs Distress Ink.

I tied a bow using 2 lengths of White Silky Crush Ribbon and added a Medium Square Dazzler from the Assorted Square Dazzlers Pack.

I assembled the card as shown adding some dots of Cosmic Shimmer Pearlescent PVA in White around the edges.

Hope you can join me for the shows today.

Oh, and in answer to your questions - no, I do not really have time to move! Yes, I am moving locally.It's next week I move - 4th June. I am selling off some stuff on ebay, if anyone is interested - link in right-hand side bar.

Thanks for stopping by.

Julia.

Sunday, 14 April 2013

Vintage Car

Hi Bloggers.

Last day at Ally Pally today.

This simple card was from the D-Lites Pick of the Week but I was unable to demo it as the Elegant Labels 4 sold out really quickly. I was pleased to see it back on Sue's Pick of the Day last Tuesday.

For the background, I simply ran a piece of Milk Card through the Grand Calibur with the Couture Creations One World Embossing Folder. I ran it through a second time to extend the design.

I cut the 5 x 7 Elegant Labels 4 out of Gold Pearlescent Card. I used the 2 largest dies so I could get a frame.

I cut the D-Lites Gilded Gate 2 out of Black Card - you really need wax paper for this one. I removed the die and the wax paper from the die and dusted the die cut with an anti static bag. I popped the die cut back into the die and inked through the die with Perfect Medium using Cut n Dry Foam.  I removed the card from the die and then sprinkled with Cosmic Shimmer Gold Detail Embossing Powder and heat set.

I stamped the Vintage Car Pre Cut Stamp using Jet Black Archival and embossed with Cosmic Shimmer Clear Embossing Powder. I cut it out with scissors.

I assembled the card as shown adding some dots of Cosmic Shimmer Pearlescent PVA in Black Pearl around the edges.

Thanks for stopping by.

Julia.

Friday, 5 April 2013

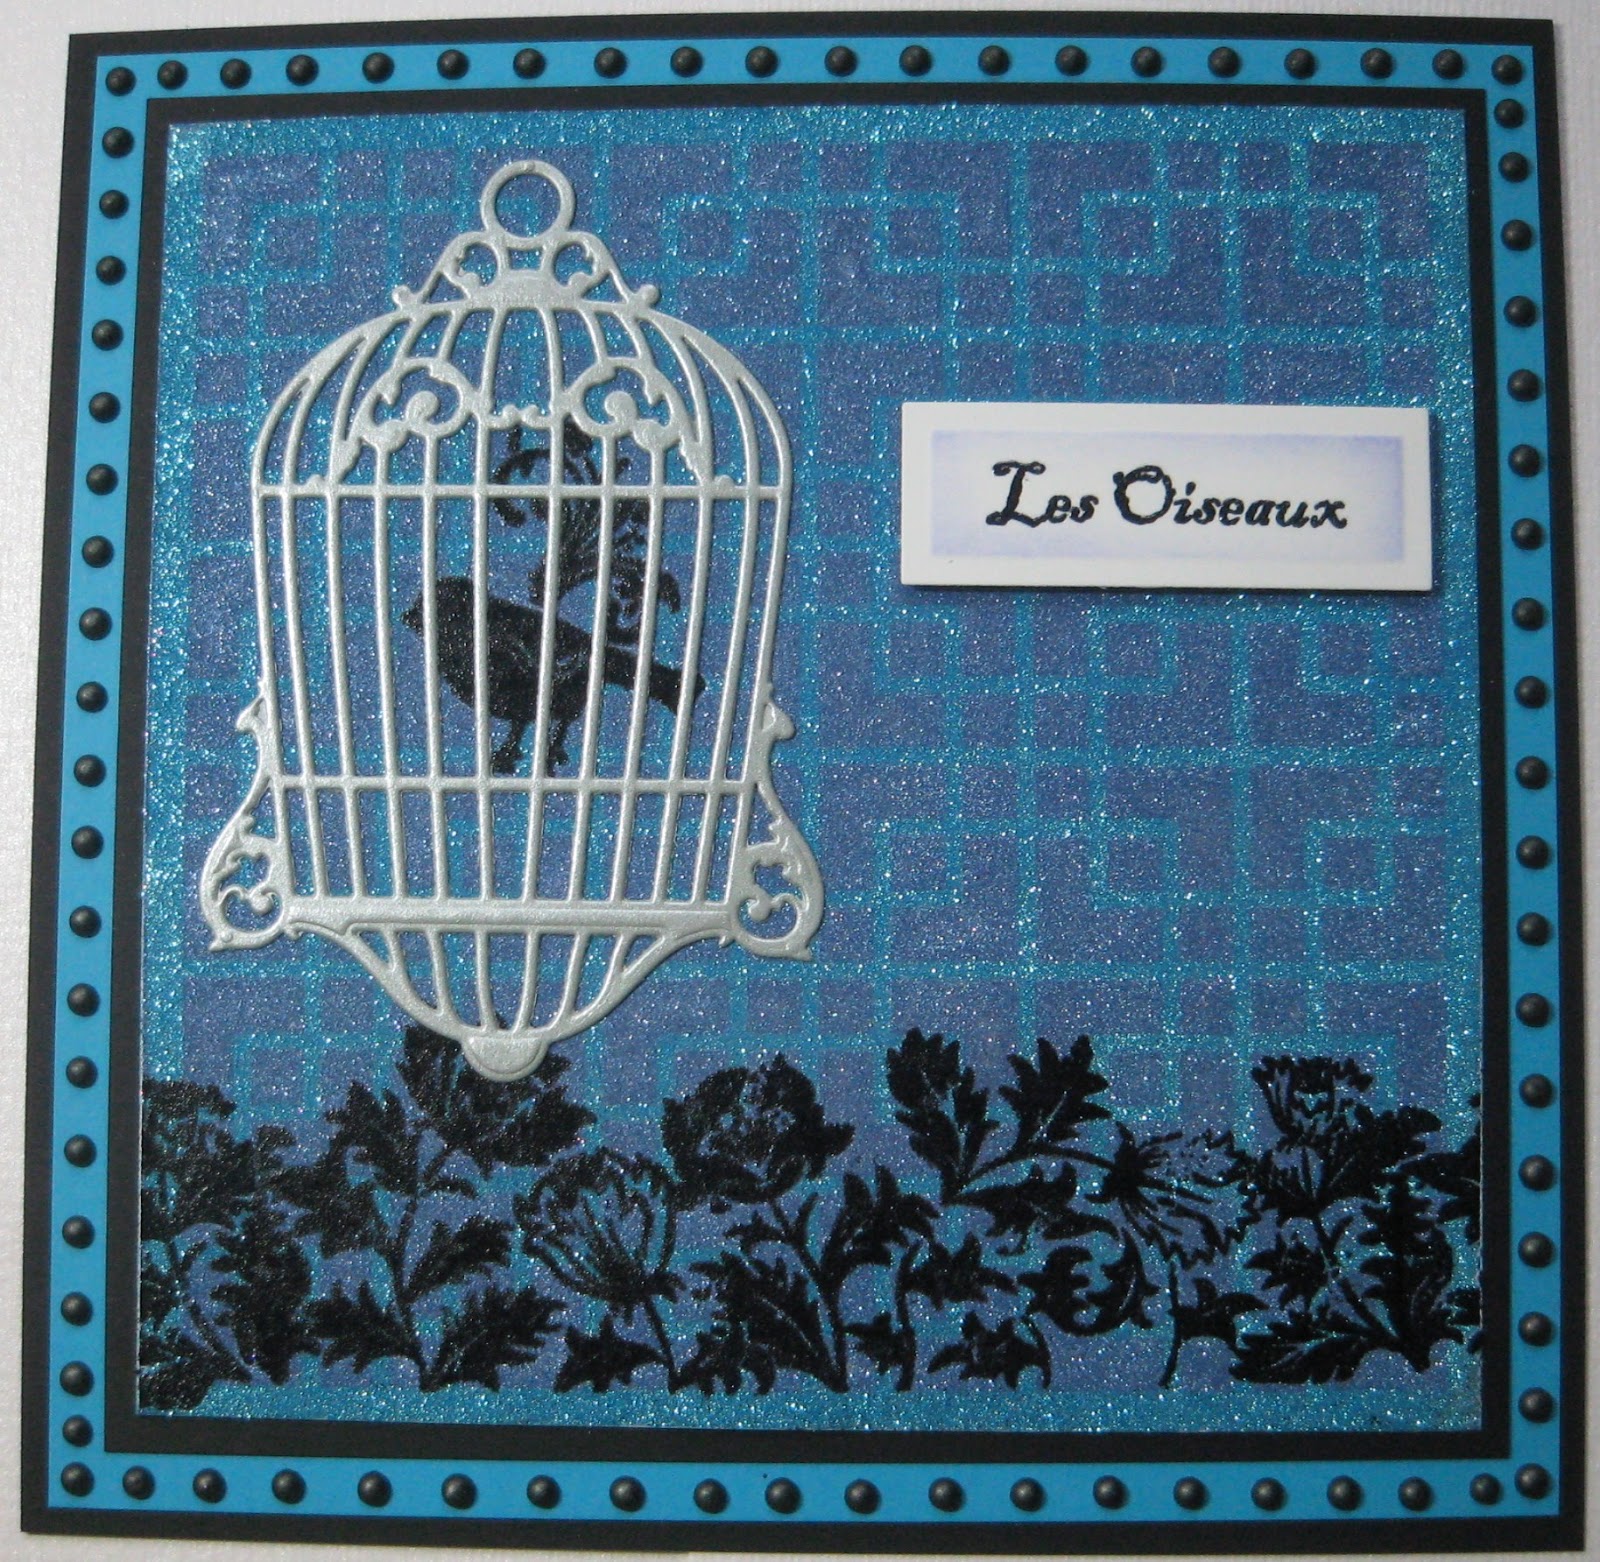
Les Oiseaux

Hi Bloggers.

We're going a bit French and very glittery today with a card from the D-Lites Pick of the Week.

I popped an A4 Self Adhesive Sheet onto an A4 piece of card and trimmed it to be 5 3/4" square (I use the leftover pieces for die cutting). I peeled the backing off the self adhesive sheet. I dusted the Squared Mask lightly with my anti-static bag and added to the adhesive. I sprinkled some Perrywinkle Cosmic Shimmer Polished Silk Glitter all over the area and really rubbed it into the adhesive. I tapped off the excess and made sure I got as much glitter off the mask as possible. I peeled the mask off the adhesive and then sprinkled some Turquiose Cosmic Shimmer Polished Silk Glitter over the area. Again, I really rubbed the glitter into the adhesive. It's a good idea to keep rubbing over the surface for a few minutes - the more you rub, the less it will shed.

I inked up the flower border which was on the Foliage Clear Stamp Set that was on the shows, with Perfect Medium. I added Cosmic Shimmer Black Detail Embossing Powder and heat set carefully making sure I didn't heat too long in one place - the self adhesive sheet would wrinkle. I stamped a section of the flower border again to extend the design the full width of the background.

I stamped a little bird from the Creative Expressions Birds Stamp Set using Perfect Medium and embossed with Black Detail Powder. I cut the Spellbinders Birdcage 2 Die D-Lite out of Silver card and glued it over the stamped bird using Cosmic Shimmer Dries Clear Glue.

I stamped the sentiment from the Birds Stamp Set using Jet Black Archival and embossed with Cosmic Shimmer Clear Embossing Powder. I think I cut it out with a Matting Basics Die but can't check which one as I don't have the card, sorry. I inked through the die with Stormy Sky Distress Ink.

I assembled the card as shown adding some dots of Cosmic Shimmer Pearlescent PVA in Black Pearl around the edges.

Thanks for stopping by.

Julia.


Wednesday, 3 April 2013

Get Well Soon

Hi Bloggers.

Now the sun is out, the daffodils are here - still mighty cold though!

Here's today's card -

For the background, I randomly stamped the Beaded Swirl Single Stamp using Mustard Seed Distress Ink over some Coconut White Card. I made sure the ink was dry and then ran it through the Grand Calibur with the Couture Creations One World Embossing Folder. I ran it through a second time to extend the pattern - the join is behind the topper so you don't really notice. I edged with Mustard Seed using Cut n Dry Foam.

For the topper, I used the Delicate Daffodil Single Stamp. I coloured the stamp using Mustard Seed and Peeled Paint Distress Ink. I lightly spritzed with water before stamping. I cut out using Spellbinders 5 x 7 Matting Basics B and inked through the die with Mustard Seed. I cut a mat out of yellow card using the Matting Basics again.

I stamped the sentiment that comes with the Daffodil stamp using Jet Black Archival and embossed with Cosmic Shimmer Clear Embossing Powder. I cut it out using Spellbinders Die D-Lites Ornamental Tags Three and inked through the die with Mustard Seed.

I tied a bow using White Crochet Ribbon and added a Large Circle Dazzler.

I assembled the card as shown adding some dots of Cosmic Shimmer Pearlescent PVA in White around the edges.

Creative Expressions Design Team are having their first ever blog hop from 10am today. You can join in the fun by following the link below -


http://blog.creative-expressions.uk.com/2013/04/bloghop

I believe there are prized to be had - so don't miss out!

Thanks for stopping by.

Julia.

Tuesday, 2 April 2013

For someone so Special

Hi Bloggers.

Hope you had a lovely Easter. Kathryn and I went to my parents' house for a few days. We just read, watched tv (which I don't normally do much) and ate. Very relaxing!

A shaped card today -

I started by stamping my sentiment from the Creative Expressions Classic Sentiments Stamp Set using Jet Black Archival and embossed with Cosmic Shimmer Clear Embossing Powder. I cut it out using the outer die of the Spellbinders Vines of Passion Die D-Lite. After the emboss stage, I left the card in the die and stamped the Damask Heart Single Stamp through the die using Victorian Velvet Distress Ink. I blotted the ink dry, making sure I removed all the ink from the die, and inked through the die with Victorian Velvet using Cut n Dry Foam.

I cut the second smallest of the Spellbinders Grand Stately Circles. After the emboss stage, I inked through the die with the Squared Mask using Victorian Velvet. Then, with the stamp in my hand, I randomly stamped the Rose Background Stamp, again using Victorian Velvet. I removed any ink that was on the die and blotted the stamping, then inked through the die with Victorian Velvet.

I cut the next 2 sizes up of the Grand Stately Circles and inked the die with Victorian Velvet.

I tied a bow using 2 lengths of the Rose Sheer Wrinkled Edge Ribbon and added a Fancy Pearl Embellishment.

I assembled the card as shown using some leftover bits from a Pearl Swirl.

Thanks for stopping by.

Julia.
www.juliawattscrafts.co.uk

Tuesday, 26 March 2013

Birthday Wishes

Hi Bloggers.

Thanks to all of you who took the time to visit Kathryn's blog yesterday. She was thrilled to have had so many page views and comments.

Back to pink and white today.

I dusted a piece of Pastel Pink Card with an anti-static bag and stamped the sentiment from the Classic Sentiments Stamp Set using Perfect Medium and embossed with Cosmic Shimmer White Detail Embossing Powder. I then stamped the Floral Scroll Stamp (I cut the solid piece of rubber from the centre of my stamp so I could see where to place it around my sentiment) again using Perfect Medium and embossed with Cosmic Shimmer White Detail Embossing Powder. I cut it out using Spellbinders 5 x 7 Elegant Labels Four and inked through the die with Spun Sugar Distress Ink.

For the background, I ran a piece of Coconut White through the Grand Calibur with the Couture Creations Pastorale Embossing Folder (the card was a little wider than the folder. I stamped along the top and the bottom with the Singles Leafy Swirl Stamp using Spun Sugar. I then inked around all the edges with Spun Sugar using Cut n Dry Foam.

I cut the single flower from the Spellbinders Floral Corner 1 Die D-Lites set 4 times out of Pastel Pink Card. I added 1 to each corner of the background and added a 5mm White Pearl to the centre of each one.

I tied a bow using White Satin Edged Organza Ribbon and added a Medium Circle Dazzler.

I assembled the card as shown adding some left-over bits from a Pearl Swirl and some dots of Cosmic Shimmer Pearlescent PVA in Vintage Pink around the edges.

Thanks for stopping by.

Julia.


Sunday, 24 March 2013

Birthday Wishes

Hi Bloggers.

Here's today's card -

For the background, I placed the Knitted Mask at a jaunty angle onto some Coconut White Card and spritzed with Purple Violet from the Cosmic Shimmer Breeze Blush Acrylic Misting Inks Set.

I stamped the Perfect Poppy Single Stamp using Perfect Medium and embossed with Cosmic Shimmer White Detail Embossing Powder. I also stamped the sentiment which comes with the poppy again using the Perfect Medium and embossed with the white powder. I cut it out using Spellbinder 5 x 7 Matting Basics B and inked through the die with Dusty Concord Distress Ink. I cut a mat out again using the Matting Basics B.

I popped some Double Sided Adhesive onto some card and die cut Spellbinders Die D-Lites Medallion 8. I did not use the little centre circle die. I peeled off the baking. I added Vintage Violet Cosmic Shimmer Polished Silk Glitter. I really rubbed it in to make sure that the fine glitter really covered the surface. The more you rub, the less it will shed. I added a Medium Circle Dazzler.

I assembled the card as shown adding some Pearl Swirls and some dots of Cosmic Shimmer Pearlescent PVA in white around the edges.

For those of you who have asked, I have ordered some Cosmic Shimmer Polished Silk Glitter for my Amazon Store. I have also ordered some Gilding Flakes and some Gilding Wax. Hopefully they will be here after Easter.

Thanks for stopping by.

Julia.


Saturday, 23 March 2013

Filigree Vase

Hi Bloggers.

Thank you for all your kind comments, especially over this last week, both here on the blog and in the emails sent to the studio. It's much appreciated and I'm glad that you have enjoyed the shows and perhaps learned one or two new techniques.

Yesterday afternoon, I popped some more stamps on my Amazon Store. You can find A6 Background stamps here. I've got some of the new pre-mounted and cut Singles Stamps which you can find here. I have been asked to get the Wedding Stamp Sets that I did on shows recently and you can find them here and here (sorry there's no picture of Wonderful Beginnings yet). I have also re-stocked Elegant Ladies, Party Ladies, Cheers and Classic Sentiments Stamp Sets as requested.

There have been quite a lot of orders during this past week and stocks are low on a number of items so I'll be re-stocking those as soon as possible. I have nearly caught up with orders and I should be back to normal from Monday.

I'm at Milton Keynes Cardiac Group today helping with their craft day. If you're in the area, please pop along. There's lots of different crafts to try.

Here's today's card -

This is such a simple card to make. Using Milk Card and the inner die to cut the Spellbinders Filigree Vase as an aperture within the Spellbinders 5 x 7 Matting Basics B. I cut a cobalt mat out of Cobalt Card again using the Matting Basics B.

I cut the largest of the 5 x 7 Elegant Labels 4 out of Milk Card.  I tied a bow using Blue/Ivory Grograin Ribbon and added a Large Square Dazzler.

I assembled the card as shown adding some Cream Self Adhesive Pearls. I did some faux stitching around the edges with a Blue Fine Liner Pen.

Thanks for stopping by.

Julia.

Friday, 22 March 2013

For You

Hi Bloggers.

One for the guys today -

For the background, I dusted a piece of Coconut White Card with an anti static bag, inked the Chicken Wire Mask with Perfect Medium and popped it on top of the card. I ran it through the Grand Calibur with the embossing sandwich. The Perfect medium transfers to the debossed pattern. I added some Cosmic Shimmer Silver Detail Embossing Powder and heat set.

I stamped the Gothic Gateway stamp using Pumice Stone Distress Ink. I cut it out using Spellbinders 5x7 Elegant Labels 4 and inked through the die with Pumice Stone using Cut n Dry Foam. As you can see, I did not use the whole die.

I cut the Spellbinders Die  D-Lite Bonsai Tree out of Black Card, removed it from the die, dusted it with my anti static bag, popped it back in the die, inked through the die with perfect medium, removed it from the die and then dusted with Pewter Grey Mica Powder from the Cosmic Shimmer Golden Winter Mica Spray Set.

I stamped the sentiment from the Creative Expressions Everyday Expressions Stamp Set using Perfect Medium and embossed with the Silver Detail Powder. I cut it out using Spellbinders Die D-Lites Petite Labels 1 and inked through the die with Pumice Stone.

I assembled the card as shown adding some dots of Cosmic Shimmer Pearlescent PVA in Silver Lustre around the edges.

Last Pick of the Week show today at 9am. Hope you can join me.

Thanks for stopping by.

Julia.