Hi Bloggers.
Here's this week's card that needs a new home - a demo card from shows earlier this year.
You can read how the original card was made here.
Leave a lovely comment below to go into the draw to win it. I will
announce the winner on Monday. Be sure to pop back to see if you have
won.
Please note : Only comments left below will go into the draw. Comments
made on the original post will not count. Information given on the
original post was correct at the time that post was published.
Some brand new Woodware Stamps have just been released. There are 24 sets including, for the first time, an A5 set. You can find them over on my website here. Below are a few of my faves (hard to choose though!).
Thanks for stopping by.
Julia.
www.juliawattscrafts.co.uk
Friday, 10 November 2017
Thursday, 9 November 2017
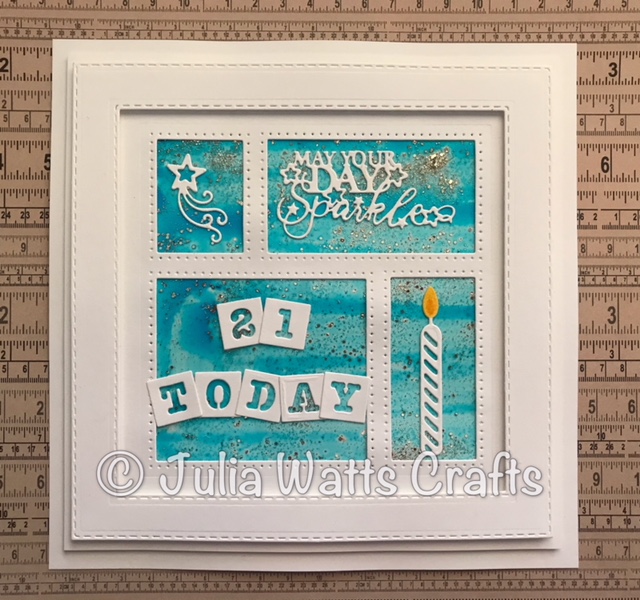
21 Today Shadow Box
Hi Bloggers.
Here's today's card -
For the background, I used a piece of Heat Emboss Acetate. I popped some CS Clear Varnish Lacquer onto my Craft Sheet. I added a drop of Bluebell CS Intense Pigment Stain and mixed well. I painted it onto my Acetate using a Wide Brush. I then sprinkled some CS Golden Sand Glitterbitz over and put aside to dry (doesn't take long).
I cut the Celebrations Shadow Box out of Coconut White Card. I glued it to my background once it was dry. I made a frame using dies #3 and #5 from the Stitched Square Peg Board Die Set and added it to my Shadow Box using Woodware Foam Tape. I matted onto a couple of pieces of Coconut White Card.
I used tiles from the Alphabet Grid Die and elements from the Celebrations Shadow Box Die Set to decorate my card. I coloured the flame on the candle using Mustard Seed and Spiced Marmalade Distress Markers.
Here's the one I demoed on Hochanda with Rose Pink CS Intense Pigment Stain instead of Bluebell -
Thanks for stopping by.
Julia.
www.juliawattscrafts.co.uk
Here's today's card -
For the background, I used a piece of Heat Emboss Acetate. I popped some CS Clear Varnish Lacquer onto my Craft Sheet. I added a drop of Bluebell CS Intense Pigment Stain and mixed well. I painted it onto my Acetate using a Wide Brush. I then sprinkled some CS Golden Sand Glitterbitz over and put aside to dry (doesn't take long).
I cut the Celebrations Shadow Box out of Coconut White Card. I glued it to my background once it was dry. I made a frame using dies #3 and #5 from the Stitched Square Peg Board Die Set and added it to my Shadow Box using Woodware Foam Tape. I matted onto a couple of pieces of Coconut White Card.
I used tiles from the Alphabet Grid Die and elements from the Celebrations Shadow Box Die Set to decorate my card. I coloured the flame on the candle using Mustard Seed and Spiced Marmalade Distress Markers.
Here's the one I demoed on Hochanda with Rose Pink CS Intense Pigment Stain instead of Bluebell -
Thanks for stopping by.
Julia.
www.juliawattscrafts.co.uk
Wednesday, 8 November 2017
Pretty Pastel Weave with Alphabet Grid overlay
Hi Bloggers.
I'm heading up to Creative Expressions HQ in Kettering today for my last workshop this year there. Should be a fun day!
Here's today's card -
For the weave, I cut the Intermediate Weaving Die out of Sky Blue, Lilac, Primrose and Aqua Card - one from each colour. I glued the Sky Blue and Lilac die cuts together, offsetting them to fill in the gaps. I repeated the process with the Primrose and Aqua die cuts. I cut the latter into pieces that were 2 strips wide and wove them through the Sky Blue/Lilac piece - under 2 strips, over 2 strips, under 2 strips and so on. I continued in this pattern until my weave was complete.
I cut the Alphabet Grid Die out of Primrose Card. I filed the tiles and letters away in my box and glued the grid to my woven background. I made a frame out of Aqua Card using dies #2 and #4 from the Stitched Square Peg Board Die Set. I added it to my background using Woodware Foam Tape and trimmed away the excess. I matted onto Lilac Card and then Sky Blue Card.
I cut the dies from the Happy Birthday Circle Die Set out of Sky Blue, Lilac, Aqua and Primrose Card.
I used the Pinwheel Floral Die Set for my flower cut from Sky Blue Card and my leaves which I cut from Primrose Card. I added a Small Circle Dazzler to the centre of my flower.
I completed my card by adding 8mm Cream Pearls to the corners of my frame.
This is the demo version that I did on the recent One Day Special using Mauve, Primrose, Baby Pink and Stone Card.
Lisa Horton is continuing with One Day Special shows on Hochanda today at 9am, 1pm and 5pm. I'm offering 10% off items from the shows on my website. You can find them here. Please enter LISAHORTON in the discount code box at checkout to activate your discount. Offer valid till midnight tonight or while stocks last.
Thanks for stopping by.
Julia.
www.juliawattscrafts.co.uk
I'm heading up to Creative Expressions HQ in Kettering today for my last workshop this year there. Should be a fun day!
Here's today's card -
For the weave, I cut the Intermediate Weaving Die out of Sky Blue, Lilac, Primrose and Aqua Card - one from each colour. I glued the Sky Blue and Lilac die cuts together, offsetting them to fill in the gaps. I repeated the process with the Primrose and Aqua die cuts. I cut the latter into pieces that were 2 strips wide and wove them through the Sky Blue/Lilac piece - under 2 strips, over 2 strips, under 2 strips and so on. I continued in this pattern until my weave was complete.
I cut the Alphabet Grid Die out of Primrose Card. I filed the tiles and letters away in my box and glued the grid to my woven background. I made a frame out of Aqua Card using dies #2 and #4 from the Stitched Square Peg Board Die Set. I added it to my background using Woodware Foam Tape and trimmed away the excess. I matted onto Lilac Card and then Sky Blue Card.
I cut the dies from the Happy Birthday Circle Die Set out of Sky Blue, Lilac, Aqua and Primrose Card.
I used the Pinwheel Floral Die Set for my flower cut from Sky Blue Card and my leaves which I cut from Primrose Card. I added a Small Circle Dazzler to the centre of my flower.
I completed my card by adding 8mm Cream Pearls to the corners of my frame.
This is the demo version that I did on the recent One Day Special using Mauve, Primrose, Baby Pink and Stone Card.
Lisa Horton is continuing with One Day Special shows on Hochanda today at 9am, 1pm and 5pm. I'm offering 10% off items from the shows on my website. You can find them here. Please enter LISAHORTON in the discount code box at checkout to activate your discount. Offer valid till midnight tonight or while stocks last.
Thanks for stopping by.
Julia.
www.juliawattscrafts.co.uk
Tuesday, 7 November 2017
Make a Cake and Alphabet Grid
Hi Bloggers.
Here's today's card -
I started by cutting the Alphabet Grid Die out of Coconut White Card. I filed the letters away in a box. I made a frame out of Coconut White Card using dies #2 and #4 from the Stitched Square Peg Board Die Set. I added it to my grid using Woodware Foam Tape. I matted onto Slate Grey Card, securing the grid to the Grey Card with CS Glue at the cross sections. I then matted onto Baby Pink Card and another piece of Coconut White.
I cut the Make a Cake Die Set elements our of Coconut White, Baby Pink and Silver Mirror Card and coloured the candles with Mustard Seed and Spiced Marmalade Distress Markers.
I added my sentiment made with tiles cut from Baby Pink and Coconut White Card using the Alphabet Grid Die (well, most were from my little collection in my box 😀).
Lisa Horton is launching a new One Day Special on Hochanda today at 6pm with some more of the September Release of Sue Wilson dies. I'm offering 10% off items from the shows on my website. You can find them here. Please enter LISAHORTON in the discount code box at checkout to activate your discount. Offer valid till midnight tomorrow night or while stocks last. Lisa has another show at 8pm tonight and then more shows at 9am, 1pm and 5pm tomorrow.
Thanks for stopping by.
Julia.
www.juliawattscrafts.co.uk
Here's today's card -
I started by cutting the Alphabet Grid Die out of Coconut White Card. I filed the letters away in a box. I made a frame out of Coconut White Card using dies #2 and #4 from the Stitched Square Peg Board Die Set. I added it to my grid using Woodware Foam Tape. I matted onto Slate Grey Card, securing the grid to the Grey Card with CS Glue at the cross sections. I then matted onto Baby Pink Card and another piece of Coconut White.
I cut the Make a Cake Die Set elements our of Coconut White, Baby Pink and Silver Mirror Card and coloured the candles with Mustard Seed and Spiced Marmalade Distress Markers.
I added my sentiment made with tiles cut from Baby Pink and Coconut White Card using the Alphabet Grid Die (well, most were from my little collection in my box 😀).
Lisa Horton is launching a new One Day Special on Hochanda today at 6pm with some more of the September Release of Sue Wilson dies. I'm offering 10% off items from the shows on my website. You can find them here. Please enter LISAHORTON in the discount code box at checkout to activate your discount. Offer valid till midnight tomorrow night or while stocks last. Lisa has another show at 8pm tonight and then more shows at 9am, 1pm and 5pm tomorrow.
Thanks for stopping by.
Julia.
www.juliawattscrafts.co.uk
Monday, 6 November 2017
So Many Candles on a Woven Background
Hi Bloggers.
Here's today's card -
For the background, I used the Intermediate Weaving Die and Coconut White Card for an 1 x 1 weave. I needed to extend the weave so when glueing the 2 die cuts together at the start, I offset them leaving a gap at the top an the bottom (pretend these are both white) -
All you need to do then is glue another single strip to the top and bottom to fill in the gaps. To extend more, just drop down as many strips are required before glueing and add strips into the gaps - easy!
Once my weave was complete, I made a frame using dies #2 and #4 from the Stitched Square Peg Board Die Set. I added it to my weave using Woodware 2mm Foam Tape and trimmed away the excess. I matted into Primrose and then Mauve Card and another piece of Coconut White Card.
I cut some candles from the Celebrations Shadow Box Die Set out of Coconut White, Primrose, Mauve and Duck Egg Card. I coloured the flames using Mustard Seed and Spiced Marmalade Distress Markers.
I cut the So Many Candles Die out of Primrose and Mauve Card and glued them together, offesetting them slightly.
I completed my card by adding an 8mm White Pearl to the corners of my frame.
I have just 2 spaces left on my workshop at Creative Expressions HQ this Wednesday. The theme is Christmas and is mainly die cutting. For more details please visit my website here. This will be my last workshop up there this year.
My last workshop locally is on Saturday 25th November. We'll be focussing on dies from Sue Wilson's September and November releases. Here's a little sneak peek -
For more info and to book, please visit my website here.
The winner of the card from Freebie Friday on 3rd November is ..........................
Please email me at juliawattscrafts@gmail.com with your address and I'll pop your card in the post.
Thanks for stopping by.
Julia.
www.juliawattscrafts.co.uk
Here's today's card -
For the background, I used the Intermediate Weaving Die and Coconut White Card for an 1 x 1 weave. I needed to extend the weave so when glueing the 2 die cuts together at the start, I offset them leaving a gap at the top an the bottom (pretend these are both white) -
All you need to do then is glue another single strip to the top and bottom to fill in the gaps. To extend more, just drop down as many strips are required before glueing and add strips into the gaps - easy!
Once my weave was complete, I made a frame using dies #2 and #4 from the Stitched Square Peg Board Die Set. I added it to my weave using Woodware 2mm Foam Tape and trimmed away the excess. I matted into Primrose and then Mauve Card and another piece of Coconut White Card.
I cut some candles from the Celebrations Shadow Box Die Set out of Coconut White, Primrose, Mauve and Duck Egg Card. I coloured the flames using Mustard Seed and Spiced Marmalade Distress Markers.
I cut the So Many Candles Die out of Primrose and Mauve Card and glued them together, offesetting them slightly.
I completed my card by adding an 8mm White Pearl to the corners of my frame.
I have just 2 spaces left on my workshop at Creative Expressions HQ this Wednesday. The theme is Christmas and is mainly die cutting. For more details please visit my website here. This will be my last workshop up there this year.
My last workshop locally is on Saturday 25th November. We'll be focussing on dies from Sue Wilson's September and November releases. Here's a little sneak peek -
For more info and to book, please visit my website here.
The winner of the card from Freebie Friday on 3rd November is ..........................
Poppyfield Card Crafts
Please email me at juliawattscrafts@gmail.com with your address and I'll pop your card in the post.
Thanks for stopping by.
Julia.
www.juliawattscrafts.co.uk
Sunday, 5 November 2017
Party Time
Hi Bloggers.
Here's today's card -
I started by cutting die #2 from the Stitched Square Peg Board die set out of Coconut White Card. I then added die #1 from the same set into the die cut square and cut. I cut die #3 from the set out of Duck Egg Card and glued my 2 die cuts together. I matted onto Coconut White Card using CE Mounting Cushion.
I cut some boxes and a little star using the Celebrations Shadow Box.
I cut the largest penant from the Celebrations Shadow Box out of Duck Egg Card 5 times. I folded them and attached them to a piece of Pastel Baker's Twine. I added my letters cut from Coconut White Card using the Alphabet Grid Die.
I added the rest of my sentiment to the bottom of my card with tiles cut from Coconut White and Duck Egg Card using the Alphabet Grid.
A simple party invite, add a tree or use festive colours and you could use it for a Christmas or New Year party.
Thanks for stopping by.
Julia.
www.juliawattscrafts.co.uk
Here's today's card -
I started by cutting die #2 from the Stitched Square Peg Board die set out of Coconut White Card. I then added die #1 from the same set into the die cut square and cut. I cut die #3 from the set out of Duck Egg Card and glued my 2 die cuts together. I matted onto Coconut White Card using CE Mounting Cushion.
I cut some boxes and a little star using the Celebrations Shadow Box.
I cut the largest penant from the Celebrations Shadow Box out of Duck Egg Card 5 times. I folded them and attached them to a piece of Pastel Baker's Twine. I added my letters cut from Coconut White Card using the Alphabet Grid Die.
I added the rest of my sentiment to the bottom of my card with tiles cut from Coconut White and Duck Egg Card using the Alphabet Grid.
A simple party invite, add a tree or use festive colours and you could use it for a Christmas or New Year party.
Thanks for stopping by.
Julia.
www.juliawattscrafts.co.uk
Saturday, 4 November 2017
Stamping into Ultra Thick Embossing Crystals
Hi Bloggers.
Here's today's card -
I started with a square piece of Coconut White Card. I dabbed a little Faded Jeans Distress Oxide onto my Craft Sheet. I misted it with waterand then pricked it up onto my card. I repeated the process with Broken China Distress Oxide. I dried the ink with my Heat Tool and then edged with Faded Jeans Oxide using a Smoothie.
I stamped the gentleman from the Wendy Vecchi 3 Cheers for Art using Forget Me Not Archival.
I stamped the sentiment from the same set using Watering Can Archival.
I doodled around the edges of my card using a Pigma Micron Pen.
I matted onto Black Card and then onto Coconut White Card.
I set the Efcolor Stove up and added some CS Clear and Midnight Blue Ultra Thick Embossing Crystals to a Melt-It Case. I popped it onto the stove platform, added the lid and left to melt. I inked up the sentiment from the same set using Clear Perfect Medium. Once the crystals were moulten I poured some onto my Craft Sheet and added my sentiment stamp to it. I left it to set for a couple of minutes and then peeled away the stamp. I brushed CS Phill Martin Chic Grey Blue Mica Powder over it. I added my sentiment to my card with a little Hi-Tack Tape and a little CS Glue.
I completed my card by adding 3 x 5mm Black Pearls.
Thanks for stopping by.
Julia.
www.juliawattscrafts.co.uk
Here's today's card -
I started with a square piece of Coconut White Card. I dabbed a little Faded Jeans Distress Oxide onto my Craft Sheet. I misted it with waterand then pricked it up onto my card. I repeated the process with Broken China Distress Oxide. I dried the ink with my Heat Tool and then edged with Faded Jeans Oxide using a Smoothie.
I stamped the gentleman from the Wendy Vecchi 3 Cheers for Art using Forget Me Not Archival.
I stamped the sentiment from the same set using Watering Can Archival.
I doodled around the edges of my card using a Pigma Micron Pen.
I matted onto Black Card and then onto Coconut White Card.
I set the Efcolor Stove up and added some CS Clear and Midnight Blue Ultra Thick Embossing Crystals to a Melt-It Case. I popped it onto the stove platform, added the lid and left to melt. I inked up the sentiment from the same set using Clear Perfect Medium. Once the crystals were moulten I poured some onto my Craft Sheet and added my sentiment stamp to it. I left it to set for a couple of minutes and then peeled away the stamp. I brushed CS Phill Martin Chic Grey Blue Mica Powder over it. I added my sentiment to my card with a little Hi-Tack Tape and a little CS Glue.
I completed my card by adding 3 x 5mm Black Pearls.
Thanks for stopping by.
Julia.
www.juliawattscrafts.co.uk
Friday, 3 November 2017
Freebie Friday
Hi Bloggers.
Here's this week's card that needs a new home -
You can read how this card was made here.
Leave a lovely comment below to go into the draw to win it. I will announce the winner on Monday. Be sure to pop back to see if you have won.
Please note : Only comments left below will go into the draw. Comments made on the original post will not count. Information given on the original post was correct at the time that post was published.
Thanks for stopping by.
Julia.
www.juliawattscrafts.co.uk
Here's this week's card that needs a new home -
You can read how this card was made here.
Leave a lovely comment below to go into the draw to win it. I will announce the winner on Monday. Be sure to pop back to see if you have won.
Please note : Only comments left below will go into the draw. Comments made on the original post will not count. Information given on the original post was correct at the time that post was published.
Thanks for stopping by.
Julia.
www.juliawattscrafts.co.uk
Thursday, 2 November 2017
Blue and White Intermediate and Striped Weave
Hi Bloggers.
Here's today's card -
For the weave on this one, I cut the Intermediate Weaving Die out of Coconut White Card once and the Striped Weaving Die out of Sky Blue Card. I cut the Striped die cuts into pairs and wove them through the White Intermediate die cut.
I made a frame out of Coconut White Card using the Scalloped Lattice Frames Set B and added it to my woven background using Woodware 2mm Foam Tape, trimming away the excess. I matted onto Coconut White, then Sky Blue and then another piece of Coconut White Card.
I cut the Birthday Wishes Die out of Sky Blue Card. I popped a piece of CE DS Self Adhesive Sheet onto a piece of Coconut White Card. I cut the oval die from the Thank You die set from it. I peeled away the backing sheet and added my sentiment. I added CS Sparkle Star Diamond Frost to the rest of the exposed adhesive.
I cut some leaves out of Coconut White Card using the Spring Foliage Die Set and made some flowers out of Sky Blue Card using just the open petal dies from the Striped Nasturtium Die Set.
I completed my card by adding a 5mm White Pearl to the centre of the flowers.
Thanks for stopping by.
Julia.
www.juliawattscrafts.co.uk
Here's today's card -
For the weave on this one, I cut the Intermediate Weaving Die out of Coconut White Card once and the Striped Weaving Die out of Sky Blue Card. I cut the Striped die cuts into pairs and wove them through the White Intermediate die cut.
I made a frame out of Coconut White Card using the Scalloped Lattice Frames Set B and added it to my woven background using Woodware 2mm Foam Tape, trimming away the excess. I matted onto Coconut White, then Sky Blue and then another piece of Coconut White Card.
I cut the Birthday Wishes Die out of Sky Blue Card. I popped a piece of CE DS Self Adhesive Sheet onto a piece of Coconut White Card. I cut the oval die from the Thank You die set from it. I peeled away the backing sheet and added my sentiment. I added CS Sparkle Star Diamond Frost to the rest of the exposed adhesive.
I cut some leaves out of Coconut White Card using the Spring Foliage Die Set and made some flowers out of Sky Blue Card using just the open petal dies from the Striped Nasturtium Die Set.
I completed my card by adding a 5mm White Pearl to the centre of the flowers.
Thanks for stopping by.
Julia.
www.juliawattscrafts.co.uk
Wednesday, 1 November 2017
Ecliptic Edger Background
Hi Bloggers.
Here's today's card which is a demo that I did on the recent Hochanda shows -
Back to my favourite technique at the moment - I used a piece of Watercolour Card cut into 2 x A5 pieces. I added 10 drops of Citrus Lime, Deep Plum and Rose Pink CS Intense Pigment Stains to 3 Mister Bottles filled with water. I misted all 3 colours onto 1 piece of the Watercolour Card. I misted a little plain water on top and then placed the other piece of Watercolour Card on top. I peeled the pieces of card apart and blotted excess off with Kitchen Roll. I kept my second piece for another project.
Working on my first piece, I placed the Prism Effect Mask on one half and misted through with water. I lifted the mask off and turned it over and placed on the other half of my background to get a negative water print. I blotted off with Kitchen Roll. I then misted through a section of the Tzar Mask with the Citrus Lime. I turned it over to get a negative print from the excess ink in another section of my background and blotted off with Kitchen Roll.
This technique is adpated from a technique in the Dyan Reavely Distinctly Dylusional A Guide to Art Journaling Book (due in stock on my website very soon and available to order bere).
I cut the largest die in Sue Wilson's Ecliptic Edger into Coconut White Card 5 times to create a background. I glued it to my misted background using CS Glue in a Woodware Fine Tip Glue Applicator.
I made a frame out of Coconut White Card using dies #2 and #4 from the Square Stitched Peg Board Die Set and added it to my backgrounds using Woodware 3mm Foam Tape.
My sentiment has been created using the Alphabet Grid Die with Coconut Whte and Black Card. I added the tiles to my card using CE Mounting Cushion.
I added a flower and leaves to my frame using the Pinwheel Floral Die Set.
Thanks for stopping by.
Julia.
www.juliawattscrafts.co.uk
Here's today's card which is a demo that I did on the recent Hochanda shows -
Back to my favourite technique at the moment - I used a piece of Watercolour Card cut into 2 x A5 pieces. I added 10 drops of Citrus Lime, Deep Plum and Rose Pink CS Intense Pigment Stains to 3 Mister Bottles filled with water. I misted all 3 colours onto 1 piece of the Watercolour Card. I misted a little plain water on top and then placed the other piece of Watercolour Card on top. I peeled the pieces of card apart and blotted excess off with Kitchen Roll. I kept my second piece for another project.
Working on my first piece, I placed the Prism Effect Mask on one half and misted through with water. I lifted the mask off and turned it over and placed on the other half of my background to get a negative water print. I blotted off with Kitchen Roll. I then misted through a section of the Tzar Mask with the Citrus Lime. I turned it over to get a negative print from the excess ink in another section of my background and blotted off with Kitchen Roll.
This technique is adpated from a technique in the Dyan Reavely Distinctly Dylusional A Guide to Art Journaling Book (due in stock on my website very soon and available to order bere).
I cut the largest die in Sue Wilson's Ecliptic Edger into Coconut White Card 5 times to create a background. I glued it to my misted background using CS Glue in a Woodware Fine Tip Glue Applicator.
I made a frame out of Coconut White Card using dies #2 and #4 from the Square Stitched Peg Board Die Set and added it to my backgrounds using Woodware 3mm Foam Tape.
My sentiment has been created using the Alphabet Grid Die with Coconut Whte and Black Card. I added the tiles to my card using CE Mounting Cushion.
I added a flower and leaves to my frame using the Pinwheel Floral Die Set.
Thanks for stopping by.
Julia.
www.juliawattscrafts.co.uk
Tuesday, 31 October 2017
Simple Thank You Alphabet Grid
Hi Bloggers.
As hinted yesterday, this card contains the waste ink (Citrus Lime, Rose Pink and Deep Plum Intense Pigment Stains in Mister Bottles) printed onto Watercolour Card from yesterday's card.
So, very simple to make. I cut the Alphabet Grid Die out of a square of Coconut White Card that was left over from making a frame using the Stitched Square Peg Board Die Set (or just cut die #2). I stored all the letters in my box.
I added the grid to my background and matted onto a Coconut White Card Blank.
I added tiles previously cut from Coconut White, Primrose, Baby Pink and Lilac Card using the Alphabet Grid Die for my sentiment.
As hinted yesterday, this card contains the waste ink (Citrus Lime, Rose Pink and Deep Plum Intense Pigment Stains in Mister Bottles) printed onto Watercolour Card from yesterday's card.
So, very simple to make. I cut the Alphabet Grid Die out of a square of Coconut White Card that was left over from making a frame using the Stitched Square Peg Board Die Set (or just cut die #2). I stored all the letters in my box.
I added the grid to my background and matted onto a Coconut White Card Blank.
I added tiles previously cut from Coconut White, Primrose, Baby Pink and Lilac Card using the Alphabet Grid Die for my sentiment.
Phill
Martin is continuing with his One Day Special on Hochanda today with shows at 9am, 1pm and 5pm. I'm offering 10% discount on items from
the shows on my website. You can find them here.
You need to enter PHILLMARTIN in the discount code box at checkout to
get your discount. Offer valid till midnight tonight or while
stocks last.
The latest release of Sue Wilson Dies is on sale from today. You can find them on my website here. Be sure to checkout Sue's Blog for new cards featuring these fab new dies.
Thanks for stopping by.
Julia.
www.juliawattscrafts.co.uk
Julia.
www.juliawattscrafts.co.uk
Subscribe to:
Posts (Atom)


