Hi Bloggers.
Here's today's card -
I've been waiting for ages to share this card but the Pinwheel Floral has been out of stock since the Hochanda shows that I did in October. It's back in stock so a great reason to share it now.
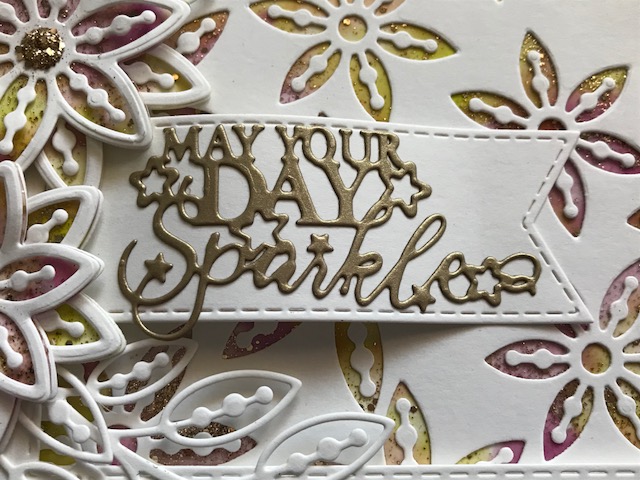
The background on this one is quite cool. I used a piece of Heat Emboss Acetate. I popped some CS Clear Varnish Lacquer into 2 areas on my Craft Sheet. I added a drop of Deep Plum CS Intense Pigment Stain into one area and Citrus Lime CS Intense Pigment Stain into the other and mixed well. I added the Citrus Lime to my acetate first, in splonges randomly all over. I then added the Deep Plum, fillinf in the gaps and overlapping the Citrus Lime in some areas to give a blended colour. I then sprinkled some CS Golden Sand Glitterbitz over and put aside to dry (doesn't take long).
I then cut the inner dies only from all 3 sized of flowers from the Pinwheel Floral Die Set into a piece of Coconut White Card several times to create a background.
Once my acetate background was dry, I glued my Pinwheel Floral Background to it.
I made a frame out of Coconut White Card using dies #2 and #4 from the Stitched Square Peg Board Die Set. I added it to my backgrounds using Woodware Foam Tape.
I cut a Stitched Flag out of Coconut White Card. I cut the sentiment from the Celebrations Shadow Box out of Antique Gold Pearl Card.
I cut some leaves out of Coconut White Card using the Pinwheel Floral Die Set. For the flowers, I cut the solid dies from the same set out of Coconut White Card and out of my acetate background. I cut both of the dies together in all the sizes out of Coconut White Card. I glued at the centre only - 1 solid Coconut White, then 1 solid acetate background and 1 Coconut White open die cut. I then stacked them up in pairs offesetting then slightly to create my flowers. I added CS Glue to the centres and sprinkled Golden Sand CS Glitterbitz over.
Phill Martin is launching a One Day Special on Hochanda at 6pm today. I'm offering 10% off items from the shows on my website. You can find them here.
Please enter PHILLMARTIN in the discount code box at checkout to
activate your discount. Offer valid till midnight tomorrow night or
while stocks last. Phill has another show at 8pm tonight and then more
shows at 9am, 1pm and 5pm tomorrow.
Thanks for stopping by.
Julia.
www.juliawattscrafts.co.uk
Showing posts with label Intense Pigment Stain. Show all posts
Saturday, 9 December 2017
Tuesday, 21 November 2017
Shaving Foam & Pigment Stain Weave
Hi Bloggers.
Here's today's card -
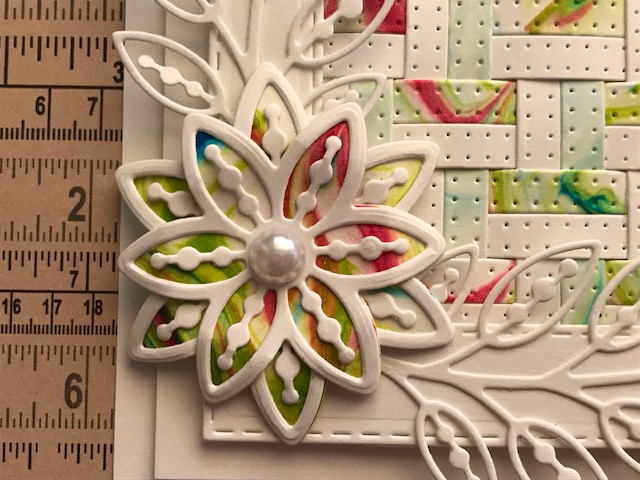
For the weave on this one, I started by creating some Shaving Foam Backgrounds with Bluebell, Citrus Lime and Rose Pink CS Intense Pigment Stains. I cut the Intermediate Weaving Die out of the first generation print from the Shaving Foam, 3rd generation print and out of Coconut White Card twice. To fit the smallest frame possible from the Stitched Square Peg Board, you need to extend the weft. So, I cut an extra strip from my first generation background and another strip of Coconut White. I glued a Coconut White die cut to my first generation cut, offsetting it to fill in the gaps but dropping it down to leave a space at the top and the bottom.I then added my extra strips.
I added my other Coconut White Die Cut to my 3rd generation cut, offesetting it to fill in all the gaps. I cut it into pieces 2 strips wide and then wove the strips through my extended piece.
I made a frame out of Coconut White Card using dies #2 and #4 from the Stitched Square Peg Board Die Set and added it to my woven background using 2mm Foam Tape trimming away the excess with scissors. I matted onto a couple of pieces of Coconut White Card.
I cut the Make a Cake die out of Coconut White Card, Silver Mirror Card and from my 3rd generation background. I coloured the candles using Mustard Seed and Spiced Marmalade Distress Markers.
I made my flowers from Coconut White and 1st generation background using the Pinwheel Floral Die Set and cut the leaves out of Coconut White Card using the same die set. I added an 8mm White Pearl to the centre of my flower.
I completed my card by adding a 5mm White Pearl to the corners of my frame.
Thanks for stopping by.
Julia.
www.juliawattscrafts.co.uk
Here's today's card -
For the weave on this one, I started by creating some Shaving Foam Backgrounds with Bluebell, Citrus Lime and Rose Pink CS Intense Pigment Stains. I cut the Intermediate Weaving Die out of the first generation print from the Shaving Foam, 3rd generation print and out of Coconut White Card twice. To fit the smallest frame possible from the Stitched Square Peg Board, you need to extend the weft. So, I cut an extra strip from my first generation background and another strip of Coconut White. I glued a Coconut White die cut to my first generation cut, offsetting it to fill in the gaps but dropping it down to leave a space at the top and the bottom.I then added my extra strips.
I added my other Coconut White Die Cut to my 3rd generation cut, offesetting it to fill in all the gaps. I cut it into pieces 2 strips wide and then wove the strips through my extended piece.
I made a frame out of Coconut White Card using dies #2 and #4 from the Stitched Square Peg Board Die Set and added it to my woven background using 2mm Foam Tape trimming away the excess with scissors. I matted onto a couple of pieces of Coconut White Card.
I cut the Make a Cake die out of Coconut White Card, Silver Mirror Card and from my 3rd generation background. I coloured the candles using Mustard Seed and Spiced Marmalade Distress Markers.
I made my flowers from Coconut White and 1st generation background using the Pinwheel Floral Die Set and cut the leaves out of Coconut White Card using the same die set. I added an 8mm White Pearl to the centre of my flower.
I completed my card by adding a 5mm White Pearl to the corners of my frame.
Thanks for stopping by.
Julia.
www.juliawattscrafts.co.uk
Tuesday, 14 November 2017
Elegant Congrats Card
Hi Bloggers.
Here's today's card -
I started my cutting die #2 from the Stitched Square Peg Board Die Set out of Coconut White Card to get my square piece of card. I removed the die and added die #1 from the set and cut. I matted onto Silver Mirror Card.
I cut one of the dies from the Ecliptic Edger die set out of Coconut White Card 4 times and glued it to the back of the SIlver Mirror Card to frame my background.
I matted onto Coconut White, then Silver Mirror and then another piece of Coconut White Card.
I cut the elements from the Make a Cake Die Set out of Coconut White Card and Silver Mirror Card. I coloured the candles using Mustard Seed and Spiced Marmalade Distress Markers. The decorative trim on the cake has been cut from a 3rd generation print of Shaving Foam with Bluebell, Rose Pink and Citrus Lime CS Intense Pigment Stains.
I cut the letters for my sentiment out of Coconut White Card using the Alphabet Grid Die. I cut a banner out of Silver Mirror Card using the Stitched Flags Die Set. There isn't actually a die the right size with a 'V' at both ends but it's easy to extend a die by making sure that you don't run the rollers of the machine over the straight edge at the end of the die - stop rolling just short of the edge. Take the die off the card, turn it around and re-seat it to the length you want. Cut again, stopping just before the straight edge again.
I cut my leaves and flowers out of Coconut White Card and more of my 3rd generation shaving foam background using the Pinwheel Floral Die Set. I added a small dazzler from the Silver Pack to the centre of my flowers.
I completed my card by adding an 8mm White Pearl to the corners.
Thanks for stopping by.
Julia.
www.juliawattscrafts.co.uk
Here's today's card -
I started my cutting die #2 from the Stitched Square Peg Board Die Set out of Coconut White Card to get my square piece of card. I removed the die and added die #1 from the set and cut. I matted onto Silver Mirror Card.
I cut one of the dies from the Ecliptic Edger die set out of Coconut White Card 4 times and glued it to the back of the SIlver Mirror Card to frame my background.
I matted onto Coconut White, then Silver Mirror and then another piece of Coconut White Card.
I cut the elements from the Make a Cake Die Set out of Coconut White Card and Silver Mirror Card. I coloured the candles using Mustard Seed and Spiced Marmalade Distress Markers. The decorative trim on the cake has been cut from a 3rd generation print of Shaving Foam with Bluebell, Rose Pink and Citrus Lime CS Intense Pigment Stains.
I cut the letters for my sentiment out of Coconut White Card using the Alphabet Grid Die. I cut a banner out of Silver Mirror Card using the Stitched Flags Die Set. There isn't actually a die the right size with a 'V' at both ends but it's easy to extend a die by making sure that you don't run the rollers of the machine over the straight edge at the end of the die - stop rolling just short of the edge. Take the die off the card, turn it around and re-seat it to the length you want. Cut again, stopping just before the straight edge again.
I cut my leaves and flowers out of Coconut White Card and more of my 3rd generation shaving foam background using the Pinwheel Floral Die Set. I added a small dazzler from the Silver Pack to the centre of my flowers.
I completed my card by adding an 8mm White Pearl to the corners.
Thanks for stopping by.
Julia.
www.juliawattscrafts.co.uk
Thursday, 9 November 2017
21 Today Shadow Box
Hi Bloggers.
Here's today's card -
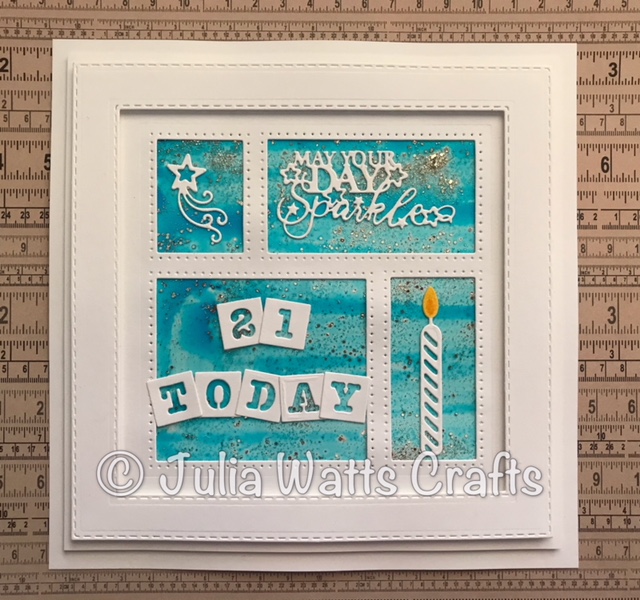
For the background, I used a piece of Heat Emboss Acetate. I popped some CS Clear Varnish Lacquer onto my Craft Sheet. I added a drop of Bluebell CS Intense Pigment Stain and mixed well. I painted it onto my Acetate using a Wide Brush. I then sprinkled some CS Golden Sand Glitterbitz over and put aside to dry (doesn't take long).
I cut the Celebrations Shadow Box out of Coconut White Card. I glued it to my background once it was dry. I made a frame using dies #3 and #5 from the Stitched Square Peg Board Die Set and added it to my Shadow Box using Woodware Foam Tape. I matted onto a couple of pieces of Coconut White Card.
I used tiles from the Alphabet Grid Die and elements from the Celebrations Shadow Box Die Set to decorate my card. I coloured the flame on the candle using Mustard Seed and Spiced Marmalade Distress Markers.
Here's the one I demoed on Hochanda with Rose Pink CS Intense Pigment Stain instead of Bluebell -
Thanks for stopping by.
Julia.
www.juliawattscrafts.co.uk
Here's today's card -
For the background, I used a piece of Heat Emboss Acetate. I popped some CS Clear Varnish Lacquer onto my Craft Sheet. I added a drop of Bluebell CS Intense Pigment Stain and mixed well. I painted it onto my Acetate using a Wide Brush. I then sprinkled some CS Golden Sand Glitterbitz over and put aside to dry (doesn't take long).
I cut the Celebrations Shadow Box out of Coconut White Card. I glued it to my background once it was dry. I made a frame using dies #3 and #5 from the Stitched Square Peg Board Die Set and added it to my Shadow Box using Woodware Foam Tape. I matted onto a couple of pieces of Coconut White Card.
I used tiles from the Alphabet Grid Die and elements from the Celebrations Shadow Box Die Set to decorate my card. I coloured the flame on the candle using Mustard Seed and Spiced Marmalade Distress Markers.
Here's the one I demoed on Hochanda with Rose Pink CS Intense Pigment Stain instead of Bluebell -
Thanks for stopping by.
Julia.
www.juliawattscrafts.co.uk
Wednesday, 1 November 2017
Ecliptic Edger Background
Hi Bloggers.
Here's today's card which is a demo that I did on the recent Hochanda shows -
Back to my favourite technique at the moment - I used a piece of Watercolour Card cut into 2 x A5 pieces. I added 10 drops of Citrus Lime, Deep Plum and Rose Pink CS Intense Pigment Stains to 3 Mister Bottles filled with water. I misted all 3 colours onto 1 piece of the Watercolour Card. I misted a little plain water on top and then placed the other piece of Watercolour Card on top. I peeled the pieces of card apart and blotted excess off with Kitchen Roll. I kept my second piece for another project.
Working on my first piece, I placed the Prism Effect Mask on one half and misted through with water. I lifted the mask off and turned it over and placed on the other half of my background to get a negative water print. I blotted off with Kitchen Roll. I then misted through a section of the Tzar Mask with the Citrus Lime. I turned it over to get a negative print from the excess ink in another section of my background and blotted off with Kitchen Roll.
This technique is adpated from a technique in the Dyan Reavely Distinctly Dylusional A Guide to Art Journaling Book (due in stock on my website very soon and available to order bere).
I cut the largest die in Sue Wilson's Ecliptic Edger into Coconut White Card 5 times to create a background. I glued it to my misted background using CS Glue in a Woodware Fine Tip Glue Applicator.
I made a frame out of Coconut White Card using dies #2 and #4 from the Square Stitched Peg Board Die Set and added it to my backgrounds using Woodware 3mm Foam Tape.
My sentiment has been created using the Alphabet Grid Die with Coconut Whte and Black Card. I added the tiles to my card using CE Mounting Cushion.
I added a flower and leaves to my frame using the Pinwheel Floral Die Set.
Thanks for stopping by.
Julia.
www.juliawattscrafts.co.uk
Here's today's card which is a demo that I did on the recent Hochanda shows -
Back to my favourite technique at the moment - I used a piece of Watercolour Card cut into 2 x A5 pieces. I added 10 drops of Citrus Lime, Deep Plum and Rose Pink CS Intense Pigment Stains to 3 Mister Bottles filled with water. I misted all 3 colours onto 1 piece of the Watercolour Card. I misted a little plain water on top and then placed the other piece of Watercolour Card on top. I peeled the pieces of card apart and blotted excess off with Kitchen Roll. I kept my second piece for another project.
Working on my first piece, I placed the Prism Effect Mask on one half and misted through with water. I lifted the mask off and turned it over and placed on the other half of my background to get a negative water print. I blotted off with Kitchen Roll. I then misted through a section of the Tzar Mask with the Citrus Lime. I turned it over to get a negative print from the excess ink in another section of my background and blotted off with Kitchen Roll.
This technique is adpated from a technique in the Dyan Reavely Distinctly Dylusional A Guide to Art Journaling Book (due in stock on my website very soon and available to order bere).
I cut the largest die in Sue Wilson's Ecliptic Edger into Coconut White Card 5 times to create a background. I glued it to my misted background using CS Glue in a Woodware Fine Tip Glue Applicator.
I made a frame out of Coconut White Card using dies #2 and #4 from the Square Stitched Peg Board Die Set and added it to my backgrounds using Woodware 3mm Foam Tape.
My sentiment has been created using the Alphabet Grid Die with Coconut Whte and Black Card. I added the tiles to my card using CE Mounting Cushion.
I added a flower and leaves to my frame using the Pinwheel Floral Die Set.
Thanks for stopping by.
Julia.
www.juliawattscrafts.co.uk
Tuesday, 31 October 2017
Simple Thank You Alphabet Grid
Hi Bloggers.
As hinted yesterday, this card contains the waste ink (Citrus Lime, Rose Pink and Deep Plum Intense Pigment Stains in Mister Bottles) printed onto Watercolour Card from yesterday's card.
So, very simple to make. I cut the Alphabet Grid Die out of a square of Coconut White Card that was left over from making a frame using the Stitched Square Peg Board Die Set (or just cut die #2). I stored all the letters in my box.
I added the grid to my background and matted onto a Coconut White Card Blank.
I added tiles previously cut from Coconut White, Primrose, Baby Pink and Lilac Card using the Alphabet Grid Die for my sentiment.
As hinted yesterday, this card contains the waste ink (Citrus Lime, Rose Pink and Deep Plum Intense Pigment Stains in Mister Bottles) printed onto Watercolour Card from yesterday's card.
So, very simple to make. I cut the Alphabet Grid Die out of a square of Coconut White Card that was left over from making a frame using the Stitched Square Peg Board Die Set (or just cut die #2). I stored all the letters in my box.
I added the grid to my background and matted onto a Coconut White Card Blank.
I added tiles previously cut from Coconut White, Primrose, Baby Pink and Lilac Card using the Alphabet Grid Die for my sentiment.
Phill
Martin is continuing with his One Day Special on Hochanda today with shows at 9am, 1pm and 5pm. I'm offering 10% discount on items from
the shows on my website. You can find them here.
You need to enter PHILLMARTIN in the discount code box at checkout to
get your discount. Offer valid till midnight tonight or while
stocks last.
The latest release of Sue Wilson Dies is on sale from today. You can find them on my website here. Be sure to checkout Sue's Blog for new cards featuring these fab new dies.
Thanks for stopping by.
Julia.
www.juliawattscrafts.co.uk
Julia.
www.juliawattscrafts.co.uk
Monday, 30 October 2017
Bright Celebrations Shadow Box
Hi Bloggers.
Here's today's card -
The background on this card uses one of my current favourite techniques with masks. I used a piece of Watercolour Card cut into 2 x A5 pieces. I added 10 drops of Citrus Lime, Deep Plum and Rose Pink CS Intense Pigment Stains to 3 Mister Bottles filled with water. I misted all 3 colours onto 1 piece of the Watercolour Card. I misted a little plain water on top and then placed the other piece of Watercolour Card on top. I peeled the pieces of card apart and blotted excess off with Kitchen Roll. I kept my second piece for another project (tomorrow's post).
Working on my first piece, I placed the Puerto Rico Blocks Mask on one half and misted through with water. I lifted the mask off and turned it over and placed on the other half of my background to get a negative water print. I blotted off with Kitchen Roll. I then misted through a section of the Prism Effect Mask with the Citrus Lime. I turned it over to get a negative print from the excess ink in another section of my background and blotted off with Kitchen Roll. I repeated in another area of my background. Finally, I repeated the process with Deep Plum and the Tzar Mask.
I cut Sue Wilson's Celebrations Shadow Box out of Coconut White Card and added it to my background using CE Mounting Cushion. I added a frame cut from Coconut White Card using dies#4 and #5 from Sue's Stitched Square Peg Board Die Set. I matted onto Coconut White Card, Black Card and then another piece of Coconut White Card.
I used the Triple Happy Birthday die cuts left over from yesterday's card all around my Shadow Box.
I popped some Rose Pink, Citrus Lime and Deep Plum CS Intense Pigment Stains onto my Craft Sheet. I used them neat and painted onto Coconut White Card. I cut the elements from the Shadow Box and the So Many Candles Sentiment from them. I cut the plain dies for the candle and hat out of Coconut White Card, colouring in the flames using Mustard Seed and Spiced Marmalade Distress Markers.
Here's today's card -
The background on this card uses one of my current favourite techniques with masks. I used a piece of Watercolour Card cut into 2 x A5 pieces. I added 10 drops of Citrus Lime, Deep Plum and Rose Pink CS Intense Pigment Stains to 3 Mister Bottles filled with water. I misted all 3 colours onto 1 piece of the Watercolour Card. I misted a little plain water on top and then placed the other piece of Watercolour Card on top. I peeled the pieces of card apart and blotted excess off with Kitchen Roll. I kept my second piece for another project (tomorrow's post).
Working on my first piece, I placed the Puerto Rico Blocks Mask on one half and misted through with water. I lifted the mask off and turned it over and placed on the other half of my background to get a negative water print. I blotted off with Kitchen Roll. I then misted through a section of the Prism Effect Mask with the Citrus Lime. I turned it over to get a negative print from the excess ink in another section of my background and blotted off with Kitchen Roll. I repeated in another area of my background. Finally, I repeated the process with Deep Plum and the Tzar Mask.
I cut Sue Wilson's Celebrations Shadow Box out of Coconut White Card and added it to my background using CE Mounting Cushion. I added a frame cut from Coconut White Card using dies#4 and #5 from Sue's Stitched Square Peg Board Die Set. I matted onto Coconut White Card, Black Card and then another piece of Coconut White Card.
I used the Triple Happy Birthday die cuts left over from yesterday's card all around my Shadow Box.
I popped some Rose Pink, Citrus Lime and Deep Plum CS Intense Pigment Stains onto my Craft Sheet. I used them neat and painted onto Coconut White Card. I cut the elements from the Shadow Box and the So Many Candles Sentiment from them. I cut the plain dies for the candle and hat out of Coconut White Card, colouring in the flames using Mustard Seed and Spiced Marmalade Distress Markers.
I completed my card by adding an 8mm White Pearl to each corner.
Phill Martin is launching a new One Day Special on Hochanda today at 6pm with his Lavish Leaves Collection. I'm offering 10% discount on items from the shows on my website. You can find them here. You need to enter PHILLMARTIN in the discount code box at checkout to get your discount. Offer valid till midnight tomorrow night or while stocks last.
The winner of the card from Freebie Friday on 27th October is .............................
nattyboots
Please email me at juliawattscrafts@gmail.com with your address and I'll pop your card in the post.
Thanks for stopping by.
Julia.
www.juliawattscrafts.co.uk
Julia.
www.juliawattscrafts.co.uk
Wednesday, 25 October 2017
One Day Special Shows continue today
Hi Bloggers.
Hope you enjoyed yesterday's shows. I have more shows today at 9am, 1pm and 5pm.
Here's today's card -
I'm offering 10% discount on items on my website from the shows. You can find them here.
Add JULIAWATTS to the discount code box at checkout to receive your
discount. Offer applies till midnight tonight or while stocks
last.
Thanks for stopping by.
Julia.
www.juliawattscrafts.co.uk
Hope you enjoyed yesterday's shows. I have more shows today at 9am, 1pm and 5pm.
Here's today's card -
The background is made using Shaving Foam and CS Intense Pigment Stains in Citrus Lime, Bluebell and Rose Pink onto Coconut White Card. This piece is actually second generation. For those of you who haven't come across this technique - I popped some cheap Shaving Foam into a plastic box spreading it around so the base was covered. I added drops of the Intense Pigment Stain. I used the end of a Paint Brush to create patterns in the Shaving Foam. I pressed a piece of Coconut White Card into it. I removed it and used a ruler to remove the foam from the card and removed any remaining foam with Kitchen Roll. I got a 2nd and 3rd print by re-distributing the foam and ink a little and popping more card on top.
I cut Sue Wilson's Alphabet Grid out of Coconut White Card. I removed all the letter blocks and added the empty grid to my background. I added a frame made out of Coconut White Card using dies #2 and #4 from Sue's Stitched Square Peg Board Die Set. I added it to my backgrounds using Woodware Foam Tape. I matted onto Coconut White Card, Black Card and then another piece of Black Card.
I cut the Alphabet Grid out of Coconut White Card a second time as I needed a couple of O's, a couple of E's and a couple of L's. I also cut it out of Black Card a couple of times. I added the letters to the grid as shown securing with CS Glue.
I cut Sue's Pinwheel Flowers out of Coconut White Card and the complete flowers out of my Shaving Foam background. I cut the leaves in the same set out of Coconut White card. I added a Small Black Circle Dazzler to the centre of each flower.
I really do love the Alphabet Grid Set - you can say whatever you want to on a card. Great for scrapbooking too!
Hope you can tune in today.
Julia.
www.juliawattscrafts.co.uk
Thursday, 12 October 2017
Petite Petal Striplet
Hi Bloggers.
Here's today's card -
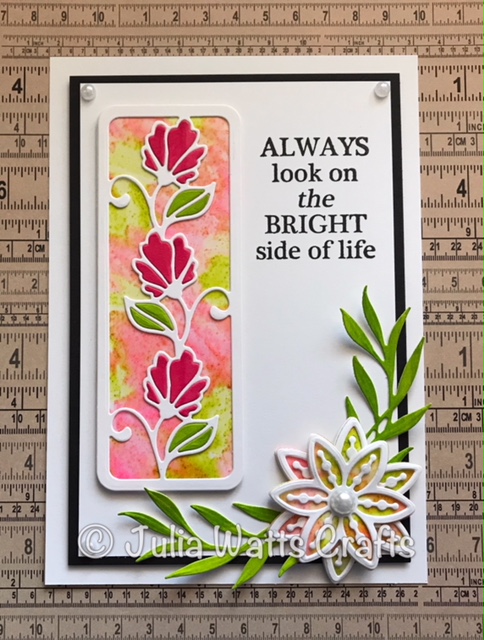
I started by creating an acetate background. I popped a little CS Clear Varnish Lacquer onto my Craft Sheet. I added a drop of CS Rose Pink Intense Pigment Stain and a little CS Frosty Dawn Diamond Frost. I added it to a piece of Heat Emboss Acetate in patches. I added some more Varnish Lacquer to my Craft Sheet and this time added Citrus Lime Intense Pigment Stain and Aurora Sparkle Diamond Frost. I added this to the gaps in my Acetate and then moved both colours around a little so that the while area was covered and put aside to dry (about 20 mins).
I cut both dies from Sue Wilson's Petite Petal Striplet out of Coconut White Card. I cut the outer die out of my Acetate background and out of Coconut White Card. I glued my decorative die cut on top of the acetate and then onto the Coconut White piece.
I popped a little Rose Pink Intense Pigment Stain onto my Craft Sheet and brushed it onto a piece of Coconut White Card. I did the same with Citrus Lime Intense Pigment Stain. I cut the striplet from the both and used the fall away pieces for the flowers and leaves on my striplet panel.
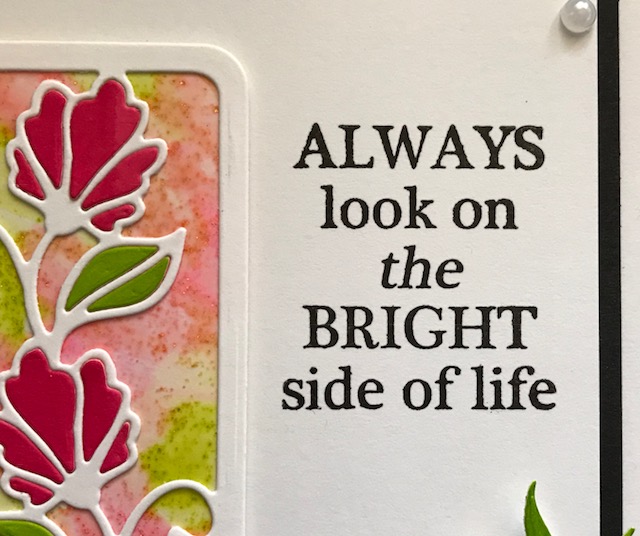
I stamped the sentiment from the Woodware On the Bright Side Stamp Set onto a Piece of Coconut White Card using Onyx Black Versafine Ink. I matted onto Black Card and then Coconut White Card. I added my striplet panel using CE Mounting Cushion.
I cut the largest 2 pairs of dies from Sue's Pinwheel Floral Die Set out of Coconut White Card. I cut the outer dies only out of my Acetate background and out of Coconut White Card. I glued the pieces for each size together and made my flower adding an 8mm White Pearl to the centre.
I cut a pair of leaves using Sue's Windswept Grasses Die Set out of my card that I coloured with the Citrus Lime Intense Pigment Stain.
I completed my card by adding a 5mm White Pearl to the corners.
Thanks for stopping by.
Julia.
www.juliawattscrafts.co.uk
Here's today's card -
I started by creating an acetate background. I popped a little CS Clear Varnish Lacquer onto my Craft Sheet. I added a drop of CS Rose Pink Intense Pigment Stain and a little CS Frosty Dawn Diamond Frost. I added it to a piece of Heat Emboss Acetate in patches. I added some more Varnish Lacquer to my Craft Sheet and this time added Citrus Lime Intense Pigment Stain and Aurora Sparkle Diamond Frost. I added this to the gaps in my Acetate and then moved both colours around a little so that the while area was covered and put aside to dry (about 20 mins).
I cut both dies from Sue Wilson's Petite Petal Striplet out of Coconut White Card. I cut the outer die out of my Acetate background and out of Coconut White Card. I glued my decorative die cut on top of the acetate and then onto the Coconut White piece.
I popped a little Rose Pink Intense Pigment Stain onto my Craft Sheet and brushed it onto a piece of Coconut White Card. I did the same with Citrus Lime Intense Pigment Stain. I cut the striplet from the both and used the fall away pieces for the flowers and leaves on my striplet panel.
I stamped the sentiment from the Woodware On the Bright Side Stamp Set onto a Piece of Coconut White Card using Onyx Black Versafine Ink. I matted onto Black Card and then Coconut White Card. I added my striplet panel using CE Mounting Cushion.
I cut the largest 2 pairs of dies from Sue's Pinwheel Floral Die Set out of Coconut White Card. I cut the outer dies only out of my Acetate background and out of Coconut White Card. I glued the pieces for each size together and made my flower adding an 8mm White Pearl to the centre.
I cut a pair of leaves using Sue's Windswept Grasses Die Set out of my card that I coloured with the Citrus Lime Intense Pigment Stain.
I completed my card by adding a 5mm White Pearl to the corners.
Thanks for stopping by.
Julia.
www.juliawattscrafts.co.uk
Monday, 14 August 2017
Stained Glass Poinsettia Star
Hi Bloggers.
Here's today's card -
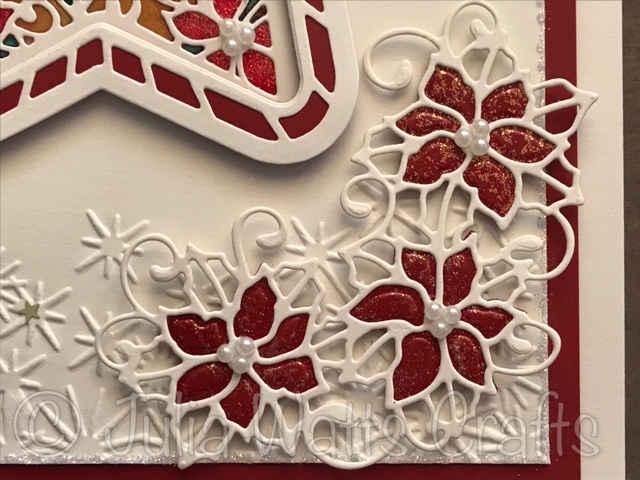
For the background, I embossed a piece of Milk Card using the Creative Expressions Sparkle Flakes Embossing Folder. I matted onto Rich Red Card and then another piece of Milk Card. I added CS Glue around the edges of my background and then sprinkled CS Frosty Dawn Diamond Frost over. I added a spot of Quickie Glue to the centre of some of the stars in the background and popped CS Golden Stars Glitter Jewels on top.
I cut the inner die from Sue Wilson's Poinsettia Star Die Set into 2 pieces of Milk Card. I sandwiched a piece of Acetate between them using Quickie Glue - it's important to make sure that EVERY line on the die cuts in secured to the Acetate.
Working on the back, I popped some CS Clear Varnish Lacquer onto my Craft Sheet. I added one drop of CS Rich Crimson Intense Pigment Stain to it and mixed well using a Paint Brush. I then added CS Frosty Dawn Diamond Frost and mixed again. I used this to colour the Poinsettia's on my Acetate. It's better to add a really good amount, to fill the area enclosed by the die cut. I cleaned my brush and then added more Lacquer to my Craft Sheet. This time I added a drop of Emerald Intense Pigment Stain and mixed well. I used this to colour the leaves. Finally, I added some Lacquer to my Craft Sheet and mixed in some CS Rich Gold Pixie Powder. I used this to colour in all the remaining areas. I put this aside to dry - approx 2 hours. The glitter used on flowers falls to the bottom, which is actually what we want as that means it's all at the front.
I cut the largest die in Sue's Radiating Star Die Set out of Rich Red Card. I cut the largest 2 dies from the same set out of Milk Card and glued the 2 die cuts together. I left them a while for the glue to set and then added die 3 from the same set and cut. This created my frame. I added some thin strips of 2mm Foam Tape. Once my Poinsettia Star piece was dry, I added my frame and trimmed away the excess. I added some 3mm Pearls to the centres of the flowers.
I added some Clear Varnish Lacquer to my Craft Sheet and mixed in some Frosty Dawn Diamond Frost. I painted this onto a piece of Rich Red Card using a Wide Brush and put aside to dry (approx 20 mins). Once dry, I cut the flowers from Sue's Poinsettia Cluster twice. I cut the outer die from the same set out of Milk Card twice. I added some 3mm Pearls to the centre of the flowers.
I'm up at Creative Expressions for a meeting today so will be unable to send out any website orders. I will get to them tomorrow.
There have been a couple of new releases. Firstly, new masks from That Special Touch - you can find them here. I think this one will be the most popular -
Also new Cosmic Shimmer Gliiterbitz - a new glitter in 16 colours. You can find them here.
The winner of the card from Freebie Friday on 11th August is ....................................
Please email me at juliawattscrafts@gmail.com with your address and I'll pop your card in the post.
I'll be back tomorrow with a sneak peek from the Woodware shows I have on Thursday.
Thanks for stopping by.
Julia.
www.juliawattscrafts.co.uk
Free card with all website orders over £10 (ask for one in the comments box at checkout).
Here's today's card -
For the background, I embossed a piece of Milk Card using the Creative Expressions Sparkle Flakes Embossing Folder. I matted onto Rich Red Card and then another piece of Milk Card. I added CS Glue around the edges of my background and then sprinkled CS Frosty Dawn Diamond Frost over. I added a spot of Quickie Glue to the centre of some of the stars in the background and popped CS Golden Stars Glitter Jewels on top.
I cut the inner die from Sue Wilson's Poinsettia Star Die Set into 2 pieces of Milk Card. I sandwiched a piece of Acetate between them using Quickie Glue - it's important to make sure that EVERY line on the die cuts in secured to the Acetate.
Working on the back, I popped some CS Clear Varnish Lacquer onto my Craft Sheet. I added one drop of CS Rich Crimson Intense Pigment Stain to it and mixed well using a Paint Brush. I then added CS Frosty Dawn Diamond Frost and mixed again. I used this to colour the Poinsettia's on my Acetate. It's better to add a really good amount, to fill the area enclosed by the die cut. I cleaned my brush and then added more Lacquer to my Craft Sheet. This time I added a drop of Emerald Intense Pigment Stain and mixed well. I used this to colour the leaves. Finally, I added some Lacquer to my Craft Sheet and mixed in some CS Rich Gold Pixie Powder. I used this to colour in all the remaining areas. I put this aside to dry - approx 2 hours. The glitter used on flowers falls to the bottom, which is actually what we want as that means it's all at the front.
I cut the largest die in Sue's Radiating Star Die Set out of Rich Red Card. I cut the largest 2 dies from the same set out of Milk Card and glued the 2 die cuts together. I left them a while for the glue to set and then added die 3 from the same set and cut. This created my frame. I added some thin strips of 2mm Foam Tape. Once my Poinsettia Star piece was dry, I added my frame and trimmed away the excess. I added some 3mm Pearls to the centres of the flowers.
I added some Clear Varnish Lacquer to my Craft Sheet and mixed in some Frosty Dawn Diamond Frost. I painted this onto a piece of Rich Red Card using a Wide Brush and put aside to dry (approx 20 mins). Once dry, I cut the flowers from Sue's Poinsettia Cluster twice. I cut the outer die from the same set out of Milk Card twice. I added some 3mm Pearls to the centre of the flowers.
I'm up at Creative Expressions for a meeting today so will be unable to send out any website orders. I will get to them tomorrow.
There have been a couple of new releases. Firstly, new masks from That Special Touch - you can find them here. I think this one will be the most popular -
Also new Cosmic Shimmer Gliiterbitz - a new glitter in 16 colours. You can find them here.
The winner of the card from Freebie Friday on 11th August is ....................................
June Fletcher
Please email me at juliawattscrafts@gmail.com with your address and I'll pop your card in the post.
I'll be back tomorrow with a sneak peek from the Woodware shows I have on Thursday.
Thanks for stopping by.
Julia.
www.juliawattscrafts.co.uk
Free card with all website orders over £10 (ask for one in the comments box at checkout).
Subscribe to:
Posts (Atom)