Showing posts with label Shadow Box. Show all posts

Tuesday, 19 December 2017

Garden Themed Shadow Box

Hi Bloggers.

Here's today's card -

Another workshop card so just an ingredients list again.

Products used -

A4 Embossing Folder – Leafy Quad
Cosmic Shimmer Pixie Powders – Burnt Orange, Bronze Blush, Straw Yellow
Vintage Photo Distress Marker
Card – Coconut White, Slate Grey, Ginger


Lisa Horton is launching a new One Day Special at 6pm today with lots of Spellbinders dies. I only have the card in stock on my website from the shows but I am offering 10% off that. You can find it here. Please enter LISAHORTON in the discount code box at checkout to activate your discount. Offer valid till midnight tomorrow night or while stocks last. Lisa has another show at 8pm tonight and then more shows at 9am, 1pm and 5pm tomorrow.

Although we don't have the dies that Lisa is using on our website, we do have lots of other Spellbinders dies at reduced prices in our Clearance Section here and in our Pre-Loved Section here.

Thanks for stopping by.

Julia.
www.juliawattscrafts.co.uk

Free card with all website orders over £10 (Add a note to your order in your cart).

Saturday, 9 December 2017

Pinwheel Floral Background

Hi Bloggers.

Here's today's card -

I've been waiting for ages to share this card but the Pinwheel Floral has been out of stock since the Hochanda shows that I did in October. It's back in stock so a great reason to share it now.

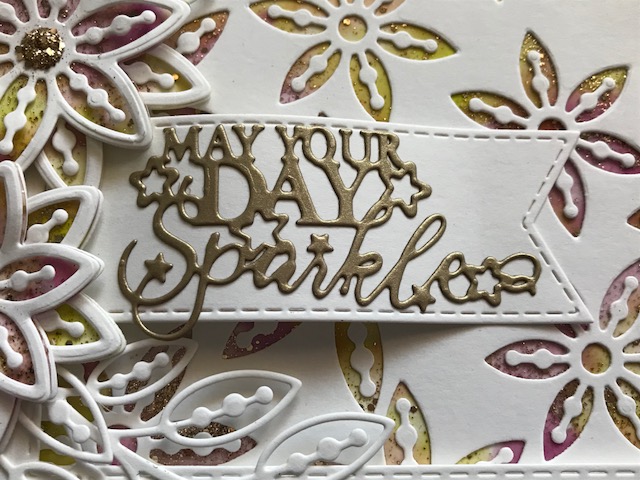
The background on this one is quite cool. I used a piece of Heat Emboss Acetate. I popped some CS Clear Varnish Lacquer into 2 areas on my Craft Sheet. I added a  drop of Deep Plum CS Intense Pigment Stain into one area and Citrus Lime CS Intense Pigment Stain into the other and mixed well. I added the Citrus Lime to my acetate first, in splonges randomly all over. I then added the Deep Plum, fillinf in the gaps and overlapping the Citrus Lime in some areas to give a blended colour. I then sprinkled some CS Golden Sand Glitterbitz over and put aside to dry (doesn't take long).

I then cut the inner dies only from all 3 sized of flowers from the Pinwheel Floral Die Set into a piece of Coconut White Card several times to create a background.

Once my acetate background was dry, I glued my Pinwheel Floral Background to it.

I made a frame out of Coconut White Card using dies #2 and #4 from the Stitched Square Peg Board Die Set. I added it to my backgrounds using Woodware Foam Tape.

I cut a Stitched Flag out of Coconut White Card. I cut the sentiment from the Celebrations Shadow Box out of Antique Gold Pearl Card.

I cut some leaves out of Coconut White Card using the Pinwheel Floral Die Set. For the flowers, I cut the solid dies from the same set out of Coconut White Card and out of my acetate background. I cut both of the dies together in all the sizes out of Coconut White Card. I glued at the centre only - 1 solid Coconut White, then 1 solid acetate background and 1 Coconut White open die cut. I then stacked them up in pairs offesetting then slightly to create my flowers. I added CS Glue to the centres and sprinkled Golden Sand CS Glitterbitz over.


Phill Martin is launching a One Day Special on Hochanda at 6pm today. I'm offering 10% off items from the shows on my website. You can find them here. Please enter PHILLMARTIN in the discount code box at checkout to activate your discount. Offer valid till midnight tomorrow night or while stocks last. Phill has another show at 8pm tonight and then more shows at 9am, 1pm and 5pm tomorrow.

Thanks for stopping by.

Julia.
www.juliawattscrafts.co.uk

Thursday, 9 November 2017

21 Today Shadow Box

Hi Bloggers.

Here's today's card -

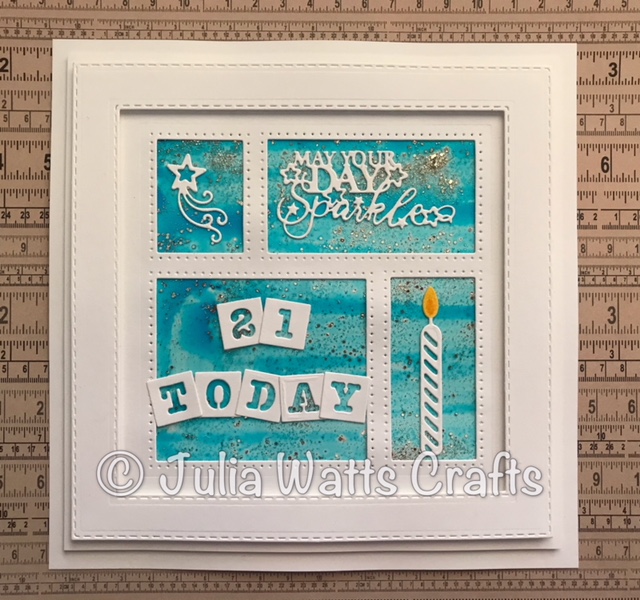
For the background, I used a piece of Heat Emboss Acetate. I popped some CS Clear Varnish Lacquer onto my Craft Sheet. I added a drop of Bluebell CS Intense Pigment Stain and mixed well. I painted it onto my Acetate using a Wide Brush. I then sprinkled some CS Golden Sand Glitterbitz over and put aside to dry (doesn't take long).

I cut the Celebrations Shadow Box out of Coconut White Card. I glued it to my background once it was dry. I made a frame using dies #3 and #5 from the Stitched Square Peg Board Die Set and added it to my Shadow Box using Woodware Foam Tape. I matted onto a couple of pieces of Coconut White Card.

I used tiles from the Alphabet Grid Die and elements from the Celebrations Shadow Box Die Set to decorate my card. I coloured the flame on the candle using Mustard Seed and Spiced Marmalade Distress Markers.


Here's the one I demoed on Hochanda with Rose Pink CS Intense Pigment Stain instead of Bluebell -

Thanks for stopping by.

Julia.
www.juliawattscrafts.co.uk

Sunday, 5 November 2017

Party Time

Hi Bloggers.

Here's today's card -

I started by cutting die #2 from the Stitched Square Peg Board die set out of Coconut White Card. I then added die #1 from the same set into the die cut square and cut. I cut die #3 from the set out of Duck Egg Card and glued my 2 die cuts together. I matted onto Coconut White Card using CE Mounting Cushion.

I cut some boxes and a little star using the Celebrations Shadow Box.

I cut the largest penant from the Celebrations Shadow Box out of Duck Egg Card 5 times. I folded them and attached them to a piece of Pastel Baker's Twine. I added my letters cut from Coconut White Card using the Alphabet Grid Die.

I added the rest of my sentiment to the bottom of my card with tiles cut from Coconut White and Duck Egg Card using the Alphabet Grid.

A simple party invite, add a tree or use festive colours and you could use it for a Christmas or New Year party.

Thanks for stopping by.

Julia.
www.juliawattscrafts.co.uk

Monday, 30 October 2017

Bright Celebrations Shadow Box

Hi Bloggers.

Here's today's card -

The background on this card uses one of my current favourite techniques with masks. I used a piece of Watercolour Card cut into 2 x A5 pieces. I added 10 drops of Citrus Lime, Deep Plum and Rose Pink CS Intense Pigment Stains to 3 Mister Bottles filled with water.  I misted all 3 colours onto 1 piece of the Watercolour Card. I misted a little plain water on top and then placed the other piece of Watercolour Card on top. I peeled the pieces of card apart and blotted excess off with Kitchen Roll. I kept my second piece for another project (tomorrow's post).

Working on my first piece, I placed the Puerto Rico Blocks Mask on one half and misted through with water. I lifted the mask off and turned it over and placed on the other half of my background to get a negative water print. I blotted off with Kitchen Roll. I then misted through a section of the Prism Effect Mask with the Citrus Lime. I turned it over to get a negative print from the excess ink in another section of my background and blotted off with Kitchen Roll. I repeated in another area of my background. Finally, I repeated the process with Deep Plum and the Tzar Mask.

I cut Sue Wilson's Celebrations Shadow Box out of Coconut White Card and added it to my background using CE Mounting Cushion. I added a frame cut from Coconut White Card using dies#4 and #5 from Sue's Stitched Square Peg Board Die Set. I matted onto Coconut White Card, Black Card and then another piece of Coconut White Card.

I used the Triple Happy Birthday die cuts left over from yesterday's card all around my Shadow Box.

I popped some Rose Pink, Citrus Lime and Deep Plum CS Intense Pigment Stains onto my Craft Sheet. I used them neat and painted onto Coconut White Card. I cut the elements from the Shadow Box and the So Many Candles Sentiment from them. I cut the plain dies for the candle and hat out of Coconut White Card, colouring in the flames using Mustard Seed and Spiced Marmalade Distress Markers.


I completed my card by adding an 8mm White Pearl to each corner.

Phill Martin is launching a new One Day Special on Hochanda today at 6pm with his Lavish Leaves Collection. I'm offering 10% discount on items from the shows on my website. You can find them here. You need to enter PHILLMARTIN in the discount code box at checkout to get your discount. Offer valid till midnight tomorrow night or while stocks last.

The winner of the card from Freebie Friday on 27th October is .............................

nattyboots

Please email me at juliawattscrafts@gmail.com with your address and I'll pop your card in the post.

Thanks for stopping by.

Julia.
www.juliawattscrafts.co.uk

Tuesday, 24 January 2017

Happy Birthday to You

Hi Bloggers.

I have a weave and a shadow box for you today -

This was a demo card from the weaving shows that I did on Hochanda earlier this month.

I started by stamping one of the stamps from the Justrite Playful Painted Trio Stamp Set onto Coconut White Card 3 times using CS Summer Sky Colour Cloud applied using a Smoothie. Once the ink was dry, I cut Sue Wilson's Classic Weaving Die from it. I cut the Classic Weaving Die again out of Coconut White Card and this one I ran through the Spellbinders Platinum Machine with the Couture Creations Velvet Tea Lights Embossing Folder. I then wove the embossed die cut through the stamped one in a simple one by one weave.

I cut Sue's Happy Birthday Shadow Box with the inserts included to cut the apertures and added it to my woven background using 3D Foam Tape.

I made a frame using dies #2 and #4 from Sue's Scalloped Lattice Frames Set B and added it to the shadow box using 3D Foam Tape again and trimmed away the excess using scissors (you may spot that I didn't quite line this up right - I blame it on the counters at Hochanda (even the low ones) and no time to faff!). I popped this onto a Coconut White Card blank.

I cut the sentiment dies and some of the little dies in the Shadow Box Set out of Aqua Card.


Thanks for stopping by.

Julia.
www.juliawattscrafts.co.uk
Free card with all website orders over £10 (ask for one in the comments box at checkout).

Deal of the Day today (24th January) - Sue Wilson Frames & Tags - Lauren only £8.99!

Wednesday, 18 January 2017

3 Years Old

Hi Bloggers.

Here's today's card -

I started by running the main large die only from Sue Wilson's Birthday Shadow Box Die Set through the Spellbinders Platinum Machine using the cut sandwich and a piece of Aqua Card. This gave me just the stitched marks around the boxes and nothing else - perfect!

I stamped the cupcake from the Justrite Make a Wish Stamp Set onto Coconut White Card using Jet Black Archival. I coloured in using CS Colour Cloud - I used Summer Sky, Frosted Aqua and Sun-Lit Cedar. I stamped the sentiment from the same stamp set, again using Jet Black Archival and coloured the stars with Summer Sky Colour Cloud. I cut the cupcake and the sentiment out using the insert dies in the Shadow Box set. I also cut the other insert dies in the set out of Coconut White Card. I added them to the stitched boxes using 3D Foam Pads.

I cut some of the little embellishment dies from the Birthday Shadow Box Set out of Aqua Card and inked through the dies with Frosted Aqua Colour Cloud using a Smoothie.

I cut a frame out of Aqua Card using dies #3 and #5 from Sue's Scalloped Lattice Frames Set B. I cut another frame out of Coconut White Card using dies #3 and #4 from the set and glued the 2 frames together using CS Glue. I added my frames to my shadow box using 3D Foam Tape.


I cut another frame out of Coconut White Card using dies #2 and #3 from the same set and glued it to my background setting it inside my frame.

I completed my card adding a 5mm White Pearl to the corners of my frame and adding a Coconut White and an Aqua Card mat.

Thanks for stopping by.

Julia.
www.juliawattscrafts.co.uk
Free card with all website orders over £10 (ask for one in the comments box at checkout).

Deal of the Day today (18th January) - Sue Wilson Frames & Tags Collection - Gillian only £6.99!