Showing posts with label Stained Glass. Show all posts

Monday, 14 August 2017

Stained Glass Poinsettia Star

Hi Bloggers.

Here's today's card -

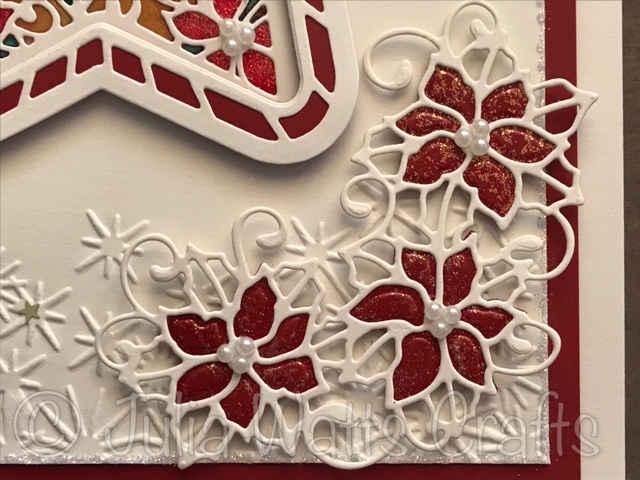
For the background, I embossed a piece of Milk Card using the Creative Expressions Sparkle Flakes Embossing Folder. I matted onto Rich Red Card and then another piece of Milk Card. I added CS Glue around the edges of my background and then sprinkled CS Frosty Dawn Diamond Frost over. I added a spot of Quickie Glue to the centre of some of the stars in the background and popped CS Golden Stars Glitter Jewels on top.

I cut the inner die from Sue Wilson's Poinsettia Star Die Set into 2 pieces of Milk Card. I sandwiched a piece of Acetate between them using Quickie Glue - it's important to make sure that EVERY line on the die cuts in secured to the Acetate.

Working on the back, I popped some CS Clear Varnish Lacquer onto my Craft Sheet. I added one drop of CS Rich Crimson Intense Pigment Stain to it and mixed well using a Paint Brush. I then added CS Frosty Dawn Diamond Frost and mixed again. I used this to colour the Poinsettia's on my Acetate. It's better to add a really good amount, to fill the area enclosed by the die cut. I cleaned my brush and then added more Lacquer to my Craft Sheet. This time I added a drop of Emerald Intense Pigment Stain and mixed well. I used this to colour the leaves. Finally, I added some Lacquer to my Craft Sheet and mixed in some CS Rich Gold Pixie Powder. I used this to colour in all the remaining areas. I put this aside to dry - approx 2 hours. The glitter used on flowers falls to the bottom, which is actually what we want as that means it's all at the front.

I cut the largest die in Sue's Radiating Star Die Set out of Rich Red Card. I cut the largest 2 dies from the same set out of Milk Card and glued the 2 die cuts together. I left them a while for the glue to set and then added die 3 from the same set and cut. This created my frame. I added some thin strips of 2mm Foam Tape. Once my Poinsettia Star piece was dry, I added my frame and trimmed away the excess. I added some 3mm Pearls to the centres of the flowers.

I added some Clear Varnish Lacquer to my Craft Sheet and mixed in some Frosty Dawn Diamond Frost. I painted this onto a piece of Rich Red Card using a Wide Brush and put aside to dry (approx 20 mins). Once dry, I cut the flowers from Sue's Poinsettia Cluster twice. I cut the outer die from the same set out of Milk Card twice. I added some 3mm Pearls to the centre of the flowers.

I'm up at Creative Expressions for a meeting today so will be unable to send out any website orders. I will get to them tomorrow.

There have been a couple of new releases. Firstly, new masks from That Special Touch - you can find them here. I think this one will be the most popular -

Also new Cosmic Shimmer Gliiterbitz - a new glitter in 16 colours. You can find them here.

The winner of the card from Freebie Friday on 11th August is ....................................

June Fletcher

Please email me at juliawattscrafts@gmail.com with your address and I'll pop your card in the post.

I'll be back tomorrow with a sneak peek from the Woodware shows I have on Thursday.

Thanks for stopping by.

Julia.
www.juliawattscrafts.co.uk
Free card with all website orders over £10 (ask for one in the comments box at checkout).

Tuesday, 25 July 2017

Paper Pieced Poinsettia Stained Glass Window

Hi Bloggers.

A bit of paper piecing for you today -

I started by cutting Sue Wilson's Poinsettia Stained Glass Window Die out of Black Card, Coconut White Card, Antique Gold Pearl Card, Rich Red Card and Rich Green Card - I kept the waste from each one using strips of Scotch Removable Tape on the back of the die after cutting and then using my Spellbinders Tool 'n One to push the waste out of the die and onto the tape.

I put a piece of Creative Expressions Double Sided Adhesive Sheet onto some Coconut White Card, peeled away the other backing sheet and popped it on the back of my die cut. I then added my pieces from my waste collections. Once completed, I filled in my background with CS Silver Chrome Polished Silk Glitter.

I matted onto Antique Gold Pearl Card, then Rich Red Card and popped onto a Coconut White Card blank.

I potentially have 4 more cards that I can make from my die cuts and waste - watch this space to see if they appear on this blog 😊

Phill Martin is launching a new One Day Special on Hochanda today at 6pm with his new Festive Berries Collection - there are some real stunners in the collection including some Stamps to Die For that co-ordinate with Sue Wilson's 2017 Festive Collection. I'm offering 10% discount on items from the shows. You can find them here. Offer applies till midnight tomorrow night or while stocks last. Discount will be applied automatically at checkout.

Thanks for stopping by.

Julia.
www.juliawattscrafts.co.uk
Free card with all website orders over £10 (ask for one in the comments box at checkout).

Saturday, 22 July 2017

Pink Poinsettia Stained Glass Window

Hi Bloggers.

I'm running my workshop locally in Milton Keynes today. Really looking forward to sharing some really cool techniques with some gorgeous products.

I thought I would share a Poinsettia Stained Glass Window in a slightly different colourway to the norm -

I've used Cosmic Shimmer Clear Varnish Lacquer with CS Intense Pigment Stains, CS Pixie Powders and CS Frosty Dawn Diamond Frost.

I started by cutting Sue Wilson's Poinsettia Stained Glass Window Die out of Coconut White Card twice. I trimmed one of them to be slightly smaller than the other,

I added Quickie Glue over every line on the back of the larger die cut and ran a thin line of CS Glue around the outside edge using a Woodware Fine Tip Glue Applicator. I popped it onto a piece of Acetate which was slightly smaller than my die cut. I pressed down firmly to make sure that it was stuck really well.

I applied Quickie Glue over every line on the front of my other die cut. Once again, I added a thin line of CS Glue around the outside edge. I popped this onto the back of the Acetate, lining the image up with the first die cut. It's really important to make sure that all of the lines are well stuck to the Acetate as the colour is applied to the back.

So, working on the back, I popped some CS Clear Varnish Lacquer onto my Craft Sheet. I added some CS Candy Pink Pixie Powder and mixed well. I then added CS Frosty Dawn Diamond Frost and mixed well. I used this to colour the Poinsettias by dabbing a good quantity of the coloured lacquer into the areas shown.

For the 'leaves' I added a drop of Citrus Lime CS Intense Pigment Stain to some CS Clear Varnish Lacquer and mixed well. I then added some Frosty Dawn Diamond Frost.

The centres of the Poinsettias are Rich Gold CS Pixie Powder added to the Clear Varnish Lacquer.

I know it's not really showing up very well but the background areas are filled in with just Frosty Dawn Diamond Frost mixed with the Clear Varnish Lacquer. This pic shows it off a bit better -

I coloured the frame of the window with the same colours as the main image.

I added a piece of Coconut White Card behind my piece once it was dry. I them matted onto Baby Pink Card, Coconut White Card and popped onto a Coconut White Card blank.

Thanks for stopping by.

Julia.
www.juliawattscrafts.co.uk
Free card with all website orders over £10 (ask for one in the comments box at checkout).
Deal of the Day today (22nd July) - Sue Wilson B
elgian Collection - Brussels only £11.99!

Wednesday, 19 July 2017

Gilded and painted Robin Redbreast

Hi Bloggers.

I'm heading up to Creative Expressions HQ in Kettering again today to run another workshop on Stained Glass Window Techniques. Looking forward to it.

Here's today's card with many thanks to Iris Clark for introducing me to a great technique -

I started by cutting Sue Wilson's Robin Redbreast Stained Glass Window Die out of Black Card. I added a piece of Creative Expressions Double Sided Self Adhesive Sheet to the back. I turned over to the front and added Cosmic Shimmer Persian Dawn Gilding Flakes. I removed the excess using a piece of Rubit Scrubit.

I then painted some of the areas using the Christmas CS Watercolour Palette. It's hard not to get paint on the lines but you can take a clean wet paint brush to remove the paint from the lines. If this is too painful to do (😐) then you can just cut another Robin Redbreast and glue it on top.

I matted onto Antique Gold Pearl Card then Rich Red Card and popped onto a Black Card blank.

Lisa Horton is continuing with her One Day Special on Hochanda today with shows at 9am, 1pm and 5pm. I'm offering 10% discount on items from the shows. You can find them here. Offer applies till midnight tonight or while stocks last. Discount will be applied automatically at checkout.

 Thanks for stopping by.

Julia.
www.juliawattscrafts.co.uk
Free card with all website orders over £10 (ask for one in the comments box at checkout).
Deal of the Day today (19th July) - Craft Consortium
Always & Forever - Rhinestone Square Charms only £2.99!

Sunday, 2 July 2017

Stained Glass Poinsettia

Hi Bloggers.

I'm demoing at Phill Martin's Honeypot Crafts Store in Nottingham today to celebrate the store's 10th Birthday. Do pop by if you're in the area - I am told that there's cake!

Sue Wilson is continuing with her One Day Special on Hochanda today with shows at 9am, 1pm and 5pm so, I thought I would share another Christmas Stained Glass Window Card -

I started by cutting the Poinsettia Stained Glass Window Die out of Coconut White Card twice. I added Quickie Glue to the back of one and popped onto a piece of Acetate. I trimmed the other die cut a little so that it was smaller than the first, added Quickie Glue to the front of it and added it to the back of the Acetate.

Working on the back, for the red areas, I popped some CS Clear Varnish Lacquer onto my Craft Sheet. I added a drop of Rich Crimson CS Intense Pigment Stain and some CS Frosty Dawn Diamond Frost and mixed well. I added to the sections shown using a Paint Brush.

For the green areas, I popped some more CS Clear Varnish Lacquer onto my Craft Sheet and mixed in a drop of Emerald CS Intense Pigment Stain.

For the centres of the flowers and the yellow sections in the frame, I mixed Clear Varnish Lacquer with a drop of Sunflower Yellow Intense Pigment Stain and a little CS Rich Gold Pixie Powder.

For the areas around the flowers, I mixed Clear Varnish Lacquer with Rich Gold Pixie Powder.

I matted onto Coconut White Card, then Antique Gold Pearl Card and then popped onto a Coconut White Card blank.

I cut Sue's From Our House to Yours Die out of Antique Gold Pearl Card and added to the inside of my card.

I'm offering 10% discount on my website on products from Sue's shows. You can find them here. Offer applies till tonight. Discount will be applied automatically at checkout.

Hope to see some of you at Phill's store.

Thanks for stopping by.

Julia.
www.juliawattscrafts.co.uk
Free card with all website orders over £10 (ask for one in the comments box at checkout).
Deal of the Day today (2nd July) - S
pellbinders Shapeabilities - Circle Contempo Tags only £5.99!

Saturday, 1 July 2017

Robin Redbreast

Hi Bloggers.

Sue Wilson is launching a new One Day Special today at 6pm with Part One of her 2017 Festive Collection so I thought I would share a Christmas Card today featuring a couple of the die sets that she has on her shows.

I started by cutting the Robin Redbreast Stained Glass Window Die out of Coconut White Card twice. I added Quickie Glue to the back of one and popped onto a piece of Acetate. I trimmed the other die cut a little so that it was smaller than the first, added Quickie Glue to the front of it and added it to the back of the Acetate. This creates a well for filling with Lacquer mixes.

Working on the back, for the green sections, I popped some CS Clear Varnish Lacquer onto my Craft Sheet and added CS Peacock Green Pixie Powder. I mixed it well and added to the areas as shown using a Paint Brush.

For the red strip areas in the frame, I popped some Clear Lacquer Varnish onto my Craft Sheet and mixed in a drop of Rich Crimson CS Intense Pigment Stain. For the berries, I used my red mix and added CS Frosty Dawn Diamond Frost.

My bird was a bit of an experiment. I started by adding a brush stroke of my pre-glittered red mix to his tummy. Once dry, I added some Clear Varnish Lacquer to my Craft Sheet and added some drops of Walnut Stain Distress Oxide Re-inker. To be honest, I think I added too many drops of the re-inker as it took quite a while to dry so a bit more experimenting is required with that method. There are a few air bubbles that I did not manage to get rid of too but he just looks a bit speckled under his chin 😊. For his beak and his eyes, I used a Clear Varnish Laquer and Sunflower Yellow Intense Pigment Stain mix.

I added a piece of Coconut White Card to the back of my window once all the areas were dry and then matted onto Chestnut Card.

For my background, I picked up Walnut Stain Distress Oxide onto a Brayer and transferred the ink to the deboss side of the CE Ice Crystals Embossing Folder. I added a piece of Coconut White Card to the cleanside of my folder, closed it and ran it through the Spellbinders Platinum Machine with the Raspberry Plate. Any remaining ink on the folder just falls off when placed under running water. I inked around the edges with Walnut Stain Distress Oxide Ink using a Smoothie. I matted onto Chestnut Card and then Coconut White.

I cut the greenery dies from Sue's Pine Cone & Greenery Die Set out of Brunswick Green Card twice. I cut the Pine Cones out of Chestnut Card - once with both dies in each and once with the just the outside dies. I used my pokey tool to help me push the cut sections forward and then glued each pair of die cuts together.

Sue will be on Hochanda today at 6pm (still on Freeview) and 8pm (not on Freeview) and at 9am, 1pm and 5pm tomorrow. I'm offering 10% discount on my website on products from the shows. You can find them here. Offer applies till tomorrow night. Discount will be applied automatically at checkout.

Tim Holtz has announced 12 new colours in the Distress Oxide family. I am taking pre-orders on my website for these now. Stock is expected at the end of August. You can find them and all 12 of the original colours and re-inkers here.

I'm heading up to Phill Martin's Nottingham Honeypot Crafts Store early tomorrow morning to demo at the celebrations of the shop's 10th Birthday. Just thought I would give you a heads up today in case you fancy a visit tomorrow.

Thanks for stopping by.

Julia.
www.juliawattscrafts.co.uk
Free card with all website orders over £10 (ask for one in the comments box at checkout).
Deal of the Day today (1st July) - S
tampendous Cling Rubber Stamp - Cosmos Spray only £4.99!

Thursday, 29 June 2017

It's Your Day!

Hi Bloggers.

Here's today's card -

I started ny dusting a piece of Heat Emboss Acetate with an Anti-Static Bag. I stamped the image and the sentiment from the Woodware Five in a Row Stamp Set using Clear Perfect Medium and embossed with CS True White Detail Embossing Powder. Working on the back, I started to colour in. I used a mix of Pixie Powder and CS Clear Varnish Lacquer. I used Golden Mint, Burnt Orange, Plum Twist and Mango Blaze. I added CS Frosty Dawn Diamond Frost to the Mango Blaze Sections. I managed to colour it all in one session as I was pushed for time but I would not usuall do this - I would wait for each section to dry before doing the next. Also, make sure you put it to dry on a level surface - mine wasn't quite level and the Burnt Orange and Mango Blaze sections merged a little but I'm ok with that.


I made a frame out of Coconut White Card using Sue Wilson's Double Piereced Rectangles and Double Pierced Rectangles Set B. Once my image was dry, I added my frame using 2mm 3D Foam Tape.

I embossed a piece of Coconut White Card with the Creative Expressions Raindrops 8 x 8 Embossing Folder. I added my framed piece using 1mm 3D Foam Tape.

I completed my card by matting onto a couple of pieces of Coconut White Card.

Thanks for stopping by.

Julia.
www.juliawattscrafts.co.uk
Free card with all website orders over £10 (ask for one in the comments box at checkout).
Deal of the Day today (29th June) - C
reative Expressions Stamps to Die For - You're so Sweet only £2.99!

Friday, 16 June 2017

Freebie Friday

Hi Bloggers.

It's Friday again! Where did that week go? I have another demo card from last month that is looking for a new home this week -

You can read how this card was made in this post. I'm happy to report that CS Clear Varnish Lacquer is now back in stock - brilliant for stained glass style techniques.

Leave a lovely comment below to go into the draw to win it. I will announce the winner on Monday. Be sure to pop back to see if you have won.

Please note : Only comments left below will go into the draw. Comments made on the original post will not count. Information given on the original post was correct at the time that post was published.

I'll be back tomorrow with a sneak peek from Sunday's One Day Special on Hochanda.

Thanks for stopping by.

Julia.
www.juliawattscrafts.co.uk
Free card with all website orders over £10 (ask for one in the comments box at checkout).
Deal of the Day today (16th June) - J
ustrite - Celtic Lattice Background Stamp only £5.99!