Thursday, 17 January 2013

Door Card

Hi Bloggers.

I was really disappointed that this card only got shown once during the 2 shows last Friday especially as it took me ages to get the measurements right. Anyway, here it is closed -

and here it is open -

I started by making my 'doors'. I cut 2 x the largest Spellbinders Fancy Postage Edge dies out of Milk Card. At the emboss stage I added the Couture Creations Ambrosia Embossing Folder and inked through the die with Rusty Hinge Distress Ink. I scored each piece along the 8cm line on my Hougie Board and then threaded some London Tan American Seam Binding along the side and then down to meet in the middle.

I cut a piece of Milk Card 15.7cm x 13cm. I stamped the scroll from the Creative Expressions Artsy Floral Stamp Set along the top and the bottom using Rusty Hinge. I popped it through the Grand Calibur with the Couture Creations Chiaro Embossing Folder. I ran it through a second time to extend the pattern and then edged with Rusty Hinge using Cut n Dry Foam. I glued the doors to the back.

I cut a Spellbinders Resplendent Rectangle out of tan card. I cut the next size down out of Milk Card and at the emboss stage added the the Chiaro Folder. I inked through the die with Rusty Hinge. I stamped the sentiment from the same stamp set using Perfect Medium and embossed with Cosmic Shimmer Dark Bronze Lustre Embossing Powder from the Metallics and Darks Set. I cut it out using Spellbinders Wavy Rectangles and inked through the die with Rusty Hinge.

I stamped one of the flowers from the stamp set 4 times using Perfect Medium and embossed with the Dark Bronze Lustre Powder. I cut them out with scissors and then inked them with Rusty Hinge. I used Rusty Hinge to stamp the little stamp in the centre of each flower and added a 5mm White Pearl.

I assembled the card as shown adding some dots of Cosmic Shimmer Pearlescent PVA in Dark Bronze around the edges.

Thanks for stopping by.

Julia

Wednesday, 16 January 2013

Closest Inspection

Hi Bloggers.

A mostly white card from last weeks shows today -

The background is simply a piece of Coconut White Card run through the Grand Calibur with the Couture Creations Compassionate Embossing Folder. I ran it through a second time to extend the pattern. This is not a repeating pattern but you can get away without the join showing too much.

I stamped the dandelion from the Creative Expressions Natures Wonders Stamp Set using Perfect Medium and embossed with Cosmic Shimmer Silver Pearl Lustre Embossing Powder from the Metallics & Darks Set. I cut it out using Spellbinders Fancy Postage Edge.

I stamped the sentiment from the Creative Expressions Butterfly Kiss Stamp Set using Perfect Medium and embossed with the Silver Pearl Lustre Powder. I cut it out with a Spellbinders Resplendent Rectangle - I highly recommend using Wax Paper when cutting this die at least until it has been used a few times.

I tied a bow using 2 lengths of White Sheer Wrinkled Edge Ribbon. I pressed a Fancy Pearl Embellishment into the Perfect Medium Pad, sprinkled it with Silver Pearl Lustre Powder, tapped off the excess and heat set it.

I assembled the card as shown adding some dots of Cosmic Shimmer Pearlescent PVA in White around the edges.

Thanks for stopping by.

Julia.


Tuesday, 15 January 2013

New Creative Expressions Stamp Designs Now in Stock

Hi Bloggers.

Just a quick post to say that the latest batch of new Creative Expressions Stamp Sets have just arrived in my Amazon Store.

Two new sets featuring some gorgeous hearts will be on my shows on 21st January -

Hearts Entwined

and From the Heart

I also have an older set on the show - Funky Floral

Also new are a couple of sentiments sets - Classic Sentiments

and Special Sentiments

For the guys we have Cheers

and Sam's new Sherlock Holmes stamp set that she'll be showing on C&C on 26th January.

I've also re-stocked the Cosmic Shimmer Metallics & Darks and Brights Embossing Powder Sets and have added the Vintage Set too. I have added the Couture Creations Compassionate Embossing Folder from my last shows and the Walrus & Carpenter Embossing Folder which is on Monday's shows.

Finally, I have re-stocked Wax Paper but I doubt if it will last very long.

All for now.

Julia.

Thinking of You

Hi Bloggers.


Now, I know a lot of you don't like green but I do. In fact, I don't think that there's many colours in crafting that I'm frightened of using. When you make cards for friends and family then you can choose favourite colours but in my job I have to use whatever is new or popped on a show and sometimes that's really good. Using something out of your comfort zone makes you think - you have to use the old grey matter. Sometimes it's a real challenge, believe me and there are many occasions when something doesn't turn out as I would like but that's life. Indeed some cards I put off blogging as I really don't like them but then I run low and have to blog them, you lot go and surprise me my loving them! Works the other way sometimes too.

Anyway, enough waffling. Here's today's green card (and please - no comments about not liking the colour!).

This is a very simple card to make and you can make it in any colour, of course, but the embossing powder I've used looks particularly good on black. This powder, as with many Cosmic Shimmer Powders, looks different if you tilt the card - the shimmer part!

The black background is simply a piece of black card run through the Grand Calibur with the Couture Creations Chiaro Embossing Folder. I ran it through a second time to extend the pattern.

I dusted a piece of black card with an anti-static bag and stamped the large image from the Creative Expressions Artsy Floral Stamp Set using Perfect Medium. If you have trouble stamping large images you can easily stamp this by popping your stamp face up on your craft sheet and take the card to the stamp. Keep a couple of fingers on it all the time and use the other hand to rub the card into the stamp - don't press into the card just rub. It doesn't matter if you catch any ink from the edge of the stamp as in this card I have torn around the edges of the image. I added Cosmic Shimmer Golden Lime Blaze Embossing Powder from the Brights Set and heat set. I tore around the edges. I tore around the edges of a slightly larger piece of white card and inked around the edges with Forest Moss Distress Ink.

I stamped the co-ordinating flower from the Creative Expressions Whimsical Floral Stamp Set onto black card, again using Perfect Medium and embossed with the Golden Lime Blaze Powder. I cut them out and popped them on top of the main image with Foam Pads.

I stamped the sentiment from the Artsy Floral Stamp set using the Perfect Medium and embossed with Golden Lime Blaze. I tore around it and added it to the main image with foam pads. I tied a bow using 3 lengths of Moss Green American Seam Binding. I spritzed it with some water, scrunched it up a bit and dried it with my heat tool. I added a Black Dazzler.

I made a mat out of white card inked with Forest Moss and added some dots of Cosmic Shimmer Pearlescent PVA in Black around the edges.

My cough is very much better now - not gone, but much better.

Thanks for stopping by.

Julia.


Monday, 14 January 2013

Thank You For Touching My Life

Hi Bloggers.

Has anyone tried Sue's Wax Paper Embossing Folder Technique? You can see her tutorial here. It looks so effective that I just had to give it a go and here's the result -

For my background I followed Sue's tutorial with the Couture Creations Chiaro Embossing Folder and Chipped Sapphire Distress Ink.

I stamped the sentiment (great sentiment, I think) from the Creative Expressions Whimsical Floral Stamp Set using Perfect Medium and embossed with Cosmic Shimmer Navy Viola Blaze Embossing Powder from the Brights Set. I cut it out using Spellbinders Resplendent Rectangles and inked through the die with Chipped Sapphire using Cut n Dry Foam. I cut a Fancy Postage Edge Die out of Cobalt card and at the emboss stage I added the Couture Creations Alora Embossing Folder.

I stamped 4 flowers from the same stamp set using Perfect Medium and embossed with the Navy Viola Blaze Embossing Powder. I cut them out with scissors and then inked them with Chipped Sapphire using Cut n Dry Foam.

I wrapped some White Sheer Wrinkled Edge Ribbon around the card and added some Royal Blue American Seam Binding on top. I tied a bow with the two ribbons and added a Medium Circle Dazzler.

I assembled the card as shown adding some dots of Cosmic Shimmer Pearlescent PVA in White around the edges.

Hope you'll give this technique a try.

Thanks for stopping by.

Julia.


Sunday, 13 January 2013

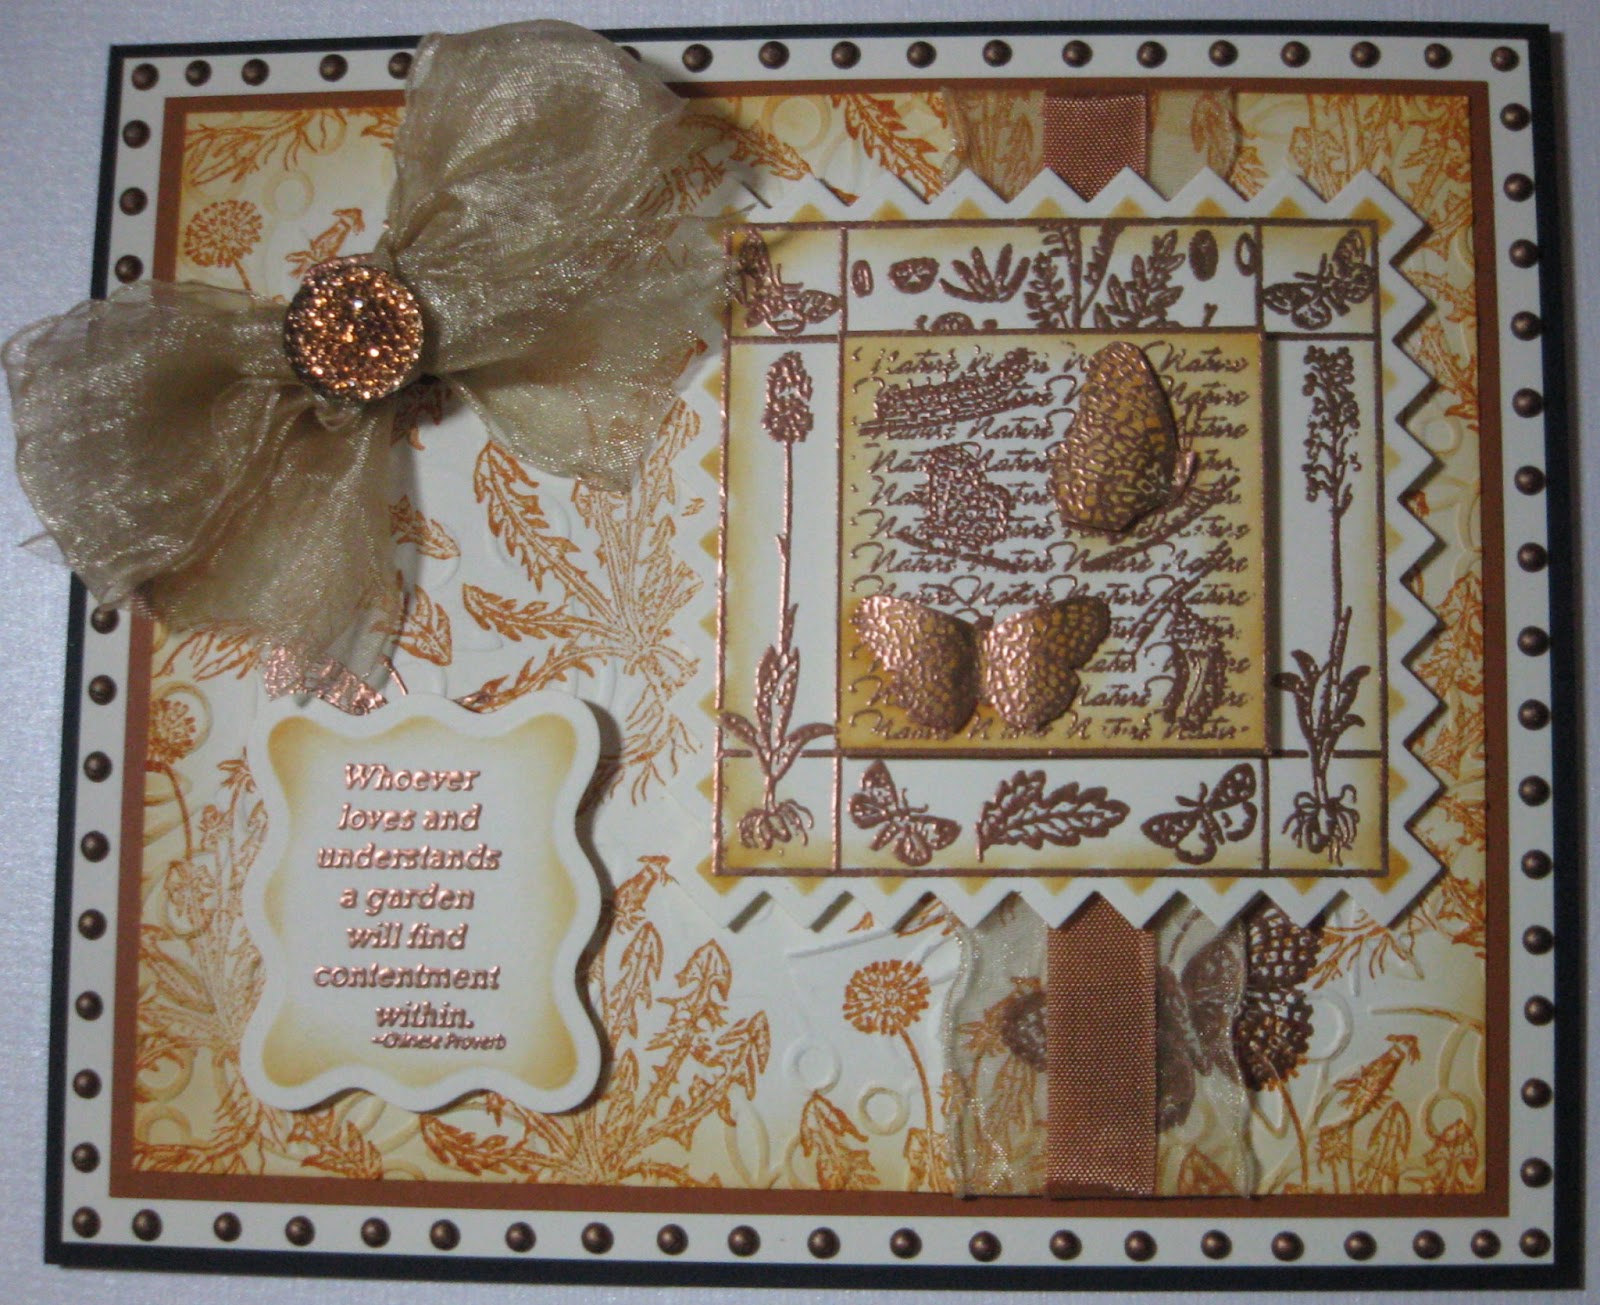
Whoever Loves a Garden

Hi Bloggers.

Here's today's card -

For the background, I stamped the dandelion from the Creative Expressions Natures Wonders Stamp Set using Rusty Hinge Distress Ink. They weren't stamped randomly but I made sure each row was offset slightly. I made sure the ink was dry, dusted the area with my anti-static bag and then stamped a butterfly from the same stamp set a few times using Perfect Medium. I added Cosmic Shimmer Ancient Copper Metallic Embossing Powder from the Metallics & Darks Set. I ran the background through the Grand Calibur with the Couture Creations Alora Embossing Folder. I ran it through a second time to extend the pattern (the ribbon hides the join on this one) and inked around the edges with Rusty Hinge using Cut n Dry Foam. I wrapped some Champagne Wrinkled Edge Ribbon and some London Tan American Seam Binding around where the join of the embossing folder pattern was.

I stamped the main image from the Creative Expressions Butterfly Kiss Stamp Set using Perfect Medium and embossed with the Cosmic Shimmer Ancient Copper Metallic Embossing Powder. I stamped it 3 times in total. One of them I left intact and cut out using Spellbinders Square Swatches and inked through the die with Rusty Hinge. On another I cut out the centre panel with scissors and inked around the edges with Rusty Hinge. In the last one, I just cut out the butterflies from the central panel and coloured them with Rusty Hinge.

I stamped the sentiment from the Natures Wonders Stamp Set, again using Perfect Medium and embossed with Ancient Copper. I cut it out using Spellbinders Wavy Rectangles and inked through the die with Rusty Hinge. I tied a bow with 2 lengths of the Champagne Ribbon and added a Light Brown Dazzler.


I assembled the card as shown adding some dots of Cosmic Shimmer Pearlescent PVA in Dark Bronze around the edges.

Thanks for stopping by.

Julia.

Saturday, 12 January 2013

Ruby Blush Blaze

Hi Bloggers.

Thanks for all your emails yesterday and comments here on the blog. Here's a demo card from yesterday -

For the background, I popped the Butterflies Mask onto some Coconut White Card and inked through with Aged Mahogany Distress Ink using Cut n Dry Foam. I then randomly stamped the hessian stamp from the Creative Expressions Butterfly Kiss Stamp Set using the Aged Mahogany and the the butterfly from the same stamp set using Barn Door Distress Ink. I wrapped a piece of White Crochet Ribbon around the background and also a piece of Tropic Wine American Seam Binding.

I stamped the main image using Perfect Medium and embossed with Cosmic Shimmer Ruby Blush Blaze Embossing Powder from the Brights Set. I cut it out using Spellbinders Fancy Postage Edge and inked through the die with Aged Mahogany.

I stamped the sentiment using Perfect Medium and embossed with the Ruby Blush Blaze Powder. I cut it out using Spellbinders Resplendent Rectangles and inked through the die with Aged Mahogany.

I assembled the card as shown adding some Black Swirls and some dots of Cosmic Shimmer Pearlescent PVA in Black around the edges.

Thanks for stopping by,

Julia.


Friday, 11 January 2013

The Wings of the Butterfly

Hi Bloggers.

This is a demo in one of the shows today - I'm on C&C at 1pm and 6pm. I really like how the background has turned out on this one. It was my first attempt at using the Cosmic Shimmer Pearlescent PVA in a slightly different way. I've found a better way to do that now - I'll share that info with you.

So, the background - I randomly stamped the butterfly stamp from the Creative Expressions Butterfly Kiss Stamp Set using Chipped Sapphire Distress Ink. Now here's the bit with the Pearlescent PVA (I've used Cosmic Pearl)  - you need to swap the top of the PVA for a Cosmic Shimmer Dries Clear Glue Top - the long nozzle one. I suggest you clean any dries clear glue from the nozzle. Then zig zag a line of PVA across the card diagonally and then rotate the card and zig zag again. I put it aside to dry overnight. Word of warning - if you don't swap the nozzle you'll probably squeeze too hard to get a good flow and the top will fly off leaving glue everywhere (done that!) or you'll find it hard to get a good even flow (done that too!).

Once dry, I ran the background through the Grand Calibur with the Couture Creations Alora Embossing Folder - I used the deboss side. I ran it through a second time to extend the pattern. Some of the PVA flattenened and some didin't - it seemed to depend on the thickness. I inked all around the edges with Chipped Sapphire using Cut n Dry Foam.

I stamped the sentiment from the same stamp set using Perfect Medium and embossed with Cosmic Shimmer Steel Blue Aurora Embossing Powder from the Metallics and Darks Set. I cut it out using the Spellbinders Fancy Postage Edge Die Set and inked through the die with Chipped Sapphire.

I cut the largest of the Fancy Postage Edge dies out of Cobalt Card. At the emboss stage I added the Alora Embossing Folder. I threaded some Blue White American Seam Binding through the holes in the die cut.

I stamped the larger butterfly from the Creative Expressions Natures Wonders Stamp Set twice using Perfect Medium and embossed with Cosmic Shimmer Steel Blue Aurora Embossing Powder. I cut them out with scissors and then coloured them with Chipped Sapphire using Cut n Dry Foam (being careful around the antenae).

I wrapped some White Sheer Wrinkled Edge Ribbon and some White Crochet Ribbon around the background. I tied a bow with the Crochet Ribbon and added a Large Dazzler to the centre of it.

I assembled the card as shown adding some dots of Cosmic Shimmer Pearlescent PVA in White around the edges.

Hope you can join me today. Please email in to the studio if you have time.

Thanks for stopping by.

Julia.

Thursday, 10 January 2013

The Beauty of Life

Hi Bloggers.

Here's today's card from the shows tomorrow. I'm hoping it'll be a demo, but who knows if there'll be time! I have a hacking cough at the moment so I hope I'm able to speak tomorrow. Never been ill on TV before!

For the background, I placed the Grid Mask at a jaunty angle onto some Milk Card and inked through with Scattered Straw Distress Ink using Cut n Dry Foam. I then inked through the Flower Mask with Rusty Hinge Distress Ink moving it around so that the whole area was covered. I randomly stamped one of the flowers from the Creative Expressions Whimsical Floral Stamp set using Dried Marigold Distress Ink. I mounted the background on to some orange card and then I wrapped some Champagne Wrinkled Edge Ribbon and some Cream Crochet Ribbon (which I had inked with Rusty Hinge) around the card.

I cut a Spellbinders Fancy Postage Edge out of orange card and at the emboss stage added the Couture Creations Alora Embossing Folder. I stamped the sentiment from the Whimsical Floral Stamp set using Perfect Medium and embossed with Cosmic Shimmer Bright Gold Metallic Embossing Powder from the Metallics and Darks Set. I cut it out using the Fancy Postage Edge die. I left the card in the die and stamped the scroll from the Artsy Floral Stamp Set around the edges using Scattered Straw. I cleaned the ink off the edges of the die with a dry cloth and then inked through the die with Rusty Hinge.

I inked some more cream crochet ribbon with Rusty Hinge. I cut it in half lengthways and added some 12mm Hi-Tack Tape to the cut edge of 3 of the pieces. I removed the backing, folded down the end to touch the tape as usual when making a ribbon rose but then just rolled the remainder of the ribbon along the tape, finishing off as usual by folding the other end down to the tape. I cut off the excess tape. I repeated this for the other 2 pieces of ribbon. I cut some leaves out of orange and milk card using the Spellbinders Little Leafs Set. I inked through the milk ones with Scattered Straw and the orange ones with Rusty Hinge.

I assembled the card as shown adding some Pearl Swirls and some dots of Cosmic Shimmer Pearlescent PVA in Golden Pearl around the edges. I also added some spare pearls from the swirls to the orange postage edge die cut.

Thanks for stopping by.

Julia.


Wednesday, 9 January 2013

You are one of Life's Treasures

Hi Bloggers.

Today's card is a revamp of one of Sue's cards that we made in a workshop maybe 3 years ago? Sometimes it's good to look back at techniques used in the past and have a go at them again especially ones that Sue has taught me - there have been so many!

Anyway, here's the card - 

For the main section with the flowers, I used a piece of Milk Card and stamped one of the small flowers from the Creative Expressions Whimsical Floral Stamp Set using Scattered Straw, Rusty Hinge and Barn Door Distress Inks. I concentrated on the areas where I was going to put my large flowers but also stamped one or two in the blank spaces. I made sure all the Distress Ink was dry and then dusted all over with my anti-static bag. I then stamped 3 large flowers over the top of the stamped areas using Perfect Medium and embossed with Cosmic Shimmer Clear Embossing Powder. I then wiped a Forest Moss Distress Ink Pad over the whole area making sure it was well covered. Using a piece of kitchen roll I wiped off the excess ink. Where I embossed the large flowers the pattern underneath was left untouched as it had been encased in the clear embossing powder.

I repeated this process on a separate piece of Milk Card stamping 2 large flowers. I cut them out after using the Forest Moss on them and then went around the edges again with Forest Moss to hide any white bits. I popped Foam Pads on the back of these 2 flowers before adding them to my design.

For the bottom section, I ran a piece of mustard card through the Grand Calibur with the Couture Creations Chiaro Embossing Folder. I popped this on to some pale yellow card. I popped both sections onto some Milk Card and wrapped some Cream Crochet Ribbon around and added a bow.

I stamped the sentiment using Perfect Medium and embossed with Cosmic Shimmer Tropic Moss Blaze Embossing Powder from the Brights Set. I cut it out using Spellbinders Resplendent Rectangles.

I assembled the card as shown - no PVA dots on this one for a change!

Thanks for stopping by.

Julia.


Tuesday, 8 January 2013

In Joy or Sadness

Hi Bloggers.

Totally different colour scheme to yesterday's card but still using the Cosmic Shimmer Brights Embossing Powder Set.

For the background, I randomly (ish!) stamped a butterfly from the Creative Expressions Butterfly Kiss Stamp Set using Perfect Medium. I stamped a few at a time and then added Cosmic Shimmer Lapis Pink Aurora Embossing Powder from the Brights set. When I had stamped the whole area, I heat set with my heat tool. I ran the background through the Grand Calibur with the Couture Creations Chiaro Embossing Folder. I ran it through a second time to extend the pattern and then inked around the edges with Victorian Velvet Distress Ink using Cut n Dry Foam.

I stamped the main image from the same stamp set again using Perfect Medium and embossed with Cosmic Shimmer Lapis Pink Aurora Embossing Powder. I cut it out using Spellbinders Wavy Rectangles and inked through the die with Victorian Velvet.

I stamped the sentiment from the same stamp set with the Perfect Medium and embossed with Lapis Pink Aurora. I cut it out using Spellbinders Resplendent Rectangles and inked through the die with Victorian Velvet.

I tied a bow using 2 lengths of Rose Sheer Wrinkled Edge Ribbon and added a Large Circle Dazzler.

I assembled to card as shown adding some dots of Cosmic Shimmer Pearlescent PVA in White around the edges.

Thanks for stopping by.

Julia.


Monday, 7 January 2013

The World is Full of Beautiful Things

Hi Bloggers.

I'm here with a sneaky peak of one of the samples from the shows on Friday. A few days early this time as I want to give you a head start with some of the lovely embossing powders on the show. I have the Cosmic Shimmer Metallics & Darks Set on the show again as it flew out last time. I also have the Cosmic Shimmer Bright Mix which are really yummy. I think it's good to have a change and use different colour embossing powders and, of course, many of these powders have the added benefit of a shimmer too. All the stamp sets on the show have been designed by Sam Poole.

Here's today's card -

For the background, I randomly stamped some of the stamps from the Creative Expressions Natures Wonders Stamp Set using Pumice Stome Distress Ink, Chipped Sapphire Distress Ink and Jet Black Archival. I made sure they were dry and then ran it through the Grand Calibur with the Grid Mask which was at a bit of a jaunty angle. I removed the mask and inked all over with Pumice Stone Distress Ink using Cut n Dry Foam.

I stamped the main image from the same stamp set using Perfect Medium and embossed with Cosmic Shimmer Navy Viola Blaze Embossing Powder from the Bright set. I cut it out using Spellbinders Wavy Rectangles and inked through the die with Pumice Stone and then Chipped Sapphire Distress Inks. I stamped and embossed the area with the butterfly on it again. I cut the butterfly out, shaped the wings and added it on top of the large image.

I stamped the sentiment from the same stamp set again using Perfect Medium and embossed with Navy Viola Blaze Embossing Powder. I cut it out using Spellbinders Resplendent Rectangles and inked through the die with Pumice Stone and Chipped Sapphire Distress Inks.

I added a couple of Faux Screw Brads in Antique Silver to my background and assembled the card as shown. I added some dots of Cosmic Shimmer Pearlescent PVA in Silver Lustre around the edges.

Thanks for stopping by.

Julia.


Sunday, 6 January 2013

You are Truly Appreciated

Hi Bloggers.

I'm taking Kathryn back to Uni today - it's been lovely having her home for a few weeks.

Just a reminder that Sue is on Create & Craft today at 12noon (2 hours) and 5pm. 

Here's today's card -

For the background, I used a square piece of Coconut White Card. I placed the largest of the Spellbinders Exquisite Circles where I wanted it and ran it through the Grand Calibur to cut an aperture. I left the die in place and ran it through the Grand Calibur with the Spellbinders Garden Lattice A4 M-Bossabilities Folder - you get a lovely pattern from the outside edge of the die. I inked around the edges of the background and the aperture with Raisin Adirondack Dye Ink using Cut n Dry Foam.

I stamped the image from the Creative Expressions Lacy Medallions Stamp Set using Plum Archival and embossed with Cosmic Shimmer Clear Embossing Powder. I cut it out using the second largest of the Exquisite Circles dies and inked through the die with Raisin Adirondack.  I cut the smallest of the Exquisite Circles, removed it from the die, inked around the edges and added a 8mm White Pearl in the centre.


I made a flower using Spiral Blossom Four, I removed the card from the die and inked both sides with Raisin Adirondack before rolling. I cut some 'leaves' out of burgundy card using the French Frills die set. I added a few spare bits from some Pearl Swirls.

I stamped the sentiment from the Creative Expressions Fanciful Phrases Stamp Set using Plum Archival and embossed with Cosmic Shimmer Clear Embossing Powder. I cut it out using Labels 28 and inked through the die with Raisin.

I assembled the card as shown adding another couple of 8mm pearls in the top corners and some dots of Cosmic Shimmer Pearlescent PVA in White around the edges.

I'll be back tomorrow with a sneak peak from Friday's shows.

Thanks for stopping by.

Julia.


Saturday, 5 January 2013

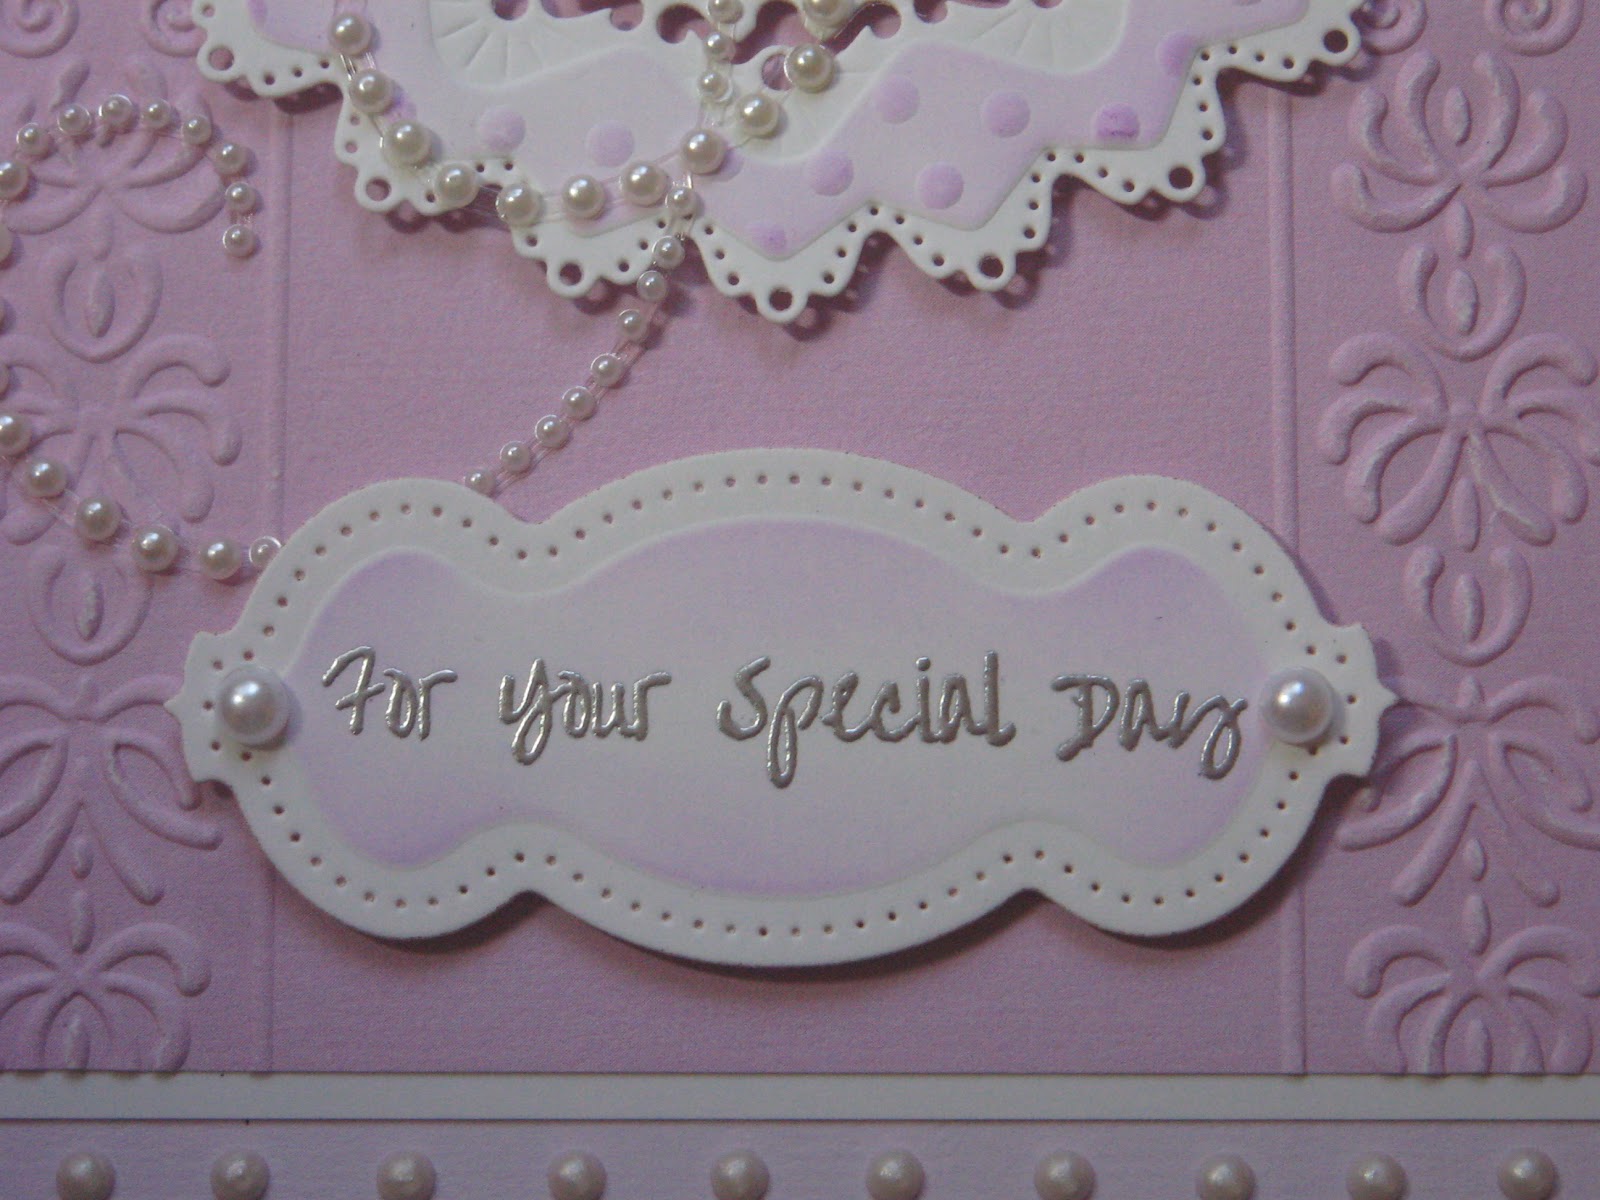
For Your Special Day

Hi Bloggers.

First, I'd like to give out shout out to my friend Tracey who works at Creative Expressions HQ and has just started a blog. Please pop over  to have a look here. I'm sure she would love some new followers.

Another Pick of the Day card today. I am scratching around trying to find cards to share at the moment ahead of my shows on 11th - hope you don't mind.

For the background, I ran a piece of Foundations Shades Paper through the Grand Calibur with the Couture Creations Pastorale Embossing Folder. The paper was wider than the folder. I ruffled some Blue White American Seam Binding down 2 sides.

I used the largest and the next but one largest of the Spellbinders Exquisite Circles dies to cut some Coconut White Card. At the emboss stage, I added the Small Polka Dots Mask and inked through the die with Purple Twilight Adirondack Dye Ink using Cut n Dry Foam. I cut a smaller motif from the Spellbinders Puzzle Effect Cut, Fold & Tuck die set using the Foundations Paper and inked through the die with Purple Twilight. I folded & tucked and added a 5mm White Pearl.

I stamped the sentiment from the Creative Expressions Fanciful Phrases Stamp Set using Perfect Medium and embossed with Cosmic Shimmer Silver Shine Metallic Embossing Powder. I cut it out using the tag die from the Spellbinders French Frills Die Set and inked through the die with Purple Twilight.

I assembled the card as shown adding a Pearl Swirl and some dots of Cosmic Shimmer Pearlescent PVA in White around the edges.

Thanks for stopping by.

Julia.


Friday, 4 January 2013

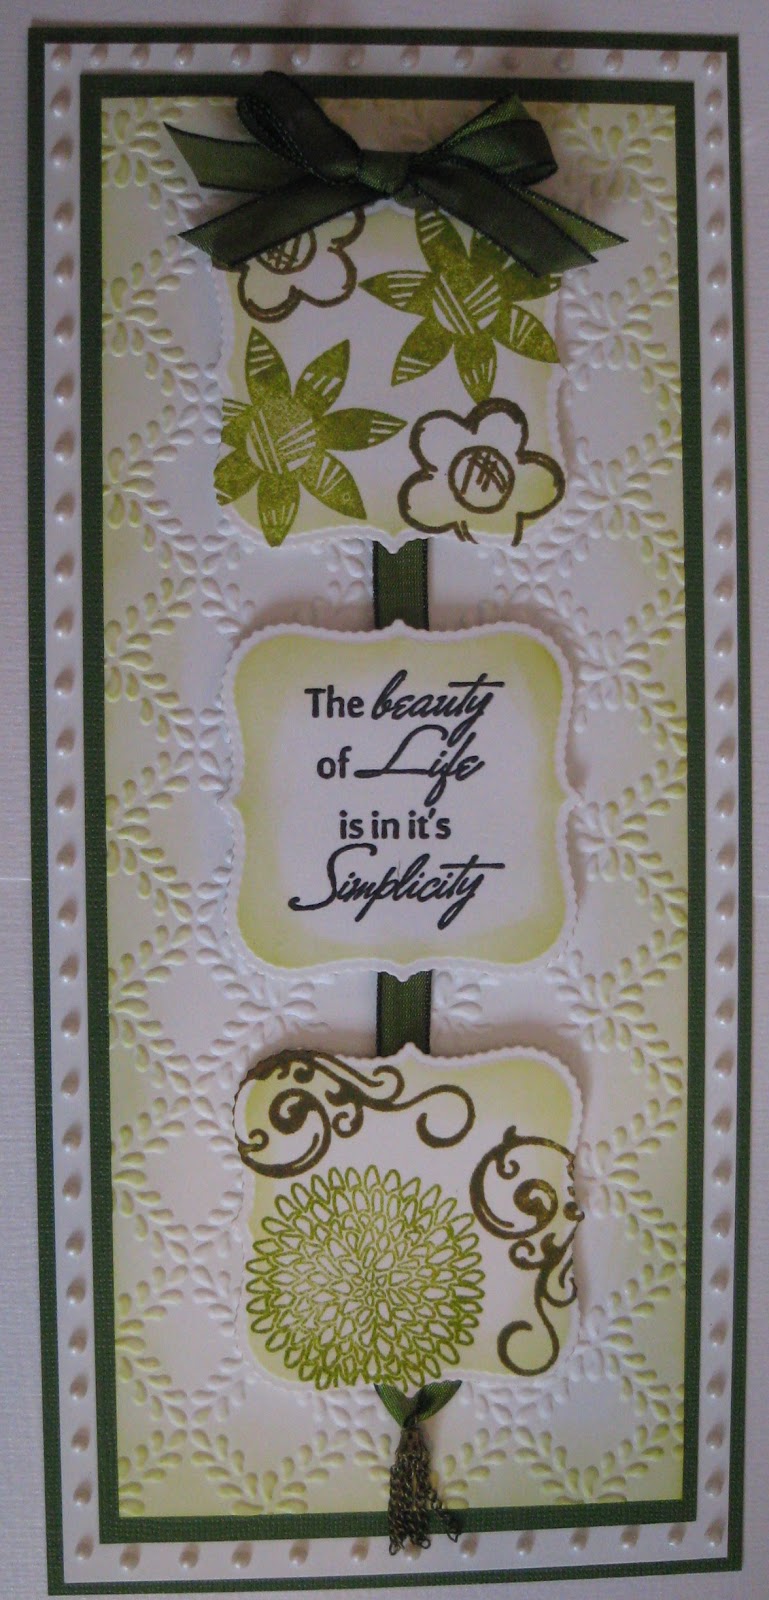
The Beauty of Life

Hi Bloggers.

A card from the November Pick of the Day today. I was going for a wall hanging feel on this one.

For the background, I ran a piece of Coconut White card through the Grand Calibur with the Spellbinders Garden Lattice A4 M-Bossabilities Folder. I inked around the edges with Lettuce Adirondack Dye Ink using Cut n Dry Foam.

For the top panel, I stamped a couple of flowers from the Creative Expressions Whimsical Floral Stamp Set using Lettuce and Oregano Adirondack Dye Ink Pads. I cut out using Spellbinders Scalloped Labels One and inked through the die with Lettuce.

I stamped the sentiment from the same stamp set using Jet Black Archival and embossed with Cosmic Shimmer Clear Embossing Powder. Again, I cut out using Scalloped Labels One and inked through the die with Lettuce.

For the bottom panel, I stamped another flower using lettuce and a gorgeous scroll from the same stamp set using Oregano. I cut out using Scalloped Labels One and inked through the die with Lettuce.

I joined the panels by running a piece of May Arts Two Tone Ribbon at the back. I added a loop at the bottom with a Creative Expressions Tassel and a bow at the top using 2 lengths of the ribbon. I added some dots of Creative Expressions Pearlescent PVA in White around the edges.

Thanks for stopping by.

Julia.