Friday, 9 May 2014

Happy Birthday

Hi Bloggers.

Here's today's card -

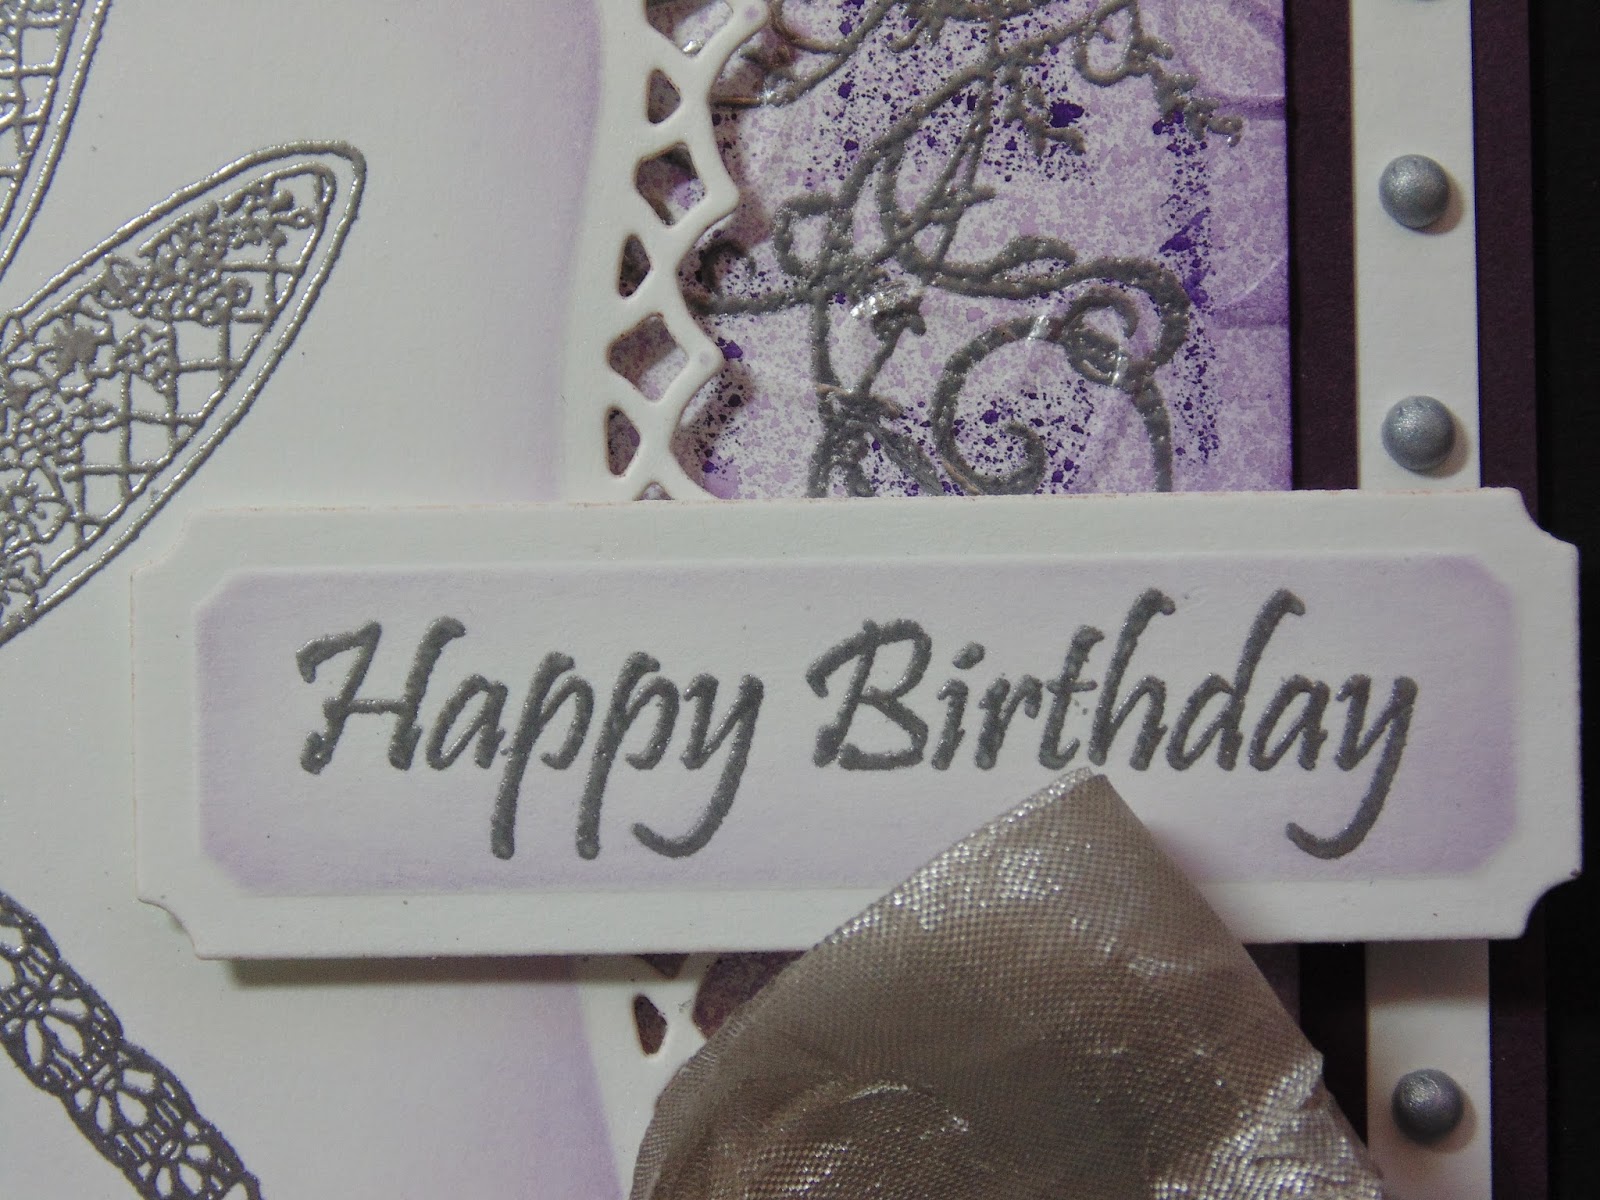
For the background, I started by spritzing through the Counterpane Mask with Grape Crush Cosmic Shimmer Ink Spray Mist. I made sure the ink was dry and then dusted with an Anti Static Bag.  I stamped the Ivy Corner in 2 of the corners using Perfect Medium and embossed with Cosmic Shimmer Silver Shine Detail Embossing Powder. I ran it through the Grand Calibur with the Couture Creations Ooh La La Embossing Powder. I ran it through a second time to extend the design and inked around the edges with Dusty Concord Distress Ink.

I stamped the Floral Dragonfly using Perfect Medium and embossed with Silver Shine Detail Powder. I cut it out using Spellbinders Decorative Labels One and inked through the die with Dusty Concord.

I stamped the sentiment that comes with the Earthenware Vase using Perfect Medium and embossed with Silver Shine Detail Powder. I cut it out using Justrite Vintage Labels 4 and inked through the die with Dusty Concord.

I tied a bow using 2 lengths of Silver Silky Crush Ribbon and added a Fancy Pearl Embellishment.

I assembled the card as shown adding a White 8mm Pearl in each corner and some dots of Cosmic Shimmer Pearlescent PVA in Silver Lustre around the edges.

I'm doing another workshop at Creative Expressions HQ in Kettering on Wednesday 4th June. Tracey Laughton will be running a workshop in the morning creating a gorgeous 3d project using MDF, Chalk Paints and dies. Here's a sneak peek of the project -

It's lovely, isn't it? I want to make it myself! Tracey's workshop runs 10am till 12.30pm and costs just £15.

My workshop follows on from Tracey's at 1.30pm and my aim is to introduce the use of Shimmer Paints with masks and stamps. I also want to show how versatile the sentiment stamps are. Here's a peek at my projects -


They're both blue so we don't have to swap ink and paint colours part way through to save time as there's alot to get done in 3 hours! My workshop costs £30.

To book a place on either or both workshops please contact Tracey on 01536 481778.

I'll be back tomorrow with a sneak peek from next Thursday's One Day Wonder. There are lots of new stamps on the shows so I thought I'd start sharing a little earlier than usual.

Thanks for stopping by.

Julia.

Thursday, 8 May 2014

True Friendship

Hi Bloggers.

Thanks for all your orders for the Spellbinders Tool n One. There's a video demo on YouTube by Spellbinders here.

Here's today's card -

For the background, I simply ran a piece of Coconut White Card through the Grand Calibur with the Couture Creations Exotic Embossing Folder. I ran it through a second time to extend the design and inked around the edges with Classic Cobalt Eco Green Dye Ink Pad.

I stamped the image from the Justrite Irises Vintage Labels Four Stamp Set using Jet Black Archival ans embossed with Cosmic Shimmer Clear Embossing Powder. I coloured in using Eco Green Dye Ink Pads. I used Classic Cobalt, Lavender Organza and Emerald. I also used Sunflower Cosmic Shimmer Matt Drawing Ink from the Summer Fayre Set. I cut the image out using a Justrite Vintage Labels Four Die. I cut a Spellbinders Decorative Labels One out of Cobalt Card.

I stamped the sentiment from the Justrite True Friends Vintage Labels Four Stamp Set using Jet Black Archival and embossed with Clear Powder. I cut it out using a Justrite Vintage Labels Four Die and cut another die out of Cobalt Card.

I tied a bow using Blue/Ivory Striped Grosgrain and added a Fancy Pearl Embellishment.

I assembled the card as shown adding some White Pearls in the corners and some dots of Cosmic Shimmer Crystal Sparkle PVA around the edges.

Thanks for stopping by.

Julia.

Wednesday, 7 May 2014

For You

Hi Bloggers.

Just in case you missed it - I now have the Spellbinders Tool n One in stock - please see this post for details.

This card was submitted for the latest project book but but sadly didn't make it.

For the background, I randomly stamped the Ruler A6 Stamp using Tumbled Glass Distress Ink. Then, I repeated the process with the Vintage Tapestry A6 Stamp. Finally, I filled in some gaps using the Beaded Flourish Single Stamp, again using Tumbled Glass. I then ran it through the Grand Calibur with the Couture Creations Extra Loren Embossing Folder. I ran it through a second time to extend the design. I rubbed some Creative Expressions Pearl Moon Gilding Wax all over. Once dry, I inked around the edges with Tumbled Glass.

I stamped the Delicate Lily Stamp using Jet Black Archival and embossed with Cosmic Shimmer Clear Embossing Powder. I coloured in using Cosmic Shimmer Matt Drawing Inks. I used Sea View and Soft Moss from the Garden Twist Set. I cut out using Spellbinders Classic Ovals Large and inked through the die with Tumbled Glass. I cut a Spellbinders Pearl Effects and inked through the die with Tumbled Glass.

I stamped the sentiment from the Creative Expressions Gratitudes Stamp Set using Jet Black Archival and embossed with Cosmic Shimmer Clear Embossing Powder. I cut it out using Spellbinders Gold Squares One within a Spellbinders Classic Squares Large Die. After embossing, I removed the Gold Die and inked through the remaining die with Tumbled Glass.

I tied a bow using White Crochet Ribbon and added a Frosted Blue Dazzler.

I assembled the card as shown adding a White 5mm Pearl to each corner and some dots of Cosmic Shimmer Summer Blue Pearlescent PVA around the edges.

Thanks for stopping by.

Julia.

Tuesday, 6 May 2014

Spellbinders Tool n One Now in Stock

Hi Bloggers.

The Tool n One is now in stock here. I was really dubious about this but I tried it last week and it really works! I love Sue's Faux Quilled Leaves die but it is a pain to prick all the bits out each time - this tool does it for you, and quickly too. Highly recommended.

You'll find a YouTube demo here.

All for now.

Julia

Best Wishes

Hi Bloggers.

I've been having a bit of a clearout this weekend and have popped a load of stuff on ebay. Click on the link in the menu above to go and have a look.

I know many of you won't like the colour of this card but forget about the colour and hopefully you'll find something you can use in a make of your own.

For the background, I started by misting a piece of Milk Card with Tangerine Cosmic Shimmer Ink Spray Mist. I popped a little Russet Red Cosmic Shimmer Shimmer Paint onto my Craft Sheet. I picked some up onto some Cut n Dry Foam and randomly inked through the centre section of the Floral Frame Mask with the paint. Then, I loaded up the Cut n Dry with more Russet Red Paint and used that as an 'ink pad' to randomly stamp the Art Collage Stamp. In the same way, I used some Topaz Cosmic Shimmer Shimmer Paint to randomly stamp the Plaid Stamp. I made sure the paint was dry and then ran it through the Grand Calibur with the Spellbinders Elite M-Bossabilities Folder. I ran it through a second time to extend the design and inked around the edges with Wild Honey Distress Ink.


I stamped the Best Wishes Stamp using Jet Black Archival and embossed with Clear Embossing Powder. I cut it out using scissors. I coloured in using Topaz Shimmer Paint, Enchanted Gold and Golden Malachite from the Cosmic Shimmer Garden Tones Watercolouur Set. For the frame, I mixed a little Tangerine Dream Mister with some Enchanted Gold Watercolour. I cut the largest die in the Murcia Die Set from Sue's Spanish Collection and inked through the die with Wild Honey.

I made 2 scrunched up flowers using the largest 2 dies in Sue's Classic Rose Die Set. I inked the tips of the petals with Wild Honey. I cut a couple of Faux Quilled Leaves out of Coconut White Card.

I assembled the card as shown adding some White Pearls in the corners and some dots of Cosmic Shimmer Pearlescent PVA in Cosmic Pearl around the edges.

Thanks for stopping by.

Julia.

Monday, 5 May 2014

Get Well Soon

Hi Bloggers.

Here's today's card -
For the background, I started by randomly inking through one of the designs in the Floral Elements Mask using Scattered Straw Distress Ink. With the stamp in my hand, I randomly stamped the Plaid Stamp using Scattered Straw. I popped a little Topaz Cosmic Shimmer Shimmer Paint onto my Craft Sheet. I picked it up onto a piece of Cut n Dry Foam. This was then my 'ink pad' and I used it to randomly stamp the Art Collage Stamp. I made sure the ink and the paint was dry and then ran it through the Grand Calibur with the Spellbinders Elite M-Bossabilities Folder.

I stamped the Get Well Soon Stamp onto Sand Card using Perfect Medium and embossed with Cosmic Shimmer True White Detail Embossing Powder. I cut it out using Spellbinders Labels 17 and inked through the die with Scattered Straw. I stamped the sentiment again in the same way as before and cut out the monogram and swirl panels. I popped these on top of the original image using 3d Foam, turning the scroll panel.

I made a flower out of white felt from the Vintage Felt Pack and Spellbinders Spiral Blossom 4. I added a 5mm White Pearl to the centre. I added a couple of Sue's Faux Quilled Leaves.

I assembled the card as shown adding some White Pearls in the corners and I pierced around the edges.

Thanks for stopping by.

Julia.

Sunday, 4 May 2014

Thanks so much

Hi Bloggers.

Here's today's card -

For the background, I inked through one of the elements in the Floral Elements Mask (not a stamp as some of you are commenting) in each corner using Dusty Concord Distress Ink. I then ran it through the Grand Calibur with the Spellbinders Regal M-Bossabilities Folder. I ran it through a second time to extend the design and inked around the edges with Dusty Concord.


I masked off the 'T' of the sentiment from the Creative Expressions Heartfelt Sentiments Stamp Set and inked up with Jet Black Archival. I removed the mask and stamped and embossed with Cosmic Shimmer Clear Embossing Powder. I stamped the monogram section of the Thank You Stamp using Jet Black Archival and embossed with Clear Powder. I cut it out and placed it next to the rest of the sentiment. I selected a die to fit. I chose Spellbinders Pearl Effects. I removed the monogram and cut out. I inked through the die with Dusty Concord and added the monogram using 3d Foam.

I cut a Spellbinders Pearl Efffects Die out of Mauve Card.

I made a flower using Sue's Classic Rose Die Set. I tied a bow using Purple/Ivory Striped Grosgrain.

I assembled the card as shown adding a Cream 8mm Pearl to each corner and some dots of Cosmic Shimmer Vanilla PVA around the edges.

Thanks for stopping by.

Julia.

Saturday, 3 May 2014

Iris

Hi Bloggers.

A couple of you have asked me to stock some items in my Amazon Store. I have emailed but received no response so just in case I thought I'd mention it here. Not using any surnames - Carol - the embossing powder you wanted is here and Susan - the Lace Mask is here.

My Justrite Toolsheds have now been combined and will be in a One Day Wonder on May 15th. I think my May dates are fixed now  but we'll see!

Here's today's card -

For the background, I ran a piece of Milk Card through the Grand Calibur with the Fleur de Lys Tiles Mask. I cut a border out of Black Card using the Spellbinders Classic Postage Stamp Edgeabilities Die Set.

I stamped the image from the Justrite Irises Vintage Labels Four Stamp Set using Jet Black Archival and embossed with Cosmic Shimmer Clear Embossing Powder. I cut it out using Justrite Vintage Labels Four and inked through the die with Walnut Eco Green Dye Ink Pad.

I cut a Spellbinders Elegant Post out of Black Card.

I stamped the sentiment from the same stamp set using Jet Black Archival and embossed with Clear Powder. I cut it out using Spellbinders Venetian Accents and inked through the die with the Walnut Ink.

I tied a bow using Black/Ivory Striped Grosgrain and added a Black Crystal Sparkler.

I assembled the card as shown adding some Black Pearls to the top left-hand corner and some dots of Cosmic Shimmer Pearlescent PVA in Black Pearl around the edges.

Thanks for stopping by.

Julia.

Friday, 2 May 2014

Happy Anniversary

Hi Bloggers.

Had a lovely day at Creative Expressions HQ yesterday. 2 workshops with some lovely ladies. One lady travelled from Blackpool! More workshops coming soon.

A simple white & silver card today -


For the background, I ran a piece of Coconut White Card through the Grand Calibur with the Spellbinders Butterfly Garden Impressabilities.

I stamped the Congratulations Stamp using Perfect Medium and embossed with Cosmic Shimmer Silver Shine Detail Powder.

I cut out just the image panel using scissors. I cut a Spellbinders Pearl Effects and a Spellbinders Diamond Effects out of White Card.

I stamped the sentiment from the Creative Expressions Celebration Stamp Set, again using Perfect Medium and embossed with Silver Shine Detail Powder. I cut it out using Spellbinders Nobel Rectangles.

I tied a bow using White Crochet Ribbon, added some White Pearl String and added a White Crystal Sparkler.

I assembled the card as shown adding a White 8mm Pearl to each corner and pierced around the edges using my Tim Holtz Ruler.

Thanks for stopping by.

Julia.

Thursday, 1 May 2014

A Heart that Loves

Hi Bloggers.

I'm running a couple of workshops today at Creative Expressions HQ. Maybe I'll see some of you there?

Here's today's card -

For the background, I ran a piece of Coconut White Card through the Grand Calibur with the Couture Creations Tied Together Embossing Folder. I ran it through a second time to extend the design and inked around the edges with Faded Jeans Distress Ink. I wrapped a piece of White Crochet Ribbon around the centre. I cut 4 corners out of Periwinkle Card using the Spellbinders Lace Hearts Die Set.

I stamped the sentiment and the frame from the Justrite Sweet Hearts Stamp Set using Perfect Medium and embossed with Cosmic Shimmer Arctic Lake Lustre Embossing Powder. I cut it out using Heartfelt Creations Timeless Amour Die Set which gave me 2 die cuts - one with the sentiment and one a lovely decorative frame. I cut a Spellbinders Decorative Labels One out of Periwinkle Card and at the emboss stage added the Heart Confetti Mask.

I cut a key using the Spellbinders Lace Hearts Die Set and inked through the die with Faded Jeans.

I assembled the card as shown adding some White Pearls and some dots of Cosmic Shimmer Pearlescent PVA in Cosmic Pearl around the edges.

Thanks for stopping by.

Julia.