Monday, 31 July 2017

Chalk Clouds on Black Card

Hi Bloggers.

Here's today's card -

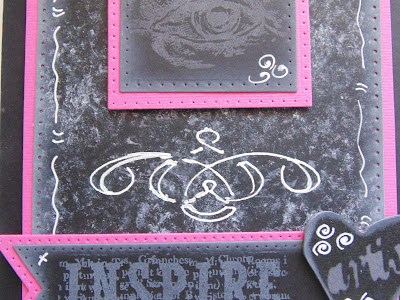
For the background, I used Natural Sponges and CS Chalk Clouds - Enchanted Blossom, Blue Lagoon and Sweet Violet onto Black Card. My Natural Sponges were just pliable - not wet, barely damp. This is important so that the ink in the Chalk Cloud pots isn't diluted. I cut my background out using Sue Wilson's Essential Pierced Rectangles. I edged with Sweet Violet Chalk Cloud using a Smoothie. I used a White Pen to scribble around the edges. I matted onto some bright pink card from my stash and popped onto a Black Card blank.

I stamped one of the images from the Woodware Eyes Stamp Set onto Black Card using Sweet Violet Chalk Cloud, applying the ink with a Smoothie. I cut it out using Sue's Double Pierced Squares and inked around the edges with Sweet Violet Chalk Cloud. I doodled in 2 of the corners with my White Pen. I cut a mat out of my bright pink using the next sized die in Sue's Double Pierced Squares Set B.

I placed my Eye topper onto my background and positioned the flourish on the Every Child Mask just below my topper. I drew through the mask with my White Pen.

I stamped the sentiment from the Woodare Vintage Inspiration Stamp Set onto Black Card using Sweet Violet Chalk Cloud. I cut it out using Sue's Pierced Flags and cut a mat out of bright pink card using the next sized die in the set.

I painted an Arty Hearts Pop-em with CS Black Gesso. Once the Gesso was dry, I edged the heart with Sweet Violet Chalk Cloud. I selected a word from the Every Child Mask and inked through the mask onto the Pop-em with Sweet Violet Chalk Cloud. I added some White Pen to the sentiment panel and the Pop-em.

. 
The winner of the card from Freebie Friday on 28th July is ......................................

hazel young

Please email me at juliawattscrafts@gmail.com with your address and I'll pop your card in the post.

Thanks for stopping by.

Julia.
www.juliawattscrafts.co.uk
Free card with all website orders over £10 (ask for one in the comments box at checkout).

Sunday, 30 July 2017

Spellbinders Thank You Card

Hi Bloggers.

Here's today's card -

I think it's fairly obvious how this card was made so I'll just give you a list of products used -

Spellbinders - Ornamental Doily, Graceful Sweet Words, Graceful Eyelets
Creative Expressions Dotted Daisies Embossing Folder
Phill Martin Scribbled Frame Sentiments
Cobalt Archival
Antique White Satin Ribbon
Craft Consortium Rhinestone Pearl Charm
Creative Expressions Self Adhesive Pearls - Cream 5mm
Card - Milk, Sky Blue
Tim Holtz Ruler
Pinflair Precision Probe
Self Healing Piercing Mat


Thanks for stopping by.

Julia.
www.juliawattscrafts.co.uk
Free card with all website orders over £10 (ask for one in the comments box at checkout).

Saturday, 29 July 2017

Succulents and Chalk Clouds

Hi Bloggers.

Here's today's card -

The background is one of my mopped up from waste ink backgrounds - the CS Chalk Clouds used are Terracotta, Blue Lagoon, Pink Princess, Gentle Lavender and Subtle Sage. I edged the background with Subtle Sage using a Smoothie. I matted onto Black Card and then Coconut White Card.


I stamped the sentiment and the image from the Woodware Succulents Stamp Set onto Coconut White Card using Onyx Black Versafine Ink. I coloured in using Chalk Clouds - Terracotta, Blue Lagoon, Pink Princess and Subtle Sage. I popped some ink onto my Craft Sheet using a Smoothie and picked the ink up using a Water Brush. Any waste ink, I misted with water and picked up onto another piece of card to use for a future project.

I cut out using Sue Wilson's Double Pierced Rectangles and inked through the die with Subtle Sage using a Smoothie. I cut a mat out of Black Card using Sue's Double Pierced Rectangles Set B.

I made a flower out of more of my Chalk Cloud background card using Sue's Sweet Williams Die Set and added a 5mm Black Pearl to the centre. I added some Subtle Sage Chalk Cloud to my Craft Sheet, misted it with water and rubbed some Blue White American Seam Binding into it. I repeated the process until all my ribbon was coloured. It's very subtle (as the name of the ink suggests!) - looks a bit darker in real life than on camera. I dried my ribbon using a Heat Tool and tied a bow.

I completed my card by adding a Small Black Circle Dazzler to each corner.

Phill Martin has just launched his new Scribbled Collection of dies. You can find them on my website here.

Thanks for stopping by.

Julia.
www.juliawattscrafts.co.uk
Free card with all website orders over £10 (ask for one in the comments box at checkout).

Friday, 28 July 2017

Freebie Friday, Hochanda shows and Workshop News

Hi Bloggers.

It's Friday again - here's this week's card that needs a new home -

You can read how this card was made here.

Leave a lovely comment below to go into the draw to win it. I will announce the winner on Monday. Be sure to pop back to see if you have won.

Please note : Only comments left below will go into the draw. Comments made on the original post will not count. Information given on the original post was correct at the time that post was published.

My next One Day Special launches on Hochanda on Wednesday 9th August at 6pm. The show contains some more of Sue Wilson's 2017 Festive Dies. If you would like to take part and send me some samples to be shown in the shows, please email me at juliawattscrafts@gmail.com and I'll give you details of the dies being used.

My next workshop in Milton Keynes is on Saturday 19th August with Lisa Horton. We've set the projects now. Attendees will spend half a day with Lisa doing her 3 projects and half a day with me doing my projects.


There are just a few spaces left - you can book via my website here.

Thanks for stopping by.

Julia.
www.juliawattscrafts.co.uk
Free card with all website orders over £10 (ask for one in the comments box at checkout).

Thursday, 27 July 2017

Woodware Posy Ring with Paint

Hi Bloggers.

Here's today's card -

A simple enough card but the background is actually quite cool and lovelier in really life.

Starting with the main image, I dusted a piece of Milk Card with an Anti-Static Pad. I stamped the Woodware Posy Ring and one of the sentiments in the set using Clear Perfect Medium and embossed with CS Gold Detail Embossing Powder. I cut it out using Sue Wilson's Double Pierced Rectangles and cut a mat out of Antique Gold Pearl Card using Sue's Double Pierced Rectangles Set B.

I cut a larger Double Pierced Rectangle out of Milk Card. I popped some CS Chocolate Bronze Metallic Lustre Paint onto my Craft Sheet. I picked it up onto a piece of Cut 'n' Dry Foam and used it to 'ink' up a section of the Posy Ring. I stamped this all around the edges of the card, re-'inking' between each stamping. It's hard to capture on camera but it has a lovely mica sheen to it.

I cut the next sized rectangle out of Antique Gold Pearl Card. I popped it onto a Milk Card blank. I completed my card by adding some Cream Pearls to the image panel.

If you haven't tried stamping with paint, I hope you will have a go - it's especially lovely with CS Shimmer Paints and CS Metallic Lustre Paints. Many of the colours look fabulous on Black Card too.

Thanks for stopping by.

Julia.
www.juliawattscrafts.co.uk
Free card with all website orders over £10 (ask for one in the comments box at checkout).

Wednesday, 26 July 2017

A bouquet of Good Wishes

Hi Bloggers.

Here's today's card -

For the background, I used a piece of Watercolour Card. I added some CS Inky Midnight Acrylic Mixed Media Paint to a mister bottle with some water and gave it a good mix. I misted some onto the Watercolour Card and also misted some Phill Martin CS Vintage Blue Mister. I blotted the excess off with Kitchen Roll.

Once dry, I trimmed it and stamped the Woodware Long Tall Flowers Stamp using Jet Black Archival. I added some Vintage Blue Mister to a Water Brush and used it to paint the flowers. When dry, I added some White Pen and some black lines around the edges using a Pigma Micron Pen. I matted onto Black Card and then a Coconut White Card blank.

I stamped the sentiment that comes in the same set onto some more of my background card using Jet Black Archival. I cut it out using Sue Wilson's Double Pierced Squares Set B and cut a mat out of Black Card using Sue's Double Pierced Squares. I added a little White Pen.

Phill Martin is continuing with his One Day Special on Hochanda today with shows at 9am, 1pm and 5pm. I'm offering 10% discount on items from the shows. You can find them here. Offer applies till midnight tonight or while stocks last. Discount will be applied automatically at checkout.

Thanks for stopping by.

Julia.
www.juliawattscrafts.co.uk
Free card with all website orders over £10 (ask for one in the comments box at checkout).

Tuesday, 25 July 2017

Paper Pieced Poinsettia Stained Glass Window

Hi Bloggers.

A bit of paper piecing for you today -

I started by cutting Sue Wilson's Poinsettia Stained Glass Window Die out of Black Card, Coconut White Card, Antique Gold Pearl Card, Rich Red Card and Rich Green Card - I kept the waste from each one using strips of Scotch Removable Tape on the back of the die after cutting and then using my Spellbinders Tool 'n One to push the waste out of the die and onto the tape.

I put a piece of Creative Expressions Double Sided Adhesive Sheet onto some Coconut White Card, peeled away the other backing sheet and popped it on the back of my die cut. I then added my pieces from my waste collections. Once completed, I filled in my background with CS Silver Chrome Polished Silk Glitter.

I matted onto Antique Gold Pearl Card, then Rich Red Card and popped onto a Coconut White Card blank.

I potentially have 4 more cards that I can make from my die cuts and waste - watch this space to see if they appear on this blog 😊

Phill Martin is launching a new One Day Special on Hochanda today at 6pm with his new Festive Berries Collection - there are some real stunners in the collection including some Stamps to Die For that co-ordinate with Sue Wilson's 2017 Festive Collection. I'm offering 10% discount on items from the shows. You can find them here. Offer applies till midnight tomorrow night or while stocks last. Discount will be applied automatically at checkout.

Thanks for stopping by.

Julia.
www.juliawattscrafts.co.uk
Free card with all website orders over £10 (ask for one in the comments box at checkout).

Monday, 24 July 2017

Elegant Cross Card for a Christening

Hi Bloggers.

Here's today's card -

For the background, I ran a piece of Coconut White Card through the Spellbinders Platinum Machine with the Creative Expressions Floral Stripes Embossing Folder. I added CS Enchanted Gold Gilding Polish to it, matted onto Gold Mirror Card and popped onto a Coconut White Card blank.

I cut die #4 from Sue Wilson's Indonesian Background die set out of Gold Mirror Card and dies #3 and #4 together out of Coconut White Card. I glued the 2 die cuts together using CS Glue in a Woodware Fine Tipe Glue Applicator, dabbing off any excess glue with Kitchen Roll before putting them together.

I cut one of the frames from Sue's Indonesian Mini Frames Die Set - cutting the outer die on it's own once and the 2 dies together once. I glued the 2 die cuts together and added them to my Background Die piece.

I cut one of the crosses from Sue's Elegant Cross Die Set out of Gold Mirror Card and added a Craft Consortium Pearl to the centre.

I cut Sue's Christening Day Die out of Gold Mirror Card and added it to the bottom of my card.

I completed my card by adding a Pearl to each corner.

The winner of the card from Freebie Friday on 21st July is ..................................

Jan on the Fosse

Please email me at juliawattscrafts@gmail.com with your address and I'll pop your card in the post.

Thanks for stopping by.

Julia.
www.juliawattscrafts.co.uk
Free card with all website orders over £10 (ask for one in the comments box at checkout).

Sunday, 23 July 2017

Party Pigs have fun!

Hi Bloggers.

Had a brilliant day yesterday with my workshop ladies. My next workshop is in just 4 weeks on Saturday 19th August with special guest Lisa Horton. Bookings are being taken now via my website here.

I have a fun card for you today -

The background is one of my many mopped up ink backgrounds. This one is with various Cosmic Shimmer Chalk Clouds. There's a bit of Toasted Rose, Princess Pink, Terracotta and Bundled Sage on this one.

I stamped the Woodware Party Pigs and a couple of the sentiments from the same set using Onyx Black Versafine Ink. I trimmed my piece and edged with Princess Pink CS Chalk Cloud using a Smoothie.

I decided to make the background most of the colouring on the pigs. I added a few highlights though on the hats and the dickie bow. I popped a little Bundled Sage and Princess Pink Chalk Cloud into their respective pot lids using Smoothies. I picked the colour up using a Water Brush and added as shown.

I matted onto Black Card and then popped onto a Coconut White Card blank. I finished my card by adding a 5mm Black Pearl to each corner.

Thanks for stopping by.

Julia.
www.juliawattscrafts.co.uk
Free card with all website orders over £10 (ask for one in the comments box at checkout).


Saturday, 22 July 2017

Pink Poinsettia Stained Glass Window

Hi Bloggers.

I'm running my workshop locally in Milton Keynes today. Really looking forward to sharing some really cool techniques with some gorgeous products.

I thought I would share a Poinsettia Stained Glass Window in a slightly different colourway to the norm -

I've used Cosmic Shimmer Clear Varnish Lacquer with CS Intense Pigment Stains, CS Pixie Powders and CS Frosty Dawn Diamond Frost.

I started by cutting Sue Wilson's Poinsettia Stained Glass Window Die out of Coconut White Card twice. I trimmed one of them to be slightly smaller than the other,

I added Quickie Glue over every line on the back of the larger die cut and ran a thin line of CS Glue around the outside edge using a Woodware Fine Tip Glue Applicator. I popped it onto a piece of Acetate which was slightly smaller than my die cut. I pressed down firmly to make sure that it was stuck really well.

I applied Quickie Glue over every line on the front of my other die cut. Once again, I added a thin line of CS Glue around the outside edge. I popped this onto the back of the Acetate, lining the image up with the first die cut. It's really important to make sure that all of the lines are well stuck to the Acetate as the colour is applied to the back.

So, working on the back, I popped some CS Clear Varnish Lacquer onto my Craft Sheet. I added some CS Candy Pink Pixie Powder and mixed well. I then added CS Frosty Dawn Diamond Frost and mixed well. I used this to colour the Poinsettias by dabbing a good quantity of the coloured lacquer into the areas shown.

For the 'leaves' I added a drop of Citrus Lime CS Intense Pigment Stain to some CS Clear Varnish Lacquer and mixed well. I then added some Frosty Dawn Diamond Frost.

The centres of the Poinsettias are Rich Gold CS Pixie Powder added to the Clear Varnish Lacquer.

I know it's not really showing up very well but the background areas are filled in with just Frosty Dawn Diamond Frost mixed with the Clear Varnish Lacquer. This pic shows it off a bit better -

I coloured the frame of the window with the same colours as the main image.

I added a piece of Coconut White Card behind my piece once it was dry. I them matted onto Baby Pink Card, Coconut White Card and popped onto a Coconut White Card blank.

Thanks for stopping by.

Julia.
www.juliawattscrafts.co.uk
Free card with all website orders over £10 (ask for one in the comments box at checkout).
Deal of the Day today (22nd July) - Sue Wilson B
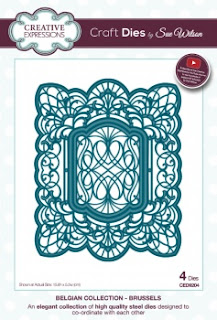
elgian Collection - Brussels only £11.99!

Friday, 21 July 2017

Freebie Friday

Hi Bloggers.

Here's this week's card that needs a new home -

You can read how this card was made here.

Leave a lovely comment below to go into the draw to win it. I will announce the winner on Monday. Be sure to pop back to see if you have won.

Please note : Only comments left below will go into the draw. Comments made on the original post will not count. Information given on the original post was correct at the time that post was published.

Thanks for stopping by.

Julia.
www.juliawattscrafts.co.uk
Free card with all website orders over £10 (ask for one in the comments box at checkout).
Deal of the Day today (21st July) - C
reative Expressions Stamps to Die For - Shaded Orange Blossom Leaves only £2.99!

Thursday, 20 July 2017

Distress Oxides Just For You

Hi Bloggers.

Another great workshop yesteday up at Creative Expressions. My next workshop up there is a Chalk Clouds Masterclass on Wednesday 6th September - you can book via my website here. My next workshop is this Saturday just outside Milton Keynes. Today is the last day that I can accept bookings as I'm cutting kits today. You can book here.

Here's today's card -

For the background, I swiped some Cracked Pistachio Distress Oxide onto my Craft Sheet. I misted with water and picked the ink up onto a piece of Coconut White Card. I swiped some Worn Lipstick Distress Oxide onto my Craft Sheet, misted with water and picked that up onto my card. Finally, I swiped some Fossilized Amber Distress Ink onto my Craft Sheet, misted it with water and added it to my card. 

Once dry, I dusted with Anti-Staic Pad. I stamped the Woodware Bold Blooms : Charlotte using Clear Perfect Medium and embossed with CS Gold Detail Embossing Powder. I coloured in using the same 3 Oxides by swiping more colour onto my Craft Sheet and picking the colour up with a Water Brush (any remaining ink, I picked up onto another piece of card for another project 😊).

I trimmed my piece and edged with Worn Lipstick Oxide using a Smoothie. I matted onto Antique Gold Pearl Card and popped onto a Coconut White Card blank.

Francoise Read has shows on Hochanda today with shows at 10am, 3pm and 7pm. I hope you can tune in, I will be. I'm offering 10% discount on items from the shows. You can find them here. Offer applies till midnight tonight or while stocks last. Discount will be applied automatically at checkout.

 Thanks for stopping by.

Julia.
www.juliawattscrafts.co.uk
Free card with all website orders over £10 (ask for one in the comments box at checkout).
Deal of the Day today (20th July) - S
pellbinders Stamp Set - Home Sweet Home only £7.00!