Friday, 21 June 2013

'Tis the Season of Love

Hi Bloggers.

Christmas in June! I know - not my fault though. I have shows today on Ideal World at 11am with Dave and on Create & Craft at 4pm with Paul. Hope you can join me.

I have to say I have struggled a bit with the prep for this one - just can't get into Christmas cardmaking just yet! Anyway, here's my favourite from the cards I have made (did take me a few hours of faffing around to complete it!), and hopefully my first demo at 11am.

I know it's not a traditional colour and if pink isn't for you then use another colour. I kind of like it!

For the background, I randomly stamped the Small Beaded Bauble from the To Die For range (I have asked for some of these from my Amazon Store) using Spun Sugar Distress Ink. I then stamped the 'Peace' sentiment from the Creative Expressions Winter Greetings Stamp Set using Victorian Velvet Distress Ink. I made sure the ink was dry and ran it through the Grand Calibur with the Couture Creations New Year Dove Embossing Folder. I ran it through a second time to extend the design and inked around the edges with Spun Sugar using Cut n Dry Foam.

I popped some Double Sided Adhesive Sheet onto some pastel pink card and cut a Spellbinders 2010 Heirloom Ornament. I peeled off the backing and covered with Glass Micro Beads. I cut 4 of the largest dies from the Spellbinders 2011 Snowflake Pendant out of Coconut White Card. I inked through the die with Spun Sugar on all of them. I left 2 of them whole and fixed them together using 3D Foam offsetting them slightly. I trimmed the long pointy bits off on the other 2 and scored them across the centre. I made a cut to the centre of each and mountain and valley folded them. I glued them together using Cosmic Shimmer Dries Clear Glue. I cut one of the Catherine Wheel style dies from the 2011 Snowflake Pendant set and inked through the die with Spun Sugar. I cut a small snowflake die from the 2012 Snowflake Pendant die set, removed from the die and inked the edges with Spun Sugar. I assembled the rosette on top of the bauble as shown adding an 8mm White Pearl.
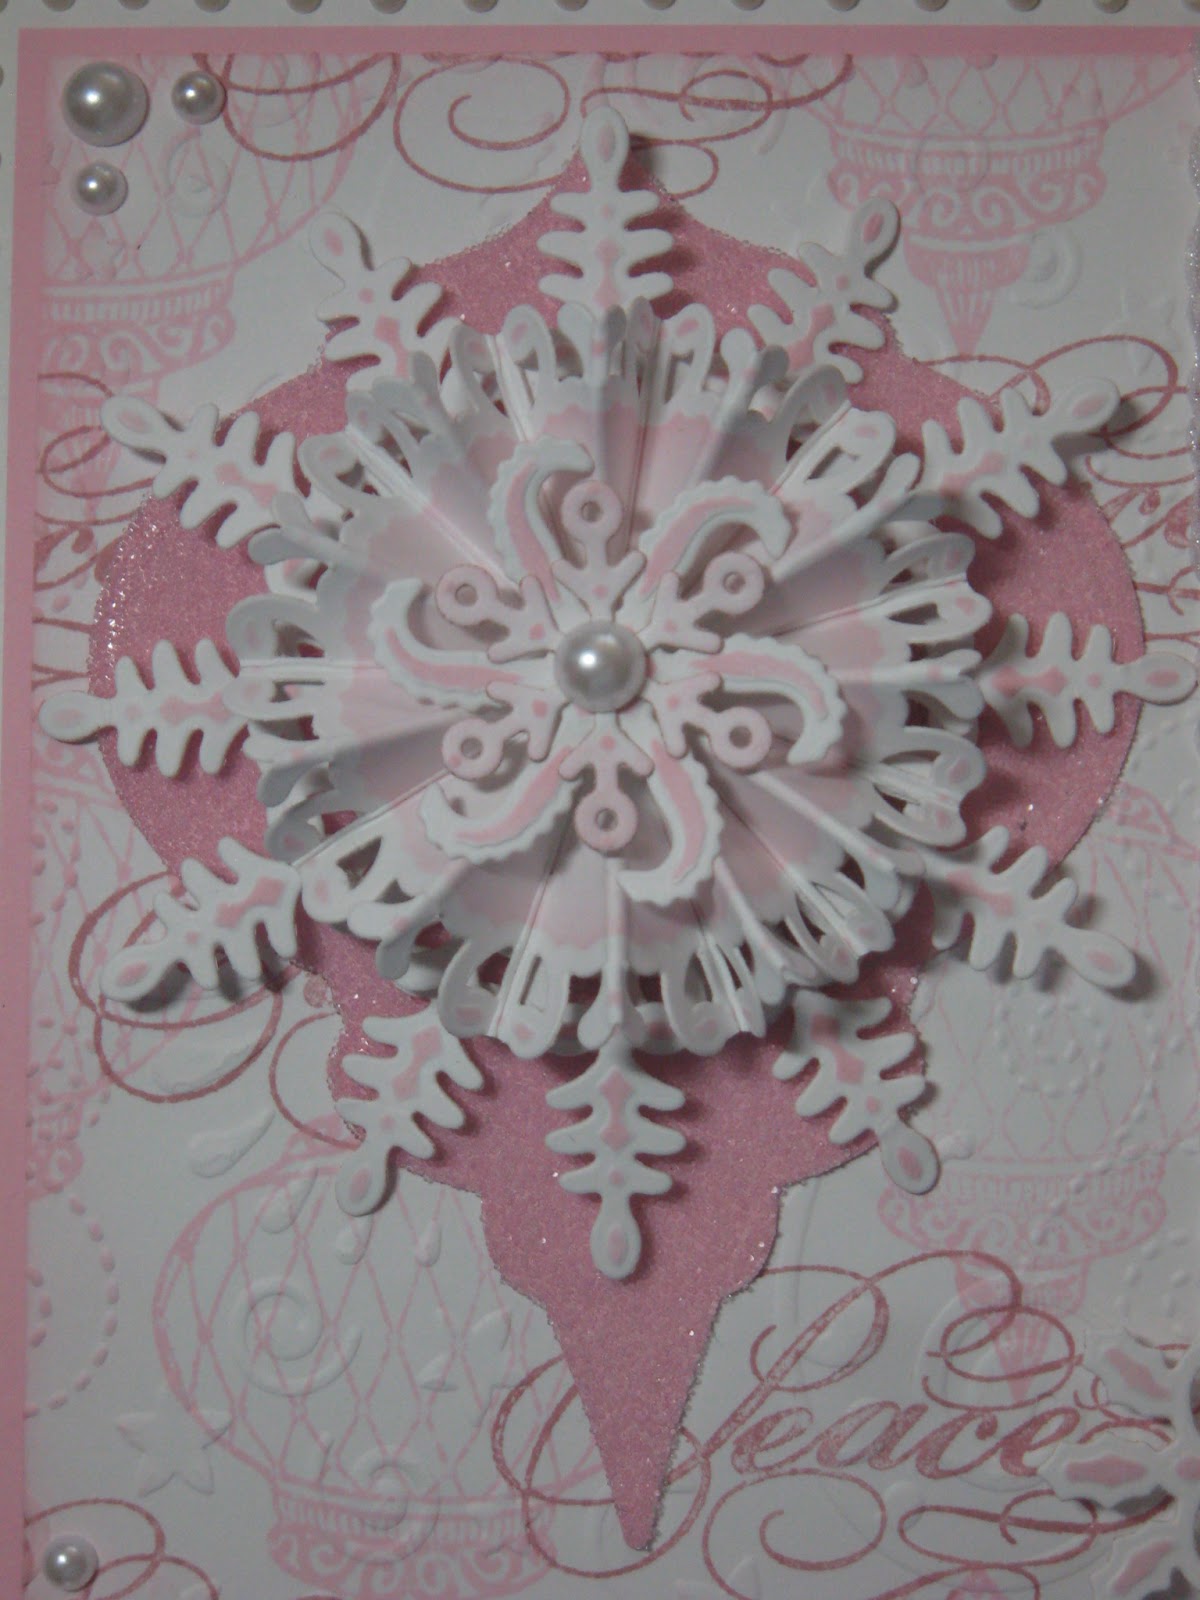
I wrapped some White Sheer Wrinkled Edge Ribbon around the card toward the right hand side. I ran a strip of pastel pink card through the Grand Calibur with the Couture Creations Star Pere Noel Embossing Folder. I rubbed some Pearl Moon Gilding Wax over it.

I stamped the sentiment from the Justrite Christmas Miracle Ornaments Stamp Set using Plum Archival and embossed with Cosmic Shimmer Clear Embossing Powder. I cut it out using Spellbinders Holly Accents and inked through the die with Spun Sugar.

I assembled the card as shown adding some dots of Cosmic Shimmer Pearlescent PVA in White around the edges.


Thanks for stopping by.

Julia.

Thursday, 20 June 2013

For a Special Couple

Hi Bloggers.

A Wedding Card today -

Easy peasy this one - can be done in any colour.

For the background, I popped my tan mat onto my base plate. I dusted a piece of Coconut White Card with my anti static bag and placed it dusted side up on my tan mat. I inked up the Heart Confetti Mask with Perfect Medium and placed it inked side down on top of the dusted card. I added the pink embossing plate and ran it through the Grand Calibur. The ink transferred to the debossed pattern. I added Cosmic Shimmer Silver Lustre Embossing Powder, tapped off the excess and heat set.

I stamped the Vintage Car using Perfect Medium and embossed with Silver Lustre. I cut it out using Spellbinders Labels 29.

I stamped the sentiment that comes with the Wedding Belle Stamp using Perfect Medium and embossed with Silver Lustre. I cut it out using Spellbinders Fancy Postage Edge.

I tied a bow using 2 lengths of White Sheer Wrinkled Edge Ribbon  and added a Fancy Pearl Embellishment.

I assembled the card as shown adding some dots of Cosmic Shimmer Pearlescent PVA in Silver Lustre around the edges.

I'll be back tomorrow with a card from the Christmas Shows on Ideal World and Create & Craft.

Thanks for stopping by.

Julia

Wednesday, 19 June 2013

Just wanted to say Hello

Hi Bloggers.

Here's today's card (I'll be mixing it up a bit over the next couple of weeks as I have have samples from a few different shows to share) -

For the background, I inked through the Patchwork Quilt Mask with Mustard Seed Distress Ink using Cut n Dry Foam. I moved the mask along the card to extend the design (you have to turn the mask till you find a fit with the existing inked pattern). I stamped over the top with one of the flourishes from the Heartfelt Creations Rye Grass Flourish Stamp Set using Scattered Straw Distress Ink. I made sure the ink was dry and then popped it through the Grand Calibur with the Couture Creations Extra Flint Embossing Folder. I ran it through a second time to extend the design and inked around the edges with Mustard Seed.

I stamped the Sunflowers from the Creative Expressions Posy Florals 2 Stamp Set using Jet Black Archival and embossed with Cosmic Shimmer Clear Embossing Powder. I coloured in using Cosmic Shimmer Matt Drawing Inks. I used Sunflower from the Summer Fayre Set (more on order), Meadow Lime & Soft Moss from the Garden Twist Set and Umber from the Autumn Shades Set. I cut it out using Spellbinders Fancy Postage Edge and inked through the die with Mustard Seed.

I stamped the sentiment from the same stamp set using Jet Black Archival and embossed with Cosmic Shimmer Clear Embossing Powder. I cut it out using Spellbinders Labels 25 and inked through the die with Mustard Seed.

I tied a bow using Cream Satin Edged Organza. I pressed a  Fancy Pearl Embellishment into a Perfect Medium Pad, sprinkled with Cosmic Shimmer Tropic Yellow Lustre Embossing Powder, tapped off the excess and heat set.

I assembled the card as shown adding some dots of Cosmic Shimmer Pearlescent PVA in White around the edges.

Thanks for stopping by.

Julia.

Tuesday, 18 June 2013

Love

Hi Bloggers.

I had a request to share this demo card from Sunday -

For the background, I spritzed some Coconut White Card with Cosmic Shimmer Pearl Mist. Once dry, I popped it through the Grand Calibur with the Couture Creations Extra Flint Embossing Folder. I ran it through a second time to extend the design.

I stamped the Wedding Belle Stamp using Perfect Medium and embossed with Cosmic Shimmer Marine Sea Lustre Embossing Powder (in the show I used Lapis Sapphire Lustre). I cut the image out using scissors. I cut 2 Spellbinders Asian Motifs. I trimmed 1 sided off each of them and glued them together to make a large frame. I cut a Spellbinders Labels 29 and at the emboss stage added the Moroccan Mask. I inked through the die with Cloudy Blue Adirondack Dye Ink.

I stamped the sentiment that comes with the Damask Heart using Perfect Medium and embossed with Marine Sea Lustre (I used Lapis Sapphire Lustre in the show). I cut it out using Spellbinders Labels 25 (I used Labels 29 in the show) and inked through the die with Cloudy Blue.

I tied a bow using White Satin Edged Organza and added a Fancy Pearl Embellishment.

I assembled the card as shown adding some White Pearls in the corners and some dots of Cosmic Shimmer Pearlescent PVA in White around the edges.

Thanks for stopping by.

Julia.


Monday, 17 June 2013

Lacy Heart

Hi Bloggers.

Thanks for all your comments and emails yesterday - much appreciated as always.

Today's card was a demo in the 7pm show -

For the background, I simply ran some Coconut White Card through the Grand Calibur with the Couture Creations Great Almanzo Embossing Folder. I ran it through a second time to extend the design.

I stamped the Lacy Heart using Perfect Medium and embossed with Cosmic Shimmer Silver Lustre Embossing Powder. I cut it out using scissors. I stamped the sentiment that comes with the Lacy Heart, again using Perfect Medium and added Silver Lustre (I did not heat set just yet). I inked up the area of the main stamp around the heart (I did cut the rubber from the centre of the stamp) and stamped it around the sentiment with Perfect Medium, added Silver Lustre Powder and heat set. I cut the heart out using scissors and popped it on top of the larger image using 3D Foam.

I cut 2 borders using Spellbinders Classic Petal Edgeabilities. At the emboss stage I added the Moroccan Mask.

I tied a bow using White Satin Edged Organza, added a Fancy Pearl Embellishment and a couple of White Pearl Decorative Stick Pins.

I assembled the card as shown adding some dots of Cosmic Shimmer Pearlescent PVA in Silver Lustre around the edges.

Thanks for stopping by.

Julia.

Sunday, 16 June 2013

Best Wishes

Hi Bloggers.

Today I have shows on Create & Craft at 3pm and 7pm - both with Dawn.

This is my first demo at 3pm and is my favourite of the cards I've made for these shows -

For the background, I stamped the Wrought Iron Corner in all 4 corners using Perfect Medium and embossed with Cosmic Shimmer Olympic Gold Lustre Embossing Powder. I then ran it through the Grand Calibur with the Couture Creations Extra Flint Embossing Folder. I ran it through a second time to extend the design and inked around the edges with Antique Linen Distress Ink using Cut n Dry Foam.

I stamped the Zentangled Flower twice using Perfect Medium and embossed with Olympic Gold Lustre. I cut them out using scissors, just cutting the head out on the second one. I shaped the petals and glued the heads together, offsetting slightly. I cut a Spellbinders Asian Motif and inked through the die with Anique Linen.

I stamped the sentiment that comes with the Wrought Iron Corner using Perfect Medium and embossed with Olympic Gold Lustre.  I cut it out using Spellbinders Labels 29 with the sentiment towards the right hand side. I inked through the die with Antique Linen.

I tied a bow using 2 lengths of Champagne Silky Crush Ribbon. I pressed a  Fancy Pearl Embellishment into a Perfect Medium Pad, sprinkled with Olympic Gold Lustre, tapped off the excess and heat set. I added a couple of Crystal Decorative Stick Pins.

I assembled the card as shown adding some dots of Cosmic Shimmer Pearlescent PVA in Golden Pearl around the edges.

Hope you can join me later.

Thanks for stopping by.

Julia.


Saturday, 15 June 2013

If friends were flowers .....

Hi Bloggers.

Here's today's card -

For the background, I popped my tan mat onto my base plate. I dusted a piece of Coconut White Card with my anti static bag and placed it dusted side up on my tan mat. I inked up the Lattice mask with Perfect Medium and placed it inked side down on top of the dusted card. I added the pink embossing plate and ran it through the Grand Calibur. The ink transferred to the debossed pattern. I added Cosmic Shimmer Burnt Red Lustre Embossing Powder, tapped off the excess and heat set. I used a dry wet wipe to remove most of the excess mica.

I stamped the rose cluster from the Posy Florals 2 Stamp Set using Perfect Medium and embossed with Burnt Red Lustre. I cut it out using scissors leaving a narrow white border. I cut a Spellbinders Labels 28 and inked through the die with Victorian Velvet Distress Ink. I cut a Spellbinders Fancy Postage Edge die and at the emboss stage added the Couture Creations Super Powder Puff Embossing Folder, I inked through the die with Victorian Velvet.

I stamped the sentiment from the same stamp set, again using Perfect Medium and embossed with Burnt Red Lustre. I cut it out using Spellbinders Labels 28 and inked though the die with Victorian Velvet.

I tied a bow using Rose Satin Edged Organza. I added a Fancy Pearl Embellishment and a couple of White Pearl Decorative Stick Pins.

I assembled the card as shown adding some dots of Cosmic Shimmer Pearlescent PVA in Vintage Pink around the edges.

I'll be back tomorrow with a card from tomorrow's wedding themed shows.

Please scroll down to the previous post to see details of new items in my Amazon Store.

Thanks for stopping by.

Julia.

Friday, 14 June 2013

New Products just arrived in my Amazon Store

Hi Bloggers.

Just to let you know that I have some new products in my Amazon Store.

From the show yesterday, I have -

Posy Florals 1

Posy Florals 2
Posy Florals 3
Leafy Mask
Lattice Mask
Daisy Chain Mask
Patchwork Quilt Mask
Couture Creations Embossing Folders -
Super Powder Puff
Extra Flint
Nuevo
Peacock Pleasure

All the Cosmic Shimmer Lustre Embossing Powders that I have in stock can be found here. I have added a few Cosmic Shimmer Aurora Embossing Powders here - if they are popular, I will add some more colours.

I also have 3 new colours in Cosmic Shimmer Pearlescent PVA -
Vintage Golden Green

 Vintage Plum
Spring Green
 Finally, I have stock of the new Cosmic Shimmer Texture Pastes here.


All for now.

Julia.

You're fantastic!

Hi Bloggers.

Hope you enjoyed the show yesterday and managed to get some goodies. Not really sure why the afternoon shows were cancelled - that's the nature of the beast!

I am a bit tired today but I need to get prepping for my shows on 21st (thankfully, I prepped Sunday's shows before I moved house).

Here's one of the cards that should have been a demo yesterday afternoon -

For the demo, I planned to stamp with Jet Black Archival and emboss with Cosmic Shimmer Tropic Pearl Lustre Embossing Powder. On this sample I have stamped with Jet Black Archival and embossed with Cosmic Shimmer Clear Embossing Powder.

For the background, I spritzed some Coconut White Card with Patina Cosmic Shimmer Vintage Mister. I then inked through one of the leaves on the Leafy Mask (coming soon) using Broken China Distress Ink all round the edges of the background piece.

I stamped the fan panel piece from the Creative Expressions Posy Florals 3 Stamp Set 5 times. I coloured in using Cosmic Shimmer Matt Drawing Inks. I used all the colours from the Garden Twist Set and Blue Cotton and Blue Lace from the Soft Velvet Set. I cut them out using scissors and went around the edges with a Black Promarker to hide any white bits. I pierced a hole in each (the stamp shows you where) and secured them together using a brad. I fanned them out and popped some 3D Foam Pads on the back to keep them in place.

I cut the largest of the Spellbinders Fancy Postage Edge dies out of Coconut White Card. At the emboss stage I added the Leafy Mask. I inked through the die with Broken China.

I stamped the sentiment from the same stamp set, cut it out using Spellbinders Labels 25 and inked through the die with Broken China.

I pressed a Fancy Pearl Embellishment into a Perfect Medium Pad, sprinkled with Cosmic Shimmer Lapis Sapphire Lustre Embossing Powder, tapped off the excess and heat set. I tied a bow using Blue Satin Edged Organza and added a couple of White Pearl Decorative Stick Pins.

I assembled the card as shown adding some dots of Cosmic Shimmer Pearlescent PVA in Summer Blue around the edges.

Thanks for stopping by.

Julia.


Thursday, 13 June 2013

Shows this afternoon

Hi Bloggers.

Sorry to report that this afternoon's shows have been cancelled. Apologies to anyone who has set their recorder and find they see some else!

All for now.

Julia

You're so Sweet

Hi Bloggers.

I have shows today on Create & Craft at 8am, 3pm and 5pm (extra show). I hope you can join me for one or more of them.

Here's today's card -

Again, this is a really simple card to construct but I wanted to share with you the use of the Cosmic Shimmer Tropic Pearl Lustre Embossing Powder. More on that in a while.

For the background, I randomly stamped one of the flourishes from the Heartfelt Creations Rye Grass Flourish Pre Cut Set using Dried Marigold Distress Ink. I then randomly stamped one of the flower clusters from the Creative Expressions Posy Florals 2 Stamp Set using Tattered Rose Distress Ink. I made sure the ink was dry and then ran it through the Grand Calibur with the Couture Creations Peacock Pleasure Embossing Folder. I ran it through a second time to extend the design and then inked around the edges with Dried Marigold.

I stamped the image from the Creative Expressions Posy Florals 1 Stamp Set using Dried Marigold and embossed with Tropic Pearl Lustre Embossing Powder. This is a really fun thing to do, try using your embossing powders on top of different colour inks and see what you get. For example, you may like the way a powder looks on black card but don't want to actually use black card, stamp with Black Archival instead and add your chosen powder - it gives a lovely effect (just remember to get your powder on quick if using an archival ink). I cut the image out using Spellbinders Labels 28 and inked through the die with Dried Marigold.

I cut the largest of the Spellbinders Fancy Postage Edge dies out of Coconut White Card. I left the card in the die, placed the Lattice Mask on top and spritzed through the mask with Marigold Cosmic Shimmer Vintage Mister. I removed the excess ink and removed from the die.

I stamped the sentiment from the Posy Florals 1 Stamp Set using Dried Marigold and embossed with Tropic Pearl Lustre. I cut it out with another Spellbinders Fancy Postage Edge die and inked through the die with Dried Marigold.

I assembled the card as shown adding some dots of Cosmic Shimmer Pearlescent PVA in White around the edges.

Thanks for stopping by. See you at 8am!

Julia