Showing posts with label Sweet Juliet. Show all posts

Wednesday, 30 April 2014

Love makes a beautiful ride

Hi Bloggers.

Here's today's card -

For the background, I ran a piece of Coconut White Card through the Grand Calibur with the Couture Creations Great Almanzo Embossing Folder. I ran it through a second time to extend the design and inked around the edges with Barn Door Distress Ink.

I stamped the Loves Beautiful Ride Stamp using Red Geranium Archival and embossed with Cosmic Shimmer Clear Embossing Powder. I cut it out using Spellbinders Fleur de Lys Rectangles and inked through the die with Barn Door.

I stamped the sentiment that comes with the image, again using Red Geranium Archiva and embosssed with clear powder. I cut it out using another Fleur de Lys Rectangle and inked through the die with Barn Door.

I tied a bow using White Crochet Ribbon and added a flower made with Heartfelt Creations Sweet Juliet Die Set.

I assembled the card as shown adding a White 8mm Pearl in each corner and some dots of Cosmic Shimmer Pealrescent PVA in Berry Red around the edges.

Thanks for stopping by.

Julia.

Monday, 21 April 2014

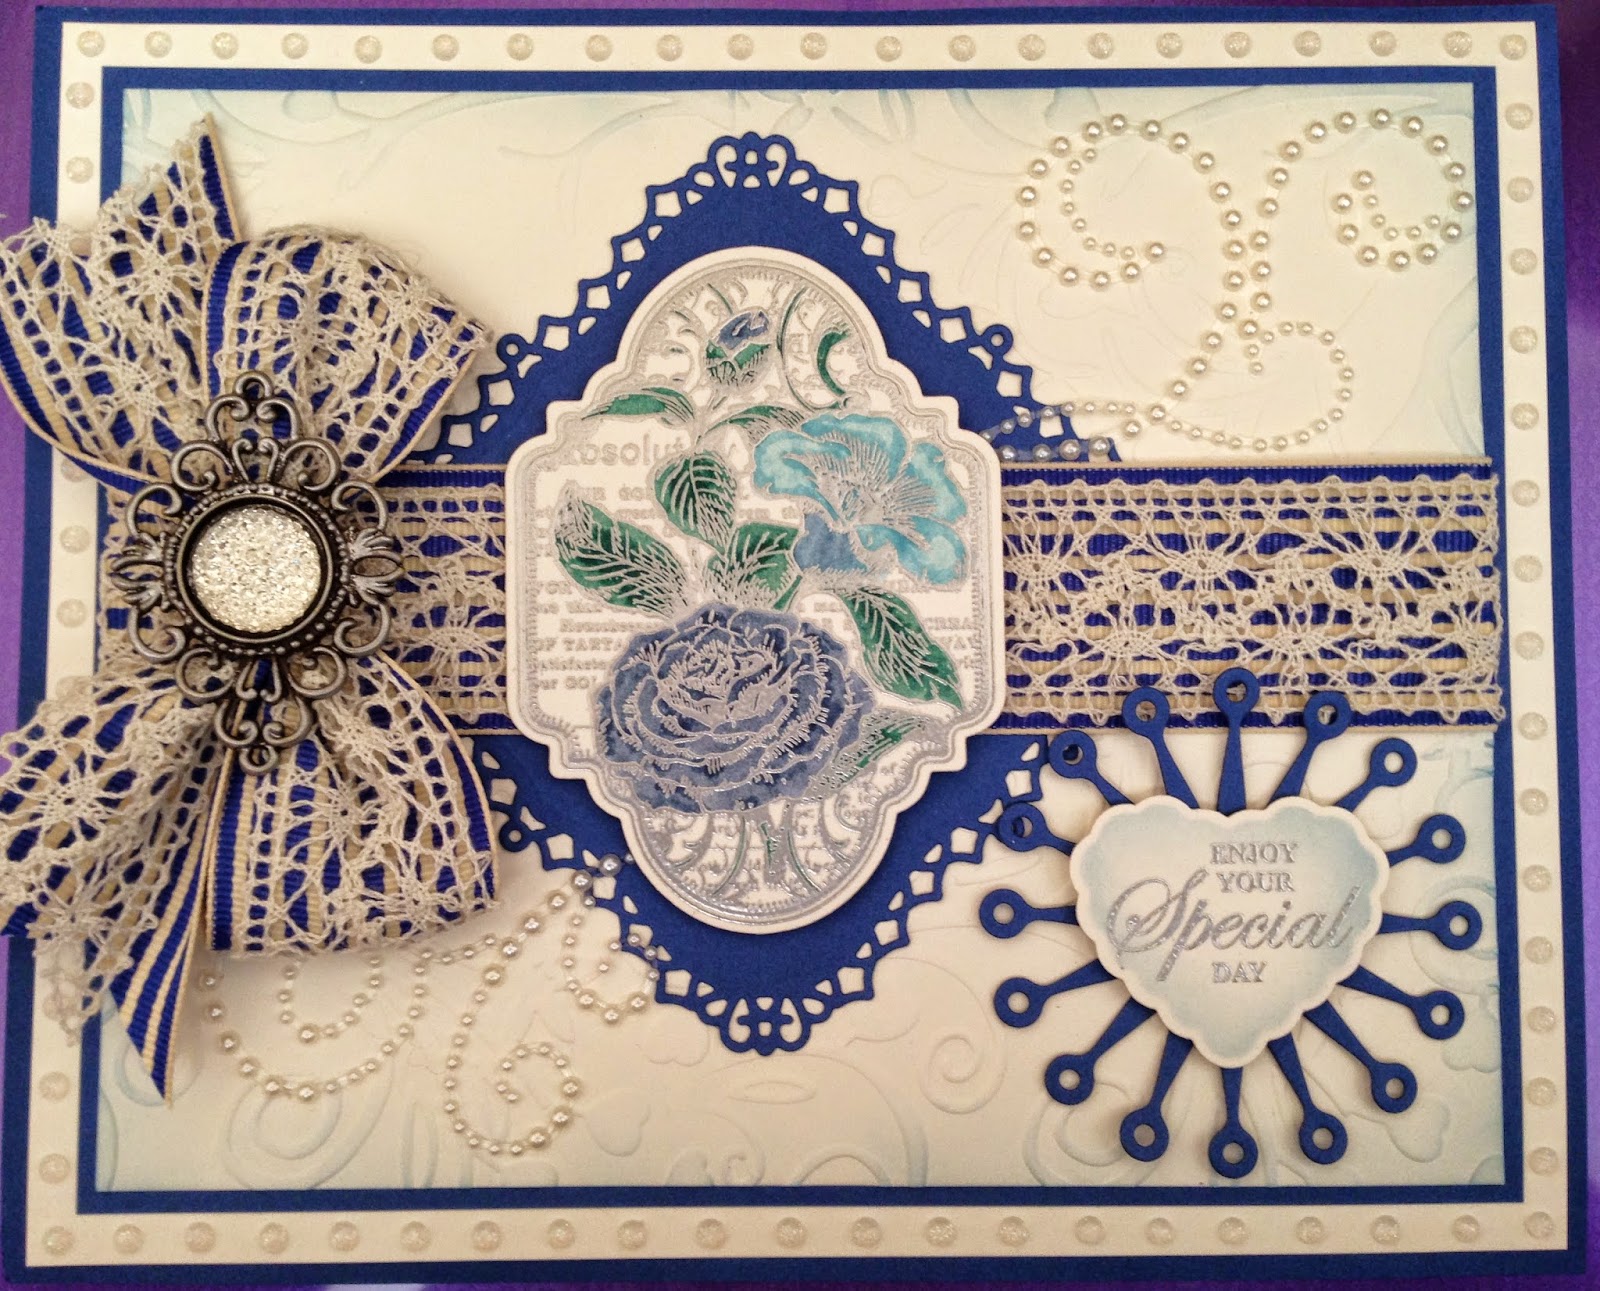
Enjoy your Special Day

Hi Bloggers.

Firstly, thank you for all the lovely comments about Sue's necklace. I was pleased it looked so good on screen. The design is called Bad Hair Day and was designed by my good friend, Sue Stallard. I showed it here on this blog in this post. Regarding making some like it to sell on Amazon, well, Sue's necklace took me 2 days to make and I only managed to complete it because I made it whilst on a beading holiday last November. I don't get much time to bead so most projects take me months to complete. So, not really possible to make lots to sell. I haven't sold a single item despite listing on etsy for 4 months and showing here via the menu at the top of the blog, so not much incentive either!

Sue's dies went so well over the weekend. I am so pleased for her. A no-brainer really as far as I'm concerned as any of you who own some her dies will know that the designs are gorgeous and they cut beautifully with not much in the die cut to poke out. I do have some dies and stamps left in my Amazon Store - you can see them all here. I have already ordered some more stock and will hopefully have them by the end of the week.

By the way, I found some more Heartfelt Creations stamps and dies. They're on auction on ebay - click on ebay in the top menu bar to go and have a look.

I don't think this card ever got shown on tv which was a shame as I really liked the way the Crochet Ribbon combined with the Grosgrain to soften it.

For the background, I ran some Milk Card through the Grand Calibur with the Couture Creations Great Almanzo Embossing Folder. I ran it through a second time to extend the design and inked around the edges with Faded Jeans.

I cut a Spellbinders Decorative Labels One out of Cobalt Card and added it to my background as shown. I wrapped a piece of Blue/Ivory Striped Grosgain around the centre of the card and then a piece of Cream Crochet Ribbon on top.

I stamped the image from the Justrite Grateful Hearts Vintage Labels Two using Perfect Medium and embossed with Cosmic Shimmer Silver Shine Detail Embossing Powder. I coloured in using Distress Markers - Tumbled Glass, Stormy Sky and Evergreen Bough. I cut it out using Justrite Vintage Labels Two and inked through the die with Faded Jeans Distress Ink.

I stamped the sentiment from the same Justrite stamp set, again using Perfect Medium and embossed with Silver Shine Detail Powder. I cut it out using a die from the Heartfelt Creations Timeless Amour Die Set and inked through the die with Faded Jeans. I cut a Heartfelt Creations Sweet Juliet Die a couple of times and offset them behind the sentiment.

I tied bow using Blue/Ivory Striped Grograin and Cream Crochet Ribbon. I pressed a Metal Dazzler Setting into Perfect Medium, covered with Silver Shine Detail Powder, tapped off the excess and heat set. I added a Medium Circle Dazzler.

I assembled the card as shown adding a Pearl Swirl and some dots of Cosmic Shimmer Crystal Sparkle PVA around the edges.

Thanks for stopping by.

Julia.

Saturday, 22 February 2014

Love makes a beautiful ride

Hi Bloggers.

In case you missed my post yesterday afternoon - I now have most of the stamps that co-ordinate with her dies now in stock in my Amazon Store. Unfortunately, the 2 stamp sets that co-ordinate with the Classic Bow Set have not arrived - I'm told they will be with me shortly. I am still waiting for the Get Well Soon & Thank You stamps and the frames from last Saturday's shows.

You can view the Sue Wilson Dies and Stamps currently in stock here (2 pages). I've put a list of the dies the stamp co-ordinates with in the description of each stamp. 

Here's today's card -

For the background, I randomly inked through the Lattice Mask with Peacock Feathers Distress Ink using Cut n Dry Foam. I then randomly stamped part of the Rose Corner using Peacock Feathers and repeated the same with a section of the Two Hearts Entwined Stamp.

I stamped the bike from the Love's Beautiful Ride Stamp Set using Perfect Medium and embossed with Cosmic Shimmer True White Detail Embossing Powder. I cut it out using Spellbinders Labels 29.

I stamped the sentiment that comes with the bike, again using Perfect Medium and embossed with TrueWhite Detail Powder. I cut it out using Spellbinders Fleur de Lis Rectangles.

I made a flower using the Heartfelt Creations Sweet Juliet Die, adding a brad from the Primary Pack. I cut some leaves out of Teal Card using the same die set.

I assembled the card as shown adding some White 8mm Pearls in the corners and some dots of Cosmic Shimmer Teal Sparkle PVA around the edges.

Thanks for stopping by.

Julia.

Wednesday, 29 January 2014

You are So Loved

Hi Bloggers.

Here's today's card -

The background is a piece of Soft Gold Card run through the Grand Calibur with the Couture Creations Tied Together Embossing Folder. I ran it through a second time to extend the design. I cut a Spellbinders 5 x 7 Elegant Labels 4 out of Milk Card.

I stamped the sentiment from the Creative Expressions Ribbon Rose Heart Stamp Set using Perfect Medium and added Cosmic Shimmer Gold Detail Powder. I then stamped the main image over it (having cut the rubber from the centre of the ribbon in the design), added the powder and heat set the lot. I cut it out using Spellbinders Decorative Labels 28.


I tied a bow using Cream Crochet Ribbon. I made a flower using the Heartfelt Creations Sweet Juliet Die Set adding a Gold Brad to the centre.

I assembled the card as shown adding a Cream 8mm Pearl to each corner and some dots of Cosmic Shimmer Crystal Sparkle Pearl PVA around the edges.

Thanks for stopping by.

Julia.

Sunday, 26 January 2014

Hugs & Kisses

Hi Bloggers.

Today I have shows on Create & Craft at 12noon (2 hours) with Nigel and at 5pm with Dawn. Hope you can join me and perhaps email in.

Here's today's card -

For the background, I stamped the Scroll Corner from the Creative Expressions Scroll Border & Corner Set using Seedless Preserves Distress Ink in the 2 bottom corners. I made sure the ink was dry and then ran it through the Grand Calibur with the Couture Creations Exotic Embossing Folder. I ran it through a second time and inked around the edges with Seedless Preserves.

I stamped the Creative Expressions Rose Striplet twice using Perfect Medium and embossed with Cosmic Shimmer Blue Maroon Aurora Embossing Powder (from the Pinks set which is on the show). I cut them both out using scissors and inked around the edges with Seedless Preserves.

The Creative Expressions Ribbon & Rose Heart Stamp Set comes with 2 sentiments. I stamped the Hugs & Kisses sentiment using Perfect Medium and added some Blue Maroon Aurora Embossing Powder (I did not heat set yet). I cut the centre of the ribbon section of my stamp out so that I could see through to position it correctly over the sentiment, stamping with Perfect Medium again. I added the Blue Maroom Aurora and heat set the whole thing. I cut it out using Spellbinders Pearl Effects and inked through the die with Seedless Preserves.

I tied a bow using Cream Crochet Ribbon. I made a flower using the Heartfelt Creations Sweet Juliet Die Set (yes it's back!), with a little felt from the Vintage Felt Pack and a Rhinestone Brad.

I assembled the card as shown adding some dots of Cosmic Shimmer Sparkle Pearl PVA in Crystal around the edges.

See you later!

Thanks for stopping by.

Julia.

Monday, 30 December 2013

Thinking of You

Hi Bloggers.

Here's today's card -

For the background, I covered a piece of paper from the Teresa Collins 8 x 8 Paper Pad with a DS Adhesive Sheet and added Glass Micro Beads.

I stamped the sentiment from the Heartfelt Creations Beautiful Juliet Stamp Set using Perfect Medium and embossed with Cosmic Shimmer Silver Shine Detail Powder. I cut it out with scissors. I cut a Spellbinders Labels 25 out of another paper from the Teresa Collins Pad and a pretty frame out of Coconut White Card using a couple of dies from the Spellbinders Majestic Labels 25 die set, inking through the die with Dried Marigold Distress Ink.

I made a flower using the Heartfelt Creations Sweet Juliet Die Set and a Teresa Collins Paper. I cut and shaped some flowers using the Heartfelt Creations Tattered Florals Die Set from the same paper I had cut the Labels 25. I cut some more from the Sweet Juliet Die Set but didn't shape them, just popped them at the back of the layered flower as is. Finally I cut some leaves from the Sweet Juliet Die Set  and inked through the die with Dried Marigold.

I assembled the card as shown adding some Cream Pearls in the Corners and some dots of Cosmic Shimmer Pearlescent PVA in White around the edges.

Thanks for stopping by.

Julia.

Tuesday, 17 December 2013

To a Beautiful You

Hi Bloggers.

Here's today's card -

A messy background on this one. I started by inking through a small section of the Elegance Border Mask with Faded Jeans Distress Ink randomly over the background piece. Then, with the stamp in my hand, I randomly stamped the Justrite Dotted Fronds Background with Faded Jeans. Finally, again with the stamp in my hand, I stamped the Creative Expressions Butterfly Corner, again with Faded Jeans. I made sure the ink was dry and then ran it through the Grand Calibur with the Couture Creations My Garden Embossing Folder. I ran it through a second time to extend the design and inked around the edges with Faded Jeans.

I stamped the Creative Expressions Bejewelled Bag onto Duck Egg Blue Card using Perfect Medium and embossed with Cosmic Shimmer True White Detail Embossing Powder. I  cut it out using Spellbinders Labels 2 and inked through the die with Faded Jeans.

I stamped the sentiment from the Heartfelt Creations Timeless Sentiments Stamp Set using Perfect Medium and embossed with True White Detail Powder. I cut it out using Spellbinders Fancy Postage Edge and inked through the die with Faded Jeans.

I made a couple of flowers using the Heartfelt Creations Sweet Juliet Dies (should be available again at the end of next month) and cut some leaves using the Heartfelt Creations Classic Leaf Die Set.

I assembled the card as shown addien some White Pearls in the corners and some dots of Cosmic Shimmer Pastel PVA in Pastel Blue around the edges.

Thanks for stopping by.

Julia.

Tuesday, 10 December 2013

Best Friends Forever

Hi Bloggers.

Here's today's card -


 For the background, I used one of the techniques from my first demo on Sunday. I stamped the Justrite Rose Garden Background using Perfect Medium. I then dusted some Angel Blue Sparkle and Iced Blue Sparkle from the Cosmic Shimmer Lovely Lights Sparkle Pigments Set all over. I removed the excess with a dry wetwipe. It's not necessary to set these powders as they have a binding agent in them. However, you can spritz with a little water and dry if you wish. I love these sparkle pigments. They have larger particles than those in normal mica powder which is why you don't get a spritzer bottle in the set - the nozzle would get glogged. You don't get a brush either, but most of you probably have one anyway. You do get 8 little pots though - 2 more than in a Mica Spray Set.


I ran the bottom section of the background through the Grand Calibur with the Couture Creations Large Joe's Garden Embossing Folder. I hid the join by wrapping a piece of White Satin Organza around ( the satin edge is over the join). I made some some flowers out of Duck Egg Blue Card and White Felt from the Vintage Felt Pack using the Heartfelt Creations Sweet Juliet Die Set.


I popped the sentiment into the gap in the frame from the Justrite Vintage Oval Labels Stamp Set and stamped using Jet Black Archival, embossed with Cosmic Shimmer Clear Embossing Powder. I cut it out using Spellbinders Labels 6 and inked though the die with Faded Jeans Distress Ink. I coloured the image in using Tumbled Glass Distress Marker, Pastel Blue from the Cosmic Shimmer Pastels Watercolour Set and Marine Sea from the Cosmic Shimmer Luscious Greens Watercolour Set. I added just a little Ice Blue Stickles to the ends of the seed heads. I cut a larger Spellbinders Labels 6 out of Duck Egg Blue Card.


 I assembled the card as shown adding some White Pearls in the corners and some dots of Cosmic Shimmer Crystal Sparkle PVA around the edges.

Thanks for stopping by.

Julia.

Thursday, 5 December 2013

Postcard

Hi Bloggers.

Here's today's card -

For the background, I used a piece of paper from the Heartfelt Creations Antiquity 12 x 12 Paper Pad. I covered it with Double-Sided Adhesive and then added Glass Micro Beads. I added an Art Deco Metal Corner to 2 of the corners and wrapped some Cream Crochet Ribbon around the centre.

I stamped the Heartfelt Creations Postcard Stamp using Coffee Archival and embossed with Cosmic Shimmer Clear Embossing Powder. I inked around the edges with Victorian Velvet Distress Ink. I coloured in using Pink Mallow Mica Powder from the Cosmic Shimmer Summer Shades Mica Spray Set and Apple Green from the Cosmic Shimmer Luscious Greens Mica Spray Set.

I made a flower. I painted a piece of card with the Pink Mallow Mica Spray and cut the smallest flower die from the Heartfelt Creations Sweet Juliet Die Set 3 times. I cut the largest flower die out of felt from the Vintage Felt Pack. I used the felt die cut and one of the painted die cuts to mak ea flower in the usual way. I cut 2 flowers out of another paper from the Antiquity pad using the Heartfelt Creations Posy Patch Die Set. I stacked the layers of the flowers up as shown and added them to the postcard image.

I tied a bow out of Cream Crochet Ribbon and added a Crystal Sparkler.

I assembled the card as shown adding some dots of Cosmic Shimmer Pearlescent PVA in Golden Pearl around the edges.

Thanks for stopping by.

Julia

Wednesday, 4 December 2013

You are so beautiful to me

Hi Bloggers.

Here's today's card -

This card can be used either upright as I designed it on on it's side so that the sentiment can be read more easily.

I stamped the image from the Heartfelt Creations Beautiful Juliet Stamp Set using Perfect Medium and embossed with Cosmic Shimmer Silver Shine Detail Embossing Powder. I cut it out using Spellbinders Majestic Labels 25 and inked through the die with Dusty Concord Distress Ink. I used another couple of Majestic Labels 25 dies to cut a mat out of Heather Card. I used the largest of the Majestic Labels 25 dies and a Spellbinders 5 x 7 Matting Basics B die to cut the frame and I inked through the dies with Dusty Concord.

I made a flower out of felt from the Vintage Felt Pack using the Sweet Juliet die set. I cut some leaves from the same set.

I assembled the card as shown adding some 5mm White Pearls in the corners.

Thanks for stopping by.

Julia.

Tuesday, 3 December 2013

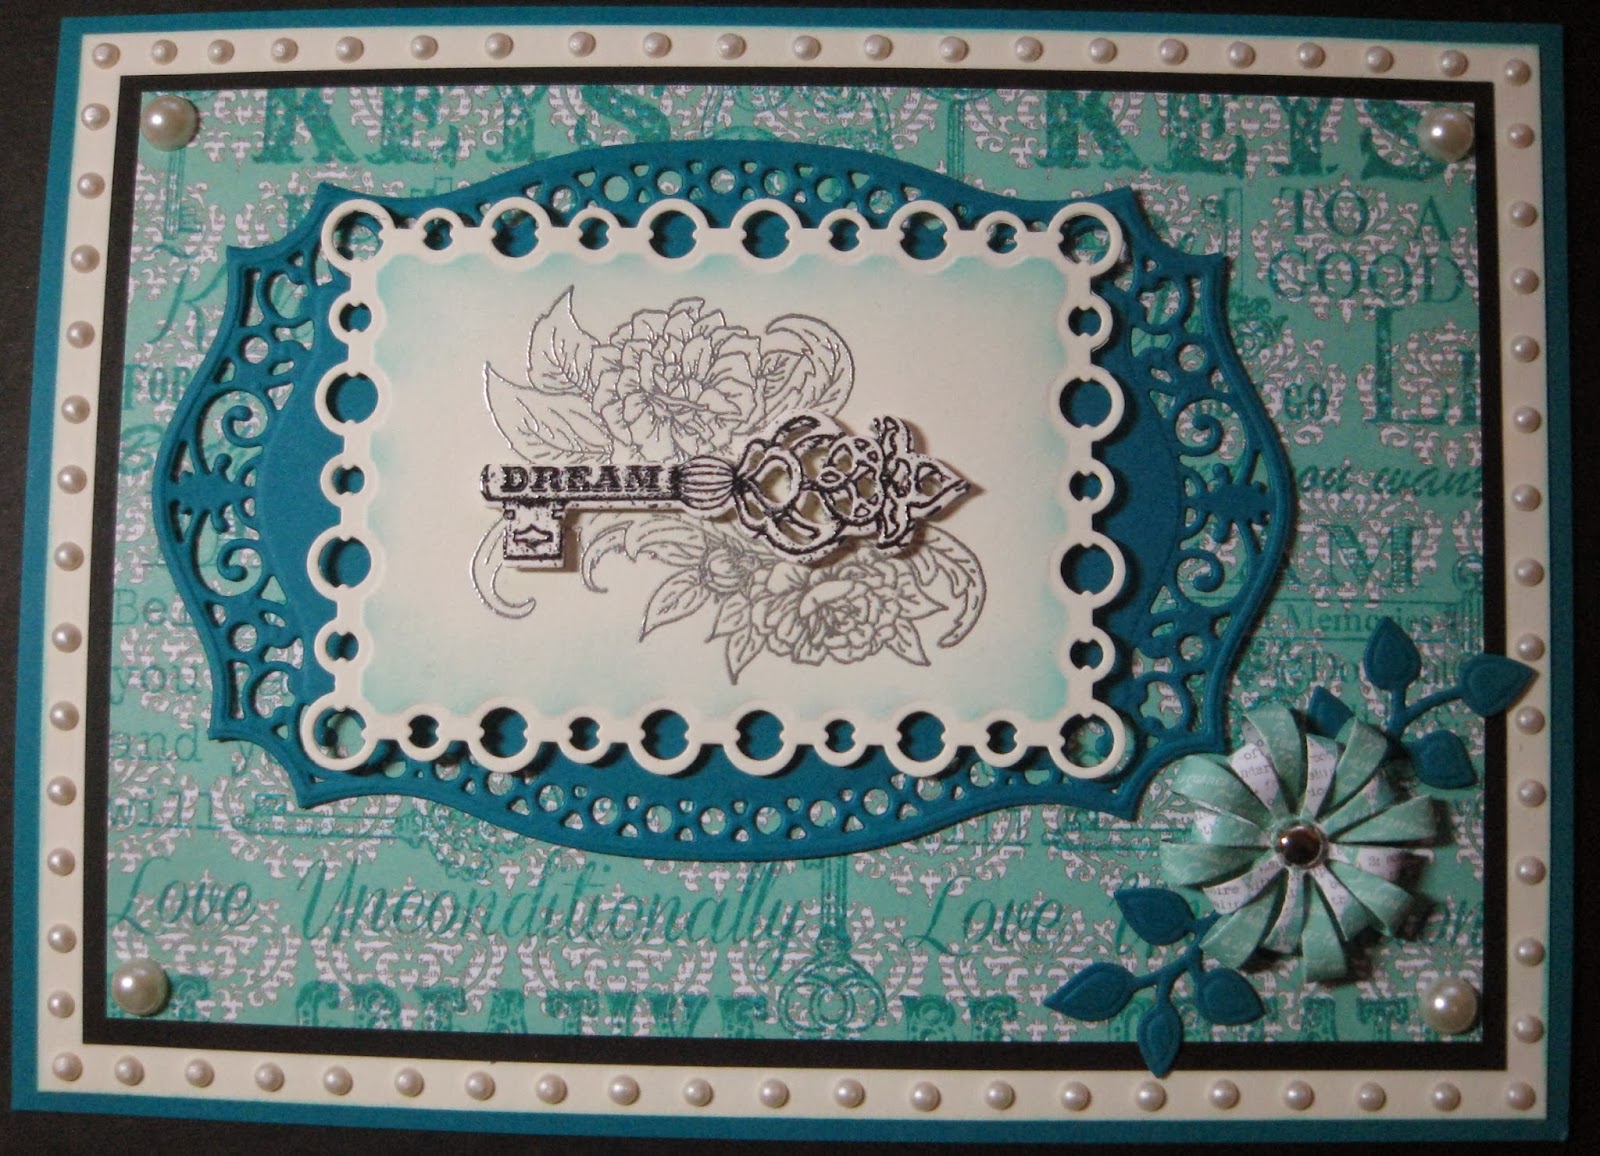
Dream

Hi Bloggers.

Another Floral Keys & Sweet Juliet card today. We are hoping to have some more Sweet Juliet dies available in the new year.

For the background, I used a piece of paper from the Teresa Collins 8 x 8 Paper Pad. I stamped the Heartfelt Creations Script Key Background a couple of times using Peacock Feathers Distress Ink.

I stamped the image from the Heartfelt Creations Keys and Roses Stamp Set using Perfect Medium and embossed with Cosmic Shimmer Silver Shine Detail Embossing Powder. I descided not to colour the image in this time. As a contrast, I used a key I had already stamped using the Heartfelt Creations Burnished Key Background and Jet Black Archival, embossed with Cosmic Shimmer Clear Embossing Powder and cut out using the Heartfelt Creation Burnished Key Die. I cut the image out using Spellbinders Pearl Effects and inked through the die with Peacock Feathers. I cut a Spellbinders Majestic Labels 25 out of Teal Card.

I made a flower from some more papers from the Teresa Collins Pad using the Heartfelt Creations Sweet Juliet Die Set. I cut some leaves out of Teal Card using the same die set.

I assembled the card as shown adding an 8mm White Pearl to each corner and some dots of Cosmic Shimmer Pearlescent PVA in White around the edges.

Thanks for stopping by.

Julia.