Hi Bloggers.
Here's today's card -
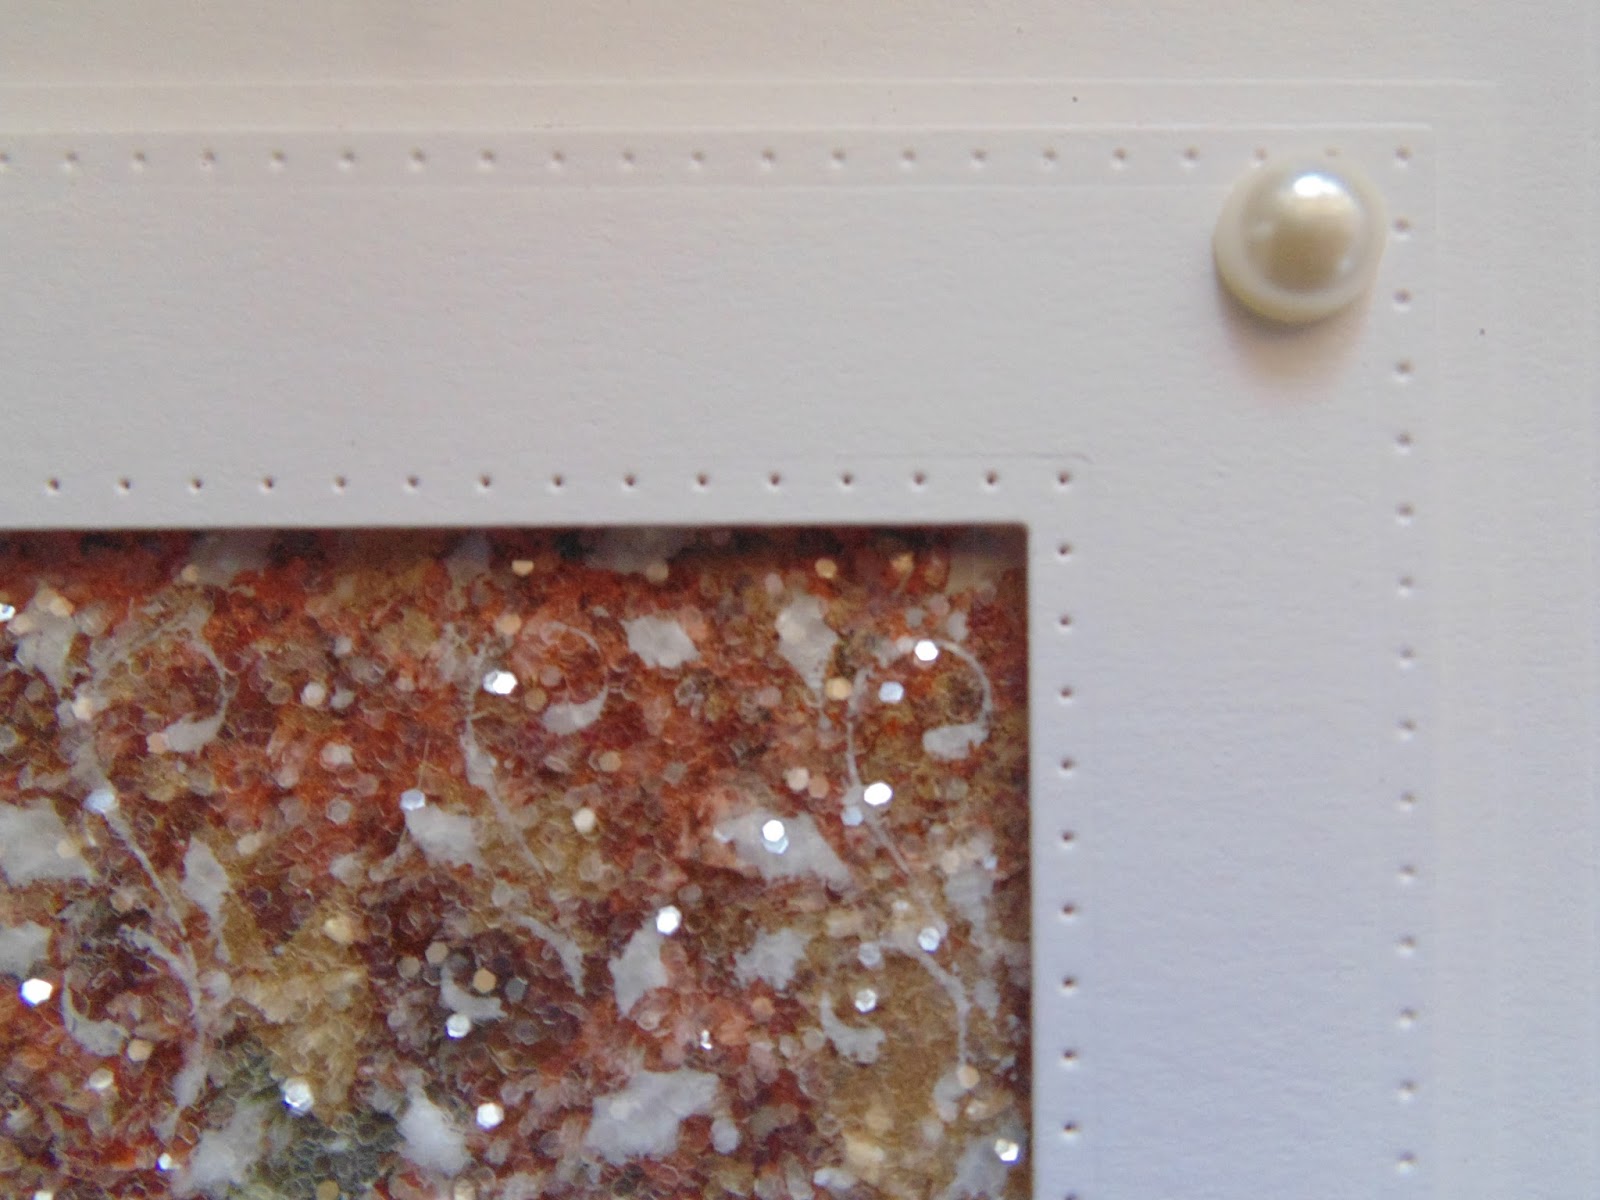
A simple weave for you today with just a little extra work preparing the backgrounds for the weave.
I cut Sue Wilson's Classic Weaving Die out of Coconut White Card and then ran it through the Spellbinders Platinum Machine with the Creative Expressions Wild Roses Embossing Folder.
I popped some CS Flake & Glitter Glue onto a piece of Wax Paper. I picked it up onto a piece of Cut n Dry Foam and used it to ink up the Justrite Holly Garland Background Stamp. I stamped it onto Coconut White Card
leaving the stamp on the card no more than 3 seconds so as not to tear
the card. I cleaned my stamp under a cold tap and then went back
to my
stamped background. I added CS Gemstones Gilding Flakes. I removed the excess using a piece of Rubit Scrubit. I popped a piece of Creative Expressions Double Sided Self Adhesive Sheet on top of the background, removed the backing sheet and added CS Iced Snow Glitter Jewels. I then cut the Classic Weaving Die into it.
I did a simple one by one weave.
I made a frame out of Coconut White Card using Sue's Double Pierced Rectangles and Double Pierced Rectangles Set B. I added it to my background using 3D Foam Tape, adding a little CS Glue to the tape as going onto Glitter Jewels. I trimmed away the excess using scissors.
I stamped the sentiment from Phill Martin's Butterfly Elegance Sentiments using Clear Perfect Medium and embossed with CS Ancient Copper Detail Embossing Powder. I cut it out using Sue's Belgian Tags. I cut out dies #2 and #3 together from the same tag out of Coconut White Card. I cut die #3 from the same tag out of Antique Copper Pearl Card.
I cut Sue's Star Flower Cluster out of Coconut White and Antique Copper Pearl Card and added 3mm White Pearls to the centre of the flowers.
I completed my card by adding an 8mm White Pearl to the corners of my frame and some mats of Coconut White Card.
I do hope you're not getting bored with woven cards - I still love them! I spent Saturday evening weaving with some leftover bits from my Hochanda shows and a couple of hours yesterday putting them onto cards so I have lots more to share with you.
Lisa Horton is continuing with her One Day Special on Hochanda today with shows at 9am, 12noon, 4pm and 7pm.
I'm offering 10% discount on items I have in stock on my website from
the shows. You can find them here. Offer applies till midnight tonight or while stocks last. Discount will be applied at checkout.
The latest release of Sue Wilson Dies and co-ordinating stamps are arriving this morning. You can find them all on my website here. All pre-orders will be sent out today. Be sure to check Sue's Blog for cards featuring her new die launch.
If something is out of stock on my website, you can now request an email as soon as it's back in stock - press 'email me when back in stock' just under the 'add to bag' button. Please only use this if you are wanted to order the item from me as I will use this when placing orders with suppliers.
Thanks for stopping by.
Julia.
www.juliawattscrafts.co.uk
Free card with all website orders over £10 (ask for one in the comments box at checkout).
Deal of the Day today (26th January) - Sue Wilson Lavish Accented Design Noble Die Set only £15.99!
Showing posts with label Iced Snow. Show all posts
Thursday, 26 January 2017
Tuesday, 13 December 2016
One Day Special on Hochanda this evening
Hi Bloggers.
I'm launching a One Day Special on Hochanda this evening at 8pm. It's a Justrite Sale Show with lots of other goodies on offer too as usual.
Here's today's sneak peek -
This is one of my favourite styles of card - so easy yet so impressive. There are several Christmas background stamps (including the one on this card) on the show but I haven't made a single Christmas Card with them. Hopefully, I can show that they're not just for Christmas.
So, starting with the background, I popped some CS Flake & Glitter Glue onto a piece of Wax Paper. I picked it up onto a piece of Cut n Dry Foam and used it to ink up the Justrite Holly Garland Background Stamp. I stamped it onto Coconut White Card leaving the stamp on the card no more than 3 seconds so as not to tear the card. I cleaned my stamp under a cold tap and then went back to my stamped images. I added CS Gemstones Gilding Flakes. I removed the excess using a piece of Rubit Scrubit.
I covered the background with a piece of Creative Expressions Double Sided Self Adhesive Sheets. I removed the other piece of backing and added CS Iced Snow Glitter Jewels.
I made a frame out of Coconut White Card using Sue Wilson's Double Pierced Rectangles and Double Pierced Rectangles Set B. I added it to my background using 3D Foam Tape and a little CS Glue (as adding to glitter).
I stamped the sentiment from the Justrite Ornate Happiness Squares Stamp Set onto Coconut White Card using Clear Perfect Medium and embossed with CS Gold Detail Embossing Powder. I cut it out using die #2 from Sue's Refined Rectangular Frame Die Set. I mounted it onto 3D Foam, added some glue and tucked it into my frame.
I popped some CE Double Sided Self Adhesive Sheet onto a piece of Coconut White Card. I peeled away the other backing sheet and added CS Gemstones Gilding Flakes. I removed the excess using a piece of Rubit Scrubit.
I cut the 2 largest complete flowers from Sue's Striped Nastutium Die Set out of my gilded card twice. I cut the corresponding open flowers from the same die set out of Coconut White Card twice. I made my flowers and added an 8mm Cream Pearl to the centres.
I cut a couple of leaves from Sue's Trailing Ivy Die Set out of Coconut White Card.
I added a couple of mats of Coconut White Card and some 8mm Cream Pearls to my frame to complete my card.
I'm offering 10% discount on items I have in stock from the shows. You can find them here. Offer applies till midnight tomorrow night or while stocks last. Discount will be applied at checkout.
I will try and load photos of the samples I've made for the shows to the gallery of this blog and to my Julia Watts Facebook Page today - please be sure to have a look as there's some lovely products on the shows.
Thanks for stopping by.
Julia.
www.juliawattscrafts.co.uk
Free card with all website orders (ask for one in the comments box at checkout).
Deal of the Day today (13th December) - Phill Martin Sentimentally Yours - Baroque Relative Corner Sentiments only £8.99!
Wednesday, 23 November 2016
Birthday Wishes
Hi Bloggers.
A bit of Fire & Ice today -
For the background, I cut the 3 decorative dies from Sue Wilson's Swirly Vine Background out of the same piece of Black Card, leaving a border around the outide edge. To make cutting easier, I cut 1 die at a time.
Next, I popped a piece of Creative Expressions Double Sided Self Adhesive Sheet onto the front of the die cut. I turned over to reveal the adhesive and added CS Autumn Leaves Gilding Flakes. I removed the excess using a piece of Rubit Scrubit.
I turned over and removed the other backing sheet. I added CS Iced Snow Glitter Jewels. I used a die from Sue's Double Pierced Squares to neaten the edges and matted onto Antique Copper Pearl Card.
I stamped the sentiment from Phill Martin's Scribbled Frame Sentiments Stamp Set onto Black Card using Clear Perfect Medium and embossed using CS Gold Detail Embossing Powder (seems to show up better than Ancient Copper). I cut out using Sue's Stitched Flags and cut the next sized die in the set out of Antique Copper Pearl Card.
I popped another piece of Double Sided Self Adhesive Sheet onto a piece of Black Card. I removed the other backing sheet and added CS Autumn Leaves Gilding Flakes. I removed the excess using a piece of Rubit Scrubit. I then cut all 4 sizes of flower from Sue's Cape Daisy Die Set. I glued them together, offsetting them and added an 8mm Black Pearl. I cut the 2 smaller leaves from Sue's Swirly Leaf Trio out of Black Card and out of Antique Copper Pearl Card.
I assembled the card as shown adding an 8mm Black Pearl to the corners and piercing around the edges using my Tim Holtz Ruler, Precision Probe and Piercing Mat.
Lisa Horton is launching a One Day Special on Hochanda this evening at 8pm. I'm offering 10% discount on items I have in stock on my website from the shows. You can find them here. Offer applies till midnight tomorrow night or while stocks last. Discount will be applied at checkout.
Thanks for stopping by.
Julia.
www.juliawattscrafts.co.uk
Free card with all website orders (ask for one in the comments box at checkout).
Deal of the Day today (23rd November) - Spellbinders Card Creator : Houndstooth only £9.99!
A bit of Fire & Ice today -
For the background, I cut the 3 decorative dies from Sue Wilson's Swirly Vine Background out of the same piece of Black Card, leaving a border around the outide edge. To make cutting easier, I cut 1 die at a time.
Next, I popped a piece of Creative Expressions Double Sided Self Adhesive Sheet onto the front of the die cut. I turned over to reveal the adhesive and added CS Autumn Leaves Gilding Flakes. I removed the excess using a piece of Rubit Scrubit.
I turned over and removed the other backing sheet. I added CS Iced Snow Glitter Jewels. I used a die from Sue's Double Pierced Squares to neaten the edges and matted onto Antique Copper Pearl Card.
I stamped the sentiment from Phill Martin's Scribbled Frame Sentiments Stamp Set onto Black Card using Clear Perfect Medium and embossed using CS Gold Detail Embossing Powder (seems to show up better than Ancient Copper). I cut out using Sue's Stitched Flags and cut the next sized die in the set out of Antique Copper Pearl Card.
I popped another piece of Double Sided Self Adhesive Sheet onto a piece of Black Card. I removed the other backing sheet and added CS Autumn Leaves Gilding Flakes. I removed the excess using a piece of Rubit Scrubit. I then cut all 4 sizes of flower from Sue's Cape Daisy Die Set. I glued them together, offsetting them and added an 8mm Black Pearl. I cut the 2 smaller leaves from Sue's Swirly Leaf Trio out of Black Card and out of Antique Copper Pearl Card.
I assembled the card as shown adding an 8mm Black Pearl to the corners and piercing around the edges using my Tim Holtz Ruler, Precision Probe and Piercing Mat.
Thanks for stopping by.
Julia.
www.juliawattscrafts.co.uk
Free card with all website orders (ask for one in the comments box at checkout).
Deal of the Day today (23rd November) - Spellbinders Card Creator : Houndstooth only £9.99!
Wednesday, 14 September 2016
Fire & Ice
Hi Bloggers.
A bit of Fire & Ice today -
I started by cutting the large decorative die from the Justrite A2 Butterfly Garden Dies into a piece of Black Card. I popped a piece of Creative Expressions Double Sided Self Adhesive Sheet on the front. I turned it over to the back and added CS Harvest Moon Gilding Flakes. I removed the excess with a piece of Rubit Scrubit.
I turned over to the front, removed the other backing sheet and added CS Iced Snow Glitter Jewels. I then used the largest die from the set to trim the frame to size.
I popped some CS Flake & Glitter Glue onto a piece of Wax Paper. I picked it up onto a piece of Cut n Dry Foam and used it to ink up the image from the Justrite Meadow Circles Stamp Set. I stamped it onto Black Card leaving the stamp on the card no more than 3 seconds so as not to tear the card. I cleaned my stamp under a cold tap and then went back to my stamped image. I added CS Harvest Moon Gilding Flakes. I removed the excess using a piece of Rubit Scrubit. I cut it out using the largest circle die from the Justrite Stitched A2 Banners & Rectangles Die Set.
I assembled the card as shown adding some Small Black Circle Dazzlers and piercing around the edges using my Tim Holtz Ruler, Precision Probe and Piercing Mat.
Thanks for stopping by.
Julia.
www.juliawattscrafts.co.uk
Free card with all website orders (ask for one in the comments box at checkout).
Deal of the Day today (14th September) - Sue Wilson Rose Garden Striplet only £6.99!
Tuesday, 30 August 2016
Friends Warm the Heart
Hi Bloggers.
Here's today's card -
For the background, I ran a piece of Coconut White Card through the Spellbinders Platinum Machine with the Couture Creations Passion Embossing Folder. I ran it through a second time to extend the design - it's not a repeating pattern but the join is not visible.
I popped some CS Flake & Glitter Glue onto a piece of Wax Paper. I picked it up onto a piece of Cut n Dry Foam and used it to ink up the Justrite Blooming Vines Stamp Set. I stamped it onto Coconut White Card leaving the stamp on the card no more than 3 seconds so as not to tear the card. I cleaned my stamp under a cold tap and then went back to my stamped image. I added CS Harvest Moon Gilding Flakes. I removed the excess using a piece of Rubit Scrubit. I cut it down into 3 pieces and matted onto Antique Gold Pearl Card.
I stamped the sentiment from the Justrite Circle of Friends Stamp Set onto Coconut White Card using Clear Perfect Medium and embossed with CS Bright Gold Detail Embossing Powder. I cut it out using Justrite A2 Butterfly Garden Dies. I also cut the butterfly wreath from the same set out of Antique Gold Pearl Card. I cut a mat out of Antique Gold Card using Sue Wilson's Melbourne Die Set.
I made a flower out of Coconut White Card using Sue's Camellia Complete Petals Die Set. I added some CS Glue and CS Iced Snow. I cut a pair of leaves out of Anitque Gold Card using Sue's Laurel Leaves Die Set.
I assembled the card as shown adding a 5mm White Pearls to each corner and piercing around the edges using my Tim Holtz Ruler, Precision Probe and Piercing Mat.
Thanks for stopping by.
Julia.
www.juliawattscrafts.co.uk
Free card with all website orders (ask for one in the comments box at checkout).
Deal of the Day today (30th August) - Sue Wilson Zig Zag Border Die only £5.99!
Sunday, 27 December 2015
Thinking of You
Hi Bloggers.
Here's today's card -
Hope you're not fed up of me using up demo bits! I still have loads left!
For the background, I ran a piece of Coconut White Card through the Spellbinders Paltinum Machine with the Couture Creations Thinking of You Embossing Folder.
I cut a frame out of Coconut White Card using Spellbinders 6 x 6 Matting Basics A and inked through the die with Phill Martin CS Frosty Heather Colour Cloud using a Smoothie. I then used one the elements in the Christmas Corner Mask and dabbed more Frosty Heather Colour Cloud through again using a Smoothie.
I stamped the floral image onto Coconut White Card using CS Flake & Glitter Glue applied with a piece of Cut n Dry Foam. I added Lilac CS Polished Silk Glitter. I cut out using Spellbinders Labels 44 and inked through the die with Frosty Heather.
I made a flower out of Mauve Card using Spellbinders Flower Play following Sue Wilson's tutorial here and here. I added some CS Dries Clear Glue and sugared with CS Iced Snow Glitter Jewels.
I cut a couple of leaves out of Coconut White Card using Spellbinders Romantic Vines.
The flash sale on my website today only is -
Discount will be applied at checkout. Offer expires at midnight tonight.
Thanks for stopping by.
Julia.
www.juliawattscrafts.co.uk
Free card on all website orders placed in December (ask for one in the comments box at checkout).
Deal of the Day today (27th December) - SW Scandinavian Collectiion Oslo only £9.99!
Here's today's card -
Hope you're not fed up of me using up demo bits! I still have loads left!
For the background, I ran a piece of Coconut White Card through the Spellbinders Paltinum Machine with the Couture Creations Thinking of You Embossing Folder.
I cut a frame out of Coconut White Card using Spellbinders 6 x 6 Matting Basics A and inked through the die with Phill Martin CS Frosty Heather Colour Cloud using a Smoothie. I then used one the elements in the Christmas Corner Mask and dabbed more Frosty Heather Colour Cloud through again using a Smoothie.
I stamped the floral image onto Coconut White Card using CS Flake & Glitter Glue applied with a piece of Cut n Dry Foam. I added Lilac CS Polished Silk Glitter. I cut out using Spellbinders Labels 44 and inked through the die with Frosty Heather.
I made a flower out of Mauve Card using Spellbinders Flower Play following Sue Wilson's tutorial here and here. I added some CS Dries Clear Glue and sugared with CS Iced Snow Glitter Jewels.
I cut a couple of leaves out of Coconut White Card using Spellbinders Romantic Vines.
The flash sale on my website today only is -
20% off all Ink Pads.
Discount will be applied at checkout. Offer expires at midnight tonight.
Thanks for stopping by.
Julia.
www.juliawattscrafts.co.uk
Free card on all website orders placed in December (ask for one in the comments box at checkout).
Deal of the Day today (27th December) - SW Scandinavian Collectiion Oslo only £9.99!
Saturday, 26 December 2015
Thankful
Hi Bloggers.
Hope you had a good Christmas Day. Here's today's card -
A demo bits card yet again! The background is Coconut White Card with Phill Martin CS Frosty Blue Sparkle Texture Paste spread through the Criss Cross Mask.
The borders are brom Sue Wilson's Spanish Collection Corner, Border & Tag Set - cut in Coconut White and backed with a strip of Sky Blue Card.
The sentiment and the daisy chain heart are from John Lockwood's Daisy Chain Elements Stamp Set, stamped onto Coconut White Card using Cobalt Archival. This was originally stamped onto a Spellbinders Triple Flip Card die cut but, as many of you will have witnessed if you've been to one of my Spellbinders demos this year, I got ink on some areas on the other sections on the die cut. Now, I usually use it anyway but this one had too much mess on it for me so, although not designed for it, I cut it out using Sue's Heart of Hearts Die Set and inked through the die with Phill Martin CS Frosty Sky Colour Cloud applied with a Smoothie. I cut the largest die in the set out of Sky Blue Card.
I cut some of Sue's Delicate Daisies Open Petals our of Cobalt Card and some of Sue's Laurel Leaves out of Coconut White Card, inking through the die with Frosty Sky. I added some Frosty Sky Twinkles to the centre of the flowers and then sprinkled some CS Iced Snow Glitter Jewels over.
I assembled the card as shown piercing around the edges using my Tim Holtz Ruler, Precision Probe and Piercing Mat.
Today is the last day that you can get 25% off everything in the Christmas Category on my website - offer expires midnight tonight. From tomorrow up to and including New Years Day, I will be running a series of one day flash sales so be sure to check back here every day or on my facebook page so that you don't miss out!
Thanks for stopping by.
Julia.
www.juliawattscrafts.co.uk
Free card on all website orders placed in December (ask for one in the comments box at checkout).
25% off all items in Christmas Category till midnight 26th December.
Deal of the Day today - 26th December - Clear Sparklers only 99p per pack!
Wednesday, 1 July 2015
Smile
Hi Bloggers.
A mix of dies on this one -
For the background, I ran a piece of Coconut White Card through the Grand Calibur with the Creative Expressions Bed of Roses Embossing Folder. I then spread some Polar White Cosmic Shimmer Sparkle Texture Paste over it and put aside to dry.
I dusted a piece of Coconut White Card with my Anti Static Pad and popped it dusted side up onto my rubber mat which was sitting on my pink embossing plate. I inked up the deboss die in Sue Wilson's Classic Adorned Design Noble Die Set with Clear Perfect Medium. I placed it inked side down onto my dusted card, added the base plate and ran it through the Grand Calibur. I dusted Phill Martin Decadent Teal Mica Powder over the inked design. I removed the excess with a very expensive Dry Wet Wipe (lol) and cut out a frame using the 2 dies either side of the deboss die from the same die set.
I cut the Couture Creations Script Smile and Island Flower Border out of Coconut White Card. I pressed Clear Perfect Medium into the die cuts, added Phill Martin Cosmic Shimmer Decadent Teal Embossing Powder and heat set. I added more Perfect Medium, more powder and heat set again.
I cut the Script Smile Die out of Coconut White Card twice more and stacked them up with the embossed die cut, gluing together with Cosmic Shimmer Dries Clear Glue.
I made a flower using Spellbinders Flower Play, inking around the edges of the petals with Peacock Feathers Distress Ink and following Sue's tutorial here and here. I added Cosmic Shimmer Dries Clear Glue and Iced Snow Cosmic Shimmer Glitter Jewels. I cut a couple of leaves out of Coconut White Card using Spellbinders Romantic Vines Dies Set.
I assembled the card as shown adding some 5mm White Pearls, some White Pearl Corners and piercing around the edges using my Tim Holtz Ruler.
I still haven't heard from a few of the winners of my Giveaway Cards. If you commented, please check here to see if you are a winner!
Before I go, I wanted to perhaps leave you with a little giggle. Before we went on holiday, Kathryn came shopping with me for holiday bits & pieces including sun cream. She recommended that I get some Aftersun that had 'tan prolonger' on the pack. Unbeknown to me, said Aftersun actually included self tanning lotion so there's me only lathering it on to my red bits and now I have lots of orange bits which looks particularly odd on my peely patches! I'm hoping it all fades to the same shade soon! lol!
Thanks for stopping by.
Julia.
www.juliawattscrafts.co.uk
Subscribe to:
Posts (Atom)