Saturday, 24 October 2015

Peace on Earth

Hi Bloggers.

John Lockwood and I are demoing at Samuel Taylors, Roseville Street, Leeds today 10am till 4pm. If you're in the area, please stop by.

Here's today's card -

For the background, I used a piece of Coconut White Card. I spritzed a piece of Cut n Dry Foam with Phill Martin Cosmic Shimmer Frosty Mink Ink Spray Mist. I used this as my Ink Pad. With the stamp in my hand, I randomly stamped the Creative Expressions Florentine Background. I added a little more Ink Spray Mist to my Craft Sheet. I mixed in a little Phill's Cosmic Shimmer Frosty Mink Mica Powder and picked it up onto my Ink Pad. With the stamp in my hand, I randomly stamped the Creative Expressions Twas the Night Background into some of the gaps in my background. I then ran it though the Grand Calibur with the Creative Expressions Let it Snow Embossing Folder.

I cut a frame out of Coconut White Card using Sue Wilson's Double Pierced Rectangles Die Set.

I cut Sue's Peace on Earth Die out of Coconut White Card and inked through the die with Phill's Cosmic Shimmer Frosty Mink Colour Cloud using a Smoothie.

I made a flower using Sue's Classic Poinsettia, Classic Poinsettia - Open Petals , Phill's Frosty Christmas 8 x 8 Paper Pad and Coconut White Card. I added a Vintage Brad to the centre.

I cut a pair of Sue's Holly Sprays out of Coconut White Card and added Phill's Frosty Mink Gilding Wax.

I assembled the card as shown adding some White Pearl Corners and piercing around the edges using my Tim Holtz Ruler, Precision Probe and Piercing Mat. The coloured mat below the piercing is Coconut White Card coloured with Frosty Mink Colour Cloud.

Thanks for stopping by.

Julia.
www.juliawattscrafts.co.uk

Friday, 23 October 2015

Freebie Friday

Hi Bloggers.

Here's this weeks card that needs a new home -

You can read how this card was made here.

Leave a lovely comment below on this post to go into the draw for a chance to win. I will do the draw on Monday - do remember to come back and check if you've won!

I'm off up North again later today for a demo day at Samuel Taylors in Leeds with John Lockwood tomorrow.

Thanks for stopping by.

Julia.
www.juliawattscrafts.co.uk

Thursday, 22 October 2015

Thanks

Hi Bloggers.

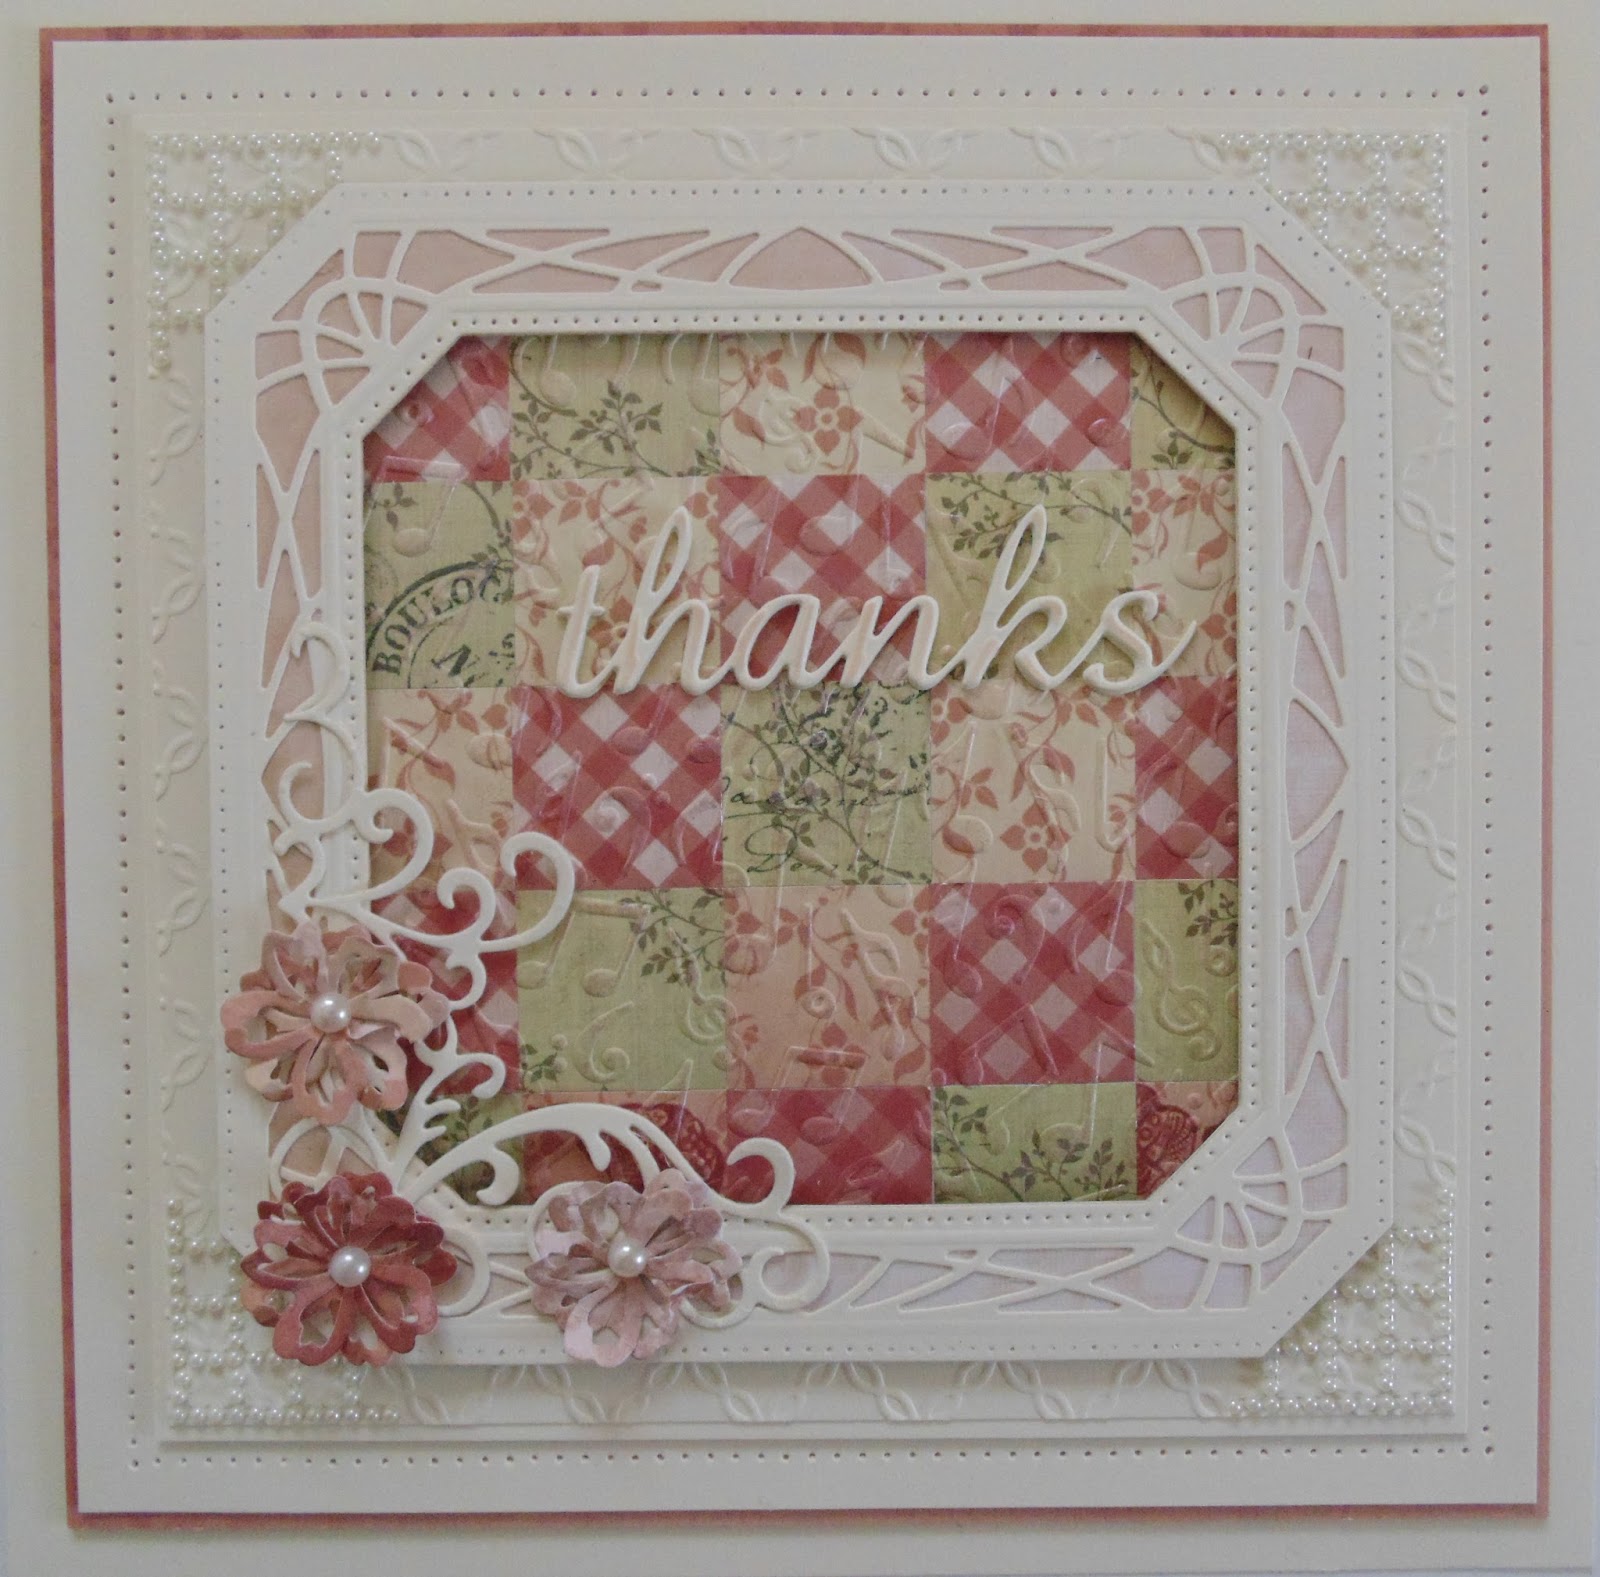
Here's today's card -

For the background that's within the frame, I used the Bargello Technique. I selected 2 papers from the Couture Creations Vintage Rose 12 x 12 Paper Pad - one with a sage green base and one with a rose pink base. I cut a few strip, each 1" wide. I turned some of the pink strips over to use the design on the back.Then then glued 2 strips of each pattern to a piece of copy paper, alternating the designs.I then cut this down into 1" strips so that each strips was made up of 1" squares of the patterned paper. I then glued these strips onto another piece of copy paper, stepping down each time to offset the patterns. I ran this through the Couture Creations Scattered Notes Embossing Folder and rubbed Blush Gilding Wax over the surface.

I made a frame using Sue Wilson's Ornate Pierced Squares Die Set, Coconut White Card and another paper from the pad. I added this to my Bargello background and trimmed away the excess. I ran a piece of Coconut White Card through the Grand Calibur with the Couture Creations Cotton Thread Quilt Embossing Folder. I ran it through a second time to extend the design. I added my frame to it and popped a White Pearl Corner on each corner.

I cur the Couture Creations Script Thanks Die out of Coconut White Card 3 times. On one of them, I inked through the die with Tattered Rose Distress Ink using a Smoothie. I stacked them on top of each other, with the inked one on the top, securing with Cosmic Shimmer Dries Clear Glue.

I cut the Couture Creations Island Flower Border a couple of time out of some scraps from the paper pad. I cut it down into individual flowers and used 6 of the larger ones to make 3 flowers. I cut the flourish die from the Couture Creations Coteaux Curls Die Set out of Coconut White Card.

I assembled the card as shown adding some 5mm White Pearls to the centre of the flowers and piercing around the edges using my Tim Holtz Ruler, Precision Probe and Piercing Mat. The coloured mat below the piercing is another paper from the pad - I did gut it to be frugal!

John Lockwood has shows on Hochanda today at 10am, 3pm and 6pm with some great ways to make die cut flowers. Hope you can tune in.

Thanks for stopping by.

Julia.
www.juliawattscrafts.co.uk

Wednesday, 21 October 2015

Smile Smile Smile

Hi Bloggers.

Here's today's card -

Another simple card.

For the background, I ran a piece of Coconut White Card through the Grand Calibur with the Couture Creations Music of the Heart Embossing Folder. I ran it through a second time to extend the design. It's not exactly a repeating pattern but you can easily line up the music paper lines to extend seamlessly. I added Bundled Sage Distress Ink using a Smoothie.

I cut the Couture Creations Owl on a Branch Die out of Black Card 3 times. I cut a square out of one of the papers from the Vintage Rose 12 x 12 Paper Pad 3 times using Sue Wilson's Double Pierced Squares Die Set. I cut 3 squares out of Black Card using Spellbinders 6 x 6 Matting Basics B Die Set.

I cut the Couture Creations Script Smile Die out of Black Card 3 times and added them to the bottom of my card overlapping them slightly.

I assembled the card as shown adding a couple of White 5mm Pearls to the top corners and piercing around the edges using my Tim Holtz Ruler, Precision Probe and Piercing Mat.

Thanks for stopping by.

Julia.
www.juliawattscrafts.co.uk

Tuesday, 20 October 2015

Thanks

Hi Bloggers.

I'm up at Creative Expressions HQ today running a workshop - should be a fun day!

Here's today's card -

For the background, I used a paper from the Couture Creations Vintage Rose 12 x 12 Paper Pad. I chose 2 more papers from the pad and cut squares out using Sue Wilson's Double Pierced Squares Noble Die Set. I matted these onto squares cut out using Spellbinders 6 x 6 Matting Basics B Die Set.

I cut the frame & insert out of Black Card using the Couture Creations Bobtails Set (on order - should be able to add it to my website later today), I rubbed Blush Gilding Wax over the frame. I cut the Couture Creations Script Thanks Die out of Coconut White Card twice and out of paper once and stacked them on top of one another securing with Cosmic Shimmer Dries Clear Glue. I added a couple of Cream Pearl Corners above and below the sentiment.

I cut the Couture Creations Musical Notes Die out of Black Card. I added Blush Gilding Wax.

I used Coconut White Card in the mat layers, colouring them with Tattered Rose Distress Ink using a Smoothie.

I assembled the card as shown adding some 8mm Cream Pearls to the corners and piercing around the edges using my Tim Holtz Ruler, Precision Probe and Piercing Mat.

Don't forget that John & Lisa are continuing with their One Day Special on Hochanda today at 9am, 12noon, 4pm and 7pm.

Thanks for stopping by.

Julia.
www.juliawattscrafts.co.uk

Monday, 19 October 2015

Fluttering by

Hi Bloggers.

Another simple card today -

For the background, I stamped the sentiment from the Creative Expressions Live, Laugh Love Sentiments Stamp Set onto a piece of Coconut White Card using Cobalt Archival. I ran it through the Grand Calibur with the Couture Creations Cotton Thread Quilt Embossing Folder. I ran it through a second time to extend the design - easy to do as it's a repeating pattern.

I cut a frame out of Coconut White Card using the Bobtails Set from the Couture Creations Frames n Frills Collection. I cut the Couture Creations Stained Glass Butterfly out of Coconut White Card twice. I trimmed one down to create a smaller butterfly. I added Clear Perfect Medium to both the butterflies, then Cosmic Shimmer Blue Speckle Embossing Powder and heat set.

I added a couple of White Pearl Corners. On one of the mats, I added Clear Perfect Medium around the edges of the card, Blue Speckle and Embossing Powder and heat set.

I assembled the card as shown piercing around the edges using my Tim Holtz Ruler, Precision Probe and Piercing Mat.

John Lockwood is launching a new MDF One Day Special on Hochanda this evening at 8pm continuing on tomorrow. He's joined by Lisa Horton, the latest addition to the Creative Expressions Team. Lisa is a very talented lady. I do hope you can tune in.

By the way, just to let you know, that the MDF Egg Stand is now back in stock on my website. You can find it here.

Thanks for stopping by.

Julia.
www.juliawattscrafts.co.uk


Sunday, 18 October 2015

Love

Hi Bloggers.

Here's today card -

This is a very simple card to make. It could be used for many occasions.

The baking paper is from the gorgeous Couture Creations Vintage Rose 12 x 12 Paper Pad.

I cut the Couture Creations Nostalgic Narelle Die out of Black Card twice and rubbed Blush Gilding Wax over both of them, left them a few minutes to dry then buffed them up using a dry wet wipe and glued them to the backing paper as shown,

I cut a piece of Double White Pearl Strip in half lengthways and added them to both sides.

The sentiment is from another of the papers in the pad.

I tied a bow using Sideshow Rose Satin Ribbon. I tied a piece of the thinner ribbon in the pack through a button from my stash and added it to the bow.

I used Coconut White Card in the mat layers, colouring them with Tattered Rose Distress Ink using a Smoothie.

I assembled the card as shown piercing around the edges using my Tim Holtz Ruler, Precision Probe and Piercing Mat.

Thanks for stopping by.

Julia.
www.juliawattscrafts.co.uk

Saturday, 17 October 2015

Let it Snow

Hi Bloggers.

I'm demoing at Grafton Crafts in Kimbolton today 10am till 4pm. If you're in the area, please stop by to say hello.

Here's today's card -

 For the background, I used a paper from Phill Martin's Christmas Holly 8 x 8 Paper Pad. I added some PM Frosty Aqua Sparkle Texture Paste to 2 of the corners through one of the designs in the Christmas Corner Mask.

I cut the Spellbinders Reindeer & Sleigh Die Set using the plain side of another paper from Phill's pad. I rubbed PM Frosty Aqua Gilding Wax over the embossed design in the die cuts.

I stamped the sentiment from the Creative Expressions Peace on Earth Stamp Set using PM CS Frosty Aqua Colour Cloud Blending Ink applied with a Smoothie. I cut it out using Spellbinders 5 x 7 Matting Basics B Die Set.

I assembled the card as shown piercing around the edges using my Tim Holtz Ruler, Precision Probe and Piercing Mat.

Thanks for stopping by.

Julia.
www.juliawattscrafts.co.uk


Friday, 16 October 2015

Shows on Hochanda today

Hi Bloggers.

No Freebie Friday this week as I'm sharing a card from today's shows on Hochanda instead. Normal service will be resumed next Friday!

My shows today are at 10am, 1pm and 5pm. Hope you can join me.

Here's today's card which will be one of my demos -

Products used -
Couture Creations : Mercanto Flourish, Owl on a Branch, Bobtails Set Frames n Frills Collection, Scattered Notes Embossing Folder
SW Dies - Double Pierced Squares
White Pearl Corners
Card - Coconut White, Black


Thanks for stopping by.

Julia.
www.juliawattscrafts.co.uk

Thursday, 15 October 2015

Sneak Peek

Hi Bloggers.

I have shows on Hochanda tomorrow at 10am, 1pm and 5pm with the 2nd half of the Couture Creations dies that I had on last month. There's also a few older dies that I didn't get chance to show on Create & Craft earlier this year plus the 12 x 12 version of the Vintage Rose Paper Pad which was extremely popular in it's 6 x 6 format.

Here's one of my demos -

Products used -

Couture Creations : Vintage Rose 12 x 12 Paper Pad, Coteaux Curls, Tall Flower Basket, Island Flower Border, Bobtails Set Frames n Frills Collection
Cosmic Shimmer Phill Martin Decadent Oak Embossing Powder
Perfect Medium
White Pearl Corners
White 5mm SA Pearls
Tim Holtz Ruler, Precision Probe and Piercing Mat


Thanks for stopping by.

Julia
www.juliawattscrafts.co.uk

Wednesday, 14 October 2015

Wish

Hi Bloggers.

Here's today's card -


For the background, I ran a piece of Milk Card through the Grand Calibur with the Couture Creations Candy Stripe Embossing Folder.

I cut the sentiment out of Vintage Gold Card and the frame out of Black Card using the Couture Creations Christmas Wish Die Set.

I cut a couple of leaves out of Black Card using the Couture Creations Holly Branch Die.

I stamped a couple of the stamps from the Creative Expressions Shaded Poinsettia Stamp Set twice onto Vintage Gold Card using Jet Black Archival. I used the corresponding dies in Sue Wilson's Classic Poinsettia Die Set to cut them out. I shaped them and glued them together to make the flower. I added a few strands of Jute Twine underneath the flower.

I assembled the card as shown adding some 5mm Black Pearls and piercing around the edges using my Tim Holtz Ruler, Precision Probe and Piercing Mat.

Thanks for stopping by.

Julia.
www.juliawattscrafts.co.uk

Tuesday, 13 October 2015

Tidings of Comfort and Joy

Hi Bloggers.

Here's today's card -

For the background, I ran a piece of Coconut White Card through the Grand Calibur with the Couture Creations Candy Stripe Embossing Folder.

I cut the Couture Creations Santa's Reindeer Die out of Vintage Gold Card twice and added 3mm Red Pearls to some of the baubles hanging from the reindeers antlers.

I stamped the sentiment from the Creative Expressions Peace on Earth Stamp Set onto Vintage Gold Card using Perfect Medium and embossed with Cosmic Shimmer True White Detail Embossing Powder. I split the sentiment down into 3 pieces.

I assembled the card as shown piercing around the edges using my Tim Holtz Ruler, Precision Probe and Piercing Mat.

Phill Martin is continuing with his One Day Special on Hochanda at 9am, 12noon, 4pm and 7pm. John Lockwood also has shows today at 11am, 2pm and 6pm with some Watercolour Stamping. Double trouble!

 Thanks for stopping by.

Julia.
www.juliawattscrafts.co.uk