Wednesday, 17 August 2016

Justrite One Day Special Continues on Hochanda today

Hi Bloggers.

I'm continuing with the Justrite One Day Special on Hochanda today with shows at 9am, 12noon, 4pm and 7pm. I hope you can join me.

I have added photos of the samples I've made for the shows to my Julia Watts Crafts Facebook Page and to the Gallery of this blog (access via top menu).

Yesterday, I shared a two-fer featuring the two Multi-Step stamp sets the One Day Special. Today, I thought I'd share another two-fer featuring the other two stamp sets that are in the One Day Special.

I've created my background using the Justrite Floral Silhouettes One Clear Stamp Set (I've used another pierced square of Coconut White Card left over from a frame again). I've stamped using Colour Clouds - Lilac Whisper, Violet Haze, Soft Cerise and Clear Day. I inked the edges with Lilac Whisper.

I stamped the image/sentiment from the Justrite Butterflies Stamp Set using Violet Haze Colour Cloud. I cut it out using Sue Wilson's Melbourne Die Set.

I made another background piece with the stamps large enough to cut the largest circle die in Sue's Melbourne set. I inked the edges of the die cut with Lilac Whisper Colour Cloud.

I cut the largest 2 dies together out of Coconut White Card.

I assembled the card as shown adding some Craft Consortium Pearls and piercing around the edges using my Tim Holtz Ruler, Precision Probe and Piercing Mat.

 Here's your second card -

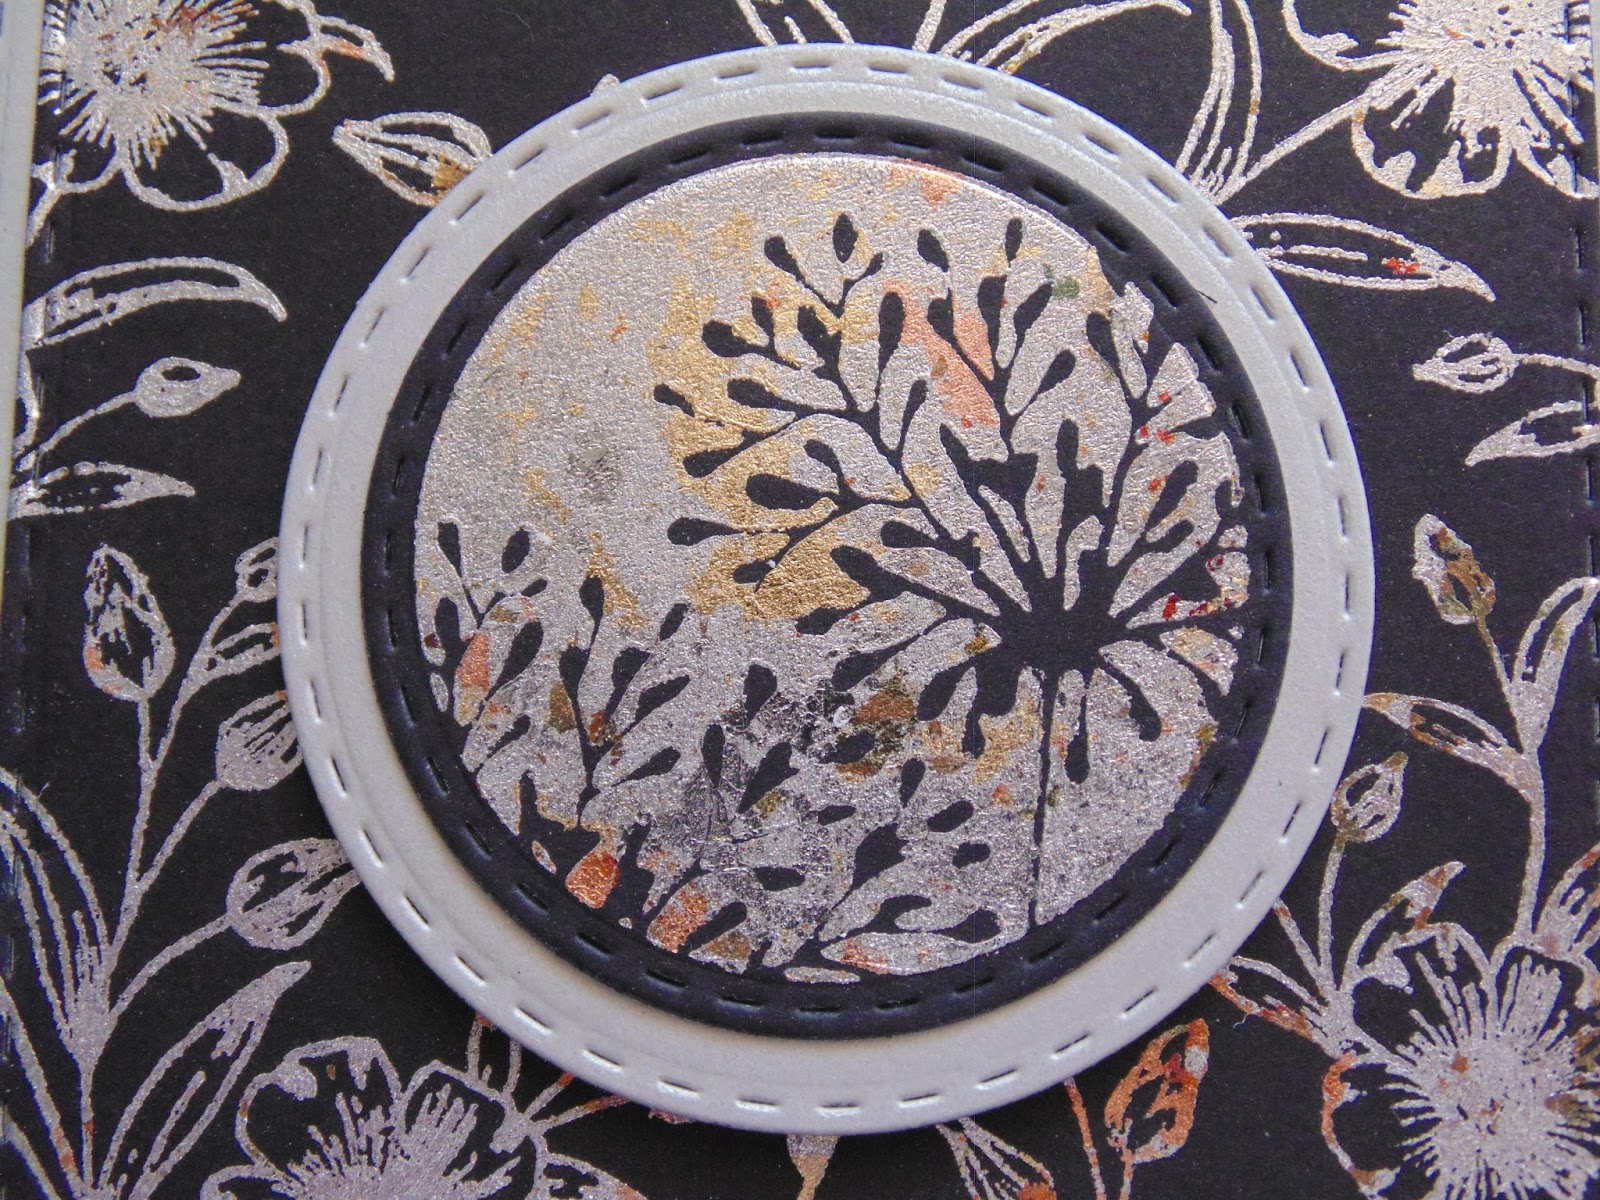
I popped some CS Flake & Glitter Glue onto a piece of Wax Paper. I picked it up onto a piece of Cut n Dry Foam and used it to ink up the Justrite Blooming Vines Stamp Set. I stamped it onto Black Card leaving the stamp on the card no more than 3 seconds so as not to tear the card. I cleaned my stamp under a cold tap and then went back to my stamped image. I added CS Aurora Lights Gilding Flakes. I removed the excess using a piece of Rubit Scrubit. I cut it to size using Justrite Stitched A2 Banners & Rectangles Dies. I cut the largest die in the set out of Silver Shine Pearl Card. I popped these die cuts onto a Black Card blank.

I stamped the image from the Justrite Meadow Circles Clear Stamp Set in the same way as the background and added the flakes again. I cut it out using a circular die from the Stitched A2 Banners & Rectangles Dies and cut a mat out of Silver Shine Pearl Card using the next sized die.

I stamped the sentiment from the same stamp set onto Black Card using Clear Perfect Medium and embossed with CS Silver Shine Detail Embossing Powder. I cut it out using Justrite A2 Card Front Basics Dies and cut a mat out of Silver Shine Pearl Card using another die from the set.

I'm offering 10% discount on products I have in stock on my website from the shows. You can find them here. Offer applies till midnight tonight or while stocks last. Discount will be applied at checkout. Seems I forgot to set up the discount yesterday (no one told me!), I set it just before 10pm last night and have been working my way through adjusting the orders and refunding where necessary. If you think you've paid too much, email me.

Don't forget that there's lots of inspiration over on the Justrite Stampers Blog - you can find it here.

See you later!

Thanks for stopping by.

Julia.
www.juliawattscrafts.co.uk
Free card with all website orders (ask for one in the comments box at checkout).
Deal of the Day today (17th August) - Sue Wilson's Classic Foldover Flowers Die Set only £8.99!


Tuesday, 16 August 2016

One Day Special on Hochanda this evening

Hi Bloggers.

I'm launching a One Day Special on Hochanda this evening at 8pm with some gorgeous Justrite Stamps and dies. I hope you can join me.

There are 2 sets of Multi Step Stamps in the One Day Special so I thought I'd share a two-fer today with a card made with each of these sets.

This card features the Justrite Multi-Step Poppies Clear Stamp Set -

For the background, I dusted a piece of Coconut White Card with my Anti Static Bag (the piece of card I used was actually left over from a frame I had cut for another project so it it pierced around the edges). I randomly stamped one of the poppies from the set (1C) over the area using Clear Perfect Medium and embossed with CS Clear Embossing Powder. I covered the area with CS Crimson Kiss and Scarlet Woman Colour Clouds applied using Smoothies. I spritzed some water into my hands and clapped over my background to create some splats. I left it for a few minutes and then blotted dry with Kitchen Roll.

I stamped the sentiment from the Justrite Circle of Friends Stamp Set (on the show at a special price) ont Coconut White Card using Jet Black Archival. I cut it out using Justrite A2 Banners & Rectangles Die Set and inked through the die with Scarlet Woman Colour Cloud.

I stamped the decorative frame from the Circle Of Friends Stamp Set using Crimson Kiss Colour Cloud. Once dry, I cut it out using Justrite Vintage Labels Three Dies and inked through the die with Scarlet Woman Colour Cloud.

I cut the largest two dies in Sue Wilson's Melbourne Die Set together out of Black Card.

Here's where the multi-step part comes in on this card - From the Justrite Multi-Step Poppies Clear Stamp Set, I stamped 1A using Jet Black Archival, 1B on top using Crimson Kiss Colour Cloud, 1C on top using Scarlet Woman Colour Cloud and then 1D on top using CS Onyx Black Colour Cloud. I repeated this for another flower then using the same colours I stamped 3A, 3B, 3C and 3D. I cut them allout using scissors and cut a couple of leaves out of Black Card using Sue Wilson's Maidenhair Fern Die Set.

I assembled the card as shown adding some Small Black Circle Dazzlers to the corners and piercing around the edges using my Tim Holtz Ruler, Precision Probe and Piercing Mat.

Here's your second card featuring the Justrite Multi-Step Landscape Elements Clear Stamp Set -

All the stamps on this card are from the stamp set with the exception of the sentiment which is from the Justrite Meadow Circles Clear Stamp Set. I've stamped using Watering Can Archival, Colour Clouds - Chic Moss, Basil Leaf, Violet Haze and Lilac Whisper. I've edged the piece and the sentiment with Clear Day Colour Cloud. My scene and the card blank have been cut using Justrite A2 Stitched Banners and Rectangles Dies. The sentiment has been cut out using Justrite Four in a Square Dies and the Black Card mat has be cut using Sue Wilson's Melbourne Die Set.

I'm offering 10% discount on products I have in stock on my website from the shows. You can find them here. Offer applies till midnight tomorrow night or while stocks last. Discount will be applied at checkout.

Hope to see you at 8pm!

Thanks for stopping by.

Julia.
www.juliawattscrafts.co.uk
Free card with all website orders (ask for one in the comments box at checkout).
Deal of the Day today (16th August) - Phill Martin Sentimentally Yours Blossom Flourishes & Corners Stamp Set only £8.99!


Monday, 15 August 2016

Monday Sneak Peek

Hi Bloggers.

Today, I'd like to share a card made using the gorgeous new Justrite Blooming Vines Background Stamp -

I've stamped the background onto a piece of Black Card using Clear Perfect Medium and embossed with CS Gold Detail Embossing Powder. I've coloured in using Mica Powders mostly (adding water to a little powder to make a paint) - I also used Peacock Green Pixie Powder to paint the lower section of the leaves. The Mica Powders I used were Phill Martin CS Graceful Peach, Chic Moss and Chic Aubergine.

I trimmed the background and matted it onto Antique Gold Pearl Card. I stamped the sentiment from the Justrite Meadow Circles Clear Stamp Set onto Black Card and embossed with Gold Detail Powder. I cut it out using a die from the Justrite A2 Card Front Basics Dies and cut a mat out of Antique Gold Pearl Card using the next sized die.

I added a Vintage Black Button and a Dazzler Setting.

I assembled the card as shown adding some 8mm Black Pearls to the corners and piercing around the edges using my Tim Holtz Ruler, Precision Probe and Piercing Mat.

The winner of the card from Freebie Friday on 12th August is .....................................

Tina T

Please email me at juliawattscrafts@gmail.com with your address and I'll pop it in the post.

Thanks for stopping by.

Julia.
www.juliawattscrafts.co.uk
Free card with all website orders (ask for one in the comments box at checkout).
Deal of the Day today (15th August) - Sue Wilson Lavish Accented Design Noble Die Set only £15.99!


Sunday, 14 August 2016

Sunday Sneak Peek

Hi Bloggers.

Today I have a sneak peek from the Justrite One day Special that I'm launching on Hochanda at 8pm on Tuesday night.

I've decided to share a simple two-fer first featuring the Justrite A2 Butterfly Garden Die Set.

I've used the largest 2 dies in the set and cut them together out of Coconut White Card. I added Clear Perfect Medium and embossed with CS Gold Brilliant Sparkle Embossing Powder. I repeated the process to double emboss. I cut the largest die from the set out of Coconut White Card and glued the embossed decorative frame. I made a card blank out of Coconut White Card uing the same die.

I cut the circular die in the same set out of Coconut White Card.

I cut the butterfly circle from the same set out of Coconut White Card and double embossed.

I stamped the sentiment from the Justrite Meadow Circles Stamp Set onto Coconut White Card using Clear Perfect Medium and embossed with CS Gold Detail Embossing Powder. I cut it out using Justrite Four in a Square Dies.


Here's your second card -

Here, I've used Icicle Pearl Card and Black Card. All the dies used are the same as before with the addition of the butterflies (from the same set) on top of the knot of the Black Satin Ribbon bow.

I'm off to run a workshop locally today - Mixed Media and MDF. It's going to be fun!

Thanks for stopping by.

Julia.
www.juliawattscrafts.co.uk
Free card with all website orders (ask for one in the comments box at checkout).
Deal of the Day today (14th August) - John Lockwood Spring Flower Words Stamp Set only £8.99!


Saturday, 13 August 2016

It is so nice knowing

Hi Bloggers.

I got back from my parents last night after a nightmare journey down the M1. My Dad came out of hospital late yesterday afternoon - he's ok but needs to go back for a little op some time.

I must apologise for the delay in website orders placed sonce Wednesday not being sent out, I will get to that this morning.

Sorry, just some photos again today - rather tired as I write this. Normal service will be resumed tomorrow with a sneak peek from my Justrite ODS on Hochanda which starts on Tuesday evening. This card features Justrite Doodled Birds, Chicken Wire Background and Text Background Stamps and CS Pixie Powders.


John Lockwood is continuing with a One Day Special on Hochanda today. I'm offering 10% discount on products I have on my website from the shows. You can find them here. Offer applies till midnight tonight or while stocks last. Discount will be applied at checkout.

Thanks for stopping by.

Julia.
www.juliawattscrafts.co.uk
Free card with all website orders (ask for one in the comments box at checkout).

Friday, 12 August 2016

Freebie Friday

Morning Bloggers.

You know the drill - leave a comment below to go into the draw.

You can read how this card was made here.

Thanks for stopping by.

Julia.
www.juliawattscrafts.co.uk
Free card with all website orders (ask for one in the comments box at checkout).

Thursday, 11 August 2016

Relax & Enjoy

Hi Bloggers.

Just photos today as I've had to shoot up to my parents house as my Dad has been taken to hospital. No wifi up there.


Thanks for stopping by.

Julia.
www.juliawattscrafts.co.uk
Free card with all website orders (ask for one in the comments box at checkout).

Wednesday, 10 August 2016

Happy Anniversary

Hi Bloggers.

For the background, I popped the All Stirred Up Mask onto a piece of Coconut White Card and spread CS Polar White Sparkle Texture Paste through it. Leaving the mask in place, I sprinkled Scarlet Mist and Sun Yellow CS Pixie Powders over. I removed the mask and put aside to dry.

I spritzed a piece of Watercolour Card with Water and sprinkled over the same 2 Pixie Powders. I put this aside to dry.

I stamped the sentiment and the frame from the Justrite Congrats Card Basics Stamp Set onto Coconut White Card using Jet Black Archival. I cut them out using an oval die from the Justrite A2 Card Front Basics Die Set. I cut the largest oval from the Justrite Hello Decorative Oval Frame Dies out of my Pixie Powdered piece (once it was dry) and I cut the large decorative die from the same set out of Coconut White Card.

Once my Texture Paste Background was dry, I added a Coconut White frame cut using Sue Wilson's Double Pierced Squares and Double Pierced Squares Set B.

I spritzed some water onto my Craft Sheet and added a little of the 2 Pixie Powders I had used before. I dragged some Blue White American Seam Binding through it and dried it using my Heat Tool. I used 2 lengths of my coloured ribbon to tie a bow. I added another bow tied using 3 lengths of Black Jute Twine and covered the knots with a Gold Dazzler.

I finished my card with a couple of Coconut White mats and added some corners from my Pixied card cut using Justrite A2 Card Front Basics Dies.

Thanks for stopping by.

Julia.
www.juliawattscrafts.co.uk
Free card with all website orders (ask for one in the comments box at checkout).
Deal of the Day today (10th August) - Creative Expressions New Home Clear Stamp Set only £8.99!


Tuesday, 9 August 2016

Stop Here!

Hi Bloggers.

I have a Christmas Card for you today -

For the background, I used a paper from Phill Martin's Frosted Essentials 8 x 8 Paper Pad. It doesn't really show up on here but I did randomly stamp the large snowflake stamp from the Justrite Holiday Magic Stamp Set over the paper using Phill Martin CS Frosty Sky Colour Cloud applied with a Smoothie. I also edged the paper with Frosty Sky Colour Cloud.

I used a strip from the reverse side of the patterned paper and applied PM CS Frosty Sky Sparkle Texture Paste through part of the star corner from the Christmas Corner Mask. Actually, becauce I didn't want to wait twice for the paste to dry, I cut the strip in half so that I could 2 both ends in the same session.

I cut the Spellbinders 5 x 7 Holly Frame out of Coconut White Card and inked through the die with Frosty Sky. I cut the little poinsettia die in the set out of a strip of plain paper from the pad twice, inking through the die with Frosty Sky. I popped a Craft Consortium Pearl in the centre of each and added themto the corners of the frame.

I dusted the frame with my Anti-Static Bag and stamped the sentiment from the Justrite Holiday Magic Stamp Set using Clear Perfect Medium and embossed with CS Silver Shine Detail Embossing Powder.

I cut both the dies from the Spellbinders Reindeer & Sleigh Die Set out of Coconut White Card. I rubbed PM CS Frosty Sky Gilding Wax over the Sleigh.

I double embossed the reindeer with PM CS Frosty Sky Embossing Powder.
I assembled the card as shown adding some PM CS Frosty Sky Twinkles around the edges of the background paper and piercing around the edges using my Tim Holtz Ruler, Precision Probe and Piercing Mat.

Phill Martin is continuing with his One Day Special on Hochanda today with shows at 9am, 12noon, 4pm and 7pm. I'm offering 10% discount on items I have in stock from the shows till midnight tonight. You can find them here. Discount will be applied at checkout.

Thanks for stopping by.

Julia.
www.juliawattscrafts.co.uk
Free card with all website orders (ask for one in the comments box at checkout).
Deal of the Day today (9th August) - John Lockwood Flower Heart Elements Stamp Set only £7.99!