Friday, 9 January 2015

Choose Joy

Hi Bloggers.

Here's today's card -

For the background, I sprayed some of Phill Martin's Graceful Lilac Ink Spray Mist onto a piece of Cut n Dry Foam to make myself an 'ink pad' (you could also use Cut n Dry Felt). I used this to stamp the Justrite Sweet Lace Background Stamp onto Coconut White Card.

I then spayed a little more onto my Craft Sheet and mixed this with a little Graceful Lilac Mica Powder. I added this to my 'ink pad' and used it to stamp the Sweet Lace Background once again. I inked around the edges of the whole piece using Dusty Concord Distress Ink.  I wrapped a piece of White Crochet Ribbon around to hide the join.

I stamped the butterfly image using Perfect Medium and embossed using Graceful Lilac Embossing Powder. I cut it out using Spellbinders Standard Circles Large. I cut the frame out of Mauve Card using Spellbinders Botanical Swirls & Accents Die Set and inked through the die with my Ink/Mica Ink Pad. I tied a bow using White Crochet Ribbon and added a White Crystal Sparkler.

I stamped the sentiment from the Justrite What Defines Us Clear Stamp Set using Perfect Medium and embossed with Graceful Lilac Embossing Powder. I cut it out using Justrite Filigree Bracket Die and inked through the die with Dusty Concord.

I assembled the card as shown adding some White Pearls to the corners and some dots of Phill Martin Graceful Lilac PVA around the edges.

Thanks for stopping by.

Julia.
 www.juliawattscrafts.co.uk

Thursday, 8 January 2015

A Life Full of Joy

Hi Bloggers.

Just to let you know that my appearance on the Craft Clinic on Monday has been pushed back a week to 19th January.

To answer a few queries I've had - the workshop on 20th January at Creative Expressions is a repeat of the one being held on 15th January. The workshops just outside Milton Keynes are all on Saturdays so that people who work have the opportunity to attend. It's not possible to do weekend workshops at Creative Expressions as the buildings are only open during the week.

Here's today's card -

For the background, I ran a piece of Coconut White Card through the Grand Calibur with the Couture Creations Velvet Tea Lights Embossing Folder. I ran it through a second time to extend the design and inked the very edges with Seedless Preserves Distress Ink.

I stamped the fans and the sentiment from the Justrite Vintage Fan & Sentiments Clear Stamp Set using Perfect Medium and embossed with Cosmic Shimmer Blue Maroon Aurora Embossing Powder. I cut them out using Justrite Vintage Fan Die.

I stamped the Justrite Autumn Damask Background using Perfect Medium and embossed with Cosmic Shimmer Blue Maroon Aurora Embossing Powder. I matted it onto a piece of Plum Card.

I cut the Couture Creations Lotus Filet Die out of Plum Card.

I assembled the card as shown adding some White Pearls, some White Mini Pearl Swirls and some dots of Cosmic Shimmer Cosmic Pearl PVA around the edges.

Thanks for stopping by.

Julia.

Wednesday, 7 January 2015

Furry Family Member

Hi Bloggers.

Before I share today's card, just wanted to let you know that there's a couple of videos that I did with Sue Wilson on her YouTube Channel. CS Shimmer Paint - here, CS Mica Powders - here and CS Sparkle Texture Paste here. Would be great if you have the time to go and have a look.

Here's today's card -

For the background, I ran a piece of Milk Card through the Grand Calibur with the Creative Expressions Rambling Blossoms Embossing Folder and inked around the edges with Black Soot Distress Ink.

I stamped the sentiment from the Pawprints on My Heart Clear Stamp Set using Jet Black Archival and embossed with Cosmic Shimmer Clear Embossing Powder. I cut it out using Spellbinders Majestic Circles and inked through the die with Black Soot.

I cut a Couture Creations Moulin Rouge Die out of Black Card.

I made a bow using Sue's Dotty 3D Bow Die Set, inking around the edges with Black Soot before construction.

I assembled the card as shown adding some Black Pearls to the corners and some dots of Cosmic Shimmer Ivory PVA around the edges.

Thanks for stopping by.

Julia.

Tuesday, 6 January 2015

Celebrate

Hi Bloggers.

Here's today's card -

For the background, I ran a piece of Coconut White Card through the Grand Calibur with the Checkerboard PinPoint Embossing Folder. I wrapped a a piece of Blue/White Striped Grosgrain around it towards one side.

I stamped the celebrate sentiment and the frame from the Justrite Emjoy the Day Clear Stamp Set using Perfect Medium and embossed with Phill Martin's Graceful Blue Embossing Powder. I cut it out using Justrite Vintage Labels 4.

I stamped the Life is Good drame from the same stamp set, again using Perfect Medium and embossed with Graceful Blue Embossing Powder. I cut it out using another Justrite Vintage 4 Die.

I cut the largest die in the Vintage Labels 4 Die Set out of Coconut White Card and then ran it through the Grand Calibur with the Creative Expressions Quilted Flower Embossing Folder.

I cut the largest die from the Spellbinders Ornate Squares Die Set out of Coconut White Card and rubbed Grraceful Blue Gilding Wax over it.

I tied a bow using Blue/White Striped Organza, added a White Crystal Sparkler and a couple of Decorative Stick Pins.

I assembled the card as shown adding a couple of White Pearls to 2 of the corners, a Pearl Swirl and some dots of Graceful Blue PVA around the edges.

I am pleased to announce that I will be demoing at Phill Martin's shop, Honeypot Crafts, with the man himself on Sunday 1st February. Should be a fun day!

Thanks for stopping by.

Julia.

Monday, 5 January 2015

Thank You and lots of Workshop News

Hi Bloggers.

Lots of workshop news at the end of this post.

Here's today's card -

For the background, I sprayed some Phill Martin Graceful Peach Ink Spray Mist onto a piece of Cut n Dry Foam to make myself an 'ink pad' (you could also use Cut n Dry Felt). I used this to stamp the Justrite Sweet Lace Background twice onto a piece of Coconut White Card. The first impression turned out a little pale but that's ok, I still used it! I ran the piece through the Grand Calibur with the Checkerboard PinPoint Embossing Folder and inked around the edges with Dried Marigold Distress Ink. I wrapped a piece of White Crochet Ribbon around the join.

I stamped the frame and the sentiment from the Justrite Botanical Swirls Labels Stamp Set using Perfect Medium and embossed using Graceful Peach Embossing Powder. I cut it out using Spellbinders Botanical Swirls & Accents Die Set. I removed the frame/sentiment piece and inked through the die with Dried Marigold for the outer frame. I stamped the bracket design from the same stamp set twice, using Perfect Medium and embossed with Graceful Peach Embossing Powder. I cut them out using the corresponding die from the Spellbinders Botanical Swirls & Accents Die Set.

I cut the corner die from the Botanical Swirls & Accents Die Set out of Coconut White Card and rubbed Graceful Peach Gilding Wax over. I popped some Graceful Peach Twinkles onto my Craft Sheet and picked some up onto a piece of Cut n Dry Foam and added it to the corner die cut.

I misted a piece of White Tulle with Graceful Peach Ink Spray Mist and let dry naturally. Once dry, I knotted it in the middle and trimmed it a little. I added a couple of Pearl Sprays, made a flower using Sue's Delicate Daisies - Open Petals and added a Small Circle Dazzler.

I assembled the card as shown adding some White Pearls to the corners and some dots of Graceful Peach PVA around the edges.

I have prepared some more workshops to be held at Creative Expressions HQ in Kettering and I will be running some full day workshops just outside Milton Keynes.

Workshops at Creative Expressions HQ, Kettering

For all workshops at CE HQ, please contact Tracey on 01536 481778 during office hours for more information or to book a place.


Thursday 15th January 2015 and Tuesday 20th January -

Morning Workshop


You can use any of Phill Martin's Graceful Colour Collections. You can use any of the Rectangular frame stamps and background stamps.

Afternoon Workshop
 

You can use any of Phill Martin's Graceful Colour Collections.

Tuesday February 3rd 2015 -

Morning Workshop

You can make a Mauve & White Card or a Blue & White Card. Any mask, any New York Square Die Set, either flower die set, any Mini Frame Stamp and Sentiment.

Afternoon Workshop

Other dies with be available.

Tuesday 24th February 2015 -

Morning Workshop

You can use any of Phill Martin's Graceful Colour Collections.There'll be various Justrite Background stamps available.

Afternoon Workshops


Variations of products used will be available as always.

Tuesday 3rd March - All Day Workshop : Introduction to Stamping

For those of you who haven't tried stamping or what to improve. We'll look at inks, different kinds of stamps and use lots of different mediums.

Workshops at Yardley Gobion Village Hall, Near Milton Keynes

I will be running a series of full day workshops at a lovely hall in the village of Yardley Gobion just 10 minutes from Milton Keynes. Milton Keynes has a great shopping centre and lots of great places to eat so why not make a weekend of it?

Workshops will be 2 - 4 projects in a day depending on complexity and will be repeats of some of the projects at Creative Expressions HQ.

Dates are -

Saturday 7th March 2015

Saturday 16th May 2015

Saturday 18th July 2015

Saturday 12th September 2015

Saturday 14th November 2015

Please email me at juliawattscrafts@gmail.com for further details.

I hope there's something of interest!

I have popped all of the worskhop info above on a page on this blog that you can access via the menu at the top of this page. If browsing on your tablet or phone, you will need to scroll down to the bottom of the comments and select to view web version and then the top menu will be visible.

Thanks for stopping by.

Julia.

Sunday, 4 January 2015

Just For You

Hi Bloggers.

Here's today's card -

For the background, I ran a piece of Milk Card through the Grand Calibur with the Creative Expressions Quilted Flower Embossing Folder. I rubbed Enchanted Gold Gilding Wax over the embossed design. I left it to dry for a few minutes and then buffed it up using a dry wetwipe.

I stamped the Justrite Fragrant Garden Background onto Milk Card using Perfect Medium and embossed using Cosmic Shimmer Gold Detail Embossing Powder. I cut the background out using Spellbinders Matting Basics A which removed the outer frame from the design.

I stamped the sentiment and the frame from the Justrite Botanical Swirls Labels Stamp Set separately, again using Perfect Medium and embossed with Gold Detail Powder. I cut them out using a couple of dies from the Spellbinders Botanical Swirls & Accents Die Set.

I tied a knot in a piece of Gold Tulle. I cut a couple of leaves out of Milk Card using Spellbinders Botanical Swirls & Accents Die Set and added a Gold Satin Ribbon Rose.

I assembled the card as shown addin a Cream Pearl to each corner and some dots of Cosmic Shimmer Ivory PVA around the edges.

John Lockwood has shows on Create & Craft today at 12noon and 3pm. Hope you can join him.

Thanks for stopping by.

Julia.

Saturday, 3 January 2015

Scrapbook Saturday

Hi Bloggers.

Seeing as we're starting a New Year, I thought I would do something a little different and share a scrapbook page every Saturday. Scrapbooking can be a little scary when you first start but in my own opinion there really are no rules except that you should really try to use acid & lignin free papers and card.

If you approach it like you would do a card, think of the photo as your topper or stamped image and go from there. Start with 8 x 8 rather than 12 x 12 - it's far less daunting and more like the size of cards we make.

As far as journalling is concerned, if you really don't want your handwriting on a page, then type it up on your pc and print it out. If you have nothing to say about a photo, don't stress about it, just don't have any journalling on that page. Scrapbooking should be fun and I think a lot of us get hung up on what supposed to be on a page and so we get put off and don't think we can do it. Anything goes as far as I'm concerned.

With the layout - if you like how it looks then go with it!

Anyhow, here's a 12 x 12 page with my daughter, Kathryn, and her boyfriend, Jonny -

I've used Colorcore Cardstock. The paper is from the Couture Creations Sew Jo 12 x 12 Paper Pad. The corners are cut using Sue's Scandinavian Corner, Border & Tag Die Set. The border is cut using Couture Creations Simplicity Border Die Set. The Title is cut using Spellbinders Font One Upper Case and Lower Case Die Sets. The text at the bottom is stamped with Jet Black Archival using some stamp sets I've had forever.

See, not complicated at all!

Thanks for stopping by.

Julia.

Friday, 2 January 2015

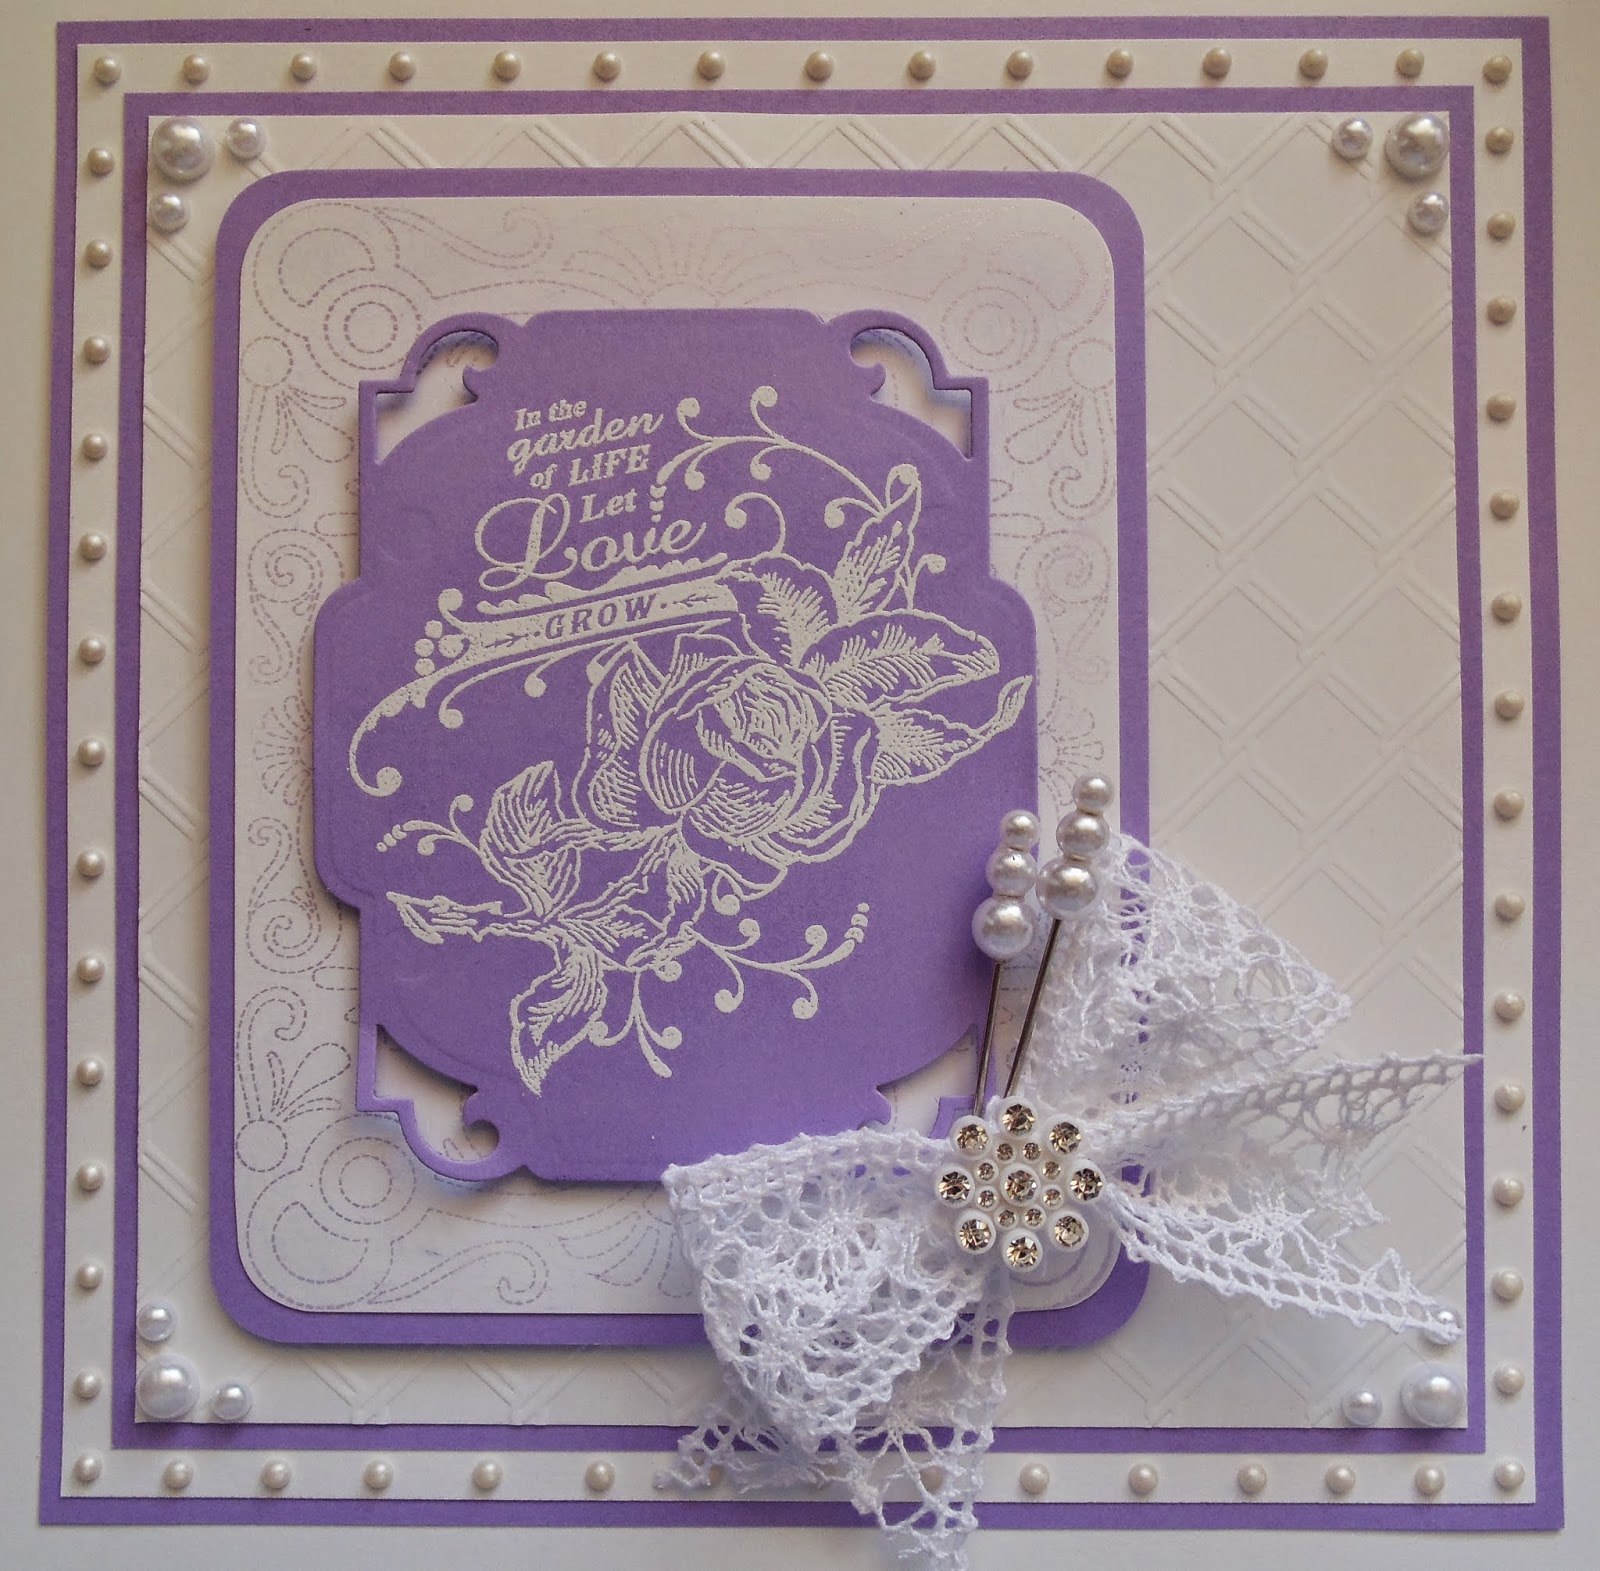
In the Garden of Life

Hi Bloggers.

Here's today's card -

For the background, I ran a piece of Coconut White Card through the Grand Calibur with the Couture Creations Great Chain Wire Embossing Folder. I ran it through a second time to extend the design.

I stamped the Justrite Stitched Frame Background using Perfect Medium. I brushed Violet Frost Mica Powder from the Cosmic Shimmer Garden Flora Mica Spray Set over the image and removed the excess with a dry wetwipe.

I stamped the main image from the Justrite Hope & Love Vintage Labels 8 & 9 Clear Stamp Set onto Mauve Card using Perfect Medium and embossed with Cosmic Shimmer True White Detail Embossing Powder. I cut it out using the largest die in the Justrite Vintage Labels 8 Die Set.

I tied a bow using White Crochet Ribbon, added a couple of White Pearl Decorative Stick Pins and a White Crystal Sparkler.

I assembled the card as shown adding White Pearls to the corners and some dots of Cosmic Shimmer Cosmic Pearl PVA around the edges.

Thanks for stopping by.

Julia.


Thursday, 1 January 2015

So Many Happy Memories

Hi Bloggers.

Happy New Year!

For the background, I stamped one of the designs from the Justrite Ornate Corners Clear Stamp Set in all 4 corners of a piece of Coconut White Card using Faded Jeans Distress Ink. I made sure the ink was dry and then ran it through the Grand Calibur with the Creative Expressions Art Deco Fanfare Embossing Folder and inked around the edges with Faded Jeans.

I stamped the sentiment and the frame from the Botanical Swirls Labels Stamp Set using Perfect Medium and embossed with Phill Martin's Graceful Blue Embossing Powder. I cut it out using Spellbinders Botanical Swirls and Accents Die Set. I removed the frame and sentiment piece and then inked through the die with Faded Jeans on the outer frame.

I cut the largest of the Spellbinders Ornate Squares Die Set out of Coconut White Card and rubbed Phill Martin's Graceful Blue Gilding Wax over.

I assembled the card as shown adding a White Pearl to each corner and some dots of Phill Martin's Graceful Blue PVA around the edges.

My daughter, Kathryn, has blogged quite a bit recently. You can visit her blog here.

Thanks for stopping by.

Julia.