Friday 27 January 2012

Taking a break

Hi Bloggers,

Just a short post to let you know that I'm taking a blog break so I can work on some samples for the Create & Craft shows on 7th February. I'll be posting samples from the show from 4th February onwards.

For now I'll leave you with a cute photo of Charlie Cat getting into the spirit of Christmas!


See you back here on 4th Feb.

Julia

Other Things May Change Us

Hi Bloggers,

Today I'm sharing this card -


I inked though the Ivy Background Mask with Paris Trunk Peach Satin and Blotter Dye Ink Pads using Cut & Dry Foam. I also spritzed with some Cosmic Shimmer Golden Pear from the Garden Flora Mica Spray set.

I stamped the sentiment from the Creative Expressions Simply Sentiments stamp set using Jet Black Archival and embossed it with Cosmic Shimmer Clear Embossing Powder. I edged it with the Blotter ink.

I cut a frame from Spellbinders Labels Two and popped it over my sentiment using 3d foam.

I made a flower using the Creative Expressions Floral Embossing Folder. I will be showing how to do this in a demo on my next show on Create & Craft. The flowers were coloured with the Peach Satin ink and spritzed with Dark Bronze from the Cosmic Shimmer Metallics Mica Spray set.

I added some green leaves made with the Spellbinders Foliage dies and popped a clear Glass Glintz in each corner.

Hope you like the card.

I'm sharing this with Make It Monday #73.

Thanks for stopping by.

Julia

Thursday 26 January 2012

Kraft Cards

Hi Bloggers.

I had a lovely morning yesterday at a card making class at Loobi Crafts in Leighton Buzzard. I go there every month to chill out and be taught. It's a great source of inspiration.

We made 2 cards using Kraft card. This one uses a mix of Tim Holtz (I think) and Creative Expressions Stamps, Barn Door Distress Ink, Jet Black Archival, Perfect Pearls Heirloom Gold and Kraft Core card -


This one uses Papermania stamps, Spellbinders Labels One, Distress Inks - Bundled Sage, Spun Sugar and Tumbled Glass, Jet Black Archival, Cosmic Shimmer Ribbon -


Thank you Lisa for a lovely morning.

Julia

Wednesday 25 January 2012

Silver Pendant

Hi Bloggers.

Following on from the technique used on the ATC yesterday, today I have this card to share with you -


I added some alcohol ink to some acetate with my Alcohol Ink Applicator Tool (can't remember colours - sorry!). I made sure the whole area was well covered. Next I stamped some swirls from the Creative Expressions Swirl stamp set using Jet Black Archival. This time I removed the ink after stamping. You need to dab it off to begin with so that you don't move the ink to another area. Once most of the ink has been removed then you can rub hard to remove the rest. The acetate background was secured to a piece of white card with 4 small silver brads.

I cut the Spellbinders Kaleidoscope Pendant from some silver mirri card and secured it to my background with a glitterery silver brad. I mounted the while lot onto some more mirri card and then a 6 x 6 card blank.

Hope you've enjoyed your visit and are inspired to give this technique a go.

Thanks for stopping by.

Julia.

Tuesday 24 January 2012

Winter Wonderland

Hi Bloggers,

The theme in December for the ATC swap for the little group I'm in was Winter Wonderland. This was entry -


I applied some Alcohol Ink to some acetate using an Alcohol Ink Applicator Tool - I think I used Pool, Stonewashed and Eggplant. Once the area was covered, I went over it again with the same inks.

I stamped some images and the sentiment from the Creative Expressions Winter Wonderland stamp set using Jet Black Archival.

Once dry, I popped a spot of Cosmic Shimmer Dries Clear Glue in each corner of a white ATC and put the acetate piece on top. I glued some blue Eco Green Glass Glintz in each corner.

I'm sharing this with Make It Monday #73.

Thanks for stopping by.

Julia

Monday 23 January 2012

Bottle Tops

Hi Bloggers,

An easy peasy card to share today - and not a stamp in sight!!!


I used some old packing card and passed it through a ribbler. I mounted some really lovely textured black card on top. Next I cut out some squares from some Starbucks coffee holders and popped the Guinness bottle tops on top.

As I said - easy peasy!!

Thanks for stopping by.

Julia.

Sunday 22 January 2012

Blue Steampunk

Hi Bloggers.

Today I'm sharing a card which was a backup demo card for the Vintage Inventor shows but wasn't needed. It seemed a shame not to make it up and share it so here it is -


The layout and techniques for this card are almost the same as for Thingamajig posted earlier this month.

Here's the details for this one - For my main background I ran some white card through the Grand Calibur with the That Special Touch Cogs Mask. I increased the size of the background by running though a second time making sure that the area that was already embossed remained outside of the plates. I then added some Faded Jeans Distress Ink with some Cut & Dry Foam. Using the Faded Jeans Distress Stain I splatted in the centre of some of the cogs.

I inked through the That Special Touch Metal Effect Mask with Faded Jeans Distress Ink onto a piece of white card.

I stamped the Steam Train Drawing from the Vintage Treasures Stamp Set with Jet Black Archival and embossed using Cosmic Shimmer Clear Embossing Powder. I coloured the background with Faded Jeans Distress Ink. I stamped the coloured the sentiment in the same way.

I assembled the card as shown and added some Creative Expressions Faux Screw Brads in Antique Silver.

Hope you like this variation.

I'm sharing this with Make It Monday #72

Thanks for stopping by.

Julia.

Saturday 21 January 2012

Garnet Tag

Hi Bloggers,

Today I have a tag to share with you -


I used a cream tag. I swiped some Eco Green Paris Trunk Dye Ink in Garnet across my Craft Sheet. I spritzed a little water on to it and then dragged my tag through it. I then dried it with my heat tool. I dabbed my tag into the ink to pick up some splats. I did this several times, drying each time. This technique is usually done with Distress Inks but works just as well with the Eco Green Dye Inks.

I then stamped the script from the Creative Expressions Wine stamp set using the Garnet Ink Pad. Next I sprayed on some Cosmic Shimmer Mister in Mallow Blush and dried it.

I ran my anti-static pad over the tag. I inked up one side of the That Special Touch Ivy Background Mask with Perfect Medium. I popped the mask ink side up onto the base plate of my Grand Calibur and put the tag face down onto the mask. I secured it with some repositionable tape. I put my tan embossing mat then the pink embossing plate on top and ran it through the machine. The perfect medium was then transferred to the debossed pattern on my tag. I dusted some Enchanted Gold Mica Powder (from the Garden Tones Cosmic Shimmer Mica Spray Set) over the ivy pattern. The mica powder clings to the Perfect Medium.

I cut a butterfly out of Burgundy card using the Spellbinders Grand Shapabilities Wonderful Wings. I inked with Perfect Medium while still in the dye and also added some ink around the edges of the butterfly once I had removes it from the die. I then dusted with the Enchanted Gold Mica Powder.

I stamped the sentiment using the Garnet Ink and embossed using Cosmic Shimmer Clear Embossing Powder. I inked around the edges with the Garnet Ink.

I secured the butterfly to the tag by popping some Cosmic Shimmer Dries Clear Glue to the body. I mounted the sentiment using 3D foam. I added some Vintage Ribbon in Basque Red to complete the tag.

I'm entering this tag into the following challenges -
Make It Monday #72
Moving Along With The Times - Things With Wings
CES Challenge Blog - Anything But a Card

Thanks for stopping by.

Julia

Friday 20 January 2012

Peachy Butterflies

Hi Bloggers,

Today I'm sharing this peach toned card with you -


I embossed some white card with the Couture Creations Intrinsic Embossing Folder. I edged it with Eco Green Paris Trunk Peach Satin Dye Ink Pad.

I stamped the sentiment from the Creative Expressions Artsy Floral Stamp set using Jet Black Archival Ink and embossed with Cosmic Shimmer Clear Embossing Powder. I cut it out using Spellbinders Labels Twenty and inked with the Peach Satin Ink while still in the die.

The butterflies are cut From DCWV Nana's Nursery Baby Girl using the Spellbinders Wonderful Wings Grand Shapabilities dies.

I assembled the card as shown and added a few pearls to the butterflies bodies.

I'm entering this card into the following challenges -
Make It Monday #72
Flutter By Wednesday #186
Moving Along With The Times - Things with Wings
Charisma Cardz - Clean and Simple

Thanks for stopping by.

Julia

Thursday 19 January 2012

Black & Gold

Hi Bloggers,

Today I'm sharing this black & gold card with you.


For the background I inked up the That Special Touch Leaves Mask with Perfect Medium. I dusted a piece of black card with my anti static bag and then placed it dusted side down onto the mask. I ran it through my Grand Caliber to emboss it. The Perfect Medium had transferred to the card when the debossed pattern was. I then added some Cosmic Shimmer Bright Gold Metallic Embossing Powder and heat set it.

I stamped the sentiment from the Creative Expressions Seasonal Flora using Perfect Medium and I embossed it with the CS Bright Gold.


I cut a frame out of matt gold card using Spellbinders Labels Twelve. I also cut some leaves out of the matt gold card using the Spellbinders Foliage dies. I made a black flower using Spellbinders Spiral Blossom One.

I assembled the card as shown and added some Cosmic Shimmer Pearlescent PVA in Olympic Gold.

Hope you like the card.

I'm sharing this card with Make It Monday #72.

Thanks for stopping by.

Julia.

Wednesday 18 January 2012

Purple and Mica Powders

Hi Bloggers,

I'm busy making samples for my next shows on Create & Craft but can't show you any just yet. So, I've made this simple card to share with you today (sorry about the picture quality - it's late as I'm writing this).


The large image is from the Creative Expressions Arty Floral set. I stamped it using Jet Black Archival and embossed it with Cosmic Shimmer Clear Embossing Powder.

I then went over the whole area with Perfect Medium and brushed over Violet Frost Mica Powder from the Cosmic Shimmer Mica Spray Set Garden Flora. The mica added a lovely shimmer to the image and changed the embossed Jet Black Archival to silver.

I tore around the edges of the image and inked over them with Eco Green Paris Trunk Ink Pad Lavender Organza.

I stamped the sentiment from the same stamp set again with the Jet Black Archival and embossed with the clear powder. I went round the edges with the Lavender Organza.

I ran a piece of square card through the Grand Calibur with the Creative Expressions Floral Embossing Folder. I needed to run it through a second time as the card was a little bigger than the folder.

I inked around the edges with Lavender Organza. I mounted it onto some white card and then some more white card which was inked around the edges with the Lavender Organza so as to add a coloured mat. I added one more mat of white card and a few purple pearls and the card was finished.

Hope you like it.

Thanks for stopping by.

Julia.

Tuesday 17 January 2012

Thinking of You

Hi Bloggers,

Sadly a dear friend of mine died on 7th January. I shall miss her a lot. I've made this card to send to her husband - I know it's pink but my friend would have loved it.


I ran a piece of white card through the Grand Calibur with the Creative Expressions Lattice Embossing Folder. I needed to run it through a second time as my card was bigger than the folder. I inked around the edges with Eco Green Crafts Paris Trunk Dye Ink Pad in Pink Taffeta and Cut & Dry Foam.

I popped this on to a white mat. I hadn't got quite the right colour of pink card so I inked around the edges of a slightly larger piece of white card with the Pink Taffeta ink to create my pink mat. I popped all this onto an A5 card blank.

I stamped the greeting (from the Creative Expressions Artsy Floral Stamp Set) using Jet Black Archival and embossed with Cosmic Shimmer Clear Embossing Powder. I inked around the edges of the sentiment with Pink Taffeta.

I cut a frame out of white card using 2 sizes of the Spellbinders Curved Rectangles Dies. When I put it through the machine to emboss I popped the That Special Touch Small Polka Dots Mask underneath. The edges of the frame remained smooth and the inside was embossed with small polka dots. I inked the polka dots with the Pink Taffeta Ink while the frame was still in the dies.


I popped the sentiment onto my card and put the frame over the top mounting on 3D foam.

The flowers were made by stamping the six petal blank flower from the Creative Expressions Button Floral stamp set using Jet Black Archival. I over stamped with a script stamp (also Creative Expressions) using the Pink Taffeta Ink Pad. I did this 3 times for each flower. I cut each flower out making sure I cut off the black stamped outline. I inked around the edge of the top of each flower with Pink Taffeta and then inked all over the reverse of all of them. I assembled the flowers in the usual way - see Sue's Wilson's Step by Step Instructions if you're not sure.

I cut some leaves out using the Spellbinders Foliage Die set and used a punch for some smaller leaves.


I popped the flowers and leaves onto the card as shown.

This card could be made for any occasion (just change the sentiment) and in any colour as I've only used white card (plus a bit of green for the foliage) and an ink pad.

Hope you like the card.

I'm sharing this with Make It Monday #72.

Thanks for stopping by.

Julia.

Monday 16 January 2012

Black & White Leaves

Hi Bloggers,

This card started out very simple but then I just had to go and dress it up a bit.


I stamped a square piece of white card with a leaf from the Creative Expressions Falling Leaves stamp set. I used Jet Black Archival and embossed it with Cosmic Shimmer Clear Embossing Powder.

I stamped the sentiment from the same stamp set onto a spare piece of white card again using the Jet Black Archival and embossed with the clear powder.

I cut a frame out of black card using Spellbinders Labels Eight and Lattice Rectangles dies. I mounted the stamped sentiment behind the frame.

I assembled the card but wasn't happy with it so I dressed it up with a length of black crochet ribbon across the width below the sentiment. I added a large bow made from the same ribbon, a Zipper Rose, a couple of Stick Pins and some Eco-Green Glass Glintz.


Hope you like the card.

I'm sharing this card with Make It Monday #72.

Thanks for stopping by.

Julia.

Sunday 15 January 2012

And Finally ........

Hi Bloggers,

This is the last sample that I have to share from the Vintage Inventor shows -


For the base layer of the tag I used a cool Tim Holtz technique. I used a cream tag. I dragged my Vintage Photo Distress Ink Pad over my Craft Sheet and spritzed with some water. I then popped my tag straight on top and swirled it around a little. I removed it and then dried with my heat tool. I then popped it back on to the ink to collect some splashes of ink and dried it again. I repeated this until I was happy with the result.

Next I stamped the Creative Expressions Scattered Words stamp with Vintage Photo. It's a big stamp so it covered the whole tag.

I used the That Special Touch Metal Effect Mask on the bottom left-hand corner and inked through with Vintage Photo.

I dyed some American Seam Binding with Vintage Photo Distress Ink. I crumpled it up whilst drying it with my heat tool.

I stamped the embellishments from the Vintage Illusion stamp set using Coffee Archival Ink, cut them out and coloured them with Vintage Photo Distress Ink.

I stamped the sentiment from the Vintage Treasures stamp set using the Coffee Archival and cut it into sections. I inked around the edges of each section with the Coffee Archival.

I assembled the tag as shown adding a Creative Expressions Faux Screw Brad in Antique Gold.

I hope you've enjoyed the Vintage Inventor projects that I've shown over the past few months. Who knows, he may well pop up again in the future!

Thanks for stopping by.

Julia.

Saturday 14 January 2012

Simple Card with Artist Spackle Background

Hi Bloggers,

Today I'm sharing this card which again features Artist Spackle in the background -


The background for this card was made by popping some Artist Spackle onto a spare piece of Craft Sheet. I then added a few drops of Vintage Photo Distress Re-Inker. You could use Vintage Photo Distress Stain instead though the result may be a little lighter or you could compensate by adding quite a lot of the stain to the spackle.

Once happy with my spackle colour, I placed the That Special Touch Metal Effect Mask onto some white card and I spread my spackle over the whole area. I scraped off any excess with a squeege tool. I removed the mask and set aside to dry. I cleaned my tools and my mask with some warm soapy water. It's easy to clean the spackle off when it's wet but it's permanent when dry.

I stamped the Steam Engine Sketch from the Vintage Treasures stamp set onto some white card with Perfect Medium and embossed with Cosmic Shimmer Clear Embossing Powder. I then went over the image with Vintage Photo Distress Ink Pad and Cut & Dry Foam. I distressed the edges of the card with my scissors and then re-applied the Vintage Photo Distress Ink. I repeated this process for the sentiment which is on the same stamp set.

Once the Artist Spackle background was dry I inked around the edges with Vintage Photo Distress Ink and Cut & Dry Foam.

I made a mat for the background by inking up the edges of a piece of white card with Vintage Photo, distressing it with my scissors and going back over it again with the ink.

I assembled the card as shown adding some Creative Expressions Faux Screw Brads in Antique Gold in each corner.

Hope you like the card.

I'm entering this card into the following challenges -
Polka Doodles - Vintage/Retro
Make It Monday #71

Thanks for stopping by.

Julia.

Friday 13 January 2012

Gold Cogs

Hi Bloggers,

I still have a few more sample cards from the Vintage Inventor shows - hope you don't mind.

Here's today's card -


This card is based on a card that Sam Poole made for Ally Pally last year. I made my card for the show to demonstrate a cool technique with the mask.

I dusted a piece of black card with my anti-static pad. I put Perfect Medium all over one side of my Cogs Mask. I placed my card, dusted side down onto the inked side of my mask and ran it through my Grand Calibur. The Perfect Medium transferred to my card. I added some Cosmic Shimmer Bright Gold Metallic Embossing Powder and heated it.

I inked a piece of American Seam Binding by running my Vintage Photo Distress Ink Pad along it. I then stamped over it using Jet Black Archival Ink.

I stamped Mr. Inventor from the Creative Expressions Vintage Inventor stamp set in Jet Black Archival. I cut him out using Spellbinders Curved Rectangles. I removed him from the die and inked around the edges lightly with Vintage Photo Distress Ink. I made a faux nestie out of rust card.

I stamped the sentiment from the Vintage Treasures Stamp Set using Jet Black Archival. I cut it out using an oval nestie. I removed it from the die and inked around the edges with Vintage Photo. I made a faux nestie from rust card.

I stamped the pressure gauge from the Vintage Illusion Stamp Set using Jet Black Archival. I gut the image out and inked with Vintage Photo. I added a Creative Expressions Faux Screw Brad in Antique Gold.

I assembled the card as shown and pierced around the edge of the large rust card with my Tim Holtz Ruler.

Thanks for stopping by.

Julia.

Thursday 12 January 2012

Following on from Yesterday

Hi Bloggers,

As promised, today's card has been made with the die cut taken from the background on yesterday's card -


The background for this card was made by popping some Artist Spackle onto a spare piece of Craft Sheet. I then added a few drops of Vintage Photo Distress Re-Inker. You could use Vintage Photo Distress Stain instead though the result may be a little lighter or you could compensate by adding quite a lot of the stain to the spackle.

Once happy with my spackle colour, I placed the That Special Touch Metal Effect Mask onto some ivory card and I spread my spackle over the whole area. I scraped off any excess with a squeege tool. I removed the mask and set aside to dry.
I cleaned my tools and my mask with some warm soapy water. It's easy to clean the spackle off when it's wet but it's permanent when dry.

I cut a faux nestie out of rust card and popped my saved die cut on to it. I stamped Mr. Inventor and the large engine plate from the Vintage Inventor stamp set using Jet Black Archival Ink onto some marine blue card and cut them out.

Once the Artist Spackle background was dry I inked around the edges with Vintage Photo Distress Ink and Cut & Dry Foam.

I assembled the card as shown adding some Creative Expressions Faux Screw Brads in Antique Gold.

Simple but effective.

Thanks for stopping by.

Julia.

Wednesday 11 January 2012

The future comes one day at a time

Hi Bloggers.

The title of this post comes from a sentiment that's on the Vintage Illusion stamp set from Creative Expressions. I think it's such a great sentiment - useful for many occasions.

Today I'm sharing this card with you -


For the background on this card I used a piece of white glossy card. I stamped some images from the Vintage Illusion and Vintage Treasures sets all over the card. I stamped them quite neatly and in a pattern taking care not to 'slide' the stamp on the card. I then went over the whole of the stamped background with Vintage Photo and Faded Jeans Distress Ink using Cut & Dry Foam. I stamped the 'STEAMPUNK' text over my background with Vintage Photo. Once I'd inked up the whole area I 'buffed' it up with an extremely dry wipe.

I stamped the steam train from the Vintage Illusion stamp set using Coffee Archival Ink and embossed with Cosmic Shimmer Clear Embossing Powder. I stamped the sentiment just below the train again with the Coffee Archival and embossed with clear embossing powder.

I cut the image out using the Spellbinders Curved Rectangles Die (my fave set at the moment) and inked with Faded Jeans while still in the die.

I stamped some cogs and a bolt from the stamp sets in Coffee Archival and embossed with clear powder. I cut them out and inked with Vintage Photo and Faded Jeans. I added some Faux Brads in Antique Gold.

Before assembling the card I found the Curved Rectangles die which was the one smaller than the one I used to cut out the steam train. I placed it on my background where I would be placing my steam train panel and secured it with a little masking tape. I popped it through my Grand Calibur. I then had a die cut shape with a cool background on it to use on another project (please pop back tomorrow to see how I used it).

I assembled the card as shown and did some paper piercing around the edge to finish.

Hope you like the card.

Thanks for stopping by.

Julia.

Tuesday 10 January 2012

And the winner is ......

Evening Bloggers,

The winner has been drawn for the card which was up for grabs from Saturday's show with Magic Hands splats.

It goes to No.9 - Rainbow Lady

Please email me at juliawattscrafts@gmail.com and include your address and I'll pop it in the post.

Many thanks for all your lovely comments.

P.S. Rainbow Lady entered 2 comments but only her first comment went in the draw so it was fair!

Julia.

Another demo card from Saturday's Show

Hi Bloggers,

Today I'm sharing this card which I demonstrated on the 6pm show last Saturday. This one was sent out to the lucky winner who was drawn from the Cup of Chance after the show.


For the background on the burgundy card I stamped the rail track from the Vintage Inventor Stamp Set with Coffee Archival Ink all down the left-hand side of the card. Being an unmounted stamp makes it quite easy to line the stamp up with the previously stamped image.

Next I added some small images from the stamp sets using Frayed Burlap and Vintage Photo Distress Ink.

I popped a good amount of Vintage Photo Distress Stain onto a spare piece of craft sheet and then added a dollop of Artist Spackle to the ink and mixed it in well using a bone folder. Once I was happy with the colour and that it was mixed sufficiently, I placed my That Special Touch Mask - Metal Effect over a corner of my background and then added my dyed spackle on top scraping away any excess with my bone folder. I repeated the process in a second corner. I then put the background aside to dry and washed my craft sheet, bone folder and mask in warm soapy water. Artist Spackle comes off easily when wet but once dry it's permanent.

I put a piece of beige card into the Creative Expressions Bark Embossing Folder and ran it through my Grand Calibur. I tore around the embossed pattern and then inked the area with Vintage Photo Distress Ink using Cut & Dry Foam.

I stamped the steam train from the Vintage Illusion stamp set using Coffee Archival Ink and embossed using Cosmic Shimmer Clear Embossing Powder. I stamped the sentiment from the Vintage Treasures set just next to the train - again using the Coffee Archival and clear embossing powder. I cut the image out using the Spellbinders Curved Rectangles die and inked with Vintage Photo while still in the die.

I stamped and embossed and coloured some embellishment images from the sheets and added a couple of Creative Expressions Faux Screw Brads in Antique Gold.

I assembled the card as shown, making sure that the Artist Spackle was dry before doing so. I finished the card with some paper piercing all around the outside edge using my Tim Holtz Ruler.

Hope you enjoyed the demo if you watched on Saturday and have enjoyed this post.

Thanks for stopping by.

Julia.

Monday 9 January 2012

Giveaway - Card from Saturday Show up for Grabs

Hi Bloggers,

I thought I'd giveaway one of the samples from the show on Saturday. It's the one shown below made with lemon juice and it's the one that 'Magic Hands' did the splat on so an original piece! For details on how to make this card please see the original post when I first made it here.


To be in with a chance of winning this card, please leave a comment below. I'll select a winner at random on Tuesday evening at 8pm.

Thanks for stopping by.

Julia.

Sunday 8 January 2012

Steam!

Hi Bloggers,

Thanks very much to those of you who joined me for my shows on Create & Craft yesterday. Your support is much appreciated.

Today I'm sharing the scrapbook page I made for the show.


My friend Dee helped me out with the fab photo of her Grandad and friends with a Road Steam Machine. Such a fabulous photo.

The background for this layout was lots of fun to make.

I took a 12 x 12 piece of card and scrunched it up. I unfolded it and then ran my Frayed Burlap Distress Ink Pad over the top so that it caught on the peaks where the card had been folded. Next I misted all over the card with water. I waited a few minutes giving the ink chance to 'move' a little and then dried and flattened it using my Encaustic Art Craft Iron.

I stamped the railtrack from the Vintage Inventor stamp set up the right-hand side of the background using Coffee Archival Ink.

I inked through the That Special Touch Mask - Metal Effect with Vintage Photo Distress Ink and Cut & Dry Foam in the top left and bottom left corners.

I stamped the Creative Expressions stamp 'Scattered Words' using Frayed Burplap in a couple of places. I splatted using Vintage Photo and Weathered Wood Distress Stains. Background complete.

I stamped the sentiment from the Vintage Treasures stamp set using Coffee Archival Ink and cut out using an oval nestie. I inked around the edges with Vintage Photo Distress Ink while still in the die.

I stamped some cogs and screws from the stamp sets using Coffee Archival Ink and inked them up with Vintage Photo and Weathered Wood Distress Inks using Cut & Dry Foam. I added a couple of Cosmic Shimmer Faux Screw Brads in Antique Gold.

The title panel was made by embossing a piece of light beige card with the Creative Expressions Brick Embossing Folder and inking the edges with Vintage Photo.

I assembled the layout as shown and did a bit of paper piercing along the way on all the brown card mats.

Hope this layout inspires you to have a go at creating your own layouts.

Thanks for stopping by.

Julia.

Saturday 7 January 2012

Things Both Modern and Ancient

Hi Bloggers,

Hope you can join me later on today on Create & Craft for my shows featuring Sam Poole's Vintage Inventor series of stamps. Details in the left-hand side bar.

Today I'm sharing one of the cards I'll hopefully be demonstrating on the first show at 12 noon.


First I dragged my Barn Door Distress Ink Pad over one side of the inside of the Creative Expressions Brick Embossing Folder. I then popped a piece of white card onto the clean side of the folder and carefully folded the inked side on top of it. I used my brayer over the top of the folder to help with the transfer of ink to my card. N.B. I did not run the folder through an embossing machine.

I carefully removed my card from the folder and added some Cosmic Shimmer Clear Embossing Powder and heat set it. I tore around the edges of the edges of the brick background.

I popped the brick background through my Grand Calibur with the That Special Touch Cogs Mask. I inked over the background using Faded Jeans Distress Ink Pad and Cut & Dry Foam. I added some splats using Faded Jeans Distress Stain.

I tore a slightly larger piece of white card and inked it with Barn Door Distress Ink and Cut & Dry Foam.

On the white background card I stamped several small images from the Vintage Inventor series using Barn Door, Faded Jeans and Weathered Wood Distress Ink.

I inked a piece of card with Faded Jeans Distress Ink and stamped Mr. Inventor using Jet Black Archival. I cut him out leaving a slight border around the edge.

I dyed some American Seam Binding with Barn Door Distress Ink. When dry I tied a small bow with 2 lengths of the ribbon and added it to Mr. Inventor using Cosmic Shimmer Dries Clear Glue.

I stamped the light bulb from the Vintage Treasures stamp set onto white card and inked with Barn Door Distress Ink. I cut it out and then added Glossy Accents to the bulb area and put aside to dry.

I stamped the sentiment from the Vintage Inventor stamp set in Jet Black Archival and cut it our using Spellbinders Labels Two. I inked around the edges with Barn Door while still in the die.

The card was assembled as shown.

I'm sharing this card with the following challenges -
Make It Monday
CES Challenge Blog - Anything Goes
Papertake Weekly - Anything Goes
Top Tip Tuesday - Anything Goes

Thanks for stopping by.

Julia.

Friday 6 January 2012

A Vintage Inventor Mother's Day Card

Hi Bloggers,

Today I'm sharing a Mother's Day card which I've made featuring Mr. Inventor.


The background papers are from My Mind's Eye Lost & Found. The grey card is Core'dinations Colorcore. I used it for the very back of the card and I used it with the Creative Expressions Bark Embossing Folder. I sanded the embossed card.

I stamped Mr. Inventor in Jet Black Archival and inked him with Old Paper Distress Ink and then Weathered Wood Distress Ink. I cut him out leaving a thin border around the edge. I mounted him onto some backing paper which was cut using the Spellbinders Curved Rectangles die set.

The sentiment is from Lili of the Valley. I inked it up with Old Paper and Weathered Wood Distress Ink. I cut a mat from one of the backing papers using the Spellbinders Eyelet Circles.

I cut some leaves out of light grey card using the Spellbinders Foliage Die set and inked with Old Paper Distress Ink while still in the die. The flowers are made from the backing papers and Spellbinders Spiral Blossom Two.

I assembled the card as shown adding a pearl in each corner.

Hope you like the card.

I'm sharing this card with my friends at Make It Monday

Thanks for stopping by. Please join me on Create & Craft tomorrow at 12noon and 6pm when I will be demonstrating Mr. Inventor.

Julia.

Thursday 5 January 2012

Cosmic Shimmer Dries Clear Glue now back in stock

Hi Bloggers,

Just a quick post to let you know that the Cosmic Shimmer Dries Clear Glue is back in stock at my Amazon Store.

I've also stocked up on lots of Distress Ink Pads.

Regards,
Julia

Vintage Inventor at Sunday Sketch & Stamp

Hi Bloggers,

Today I'm sharing my entry into this weeks Sunday Sketch & Stamp Challenge . I'm using Mr. Inventor again as I'm still prepping for the shows on Saturday.


The background paper is My Mind's Eye Lost & Found. I've added some cogs from the Vintage Treasures stamp set which I stamped in Jet Black Archival Ink. I also added some Barn Door Distress Ink around the edges of the backing paper using Cut & Dry Foam.

I didn't have the colour card I wanted for the mat for the backing paper so I inked up some ivory card with Old Paper Distress Ink - just around the edges with Cut & Dry Foam.

I stamped the Creative Expressions Scattered Words stamp onto ivory card using Old Paper Distress Ink and embossed it with Cosmic Shimmer Clear Embossing Powder. I trimmed the image and then cut it in half.

I then used the faux batik method (described in yesterday's post) to create the border in the middle. I used a cog stamp from the Vintage Illusion stamp set and the spring from the Vintage Inventor stamp set. I brayered with Barn Door Distress ink and once dry I edged the panel with Barn Door and Cut & Dry Foam.

I popped some ivory card inside the Creative Expressions Brick Embossing Folder and put it through the Grand Calibur. I tore the card around the edges of the bricks and inked with Old Paper Distress Ink and Cut & Dry Foam.

I stamped Mr. Inventor onto red card using Jet Black Archival Ink and cut him out leaving a thin border all around the edge.

I assembled the card as shown and added some Creative Expressions Faux Screw Brads in Antique Copper.

I'm entering this card into the following challenges -
Sunday Sketch & Stamp - Challenge 87
Make It Monday #70

Thanks for stopping by.

Julia.

Wednesday 4 January 2012

Vintage Inventor and Faux Batik

Hi Bloggers,

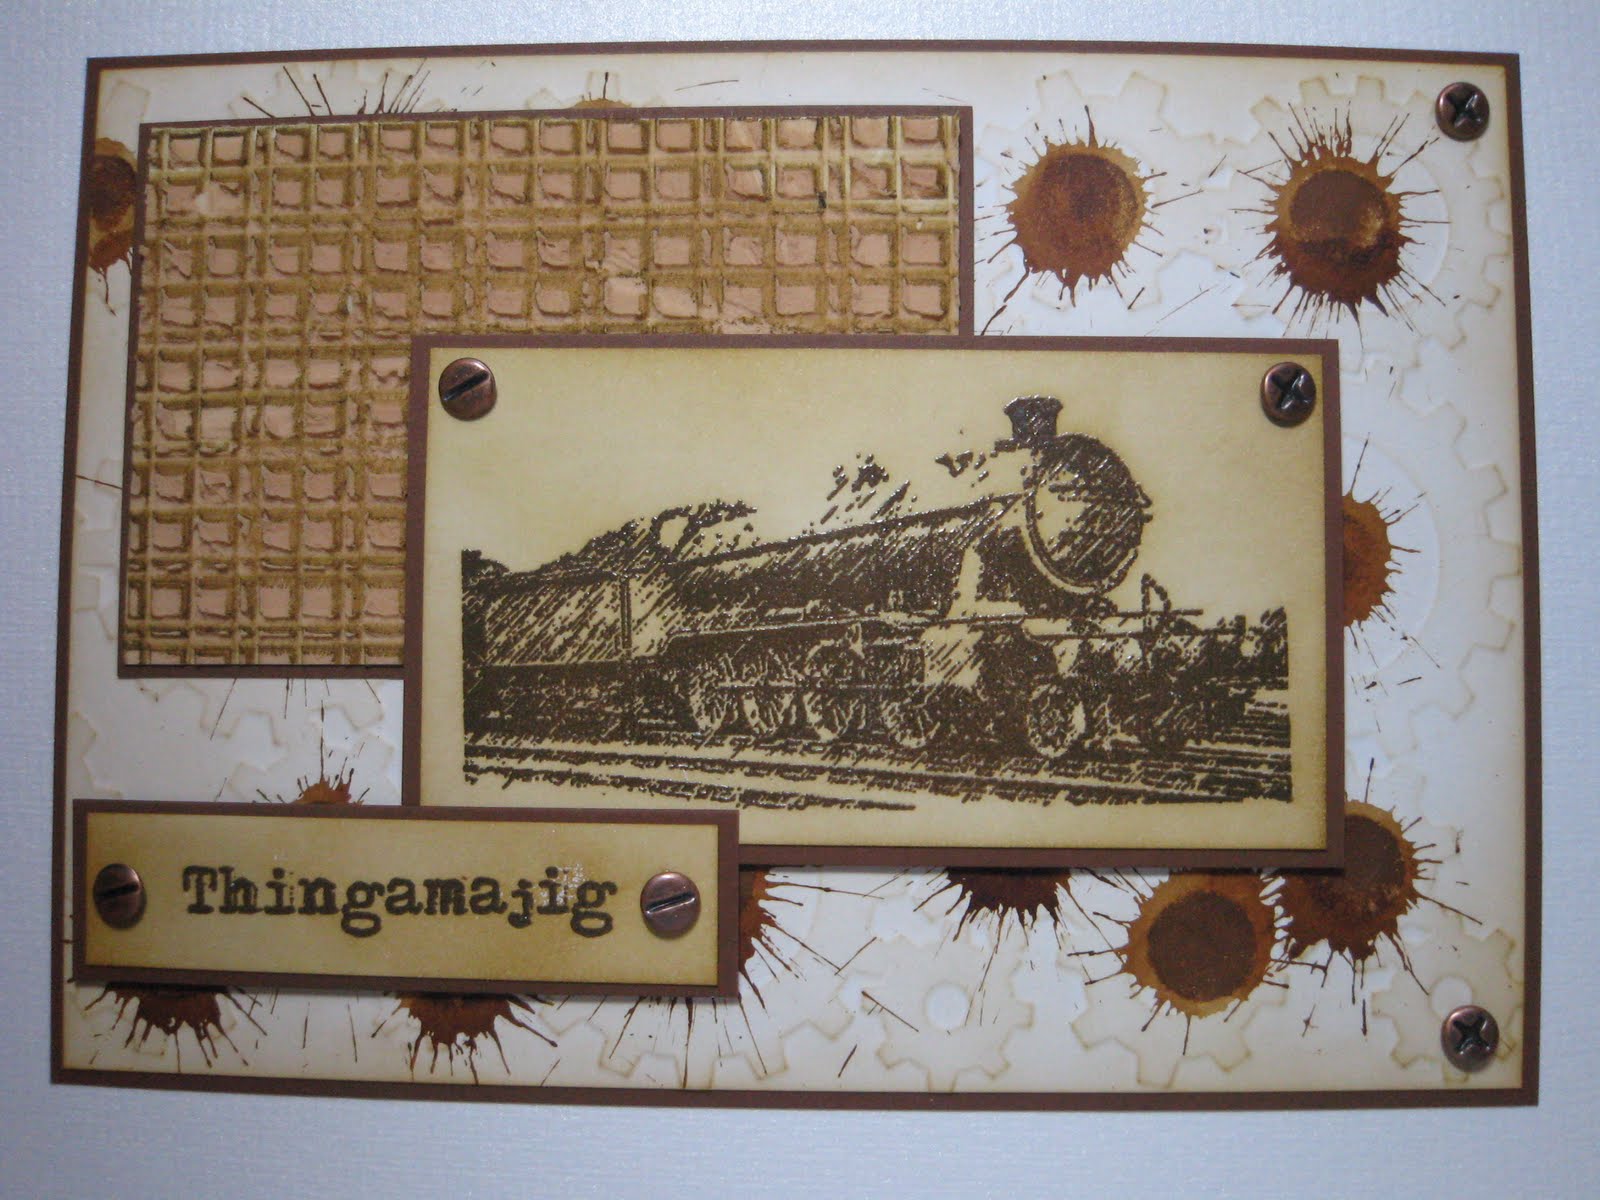
Today I'm sharing a card made with the Creative Expressions Vintage Inventor stamp sets.


This card uses the faux batik technique on the background. Sue Wilson taught me this technique a couple of years ago and I love it! You can use any stamps for the background. The Vintage Inventor series from Creative Expressions contains lots of stamps which are suitable.

I used a piece of white cardstock and wiped it with my anti-static pad. I stamped some cogs using Perfect Medium (I used a cog from each of the stamp sets - Vintage Inventor, Vintage Illusion and Vintage Treasures). I then embossed them with Cosmic Shimmer Clear Embossing Powder.

The fun part (or hard part depending on your perspective) comes next. I folded the stamped card this way and that way all over making sure that the folds were sharp by using my bone folder. The more you do and the more random the better. I turned the card over and did some folds going the other way.

I then spritzed the card with some water to break up the fibres a little. The next bit works really well if you have a Big & Juicy Ink Pad. However, these have been discontinued so we need to look at alternatives. You can used Adirondack Dye Inks or any other dye based ink. Here I have used Pine Needles and Faded Jeans Distress Ink. I used 2 brayers (you can use one but you must clean and dry it when you swap inks). I inked up the first brayer with Pine Needles and ran it over the centre of my design diagonally. I then inked up the other brayer with Faded Jeans and ran it over the remaining white apace. The embossed areas resist the ink and the ink is concentrated along the folds. I set it aside to dry.

I stamped Mr. Inventor using Jet Black Archival Ink and embossed him with Cosmic Shimmer Clear Embossing Powder. I cut the image out using a Spellbinders Labels Eight die and inked around the edges with Pine Needles Distress Ink while still ink the die. I cut a mat out of white card using a Spellbinders Labels Twenty die and inked around the edges with Faded Jeans Distress Ink while still in the die.

I stamped 2 large tickets from the Creative Expressions Tickets stamp set using Jet Black Archival Ink and embossed with Cosmic Shimmer Clear Embossing Powder.

I swiped some Pine Needles Distress Ink onto my Creative Expressions Non-Stick Craft Sheet and added a little water to it using a paint brush. I coloured in the tickets and Mr. Inventor as shown. I cleaned my craft sheet and repeated the process with Faded Jeans.

I stamped the sentiment from the Vintage Illusion set with Jet Black Archival and embossed with the clear powder. I cut it out using a Spellbinders Double-Ended Tag die and inked around the edges with Faded Jeans Distress Ink while still in the die.

I assembled the card as shown securing the sentiment with some Creative Expressions Faux Screw Brads in Antique Silver.

Hope you like the card.

I'm sharing this card with Make It Monday #70.

Thanks for stopping by.

Julia.

Tuesday 3 January 2012

Thingamajig

Hi Bloggers,

I just love that Sam Poole put a 'Thingamajig' text stamp on her Vintage Inventor stamp set. What a fantastic word that is - can be used in so many situations!

Anyway, this is the card I'm sharing today which I've made for the show I'm doing on Create & Craft on Saturday.


First I put some Vintage Photo Distress Stain onto a spare piece of Craft Sheet and I added some Artist Spackle and mixed until the colour was blended evenly. Then I spread the dyed spackle onto a piece of card. I used a squeege tool to make it fairly even. Next I inked up the Creative Expressions Plaid stamp with Coffee Archival Ink and stamped into the Artist Spackle. I carefully removed the stamp and cleaned it thoroughly in warm soapy water and set the stamped spackle aside to dry. Cool, eh?


For my main background I ran some white card through the Grand Calibur with the That Special Touch Cogs Mask. I increased the size of the background by running though a second time making sure that the area that was already embossed remained outside of the plates. I then added some Vintage Photo Distress Ink with some Cut & Dry Foam. Using the Vintage Photo Distress Stain I splatted in the centre of each cog.


I stamped the Steam Train from the Vintage Illusion stamp set with Coffee Archival Ink and embossed using Cosmic Shimmer Clear Embossing Powder. I coloured the background with Vintage Photo Distress Ink. I stamped the coloured the sentiment in the same way.

I assembled the card as shown and added some Creative Expressions Faux Screw Brads in Antique Copper.

I'm entering this card into the following challenges -
Make It Monday #70
Simon Says Stamp - Anything Goes

Thanks for stopping by. Hope you can join me on Saturday (details on the left-hand side bar).

Julia.

Monday 2 January 2012

Mr. Inventor For Valentine's Day

Hi Bloggers.

You know how much I love Mr. Inventor and I'm always looking for more ways to use him on cards. Well, I decided to see if he would work on a Valentine's Card - I think he does.


I used Sue Wilson's idea with the Spellbinders Heart Circles. I cut one out in black, white and red. I cut in between each heart on the red one so that I could fold them forward giving more dimension. I layered each die cut on top of each other offsetting each one slightly so that the previous layer showed through. I edged the inside of the top red piece with some faux stitching using my Inkssentials White Pen.

I stamped Mr. Inventor from the Creative Expressions Vintage Inventor Stamp Set onto some white card using Jet Black Archival Ink and cut him out leaving a slight border all round. I swiped some Barn Door Distress Ink onto my Creative Expressions Craft Sheet. I added a little water to the ink with my paint brush and painted the areas shown on Mr. Inventor. I added him to my heart circles with 3D foam.


For the background paper I used the Stamps by Judith Stubbie AAA-04 Dots available in the UK here or in the USA here. I stamped it randomly over my white card using Barn Door Distress Ink and edged it with Barn Door using Cut & Dry Foam.

I cut 2 borders out of black card using the Spellbinders Parisian Accents border die. I added this to my stamped background offsetting the borders slightly and leaving a gap between them of approx 5mm.

I dyed some American Seam Binding using Barn Door Distress Ink and dried it thoroughly.

I added a strip of Hi-Tack Tape along the gap between my Parisian Accents borders and ruffled a piece of the dyed ribbon along it. I tied a very tatty bow using 2 lengths of the ribbon and nestled it into by ruffled ribbon. The American Seam Binding is a much stiffer ribbon than the Vintage Ribbon and by scrunching it up when drying it, it becomes really tatty. The flower was made from a Marianne Designs die and was the perfect size for my bow. I added a couple of Creative Expressions Black Pearl Decorative Stick Pins.


I added a swirl made from Creative Expressions Pearlescent PVA Black Pearl and 3 hearts from the waste from the Heart Circles die. I finished the card off by doing some faux stitching with my Inssentials White Pen.

I'm entering this card into the following challenges -
Penny Black & More - Love and Hearts
Stampavie & More - Hearts
Crafters Companion - Love is in the Air
Simon Says Stamp - Anything Goes
Make It Monday #70

Thanks for stopping by. Hope you've enjoyed your visit.

Julia.

Sunday 1 January 2012

New Beginnings

Hi Bloggers,

Happy New Year!

Today I'm sharing this card with you -


The image is Lili of the Valley Baby Blanket. I stamped using Memento Tuxedo Black and coloured with Promarkers. I cut the image out using Spellbinders Labels Twelve and cut a mat out of pink card which I edged with my white Inssentials pen.

The papers are all from Polka Doodles Sundae of Seasons and were arranged as per the layout at Sketch Saturday this week.

I added some ruffled Vintage Ribbon in pink and added a tatty bow using 3 lengths of the same. I also added a button from my stash with some baker's twine threaded through.

The sentiment is also Lili of the Valley. I cut it out using a Spellbinders Double-Ended Tag die and cut another tag out of pink card. I cut the pink tag in half along its length and added it to my sentiment tag to create a mat.

I finished the card off with some pearls.

I'm entering this card into the following challenges -
Sketch Saturday
Allsorts Challenge - New Beginnings
Simon Says Stamp - Anything Goes
Make It Monday #69
Sweet Stampin' Challenge - New Beginnings
Joanna Sheen - Celebrations

Thanks for stopping by.

Julia.