Sunday 30 June 2013

Vintage Car

Hi Bloggers.

Here's today's card -

For the background, I spritzed some Milk Card with Cosmic Shimmer Rich Gold Mister. I dried it with my heat tool and then dusted with my anti-static bag. I stamped the Curly Corner in 2 corners using Perfect Medium and embossed with Cosmic Shimmer Olympic Gold Lustre Embossing Powder. I then popped it through the Grand Calibur with the Couture Creations Great Almanzo Embossing Folder. I ran it through a second time to extend the design.

I stamped the Vintage Car using Perfect Medium and embossed with Olympic Gold Lustre. I cut in out using Spellbinders Labels 29 and inked through the die with Antique Linen.

I tied a bow using 2 lengths of Champagne Silky Crush Ribbon. I pressed a  Fancy Pearl Embellishment into a Perfect Medium Pad, sprinkled with Olympic Gold Lustre, tapped off the excess and heat set. I added a couple of Cream Pearl Decorative Stick Pins.

I assembled the card as shown. I spritzed the middle mat with Rich Gold Mister and added dots of Cosmic Shimmer Pearlescent PVA in Golden Pearl.

Thanks for stopping by.

Julia.

Saturday 29 June 2013

So Sweet of You

Hi Bloggers.

Today a complete contrast to yesterday's card -

For the background, I ran a piece of black card through the Grand Calibur with the Couture Creations Super Powder Puff Embossing Folder. I ran it through a second time to extend the design. I then rubbed Cosmic Shimmer Vintage Golden Green Gilding Wax all over.

I stamped the frame from the Creative Expressions Posy Florals 3 Stamp Set using Jet Black Archival and embossed with Cosmic Shimmer Tropic Pearl Lustre Embossing Powder. I cut it out using scissors.

I stamped the fan piece 3 times, again using Jet Black Archival and embossed with Tropic Pearl Lustre. I added a black brad to fix them together.

I stamped the sentiment using Jet Black Archival and embossed with Tropic Pearl Lustre. I cut it out using Spellbinders Labels 28.

I assembled the card as shown adding some cream pearls and some dots of Cosmic Shimmer Pearlescent PVA in Black Pearl around the edges.

Thanks for stopping by.

Julia.


Friday 28 June 2013

Flowers are like friends

Hi Bloggers.

A bright triptych today -

For the background, I spritzed some Coconut  White Card with Tarnished Gold Cosmic Shimmer Vintage Mister. I dried it with my heat tools and then inked through the Leafy Mask with Mustard Seed Distress Ink using Cut n Dry Foam. I moved the mask around the card to extend the design. Next, I randomly stamped one of the flourishes from the Heartfelt Creations Rye Grass Flourish Stamp Set, again using Mustard Seed.

I stamped the flower image from the Posy Florals 1 Stamp Set using Perfect Medium and embossed with Cosmic Shimmer Tropic Yellow Lustre Embossing Powder. I cut them out using Spellbinders Labels 28 and inked through the die with Mustard Seed. I cut a Spellbinders Fancy Postage Edge for each of them out of yellow card.

I stamped the sentiment from the same stamp set using Perfect Medium and embossed with Tropic Yellow Lustre. I cut it out using Spellbinders Fancy Postage Edge and inked through the die with Mustard Seed.

I tied a bow using Cream Satin Edged Organza. I pressed a  Fancy Pearl Embellishment into a Perfect Medium Pad, sprinkled with Tropic Yellow Lustre, tapped off the excess and heat set. I added a couple of Cream Pearl Decorative Stick Pins at the back of the bow.

I assembled the card as shown adding some Cream Pearls in the top corners and some dots of Cosmic Shimmer Pearlescent PVA in White around the edges.

Thanks for stopping by.

Julia.

Thursday 27 June 2013

You are Loved

Hi Bloggers.

Before I show today's card, I'd like to answer a question from yesterday. Norah asked if I decide on the size of my background first or decide after I have my images and die cuts ready. Well, it depends. Usually, I will get my images, die cuts, ribbon, etc ready, lay them out on my craft sheet and measure to decide my background size. Sometimes I have to adjust it to fit in with the size of the embossing folder I want to use. Sometimes, I want to use a specific mask or folder that simply does not lend itself to being extended so in that case I set my background size first and then choose my toppers accordingly.

Here's today's card -

I used Milk Card for this one. I started my stamping the Wrought Iron Corner in each corner and embossed with Cosmic Shimmer Marine Sea Lustre Embossing Powder (finally back in stock!). I then popped it through the Grand Calibur with the Couture Creations Extra Flint Embossing Folder. I ran it through a second time to extend the design and inked around the edges with Cloudy Blue Adirondack Dye Ink using Cut n Dry Foam.

I cut a Spellbinders Labels 29 and at the emboss stage I added the Couture Creations Great Almanzo Embossing Folder. I inked through the die with Cloudy Blue.

I stamped the sentiment that comes with the Lacy Heart Stamp using Perfect Medium and added Marine Sea Lustre. I did not heat set at this stage. I then stamped the Lacy Heart stamp around it (I cut out the rubber from the centre of the heart so I could see through to position), again using Perfect Medium, added Marine Sea Lustre and heat set the lot. I cut the frame out using scissors.

I tied a bow using 2 lengths of White Silky Crush Ribbon. I pressed a  Fancy Pearl Embellishment into a Perfect Medium Pad, sprinkled with Marine Sea Lustre, tapped off the excess and heat set.

I assembled the card as shown adding some Cream Pearls in the corners and some dots of Cosmic Shimmer Pearlescent PVA in Golden Pearl around the edges.

Thanks for stopping by.

Julia.

Wednesday 26 June 2013

Purple Iris

Hi Bloggers.

Here's today's card -

For the background, I stamped the corner stamp from the Heartfelt Creations Rye Grass Flourish Stamp Set in each corner using Shaded Lilac Distress Ink. I then ran it through the Grand Calibur with the Couture Creations Super Powder Puff Embossing Folder. I ran it through a second time to extend the design and then inked around the edges with Shaded Lilac.

I cut a Spellbinders Fancy Postage Edge. At the emboss stage I added the Couture Creations Nuevo Embossing Folder and inked through the die with Shaded Lilac.

I stamped the image from the Creative Expressions Posy Florals 2 Stamp Set using Jet Black Archival and embossed with Cosmic Shimmer Clear Embossing Powder. I coloured it in using Cosmic Shimmer Matt Drawing Inks. I used Purple Lilac and Sunflower from the Summer Fayre Set and Soft Moss from the Garden Twist Set. I cut it out using Spellbinders Labels 25 and inked through the die with Shaded Lilac.

I stamped the sentiment from the same stamp set, again using Jet Black Archival and embossed with clear powder. I cut it out using Spellbinders Labels 28 and inked through the die with Shaded Lilac.

I tied a bow using White Satin Edged Organza and added a Fancy Pearl Embellishment.

I assembled the card as shown adding some dots of Cosmic Shimmer Pearlescent PVA in White around the edges.

Thanks for stopping by.

Julia.


Tuesday 25 June 2013

You're Fanastic in Blue

Hi Bloggers.

Here's today's card -

This card uses Sue's Shaving Foam Technique. I used some Patina Cosmic Shimmer Vintage Mister to begin with but I wasn't happy with the depth of colour that gave me. So, using the same foam that was still in my box lid, I added some Broken China Distress Ink Re-Inker, swirled it around and popped my card back into it - much better! When dry, I randomly stamped one of the Heartfelt Creations Rye Grass Flourish stamps using Broken China Distress Ink Pad.

I stamped the image from the Creative Expressions Posy Florals 3 Stamp Set using Perfect Medium and embossed with Cosmic Shimmer Lapis Sapphire Lustre Embossing Powder. I used a dry wetwipe to remove the excess mica. I cut it out using Spellbinders Fancy Postage Edge and inked through the die with Broken China.

I stamped the sentiment from the same stamp set, again using Perfect Medium and embossed with Lapis Sapphire Lustre. I cut it out using Spellbinders Labels 25 and inked through the die with Broken China.

I tied a bow using Blue Satin Edged Organza and added a Frosted Blue Dazzler.

I assembled the card as shown adding some dots of Cosmic Shimmer Pearlescent PVA in Summer Blue around the edges.

Thanks for stopping by.

Julia.

Monday 24 June 2013

For a Special Couple

Hi Bloggers.

A Wedding Card today -

I used Milk Card on this one. For the background, I inked through the Elegance Mask with Antique Linen Distress Ink using Cut n Dry Foam. I did this 3 times across the card.

I stamped the Wedding Belle using Perfect Medium and embossed with Cosmic Shimmer Olympic Gold Lustre Embossing Powder. I cut it out using Spellbinders Labels 29, with the image towards the right, and inked through the die with Antique Linen.

I stamped the sentiment that comes with the image, again using Perfect Medium and embossed with Olympic Gold Lustre. I cut it out using Spellbinders Fancy Postage Edge and inked through the die with Antique Linen.

I tied a bow using Cream Satin Edged Organza. I pressed a  Fancy Pearl Embellishment into a Perfect Medium Pad, sprinkled with Olympic Gold Lustre, tapped off the excess and heat set.

I assembled the card as shown adding some Cream Pearls in the corners and some dots of Cosmic Shimmer Pearlescent PVA in Golden Pearl around the edges.

Thanks for stopping by.

Julia.

Sunday 23 June 2013

Daisy Patch

Hi Bloggers.

Sue has shows today on Create & Craft - Toolshed 12noon till 2pm and 5pm. She has some lovely Heartfelt Creations Stamps and dies on the show so I thought I'd share this one today from the Pick of the Day last month.

For the background, I ran some Coconut White Card through the Grand Calibur with the Couture Creations Peacock Pleasure Embossing Folder. I ran it through a second time to extend the design and then inked around the edges with Meadow Adiondack Dye Ink using Cut n Dry Foam.

I cut 2 Heartfelt Creations Decorative Butterfly Corners out of green Card.

I stamped the smaller image from the Heartfelt Creations Daisy Patch Bouquet Pre Cut Stamp Set using Jet Black Archival and embossed with Cosmic Shimmer Clear Embossing Powder. I coloured it in using Cosmic Shimmer Matt Drawing Inks. I used Marigold from the Autumn Shades Set and Soft Moss from the Garden Twist Set. I cut it out using Justrite Nested Oval Medallion Labels dies and inked though the die with Meadow Ink.

I stamped 3 of the coordinating flowers using the Heartfelt Creations Daisy Patch Flowers Stamp Set and coloured them in using Marigold Matt Drawing Ink. I cut them out using the Heartfelt Creations Daisy Patch Dies.

I tied a bow using 2 lengths of White Silky Crush Ribbon and added a Teal Dazzler.

I assembled the card as shown adding some dots of Cosmic Shimmer Pearlescent PVA in White around the edges.

Thanks for stopping by.

Julia.


Saturday 22 June 2013

Christmas Quick Makes

Hi Bloggers.

I made a bunch of quick cards for the shows yesterday thinking that not all the cards we want to make for Christmas should be hours in the making. Here they are - no descriptions as so easy, just an ingredients list for each one.

Justrite Merry Christmas Background, Stamps to Die For - Mini Lattice bauble, Perfect Medium, Spellbinders 2011 Heirloom Ornament, Cosmic Shimmer Silver Shine Detail Embossing Powder, Assorted Square Dazzlers, White Sheer Wrinkled Edge Ribbon, 5mm White Pearls, Silver Lustre PVA.

Stamps to Die For - Ornate Bauble, Spellbinders 2010 Heirloom Ornament, Spellbinders Holly Accents, Perfect Medium, Cosmic Shimmer Bright Gold Detail Embossing Powder, Couture Creations - Message in a Tree, Cast Bronze Gilding Wax, Deep Red Gilding Wax, Red Sheer Wrinkled Edge Ribbon, Red Dazzler, Fired Brick Distress Ink, Berry Red PVA.

Justrite Christmas Holly Background, Justrite Christmas Miracle Ornaments, Spellbinders 2011 Heirloom Ornament, Antique Linen Distress Ink, Perfect Medium, Cosmic Shimmer Bright Gold Detail Embossing Powder, Golden Pearl PVA.

Justrite Merry Christmas Background, CE Snowflakes & Sprigs, CE Winter Greetings, Couture Creations - Message in a Tree, Tumbled Glass Distress Ink, Spellbinders 2011 Heirloom Ornament, Silver Lustre PVA, Aqua Silky Crush Ribbon, Assorted Circle Dazzlers.


Couture Creations - Baubles and Baubles, CE Winter Greetings, Perfect Medium, Cosmic Shimmer Silver Shine Detail Embossing Powder, Silver Lustre PVA.

As I write this, it looks like mt second show from yesterday with Loen will be repeated at 3am tomorrow morning.

Thanks for stopping by.

Julia.

Friday 21 June 2013

'Tis the Season of Love

Hi Bloggers.

Christmas in June! I know - not my fault though. I have shows today on Ideal World at 11am with Dave and on Create & Craft at 4pm with Paul. Hope you can join me.

I have to say I have struggled a bit with the prep for this one - just can't get into Christmas cardmaking just yet! Anyway, here's my favourite from the cards I have made (did take me a few hours of faffing around to complete it!), and hopefully my first demo at 11am.

I know it's not a traditional colour and if pink isn't for you then use another colour. I kind of like it!

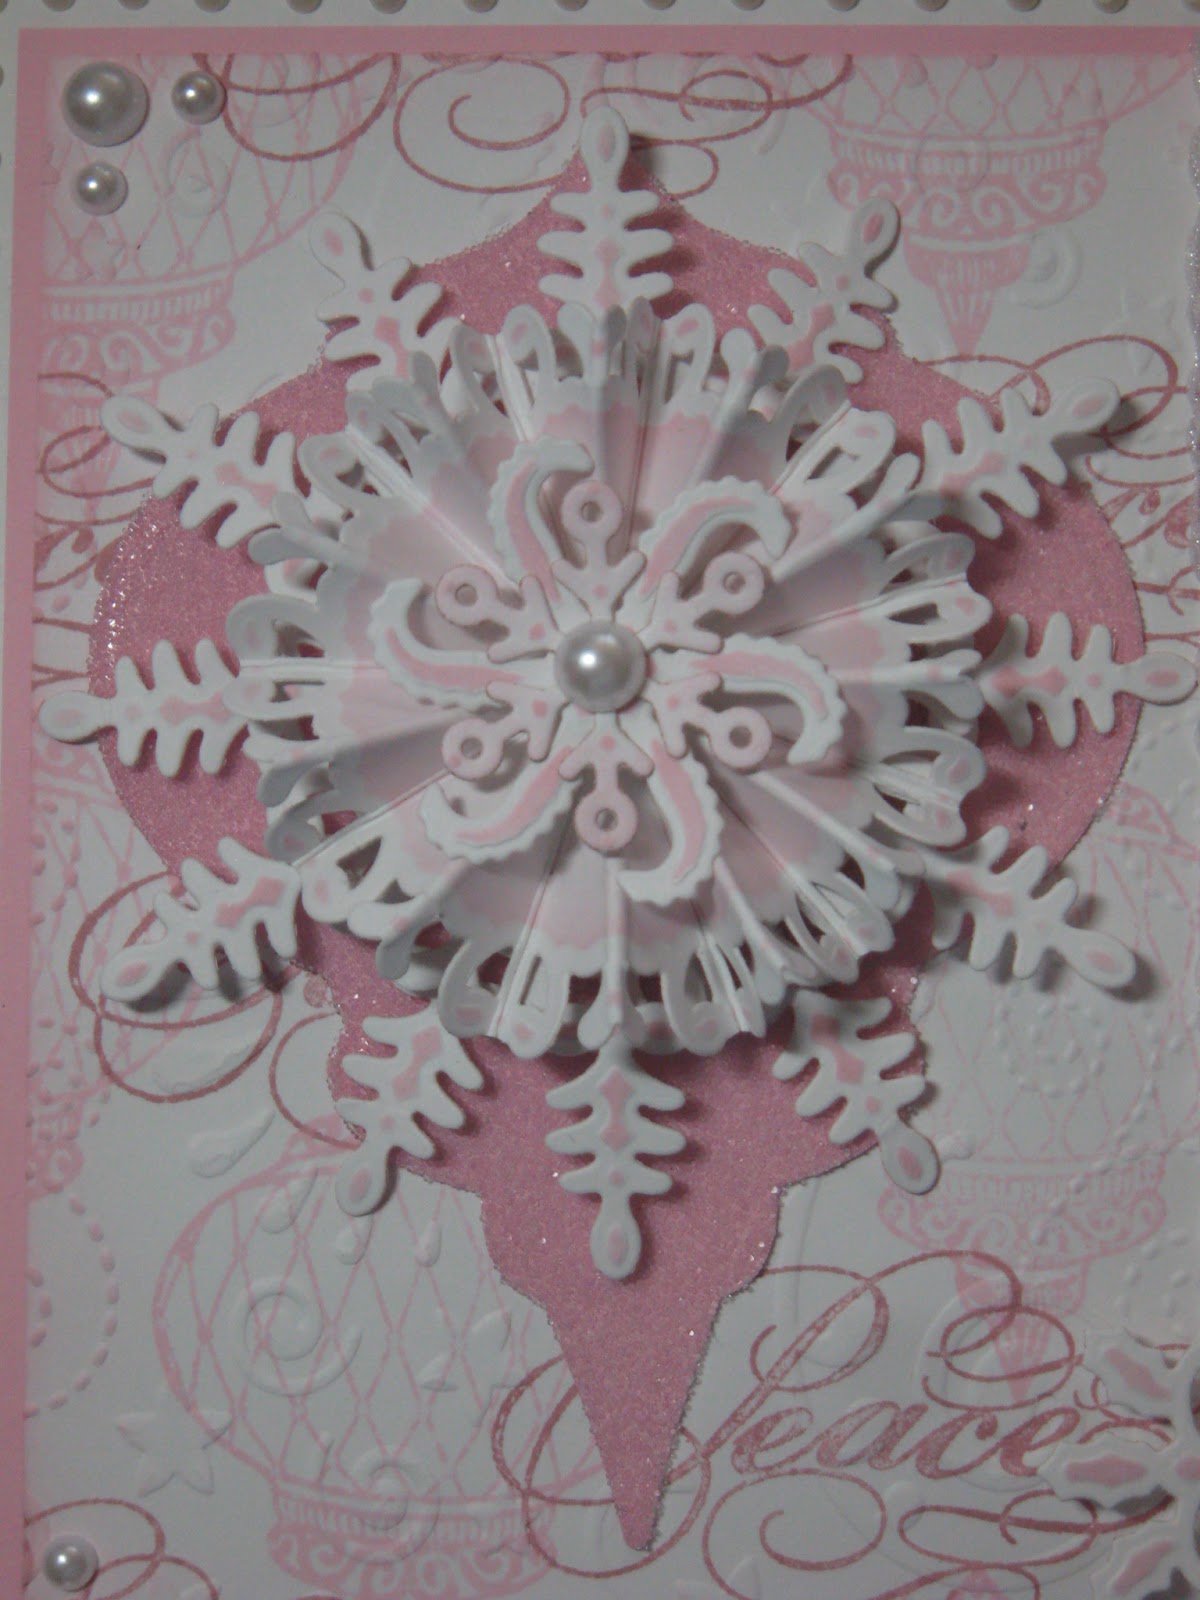
For the background, I randomly stamped the Small Beaded Bauble from the To Die For range (I have asked for some of these from my Amazon Store) using Spun Sugar Distress Ink. I then stamped the 'Peace' sentiment from the Creative Expressions Winter Greetings Stamp Set using Victorian Velvet Distress Ink. I made sure the ink was dry and ran it through the Grand Calibur with the Couture Creations New Year Dove Embossing Folder. I ran it through a second time to extend the design and inked around the edges with Spun Sugar using Cut n Dry Foam.

I popped some Double Sided Adhesive Sheet onto some pastel pink card and cut a Spellbinders 2010 Heirloom Ornament. I peeled off the backing and covered with Glass Micro Beads. I cut 4 of the largest dies from the Spellbinders 2011 Snowflake Pendant out of Coconut White Card. I inked through the die with Spun Sugar on all of them. I left 2 of them whole and fixed them together using 3D Foam offsetting them slightly. I trimmed the long pointy bits off on the other 2 and scored them across the centre. I made a cut to the centre of each and mountain and valley folded them. I glued them together using Cosmic Shimmer Dries Clear Glue. I cut one of the Catherine Wheel style dies from the 2011 Snowflake Pendant set and inked through the die with Spun Sugar. I cut a small snowflake die from the 2012 Snowflake Pendant die set, removed from the die and inked the edges with Spun Sugar. I assembled the rosette on top of the bauble as shown adding an 8mm White Pearl.

I wrapped some White Sheer Wrinkled Edge Ribbon around the card toward the right hand side. I ran a strip of pastel pink card through the Grand Calibur with the Couture Creations Star Pere Noel Embossing Folder. I rubbed some Pearl Moon Gilding Wax over it.

I stamped the sentiment from the Justrite Christmas Miracle Ornaments Stamp Set using Plum Archival and embossed with Cosmic Shimmer Clear Embossing Powder. I cut it out using Spellbinders Holly Accents and inked through the die with Spun Sugar.

I assembled the card as shown adding some dots of Cosmic Shimmer Pearlescent PVA in White around the edges.


Thanks for stopping by.

Julia.

Thursday 20 June 2013

For a Special Couple

Hi Bloggers.

A Wedding Card today -

Easy peasy this one - can be done in any colour.

For the background, I popped my tan mat onto my base plate. I dusted a piece of Coconut White Card with my anti static bag and placed it dusted side up on my tan mat. I inked up the Heart Confetti Mask with Perfect Medium and placed it inked side down on top of the dusted card. I added the pink embossing plate and ran it through the Grand Calibur. The ink transferred to the debossed pattern. I added Cosmic Shimmer Silver Lustre Embossing Powder, tapped off the excess and heat set.

I stamped the Vintage Car using Perfect Medium and embossed with Silver Lustre. I cut it out using Spellbinders Labels 29.

I stamped the sentiment that comes with the Wedding Belle Stamp using Perfect Medium and embossed with Silver Lustre. I cut it out using Spellbinders Fancy Postage Edge.

I tied a bow using 2 lengths of White Sheer Wrinkled Edge Ribbon  and added a Fancy Pearl Embellishment.

I assembled the card as shown adding some dots of Cosmic Shimmer Pearlescent PVA in Silver Lustre around the edges.

I'll be back tomorrow with a card from the Christmas Shows on Ideal World and Create & Craft.

Thanks for stopping by.

Julia

Wednesday 19 June 2013

Just wanted to say Hello

Hi Bloggers.

Here's today's card (I'll be mixing it up a bit over the next couple of weeks as I have have samples from a few different shows to share) -

For the background, I inked through the Patchwork Quilt Mask with Mustard Seed Distress Ink using Cut n Dry Foam. I moved the mask along the card to extend the design (you have to turn the mask till you find a fit with the existing inked pattern). I stamped over the top with one of the flourishes from the Heartfelt Creations Rye Grass Flourish Stamp Set using Scattered Straw Distress Ink. I made sure the ink was dry and then popped it through the Grand Calibur with the Couture Creations Extra Flint Embossing Folder. I ran it through a second time to extend the design and inked around the edges with Mustard Seed.

I stamped the Sunflowers from the Creative Expressions Posy Florals 2 Stamp Set using Jet Black Archival and embossed with Cosmic Shimmer Clear Embossing Powder. I coloured in using Cosmic Shimmer Matt Drawing Inks. I used Sunflower from the Summer Fayre Set (more on order), Meadow Lime & Soft Moss from the Garden Twist Set and Umber from the Autumn Shades Set. I cut it out using Spellbinders Fancy Postage Edge and inked through the die with Mustard Seed.

I stamped the sentiment from the same stamp set using Jet Black Archival and embossed with Cosmic Shimmer Clear Embossing Powder. I cut it out using Spellbinders Labels 25 and inked through the die with Mustard Seed.

I tied a bow using Cream Satin Edged Organza. I pressed a  Fancy Pearl Embellishment into a Perfect Medium Pad, sprinkled with Cosmic Shimmer Tropic Yellow Lustre Embossing Powder, tapped off the excess and heat set.

I assembled the card as shown adding some dots of Cosmic Shimmer Pearlescent PVA in White around the edges.

Thanks for stopping by.

Julia.

Tuesday 18 June 2013

Love

Hi Bloggers.

I had a request to share this demo card from Sunday -

For the background, I spritzed some Coconut White Card with Cosmic Shimmer Pearl Mist. Once dry, I popped it through the Grand Calibur with the Couture Creations Extra Flint Embossing Folder. I ran it through a second time to extend the design.

I stamped the Wedding Belle Stamp using Perfect Medium and embossed with Cosmic Shimmer Marine Sea Lustre Embossing Powder (in the show I used Lapis Sapphire Lustre). I cut the image out using scissors. I cut 2 Spellbinders Asian Motifs. I trimmed 1 sided off each of them and glued them together to make a large frame. I cut a Spellbinders Labels 29 and at the emboss stage added the Moroccan Mask. I inked through the die with Cloudy Blue Adirondack Dye Ink.

I stamped the sentiment that comes with the Damask Heart using Perfect Medium and embossed with Marine Sea Lustre (I used Lapis Sapphire Lustre in the show). I cut it out using Spellbinders Labels 25 (I used Labels 29 in the show) and inked through the die with Cloudy Blue.

I tied a bow using White Satin Edged Organza and added a Fancy Pearl Embellishment.

I assembled the card as shown adding some White Pearls in the corners and some dots of Cosmic Shimmer Pearlescent PVA in White around the edges.

Thanks for stopping by.

Julia.


Monday 17 June 2013

Lacy Heart

Hi Bloggers.

Thanks for all your comments and emails yesterday - much appreciated as always.

Today's card was a demo in the 7pm show -

For the background, I simply ran some Coconut White Card through the Grand Calibur with the Couture Creations Great Almanzo Embossing Folder. I ran it through a second time to extend the design.

I stamped the Lacy Heart using Perfect Medium and embossed with Cosmic Shimmer Silver Lustre Embossing Powder. I cut it out using scissors. I stamped the sentiment that comes with the Lacy Heart, again using Perfect Medium and added Silver Lustre (I did not heat set just yet). I inked up the area of the main stamp around the heart (I did cut the rubber from the centre of the stamp) and stamped it around the sentiment with Perfect Medium, added Silver Lustre Powder and heat set. I cut the heart out using scissors and popped it on top of the larger image using 3D Foam.

I cut 2 borders using Spellbinders Classic Petal Edgeabilities. At the emboss stage I added the Moroccan Mask.

I tied a bow using White Satin Edged Organza, added a Fancy Pearl Embellishment and a couple of White Pearl Decorative Stick Pins.

I assembled the card as shown adding some dots of Cosmic Shimmer Pearlescent PVA in Silver Lustre around the edges.

Thanks for stopping by.

Julia.