Hi Bloggers.
My Blog has now moved over to Wordpress and no more new posts will be added here. All the existing content will remain on here but it will not be updated.
Please follow my new Blog - https://juliawattscraftsblog.wordpress.com/
Thank you.
Julia
Sunday, 7 January 2018
Saturday, 6 January 2018
New Zealand Background with Gilding Flakes
Hi Bloggers.
Here's today's card -
 This is so simple to construct, using Gilding Flakes. You can swap the Gilding Flakes for glitter or any medium you like - paints, pixie powders, misters, acetate backgrounds, printed background papers, anything!
For this one, I have simply cut all the layers in the New Zealand Background, added Double Sided Self Adhesive Sheet to the back and then rubbed Gilding Flakes on the front. Very straight forward so just a list of ingredients today -
Products used -
Sue Wilson Dies - New Zealand Background, Double Pierced Background Rectangles, Classic Foldover Flowers, Blossoming Branch, Pierced Flags
Woodware Double Sided Self Adhesive Sheet
CS Harvest Moon Gilding Flakes
Woodware - Vintage Pocket Watches (sentiment)
Clear Perfect Medium
CS Bright Gold Detail Embossing Powder
Ivory Felt
Self Adhesive Pearls - Cream 3mm
CE Mounting Cushion
CS Glue
Card - Milk, Antique Gold Pearl

 Thanks for stopping by.
Julia.
www.juliawattscrafts.co.uk
Free card with all website orders over £10 (Add a note to your order in your cart).
Here's today's card -

For this one, I have simply cut all the layers in the New Zealand Background, added Double Sided Self Adhesive Sheet to the back and then rubbed Gilding Flakes on the front. Very straight forward so just a list of ingredients today -
Products used -
Sue Wilson Dies - New Zealand Background, Double Pierced Background Rectangles, Classic Foldover Flowers, Blossoming Branch, Pierced Flags
Woodware Double Sided Self Adhesive Sheet
CS Harvest Moon Gilding Flakes
Woodware - Vintage Pocket Watches (sentiment)
Clear Perfect Medium
CS Bright Gold Detail Embossing Powder
Ivory Felt
Self Adhesive Pearls - Cream 3mm
CE Mounting Cushion
CS Glue
Card - Milk, Antique Gold Pearl


Julia.
www.juliawattscrafts.co.uk
Free card with all website orders over £10 (Add a note to your order in your cart).
Friday, 5 January 2018
Freebie Friday
Hi Bloggers.
Freebie Friday is back! Here's the first card of the year that needs a new home -
 You can read how this card was made in this post.
Leave a lovely comment below to go into the draw to win it. I will announce the winner on Monday.
Please note : Only comments left below will go into the draw. Comments made on the original post will not count. Information given on the original post was correct at the time that post was published.
I am moving my blog from Blogger to Wordpress. Tomorrow's post will go live here on Blogger and on Wordpress. From Sunday onwards, hopefully, posts will only be added to Wordpress. I've moved a whole bunch of content over there. Everything will stay here should you wish to refer to really old posts. My new blog address is juliawattscraftsblog.wordpress.com
Thanks for stopping by.
Julia.
www.juliawattscrafts.co.uk
Free card with all website orders over £10 (Add a note to your order in your cart).
Freebie Friday is back! Here's the first card of the year that needs a new home -

Leave a lovely comment below to go into the draw to win it. I will announce the winner on Monday.
Please note : Only comments left below will go into the draw. Comments made on the original post will not count. Information given on the original post was correct at the time that post was published.
I am moving my blog from Blogger to Wordpress. Tomorrow's post will go live here on Blogger and on Wordpress. From Sunday onwards, hopefully, posts will only be added to Wordpress. I've moved a whole bunch of content over there. Everything will stay here should you wish to refer to really old posts. My new blog address is juliawattscraftsblog.wordpress.com
Thanks for stopping by.
Julia.
www.juliawattscrafts.co.uk
Free card with all website orders over £10 (Add a note to your order in your cart).
Thursday, 4 January 2018
Happy Hour Background Panels
Hi Bloggers.
Here's today's card -
 Another really easy card to make. I cut 3 strips of Coconut White Card. I cut the central panel from the Happy Hour Background into each one. I matted them all onto Black Card.
I embossed a piece of Coconut White Card using the Couture Creations Velvet Tea Lights Embossing Folder. I matted onto Black Card and then another piece of Coconut White Card.
 I cut the sentiments from the 3D Cosmopolitan Cocktail Die Set out of Black Card.
I completed my card by adding a 5mm Black Pearl to each corner of my embossed background, edging with CS Glue and adding CS Crystal Chips.
 Jane Gill has shows on Hochanda today at 8am, 12noon and 4pm. I'm offering 10% discount on items from the shows. You can find them here. Please enter JANEGILL in the discount code box at checkout to activate your discount. Offer applies till midnight tonight or while stocks last.
Thanks for stopping by.
Julia.
www.juliawattscrafts.co.uk
Free card with all website orders over £10 (Add a note to your order in your cart).
Here's today's card -

I embossed a piece of Coconut White Card using the Couture Creations Velvet Tea Lights Embossing Folder. I matted onto Black Card and then another piece of Coconut White Card.

I completed my card by adding a 5mm Black Pearl to each corner of my embossed background, edging with CS Glue and adding CS Crystal Chips.

Thanks for stopping by.
Julia.
www.juliawattscrafts.co.uk
Free card with all website orders over £10 (Add a note to your order in your cart).
Wednesday, 3 January 2018
New Zealand Background with Misters
Hi Bloggers.
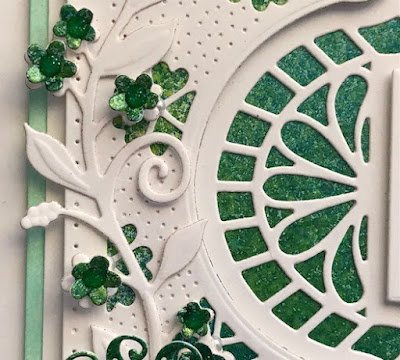
Today's card features the New Zealand Background -
 I started by misting a piece of Watercolour Card with Aqua Lagoon, Golden Mint and Egyptian Blue CS Misters.
I cut dies #5 and #6 from the New Zealand Background Die Set into a piece of Coconut White Card. I added a die from the Double Pierced Background Rectangle Die Set. I trimmed my misted background to slightly smaller than my die cut and glued the pieced together. I slotted die #4 into the aperture and cut to create a frame.
I then cut die #3 into another piece of Coconut White Card. I glued my waste piece from the previous step at the back of it. I added my large background piece to it using CE Mounting Cushion and added a frame cut from Coconut White Card using the Double Pierced Background Rectangle Die Set. I matted onto Coconut White Card, another piece of Coconut White Card inked with Fresh Grass Colour Cloud and a final piece of Coconut White Card.
 I stamped the sentiment from the Woodware Imagine Verse Stamp Set onto Coconut White Card using Vivid Chartreuse Archival. I cut it out using die #2 from the New Zealand Background.
 I made some flowers out of Coconut White Card and more of my misted background using the Spiral Flower Die Set and added an 8mm White Pearl to the centre of each flower.
 I cut a couple of pairs of foliage out of Coconut White Card using the Blossoming Branch Die Set. I cut the little flowers out of more of my misted background. I added a little CS Crystal Sparkle PVA to the centre of each little flower.

 Thanks for stopping by.
Julia.
www.juliawattscrafts.co.uk
Today's card features the New Zealand Background -

I cut dies #5 and #6 from the New Zealand Background Die Set into a piece of Coconut White Card. I added a die from the Double Pierced Background Rectangle Die Set. I trimmed my misted background to slightly smaller than my die cut and glued the pieced together. I slotted die #4 into the aperture and cut to create a frame.
I then cut die #3 into another piece of Coconut White Card. I glued my waste piece from the previous step at the back of it. I added my large background piece to it using CE Mounting Cushion and added a frame cut from Coconut White Card using the Double Pierced Background Rectangle Die Set. I matted onto Coconut White Card, another piece of Coconut White Card inked with Fresh Grass Colour Cloud and a final piece of Coconut White Card.


Julia.
www.juliawattscrafts.co.uk
Tuesday, 2 January 2018
Scattered Leaves Background and Pixie Powders on Acetate
Hi Bloggers.
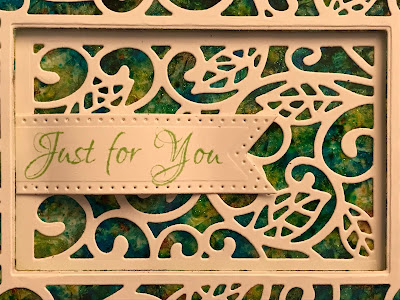
Here's today's card -
 The background on this one is one of my favourite techniques with Pixie Powders. To recap - I used a piece of Heat Emboss Acetate. I added CS Glue, spritzed with water and spread the glue all over using my finger. I then added Cosmic Shimmer Pixie Powders in Aqua Lagoon, Golden Mint and Ancient Copper so that all the glue was covered. I spritzed with a little more water and then added CS Frosty Dawn Diamond Frost.
I scrunched up a piece of White Tissue Paper, opened it out and added
it to my background. I dabbed it down using a piece of Kitchen Roll and
put aside to dry.
The background on this one is one of my favourite techniques with Pixie Powders. To recap - I used a piece of Heat Emboss Acetate. I added CS Glue, spritzed with water and spread the glue all over using my finger. I then added Cosmic Shimmer Pixie Powders in Aqua Lagoon, Golden Mint and Ancient Copper so that all the glue was covered. I spritzed with a little more water and then added CS Frosty Dawn Diamond Frost.
I scrunched up a piece of White Tissue Paper, opened it out and added
it to my background. I dabbed it down using a piece of Kitchen Roll and
put aside to dry.
I cut dies #3 and #4 together from the Scattered Leaves Background into a piece of Coconut White Card. I added a die from the Pierced Background Rectangle Die Set and cut. I trimmed by background to fit behind the the die cut and glued into place. I waited a while for the glue to set and then slotted die #3 in the centre and cut. I matted onto a couple of pieces of Coconut White Card using a couple of layers of CE Mounting Cushion.
 I cut dies #1 and #2 together out of Coconut White Card and added the remaining piece of my acetate background behind it. I glued it in place in the aperture of my frame.
 I stamped the sentiment from the Creative Expressions Petite Lavish Sentiments Stamp Set onto Coconut White Card using Vivid Chartreuse Archival Ink. I cut it out using Pierced Flags. I shaped it and tucked it into the side of my frame.
 I have loaded the Milton Keynes Workshops for 2018 onto my website. Guests this year include Leonie Pujol, Lisa Horton, Francoise Read, Jane Gill and Phill Martin. I'll be doing a few workshops on my own including one purely on background techniques. You can find all the workshops here.
Yesterday, I added quite a few products to the pre-loved section of my website - you can find them here. Also, just to give you a heads up - out Big Sale ends tomorrow at 5pm. You can see hundreds of items at reduced prices here.
Thanks for stopping by.
Julia.
www.juliawattscrafts.co.uk
Here's today's card -

I cut dies #3 and #4 together from the Scattered Leaves Background into a piece of Coconut White Card. I added a die from the Pierced Background Rectangle Die Set and cut. I trimmed by background to fit behind the the die cut and glued into place. I waited a while for the glue to set and then slotted die #3 in the centre and cut. I matted onto a couple of pieces of Coconut White Card using a couple of layers of CE Mounting Cushion.


Yesterday, I added quite a few products to the pre-loved section of my website - you can find them here. Also, just to give you a heads up - out Big Sale ends tomorrow at 5pm. You can see hundreds of items at reduced prices here.
Thanks for stopping by.
Julia.
www.juliawattscrafts.co.uk
Monday, 1 January 2018
Cosmopolitan Cocktail Celebration
Hi Bloggers.
Happy New Year to you all!
A bit of a two-fer for you today as I have included the card I demoed at the bottom of this post -
 For the background, I stamped one of the images from the Festive Flurry Celebrations Stamp Set onto Coconut White Card several times using Jet Black Archival. I then misted quite closely with Scarlet Sunrise CS Ink Spray Mist.
 I cut the largest 2 dies in the Portuguese Background Die Set into a piece of Coconut White Card. I added a Double Pierced Background Rectangle to cut them out. I misted a piece of Coconut White Card with Scarlet Sunrise Mister. I glued it to the back of my frame. I slotted die #5 back into the frame and cut. I added to my background using Woodware Foam Tape.
 I matted onto a piece of Coconut White Card then Black Card and then another piece of Coconut White.
I made up a cocktail glass using the 3D Cosmopolitan Die Set. I added CS Glue and CS Crystal Chips Glitter Jewels to the top of the Acetate on the glass.
 I stamped the sentiment from the Cheers to You Stamp Set using Jet Black Archival. I cut it out using the Pierced Flags Die Set, switching the 'v' of the flag to make it double-ended.
 Here's the version I made on air - I had to improvise a bit as we'd sold out of the Cheers to You Stamp Set and I had made this card with Milk Card rather than Coconut White so had to stamp onto a piece of misted card. The frame is made using the Double Stitched Rectangles, the banner from the Stitched Flags, the sentiment is from Lisa's Festive Flurry Celebrations Stamp Set and I've used Marigold CS Ink Spray Mist -
 Thanks for stopping by.
Julia.
www.juliawattscrafts.co.uk
Free card with all website orders over £10 (Add a note to your order in your cart).
Happy New Year to you all!
A bit of a two-fer for you today as I have included the card I demoed at the bottom of this post -


I made up a cocktail glass using the 3D Cosmopolitan Die Set. I added CS Glue and CS Crystal Chips Glitter Jewels to the top of the Acetate on the glass.


Julia.
www.juliawattscrafts.co.uk
Free card with all website orders over £10 (Add a note to your order in your cart).
Sunday, 31 December 2017
Happy Hour Backgound with Misters on Acetate
Hi Bloggers.
Hope you enjoyed the shows yesterday. I thought it would be appropriate to continue with the cocktail glass show samples today as it's New Year's Eve -
 A cool background on this one. I started by adding some CS Glue to some Acetate. I misted it with a little water and moved the glue around using my finger. I then misted with Aqua Lagoon, Scarlet Mist and Golden Mint Misters. I scrunched up a piece of White Tissue Paper, opened it out and added it to my background, tapping it down with a piece of Kitchen Roll. I put aside to dry - this takes quite a while depending on how wet it is. Once dry, it is possible to fill in any gaps by misting the tissue paper again with misters but I didn't in this case.
I cut the Happy Hour Background into a piece of Coconut White Card. I added some of my background to the back.

 I made a frame out of Coconut White Card and added it to my Happy Hour Background using CE Mounting Cushion. I matted onto a piece of Coconut White Card, Black Card and then another piece of Coconut White Card.
I cut a Cocktail Glass out of Coconut White Card. I misted the stem with CS Riviera Blue Ink Spray Mist. I cut the Cocktail Glass out of some of my Acetate Background. I trimmed away the stem and added it to my part misted Coconut White Die Cut. I cut the straw from the 3D Cosmopolitan Glass Die Set out of Coconut White Card and the rind die out of Coconut White Card misted with Golden Mint CS Mister.
 I cut the celebrate sentiment from the 3D Cosmopolitan Cocktail Die Set out of Black Card. I cut a banner out of Coconut White Card using the Stitched Flags Die Set.
 Hope you enjoy your New Year's Eve.
Thanks for stopping by.
Julia.
www.juliawattscrafts.co.uk
Free card with all website orders over £10 (Add a note to your order in your cart).
Hope you enjoyed the shows yesterday. I thought it would be appropriate to continue with the cocktail glass show samples today as it's New Year's Eve -

I cut the Happy Hour Background into a piece of Coconut White Card. I added some of my background to the back.


I cut a Cocktail Glass out of Coconut White Card. I misted the stem with CS Riviera Blue Ink Spray Mist. I cut the Cocktail Glass out of some of my Acetate Background. I trimmed away the stem and added it to my part misted Coconut White Die Cut. I cut the straw from the 3D Cosmopolitan Glass Die Set out of Coconut White Card and the rind die out of Coconut White Card misted with Golden Mint CS Mister.


Thanks for stopping by.
Julia.
www.juliawattscrafts.co.uk
Free card with all website orders over £10 (Add a note to your order in your cart).
Saturday, 30 December 2017
Cocktail Shows on Hochanda today
Hi Bloggers.
I have shows on Hochanda today at 8am, 12noon and 3pm. I hope you can join me.
Here's a card from today's shows -
 For the background, I cut one of the dies from the Ecliptic Edger Die Set into a piece of Coconut White Card several times. I used this as a mask and misted through it onto another piece of Coconut White Card using Golden Mint and Scarlet Mist CS Misters, I put my mask aside to use on another project.
 I made a frame out of Coconut White Card using the Double Stitched Rectangles Die Set and added it to my background using CE Mounting Cushion. I matted onto Coconut White, then Black and another piece of Coconut White Card.
I managed to cut the 'liquid' die from the 3D Cosmopolitan Glass Die out of the waste from my background card. I cut the rest of the cocktail glass out of Coconut White Card and Heat Emboss Acetate. I cut the umbrella out of more waste background card and the straw out of Coconut White Card - both from the Cocktail Glasses Die Set. I added CS Glue around the rim of the glass and CS Crystal Chips Glitter Jewels.
 I added a strawberry cut from Ruby and Brunswick Green Card (from 3D Cosmopolitan Cocktail Die Set).
I stamped the sentiment from the Cheers to You Stamp Set onto Coconut White Card using Onyx Black Versafine. I cut it out using die #2 from the Portuguese Background Die Set.
 I'll show you how to put the Cocktail Glass die together during at least one of my shows today. You can also watch Sue put one together in this YouTube video -
I'm offering 10% discount on items on my website from the shows. You can find them here.
Please enter COCKTAIL in the discount code box at checkout to
activate your discount. Offer applies till midnight tonight or while stocks last. If you're shopping, don't forget to browse the Big Sale and Pre-Loved sections as there are lots of bargains in there!
Thanks for stopping by.
Julia.
www.juliawattscrafts.co.uk
Free card with all website orders over £10 (Add a note to your order in your cart).
I have shows on Hochanda today at 8am, 12noon and 3pm. I hope you can join me.
Here's a card from today's shows -


I managed to cut the 'liquid' die from the 3D Cosmopolitan Glass Die out of the waste from my background card. I cut the rest of the cocktail glass out of Coconut White Card and Heat Emboss Acetate. I cut the umbrella out of more waste background card and the straw out of Coconut White Card - both from the Cocktail Glasses Die Set. I added CS Glue around the rim of the glass and CS Crystal Chips Glitter Jewels.

I stamped the sentiment from the Cheers to You Stamp Set onto Coconut White Card using Onyx Black Versafine. I cut it out using die #2 from the Portuguese Background Die Set.

Thanks for stopping by.
Julia.
www.juliawattscrafts.co.uk
Free card with all website orders over £10 (Add a note to your order in your cart).
Friday, 29 December 2017
Cocktail Glasses Sneak Peek
Hi Bloggers.
I have shows on Hochanda tomorrow at 8am, 12noon and 3pm with Sue Wilson's Cocktail dies from the Necessities Collection and Background Collection.
As promised, I have a sneak peek for you today -
 This is a really simple card but it's one of my favourites. When cutting the Celebrate sentiment from the 3D Cosmopolitan Cocktail Glass Die Set, I discovered that you could still read the negative - it's the same with the Party sentiment in the same die set - very clever of Sue to do that! So, these dies make perfect masks - I've done that in some of my samples. On this card, I could have cut the sentiment out of Double Sided Adhesive Sheet on card 3 times and added Polished Silk Glitter to each one. But, to be honest, the letters are very delicate and this way is much easier and you get the cut away sentiment to use onother projects.
I started with a piece of Coconut White Card that was left over from cutting out a frame using the Double Stitched Rectangles Die Set. I cut the Celebrate sentiment from the 3D Cosmopolitan Cocktail Glass Die Set out of the card 3 times as shown. I cut 3 strips of Woodware Double Sided Adhesive Sheet. I added one to the back of the top sentiment and added Sahara Gold CS Polished Silk Glitter to exposed adhesive on the front. I repeated the process with the central and bottom sentiments with Rose Copper and Silver Chrome Polished Silk Glitter respectively.
 I matted onto Black Card cut using the next sized die in the Double Stitched Rectangles Die Set and then onto another piece of Coconut White Card.
I added a piece of Woodware Double Sided Adhesive Sheet to a piece of Coconut White Card. I cut a glass, a straw and an umbella from it using the Cocktail Glasses Die Set. I peeled away the other backing sheet and added Sahara Gold Polished Silk Glitter to the glass, Rose Copper Polished Silk Glitter to the straw and Silver Chrome Polished Silk Glitter to the umbrella.
 Simple!
I've added photos of the samples from the shows to the Gallery Section of this blog and to my Julia Watts Crafts Facebook Page.
Thanks for stopping by.
Julia.
www.juliawattscrafts.co.uk
Free card with all website orders over £10 (Add a note to your order in your cart).
I have shows on Hochanda tomorrow at 8am, 12noon and 3pm with Sue Wilson's Cocktail dies from the Necessities Collection and Background Collection.
As promised, I have a sneak peek for you today -

I started with a piece of Coconut White Card that was left over from cutting out a frame using the Double Stitched Rectangles Die Set. I cut the Celebrate sentiment from the 3D Cosmopolitan Cocktail Glass Die Set out of the card 3 times as shown. I cut 3 strips of Woodware Double Sided Adhesive Sheet. I added one to the back of the top sentiment and added Sahara Gold CS Polished Silk Glitter to exposed adhesive on the front. I repeated the process with the central and bottom sentiments with Rose Copper and Silver Chrome Polished Silk Glitter respectively.

I added a piece of Woodware Double Sided Adhesive Sheet to a piece of Coconut White Card. I cut a glass, a straw and an umbella from it using the Cocktail Glasses Die Set. I peeled away the other backing sheet and added Sahara Gold Polished Silk Glitter to the glass, Rose Copper Polished Silk Glitter to the straw and Silver Chrome Polished Silk Glitter to the umbrella.

I've added photos of the samples from the shows to the Gallery Section of this blog and to my Julia Watts Crafts Facebook Page.
Thanks for stopping by.
Julia.
www.juliawattscrafts.co.uk
Free card with all website orders over £10 (Add a note to your order in your cart).
Thursday, 28 December 2017
Scattered Leaves Background and Pixie Powders
Hi Bloggers.
Hope you enjoyed the shows over the past couple of days. Today I'll be continuing with my prep for the shows I have on Saturday.
Here's today's card -
 2 techniques with Pixie Powders on this card. For the central panel, I added a good layer of CS Glue to a piece of Black Gloss Card. I then added CS Pixie Powders in Plum Twist, Sun Yellow, Spearmint and Ancient Copper. I made sure that all the glue was covered. Using a Low Speed Heat Tool, I heated the area until the glue started bubbling. I swapped over to a regular heat tool and continued to heat. This does take quite a while.
 For the frame, I misted a piece of Black Card with water. I then sprinkled the Pixie Powders over. I added a little more water and put aside to dry. Once dry, I cut dies #2 and #3 together from the Scattered Leaves Background into it. I added a die from the Double Pierced Background Rectangle to cut the frame out. I glued a piece of Coconut White Card behind it. I slotted die #2 back into the centre and cut. I added my frame to my CS Glue/Pixie Powder background using CE Mounting Cushion. I matted onto Coconut White Card, Black Card and then another piece of Coconut White Card.
 I stamped the sentiment from the Woodware Vintage Pocket Watches Stamp Set onto Coconut White Card using Jet Black Archival. I cut it out using the Pierced Flags Die Set.
 I made a flower out of Coconut White Card and more of my Black Card with Pixie Powder on it using the Spiral Flower Die Set. I added a drop of Old Gold CS Phill Martin PVA to the centre.
 I'll be back tomorrow with a sneak peek from Saturday's shows.
Thanks for stopping by.
Julia.
www.juliawattscrafts.co.uk
Free card with all website orders over £10 (Add a note to your order in your cart).
Hope you enjoyed the shows over the past couple of days. Today I'll be continuing with my prep for the shows I have on Saturday.
Here's today's card -


Thanks for stopping by.
Julia.
www.juliawattscrafts.co.uk
Free card with all website orders over £10 (Add a note to your order in your cart).
Subscribe to:
Posts (Atom)