Monday 31 March 2014

Some People

Hi Bloggers.

Here's today's card -

The background on this one took a few days as I let each corner dry naturally. I placed one of the corners on the Ornate Elements Mask butt up to the corner of a piece of Black Card and added Gunmetal Cosmic Shimmer Sparkle Texture Paste to the selected corner design. I removed the mask and put aside to dry. Once dry, I repeated the process in another corner. I continued to do this until all 4 corners were complete.

I stamped the sentiment from the Creative Expressions Kind Thoughts Stamp Set using Jet Black Archival and embossed with Cosmic Shimmer Clear Embossing Powder. I cut it out using Sue's Basic Frames Die Set A from the Californian Collection. I cut a Decorative Frame Set B out of Grey Card.

I wrapped some Silver Silky Crush Ribbon around the centre of the background and also tied a bow using 2 lengths of it. I made a flower out of Black Crochet Ribbon and added it to my bow.

I assembled the card as shown adding a Black 8mm Pearl to each corner and I pierced around the edges.

For anyone interested, I've just popped some Heartfelt Creations stuff on Ebay - click on the link in the menu at the top of the page to go and have a look.

Thanks for stopping by.

Julia.

Sunday 30 March 2014

Flutterby

Hi Bloggers.

I am hoping that my cold is on its way out now though the hacking cough interferring with my sleep is still a pain.

Here's today's card -

So, for the background, I popped my tan mat onto my base plate. I dusted a piece of Milk Card with my anti static bag and placed it dusted side up on my tan mat. I inked up the Counterpane Mask with Perfect Medium and placed it inked side down on top of the dusted card. I added the pink embossing plate and ran it through the Grand Calibur. The ink transferred to the debossed pattern. I added Cosmic Shimmer Gold Detail Embossing Powder tapped off the excess and heat set.

I stamped the Mosaic Butterfly using Cosmic Shimmer Flake & Glitter Glue. Once the glue had gone clear I added Cosmic Shimmer Mulled Wine Gilding Flakes. I cut it out using Spellbinders Decorative Labels One and inked through the die with Antique Linen.

I tied a bow using 2 lengths of Champagne Silky Crush Ribbon and added a Fancy Pearl Embellishment.

 I assembled the card as shown addin a Cream 8mm Pearl to each corner, a piece of a Pearl Swirl flowing from the butterfly and some dots of Cosmic Shimmer Ivory Pastel PVA around the edges.

The lovely Sam Poole is on Create & Craft today at 12noon for 2 hours and again at 5pm. Hope you can join her.

Thanks for stopping by.

Julia.

Saturday 29 March 2014

Let's Get Together

Hi Bloggers.

Here's today's card -

 For the background, I started by misting a piece of Milk Card with Arctic Blue Cosmic Shimmer Vintage Ink Spray Mist. I popped a little Sky Cosmic Shimmer Shimmer Paint onto my craft sheet. I picked a little up with a piece of Cut n Dry Foam and randomly popped some through the Random Fleur De Lys Mask. I then added a little Pearl Shimmer Paint to the Sky left on my craft sheet used it through the Lace Mask with some Cut n Dry. Then I ran it through the Grand Calibur with Sue's Art Deco Fanfare Embossing Folder and inked around the edges with Salty Ocean Distress Ink.

I cut a border using Sue's Border, Corner & Tag Set from the Italian Collection and inked through the die with Salty Ocean.

I stamped the sentiment from the Creative Expressions Gratitudes Stamp Set using Cobalt Archival and embossed with Cosmic Shimmer Clear Embossing Powder. I cut it out using one of the dies from Sue's Decorative Frames Set in the Californian Collection and inked though the die with Salty Ocean. I cut a couple of the dies from the San Francisco Die Set (also from the Californian Collection) and inked through the die with Salty Ocean.

I tied a bow using Cream Satin Edged Organza and added a Frosted Blue Dazzler.

I assembled the card as shown adding a Pearl Swirl and I pierced around the edges using my Tim Holtz Ruler.

Thanks for stopping by.

Julia.

Friday 28 March 2014

For You

Hi Bloggers.


Here's today's card - 

This card is really easy to achieve - you just need the rights tools and a bit of patience!

For the background, I used some Frosty Dawn Cosmic Shimmer Sparkle Texture Paste through the Swoosh Mask onto Coconut White Card and put aside to dry.

I stamped the sentiment from the Creative Expressions Gratitudes Stamp Set using Clear Perfect Medium and embossed with Cosmic Shimmer Gold Detail Embossing Powder. I cut it out using a die from Sue's Decorative Frames Set in the Italian Collection. I inked through the die with Antique Linen Distress Ink. I also cut another larger die from the same set and again inked through the die with Antique Linen.

I cut some Faux Quilled Leaves from Coconut White Card and some Faux Quilled Blooms from Milk Card. I spritzed the blooms with a little water before I shaped them so they would keep their shape instead of flattening out. I added a Cream 8mm Pearl to the centre of each flower.

I assembled the card as shown adding a Cream Pearl to each corner and I pierced around the edges using my Tim Holtz Ruler.

Thanks for stopping by.

Julia.
www.juliawattscrafts.co.uk


Thursday 27 March 2014

Sending my Thanks

Hi Bloggers.

Thanks for all your emails and comments yesterday - much appreciated as always. Glad you loved the new products.

Here's today's card -

For the background, I ran a piece of Coconut White Card through the Grand Calibur with Sue's Quilted Flower Embossing Folder. I inked around the edges with Dusty Concord Distress Ink using Cut n Dry Foam.

I spritzed a piece of card with Purple Orchid and Evergreen Cosmic Shimmer Vintage Ink Spray Mist. Once dry, I popped the Random Fleur de Lys Mask on top. I spread some Lilac Blush Cosmic Shimmer Sparkle Texture Paste across the centre and them some Sea Green top and bottom. I removed the mask and set aside to dry. Once dry, I chopped it into 3 sections and matted onto some Mauve Card.

I stamped the sentiment from the Creative Expressions Gratitudes Stamp Set using Perfect Medium and embossed with Cosmic Shimmer Silver Shine Detail Embossing Powder. I cut it out using the smallest die in the Granada Die Set (Spanish Collection) and inked through the die with Dusty Concord. I cut the 2 largest dies together from the Galicia Die Set (Spanish Collection) out of Mauve Card and inked through the die with Dusty Concord.

I tied a bow using 2 lengths of Silver Silky Crush Ribbon and added a Lavender Dazzler.

 I assembled the card as shown adding a White 8mm Pearl to each corner and I pierced around the edges.

Thanks for stopping by.

Julia.

Wednesday 26 March 2014

Wishing you the happiest of birthdays

Hi Bloggers.

I have shows today on Create & Craft at 10am with Dave and 1pm with Steph. Times changed a few times yesterday so please check the schedule.

Here's today's card -

The background, I ran a piece of Apricot Card through the Grand Calibur with Sue's Art Deco Fanfare Embossing Folder.

I mixed a little Mango Orange Mica Powder from the Cosmic Shimmer Circus Brights Mica Spray Set with some Aurora Sparkle Cosmic Shimmer Sparkle Texture Paste and applied it through the Rope Frame Mask. I put it aside to dry. Once dry, I cut an aperture out the centre using a Spellbinders Marvelous Squares die.

I stamped the sentiment from the Creative Expressions Kind Thoughts Stamp Set using Perfect Medium and embossed with Cosmic Shimmer Gold Detail Embossing Powder. I cut it out using Spellbinders Captivating Squares and inked through the die with Dried Marigold Distress Ink.

I tied a bow using 2 lengths of Champagne Silky Crush Ribbon and added a Frosted Peach Dazzler.

I assembled the card as shown adding a White 8mm Pearl to each corner and I pierced around the edges.

Thanks for stopping by. See you later!

Julia.

Tuesday 25 March 2014

Times for tomorrow have changed again!

Hi Bloggers.

Yes, times for tomorrow have changed again! Now 10am and 1pm, but please check the schedule in the morning.

All for now.

Julia.

Show times change for tomorrow

Hi Bloggers.

Just to let you know that the times of tomorrow's shows have changed - they're now 8am and 1pm.

All for now.

Julia.

Sneak Peek Part 2

Hi Bloggers.

Here's today's sneak peek from tomorrow's shows. I thought I'd actually share 3 cards to give you more of an idea of what you can do with the Cosmic Shimmer Shimmer Paints.

I did one of my random backgrounds on this one but I used Cosmic Shimmer Shimmer Paints instead of Distress Inks.

I started by spritzing a piece of Milk Card with Clover Cosmic Shimmer Vintage Ink Spray Mist. I popped a little Pink Plum Cosmic Shimmer Shimmer Paint onto my Craft Sheet. I picked a little up onto a piece of Cut n Dry Foam and used it to randomly ink through one of the elements of the Ornate Elements Mask. I added a little Warm White Matt Chalk Paint to the Pink Plum Shimmer Paint, which lightens the Shimmer Paint and makes it matt, and then randomly inked through the Random Fleur de Lys Mask using Cut n Dry Foam. I then ran it through the Grand Calibur with Sue's Quilted Flower Embossing Folder. I inked around the edges with Picked Raspberry Distress Ink. I wrapped a piece of Cream Crochet Ribbon around the centre.


I stamped the image panel from the Justrite Irises Vintage Labels Four Stamp Set 3 times using Jet Black Archival and embossed with Cosmic Shimmer Clear Embossing Powder. I cut them out using a Justrite Vintage Labels Four Die and inked through the die with Picked Raspberry.

I stamped the sentiment from the Creative Expressions Gratitudes Stamp Set using Jet Black Archival and embossed with Clear Powder. I cut it out using the smallest die from Sue's Granada Die Set from the Spanish Collection. I inked through the die with Picked Raspberry.

I assembled the card as shown adding some White Pearls to the corners and I pierced around the edges using my Tim Holtz Ruler.

Here's the second card -

For the background, I spritzed a piece of Milk Card with Purple Orchid Cosmic Shimmer Vintage Ink Spray Mist. I popped a litttle Violet Cosmic Shimmer Shimmer Paint onto my craft sheet then using a piece of Cut n Dry Foam, I inked through one of the elements in the Ornate Elements Mask in each corner.

I stamped the image from the Justrite Irises Vintage Labels Four Stamp Set using Jet Black Archival and embossed with Clear Powder. I started colouring in using the Violet Shimmer Paint adding a little water. Then I added a little Pearl Shimmer Paint to the Violet Paint. This lightened the Violet colour. I coloured in the areas as shown. Then I popped a little Green Aqua Shimmer Paint onto my craft sheet and added a little Warm White Matt Chalk Paint. The Chalk Paint lightened the Shimmer Paint and removed the shimmer to give it a matt chalk finish. I used this to colour in the leaves. I cut it out using Justrite Vintage Labels Four and inked through the die with Dusty Concord.

I cut the largest of the dies in Sue's Decorative Frames (Set B) die set from the Californian Collection out of Amethyst Card.

I tied a bow using Purple/Ivory Striped Grosgrain and added a Fancy Pearl Embellishment. I assembled the card as shown, again piercing around the edges with my ruler.

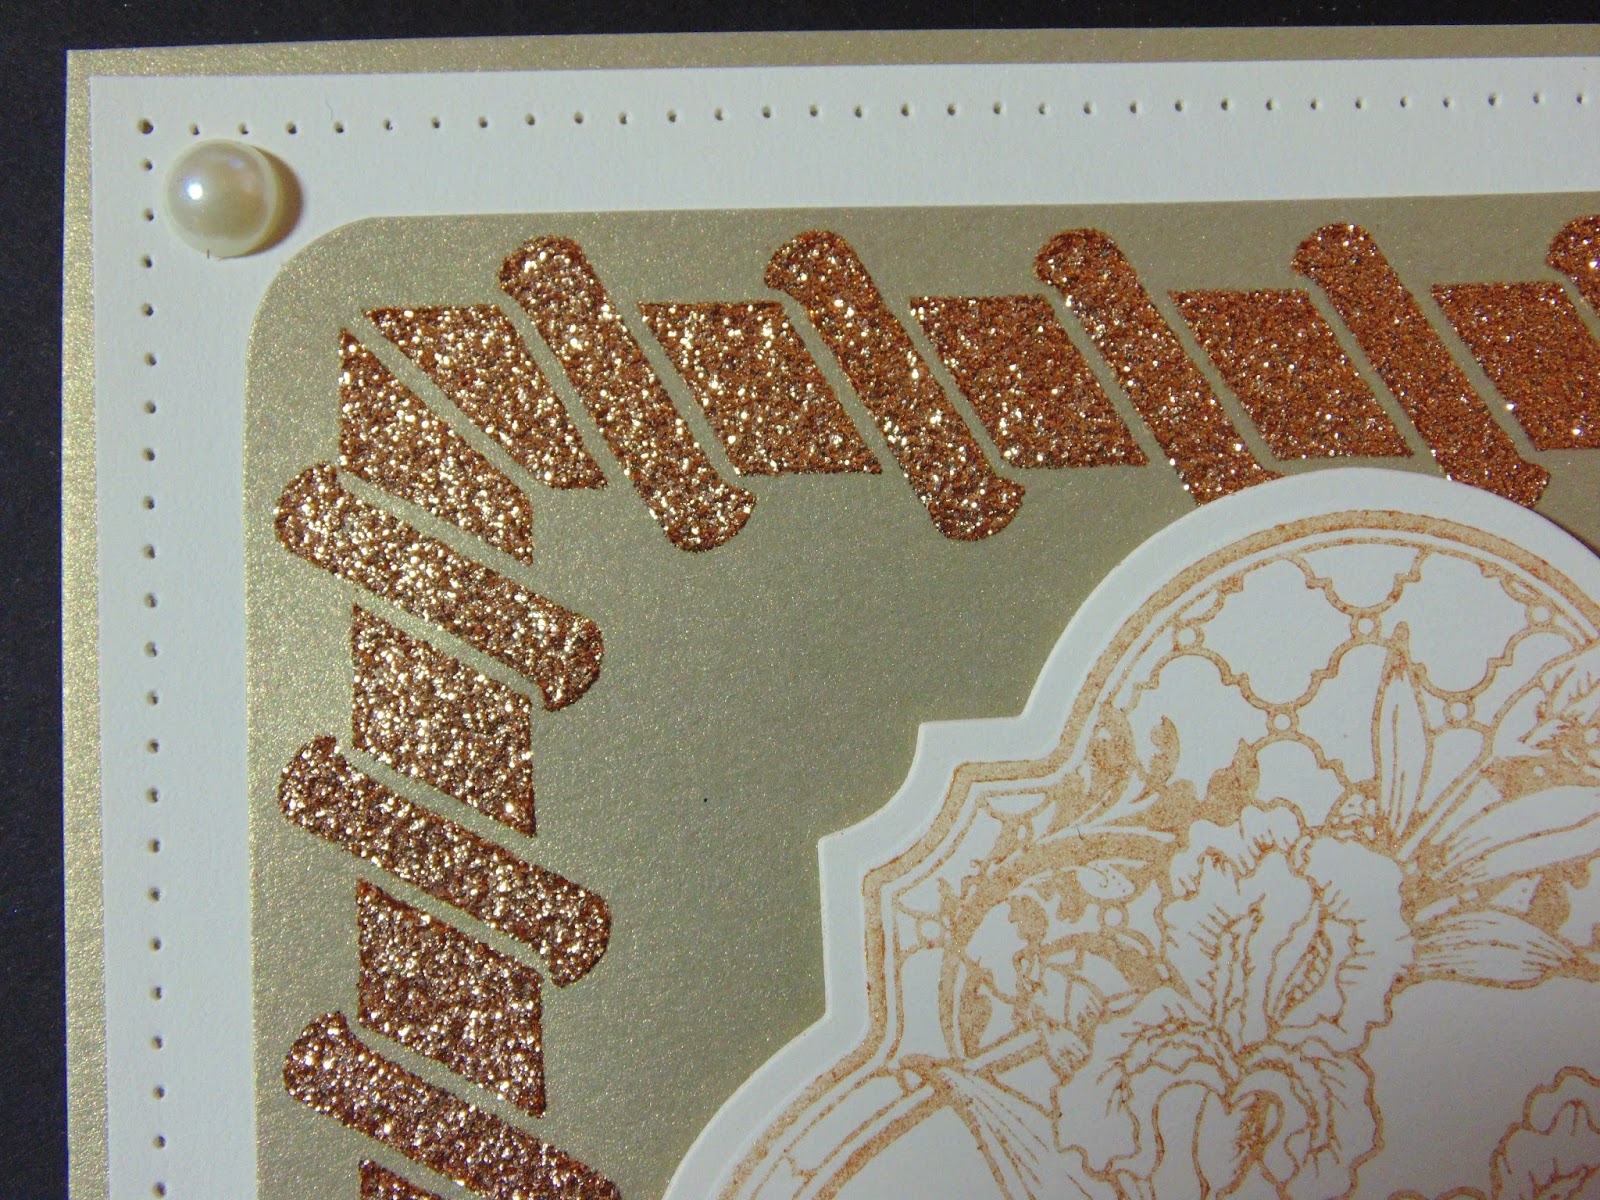
Here's the final card for today -

OK, so not a brilliant photo on this one, sorry. For the background, I applied some Warm Gold Cosmic Shimmer Sparkle Texture Paste through the Rope Frame Mask. I put it aside to dry.

I popped a little Bronze Cosmic Shimmer Shimmer Paint onto my craft sheet. I picked some up onto a piece of Cut n Dry Foam. I used this to apply paint to the image from the Justrite Irises Vintage Labels Four. I then stamped the image onto a piece of Milk Card and cut it out using Justrite Vintage Labels Four.

I tied abow using 2 lengths of Champagne Silky Crush Ribbon. I added a little Cream Pearl String. I popped a Light Brown Dazzler into a Metal Dazzler Setting and added this to my bow.

I assembled the card as shown adding a Cream 8mm Pearl to each corner and piercing around the edges.

I hope you've enjoyed this look at the potential of the lovely Shimmer Paints.

Thanks for stopping by.

Julia.

Monday 24 March 2014

Sneak Peek

Hi Bloggers.

I thought I'd share a sneak peek from Wednesday's shows today. The emphasis for the shows is on the new Cosmic Shimmer Shimmer Paints and Cosmic Shimmer Sparkle Texture Paints. I have lots of techniques to share with you - hope I get the chance to show them all.

Here's today's card -

So, the background is Cosmic Shimmer Warm Gold Sparkle Texture Paste spread through the Random Fleur de Lys Mask. The paste takes 4 to 5 hours to dry naturally depending on temperature and humidity. You can heat set it, takes approx 10 minutes. The finish, if heat set, is slightly smoother to the touch. It kinda bubbles up a bit as it dries - a bit like liquid applique. All my samples for the shows have been left to dry naturally.

There are no dies on the shows so I have been having fun using some of Sue's new dies. I stamped the sentiment from the Creative Expressions Gratitudes Stamp Set using Perfect Medium and embossed with Cosmic Shimmer Gold Detail Embossing Powder. I cut it out using one of the dies from Sue's Californian Collection Decorative Frames (Set B). I cut a larger die from the same set out of Soft Gold Card.

 I tied a bow using 2 lengths of Champagne Silky Crush Ribbon and added a Vintage Black Button.

I assembled the card as shown adding a Black 8mm Pearl in each corner and some dots of Cosmic Shimmer Pearlescent PVA in Olympic Gold around the edges.

I've made some colour swatches of the Sparkle Texture Pastes on the show including 2 new white based ones.

Below is Silver Moon, Warn Gold and Gunmetal on black then white card -

Below is Pink Blush, Apple Red and Lilac Blush -


Below is Sea Green, Ocean Spray and Egyptian Blue -

Below is the white set which do cool stuff on Black Card, Aurora Sparkle, Frosty Dawn and Icicle Blue -

I have most of the Sparkle Texture Pastes in stock in my Amazon Store here, I'm just waiting for the Frosty Dawn and Icicle Blue.

Thanks for stopping by.

Julia.