Saturday, 16 August 2014

Christmas Blessings

Hi Bloggers.

Thanks for all your emails to the show yesterday. Sorry that there was no 2pm show - out of our control. Lovely to see so many of you taking part in the blog hop. It's running till Tuesday afternoon so there's still time to take part. The start point is here.

I'll post some Christmas cards for a few days and then mix it up with some cards from last Sunday's Toolshed. I've popped my samples from yesterday's shows on Facebook here. The only one that's not on there is the one on the Blog Hop.

Here's today's card -

For the background, I ran a piece of Coconut White Card through the Grand Calibur with the Couture Creations Poinsettia Lullaby Embossing Folder. I ran it through a second time to extend the design. I popped a little Gold Cosmic Shimmer Shimmer Paint onto my Craft Sheet. I picked some up onto a piece of Cut n Dry Foam and rubbed over the embossed surface.

I stamped the bottom panel from the Joy to the World Stamp using Perfect Medium and embossed with Cosmic Shimmer Gold Detail Embossing Powder. I cut it out around the outer frame.

I cut a couple of the Spellbinders Adorning Squares Dies out of Vintage Gold Card.

I stamped the sentiment from the Creative Expessions Winter Greetings Stamp Set. again using Perfect Medium and embossed with Gold Detail Powder. I cut it out using a Spellbinders Romantic Rectangles Two Die. I cut the die again out of Vintage Gold Card, which I then cut in half lengthways and glued it behind the sentiment panel offsetting it slightly.

I tied a bow using 2 lengths of Champagne Silky Crush Ribbon and added a Fancy Pearl Embellishment.

I assembled the card as shown adding some White Pearls and some dots of Cosmic Shimmer Crystal Sparkle PVA around the edges.

Thanks for stopping by.

Julia.

Friday, 15 August 2014

Creative Expressions August 2014 Blog Hop

Hi Bloggers.

Welcome to the Creative Expressions August 2014 Blog Hop! Hopefully you got here from Sue Wilson's blog but, if you didn't, here's the start at the Creative Expressions News Blog!

The new Christmas designs from the Singles Range at Creative Expressions, include seven different stamps. As you will see from the samples made for the Blog Hop, they do not just have to be used as they are but can be altered and interchanged to give lots of different options.

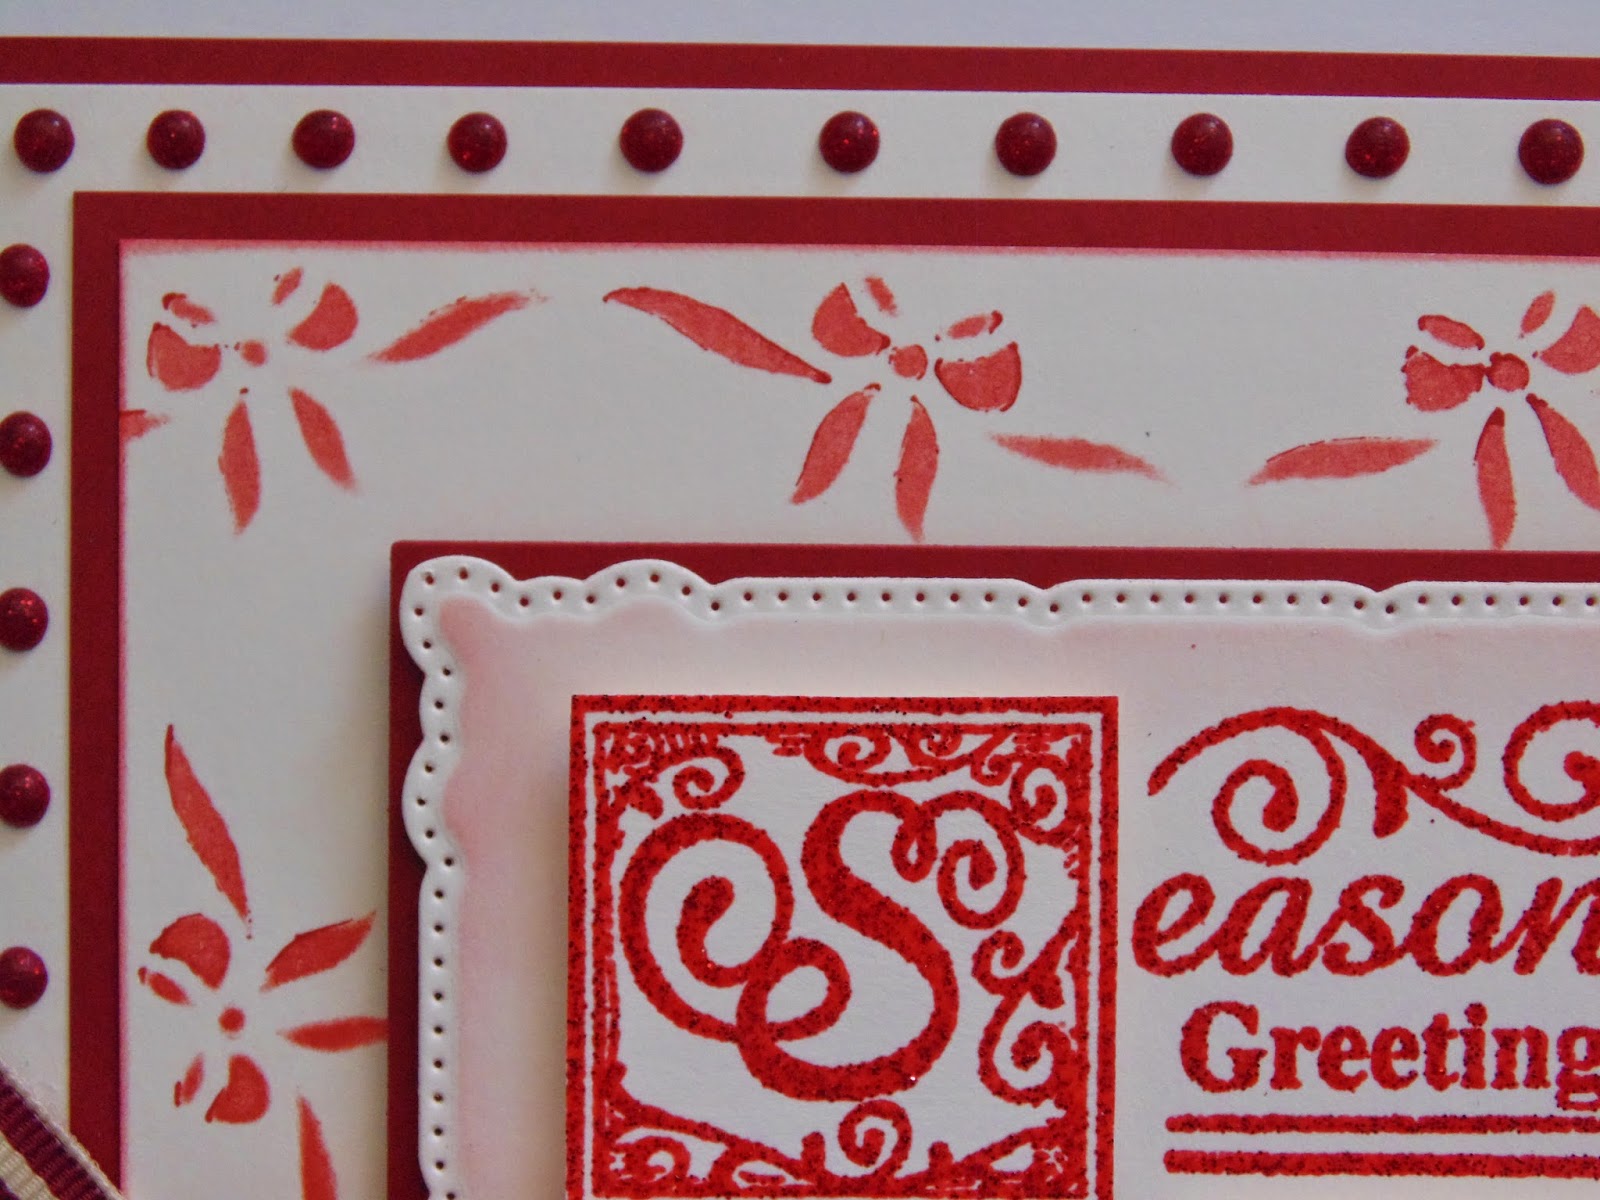
For my project, I used the Seasons Greetings Stamp and the Peace on Earth Stamp. Here's my card -

For the background, I masked the areas around the bow bunting on the Deck the Halls Mask. I popped a little Russet Red Cosmic Shimmer Shimmer Paint onto my Craft Sheet. I picked some up onto a piece of Cut n Dry Foam and 'inked' through the mask onto a piece of Milk Card with the paint. I repeated the same at the bottom of the card. I masked off 2 of the bows and inked through the remaining 2 bows on both sides of the background. I inked around the very edge of the background with the paint.

I masked off the monogram panel and the picture panel of the Seasons Greetings Stamp, inked up using Perfect Medium, removed the masks, stamped onto Milk Card, added Cosmic Shimmer Christmas Red Sparkle Embossing Powder and heat set. On separate pieces of Milk Card, I stamped the monogram panel from the Seasons Greetings Stamp and the image panel from the Peace to the World Stamp using Perfect Medium and embossed with Christmas Red Sparkle Powder. I cut them both out around the outer lines. I placed them next to the 'easons Greetings' text and selected my Spellbinders die to fit. I selected Marvelous Squares. I secured it with removeable tape, removed the panels and ran it through the Grand Calibur. I inked through the die with Barn Door Distess Ink. I cut a mat out of Rich Red Card using Spellbinders Grand Squares.


I added the 2 panels using 3D Foam and added a Self Adhesive Pearl Snowflake.

I tied a bow using Burgundy/Ivory Striped Grosgrain and added a dazzler from the Assorted Square Dazzlers Pack.

I assembled the card as shown adding some dots of Cosmic Shimmer Berry Sparkle PVA around the edges.

I have shows today (Friday) on Create & Craft at 10am (with Nigel) and 2pm (with Leonie) featuring these stamps and lots of samples that the Creative Expressions Design Team have made for the shows and this blog hop. I hope you can join me. The show with Leonie is scheduled to be repeated at 10am tonight and 4am tomorrow morning. It may well be on Craft Extra too but as I write this there is nothing on the schedule.

One randomly selected person commenting on this blog post before the closing date will win the following fabulous prize, which includes some of the new stamp designs.


Thank you for visiting my blog, please leave a comment below (only lovely positive comments please!) in order to be in with a chance of winning a prize!

Once you have done that, you will need to click here to visit Tracey Laughton's blog.

To help you along the way, here is a list for the Blog Hop:-
1. Sue Wilson
2. Julia Watts (you are here)
3. Tracey Laughton
4. Kim Bacon
5. Donna Ratcliff
6. Neil Burley
7. Tracy Heaton
8. Kerry Hickton
9. Pam Smith
10. Creative Expressions

Start page, prize details and how to take part: Creative Expressions News Blog. The blog hop started on Friday 15th August at 6am and ends Tuesday 19th August at 5pm.

Thank you for taking part in our Blog Hop – good luck! Oh, and don't forget to check back after the hop has ended to see if you have won a prize!

Julia.

Thursday, 14 August 2014

Sneak Peek

Hi Bloggers.

As promised, here's a sneak peek from tomorrow's Christmas Stamping Shows. We have 7 new Singles Stamps on the shows all with a Christmas Sentiment theme. Like the everyday sentiment stamps that came ealier this year, you can use them as they come or mix them up.

Here's today's card -

I started by dusting a piece of Coconut White Card with my anti-static bag and then running it through the Grand Calibur with the Deck the Halls Mask. Keeping the mask in place, I inked through it with Perfect Medium using Cut n Dry Foam. I removed the mask, added Cosmic Shimmer Black Sparkle Embossing Powder and heat set. I was not happy with the coverage so I replaced the mask, inked through again, removed mask, added more powder and heat set again. I edged the piece with Black Soot Distress Ink.

I stamped the Peace on Earth Stamp onto Coconut White Card using Jet Black Archival and embossed with Cosmic Shimmer Clear Embossing Powder. I cut it out using Spellbinders Adorning Squares. I stamped and embossed it again. This time I covered it with a piece of Creative Expressions Double Sided Adhesive and added Cosmic Shimmer Diamond Sprinkles. I cut out the Peace and Bauble panels and added them to the top of the original image using 3D Foam. I cut a black mat using the smallest die from the Spellbinders Grand Squares Die Set.


I tied a bow using Black Crochet Ribbon and added a Fancy Pearl Embellishment and a White Mini Pearl Swirl. The crochet ribbon hides the bell ribbon on the mask design.

I assembled the card as shown adding a Black 8mm Pearl in each corner and some dots of Cosmic Shimmer Pearlescent PVA in Cosmic Pearl around the edges.

We're having a blog hop tomorrow morning starting at 6am on Sue's blog to coincide with my shows on Create & Craft featuring all 7 of the new Christmas stamps. There are prizes to be won on each blog on the hop but to be in with a chance to win, you need to comment on the blog posts and more importantly check back after the closing date to see if you've won!

Thanks for stopping by,

Julia.

Wednesday, 13 August 2014

You are Amazing

Hi Bloggers.

The first packs of Card Sample auctions end this evening on ebay raising money for Macmillan Cancer Support. Click on the ebay link in the menu above to go and have a look.

Here's today's card -

For the background, I ran a piece of Coconut White Card through the Grand Calibur with the Checkerboard PinPoint Embossing Folder. I rubbed Patina Gilding Wax all over the embossed surface. I put aside for 5 minutes and then rubbed over the surface with a dry wet wipe - this makes it shinier and smoother.

I stamped the Justrite Stitched Vines Background onto Coconut White Card using Perfect Medium. I dusted over the surface with Jade Teal Mica Powder from the Cosmic Shimmer Luscious Greens Mica Spray Set. I removed the excess mica powder using a dry wet wipe. I cut it into 3 panels and matted them onto Teal Card.

I made myself some embossing powder by mixing some Cosmic Shimmer True White Detail Embossing Powder with a little Jade Teal Mica Powder. I stamped the frame from the Justrite Stitched Sunflowers Vintage Labels Eight Clear Stamp Set using Perfect Medium and added my Custom Made Embossing Powder. I did not heat set just yet. I stamped the sentiment from the Justrite Celebrations Clear Stamp Set, using Perfect Medium and added my Custom Powder. I heat set and then wiped off the excess mica powder with a dry wet wipe. I cut it out using Justrite Vintage Labels Eight Dies. I cut 2 Justrite Heirloom Flourish Two Dies out of Teal Card and secured them at the back of the Labels Eight die cut using CS Dries Clear Glue so that they were 'holding hands' with the die cut.

I pressed 3 Victorian Metal Corners into Perfect Medium, added my Custom Powder, tapped off the excess and heat set. I did the same with a Vintage Metal Embellishment.

I stamped the sunflower from the Justrite Stitched Sunflowers Vintage Labels Eight Clear Stamp Set using Perfect Medium. I cut it out using scissors. I tied a bow using White Crochet Ribbon, added my sunflower and the coloured Vintage Metal Embellishment.

I added some CS Dries Clear to the back of my coloured metal corners. I find that they stick best if you give it a couple a minutes for the glue to go tacky before applying to your project.

I assembled the card as shown adding some dots of Cosmic Shimmer Pearlescent PVA in Cosmic Pearl around the edges.

I'll be back tomorrow with a sneak peek from my Christmas Stamping Shows on Friday. Don't worry, I will share the rest of the samples from Sunday's Toolshed here in due course.

Thanks for stopping by.

Julia.

Tuesday, 12 August 2014

Write Your Own Story

Hi Bloggers.

Here's today's card -

I stamped the Justrite Iron Works Vintage Labels 8 Background Stamp onto a piece of Milk Card using Jet Black Archival  and embossed with Cosmic Shimmer Clear Embossing Powder. I coloured in some of the elements using Caramel Adirondack Dye Ink. I trimmed the background down and then edged the piece with Caramel Ink using Cut n Dry Foam.

I stamped the typewriter image from the Justrite Just Typed Clear Stamp Set using Jet Black Archival and embossed with Cosmic Shimmer Clear Embossing Powder. I cut it out using scissors. I edged with Caramel Ink.

I stamped the sentiment from the same stamp set, again using Jet Black Archival and embossed with Clear Powder. I trimmed it, edged it with Caramel Ink and glued it bebind the typewriter.

I cut a Justrite Vintage Labels 8 Die from a piece of patterned paper from the CE Teresa Collins 8 x 8 Paper Pad and inked through the die with Caramel Ink.

I assembled the card as shown adding some dots of Cosmic Shimmer Pearlescent PVA in Black Pearl around the edges.

Thanks for stopping by.

Julia.

Monday, 11 August 2014

You are the Best

Hi Bloggers.

Thanks for the emails and comments yesterday. Glad you enjoyed the show. I have uploaded photos of the samples to my Julia Watts Crafts Facebook Page here.

I'm having another clearout. Please click on the ebay link in the menu above to go and have a look.

Here's today's card -

For the background, I started by stamping one of the little flower stamps from the Justrite Floral Fan Elements Stamp Set over a piece of Coconut White Card using Stonewashed Adirondack Dye Ink. I made sure the ink was dry and ran it through the Grand Calibur with the Rows of Bows PinPoint Embossing Folder. I inked around the edges with Stonewashed Ink and then added some Sky Blush Cosmic Shimmer Twinkles and put aside to dry.

I cut the largest die from Sue's Granada Die Set out of Coconut White Card. I cut the largest 2 dies from the same die set out of Perwinkle Card. I glued the 2 die cuts together using CS Dries Clear Glue.

I stamped the floral fan piece from the Justrite Floral Fan Elements Stamp Set 5 times using Jet Black Archival. I added Cosmic Shimmer Clear Embossing Powder but did not heat set until I added the sentiments (from the same stamp set).

I coloured in using Marine Aqua and Apple Green Mica Powders from the Cosmic Shimmer Luscious Greens Mica Spray Set.

I assembled the fan as shown securing with a Black Brad and then glueing together with CS Dries Clear Glue.

I tied a bow using Blue/White Striped Grosgrain and added a Black Vintage Button.

I assembled the card as shown adding a White 8mm Pearl to each corner and some dots of Cosmic Shimmer Pearlescent PVA in Summer Blue around the edges.

Thanks for stopping by.

Julia.

Sunday, 10 August 2014

Toolshed today on Create & Craft

Hi Bloggers.

Today I'm on the Toolshed on Create & Craft at 12 noon for 2 hours with Dean. Hope you can join me.

Here's today's card -

I started by doing Sue's Scribble PVA technique onto Coconut White Card with Summer Blue, Vintage Pink, Vintage Plum and Cosmic Pearl PVAs. I put aside to dry. Once dry I cut into 4 squares. I edged with Stonewashed Adirondack Dye Ink and matted onto Periwinkle Card.

For the background, I ran a piece of Coconut Card through the Grand Calibur with the Checkerboard PinPoint Embossing Folder and inked around the edges with Stonewashed Ink.

I stamped the sunflowers from the Justrite Stitched Sunflowers Vintage Labels 8 Clear Stamp Set using Jet Black Archival and embossed with Cosmic Shimmer Clear Embossing Powder. I cut them out using scissors (there is a SVG file for this set by the way). I coloured them in using Marine Aqua Mica Powder from the Cosmic Shimmer Luscious Greens Mica Spray Set and Blue Sky Mica Powder from the Cosmic Shimmer Summer Shades Mica Spray Set. I added Cosmic Shimmer Aqua Twinkles to the centre of the smallest flower.

I stamped 2 leaves from the same stamp set, again using Jet Black Archival and embossed with Clear Powder. I coloured in using Apple Grren Mica Powder from the Luscious Greens Set.

I stamped the sentiment from the Justrite Celebrations Sentiments Stamp Set using Jet Black Archival and embossed with Clear Powder. I cut it out using Justrite Vintage Labels 9 Dies (sorry not on this show - on my next Justrite show) and inked around the edges of the die cut with Stonewashed Ink. I added a couple of 8mm White Pearls.

I assembled the card as shown adding some more White Pearls and some dots of Cosmic Shimmer Pearlescent PVA in Summer Blue around the edges.

You can see you more ideas on how to use the Stitched Sunflowers Stamp Set on the Justrite Stampers Blog here.

Hope to see you at 12.

Thanks for stopping by.

Julia.

Saturday, 9 August 2014

Sneak Peek Part 2

Hi Bloggers.

Here's today's sneak peek from tomorrow's show -

For the background, I ran a piece of Coconut White Card through the Grand Calibur with the Floral Brocade PinPoint Embossing Folder and inked around the edges with Dusty Concord Distress Ink.

I stamped the Justrite Iron Works Vintage Labels 8 Background Stamp using Perfect Medium and embossed with Cosmic Shimmer Gold Detail Embossing Powder. I coloured some sections using Lapis Lavender Mica Powder from the Cosmic Shimmer Summer Shades Mica Spray Set.

I made myself some embossing powder by popping a little Cosmic Shimmer True White Detail Embossing Powder into a little bag, adding some Lapis Lavender Mica Powder and giving it a good shake.

I cut a Justrite Just Typed Offset SVG file using the Cricut Explore. I stamped the typewriter image from the Justrite Just Typed Clear Stamp Set using Perfect Medium, added my custom made embossing powder and heat set.

I stamped the sentiment from the same stamp set using Perfect Medium and embossed with Gold Detail Powder. I cut it out using Justrite Antique Tags One Dies and inked through the die with Dusty Concord.

I pressed 4 Victorian Metal Corners into Perfect Medium, added my custom made embossing powder and heat set. I applied some CS Dries Clear Glue to the corners, left for a few minutes to become tacky and then added to the corners of my background.

I assembled the card as shown adding some dots of Cosmic Shimmer Pearlescent PVA in Olympic Gold around the edges.

Lots more ideas with this stamp set on the Justrite Stampers Blog here.

Thanks for stopping by.

Julia.

Friday, 8 August 2014

Sneak Peek

Hi Bloggers.

As promised, here's an early sneak peek from Sunday's show -

I've made cards with this bundle using 3, 5 and 7 pieces for a bit of variety - I'll be sharing them all in due course.

For the background, I stamped the Justrite Basket Weave Background onto Coconut White Card using Perfect Medium. I stamped it a second time and then dusted over the surface with Marine Aqua Mica Powder from the Cosmic Shimmer Luscious Greens Mica Spray Set. I rubbed away the excess mica using a dry wetwipe.

I used the Justrite Floral Fan Elements Offset SVG file and cut 2 borders out of Periwinkle Card using the Cricut Explore. I stamped the border from the Justrite Floral Fan Elements Clear Stamp Set onto each using Perfect Medium and embossed with Cosmic Shimmer Gold Detail Powder (it's easier to line up if you take the card to the stamp).

I stamped the fan design from the same stamp set, again using Perfect Medium. I added Gold Detail Powder but did not heat set yet. I stamped the sentiment, again from the same stamp set, within the panel in the fan design, added Gold Powder and heat set the lot. I cut it out using Justrite Vintage Fan Dies. I did this twice more.

I tied a bow using Blue/White Striped Grosgrain and added a Vintage Metal Button.

I assembled the card as shown adding some dots of Cosmic Shimmer Pearlescent PVA in Olympic Gold around the edges.

Lots more ideas with this stamp set on the Justrite Stampers Blog here.

I'll be back with another sneak peek tomorrow.

Thanks for stopping by.

Julia.