Showing posts with label Brilliant Sparkle. Show all posts

Friday, 22 December 2017

Freebie Friday

Hi Bloggers.

We had a lovely day for yesterday for my parents anniversary. Service in the hotel was slow to say the least though and they didn't even have us booked in for lunch even though I had confirmation! We did have a bit of a giggle about it though - it was like a posh Fawlty Towers! And, yes, I did know about the message from the Queen. It was all arranged and should be waiting for them when they get back home today.

Here's the final Freebie Friday Card of 2017 -

You can read how this card was made in this post.

Leave a lovely comment below to go into the draw to win it. I will announce the winner on Christmas Day. Be sure to pop back to see if you have won.

Please note : Only comments left below will go into the draw. Comments made on the original post will not count. Information given on the original post was correct at the time that post was published.

I'll be back tomorrow with the first sneak peek from the One Day Special that I'm launching on Hochanda on Boxing Day.
Thanks for stopping by.

Julia.
www.juliawattscrafts.co.uk

Free card with all website orders over £10 (Add a note to your order in your cart).

Saturday, 30 September 2017

Glittered and Gilded Paper Cuts Noel Rudolf

Hi Bloggers.

I have my Christmas Workshop just outside Milton Keynes today. We're doing a Pick 'n' Mix format - could be complete chaos! Who knows? I'll try anything once!

Here's today's card -


Products used -
Paper Cuts - Noel Rudolf, Jingle Bells, Festive Cornucopia
Creative Expressions - Double Sided Self Adhesive Sheet, Ice Crystals Embossing Folder, Card : Coconut White, Antique Gold Pearl, Mounting Cushion
Cosmic Shimmer - Egyptian Gold Gilding Flakes, Frosted Crystals Glitter Jewels, Sparkle Star Diamond Frost, Clear Mirage Brilliant Sparkle Embossing Powder, Glue
Ranger - Clear Perfect Medium, Rubit Scrubit, Low Speed Heat Tool

I added a piece of DS Adhesive Sheet to Coconut White Card. I cut the circle die and the star corners from the Jingle Bells Die Set out of it.  I also cut the Noel Rudolf die from it.

I peeled away the backing on the Noel Rudolf and the Star Corners and added Sparkle Star Diamond Frost.

I added Egyptian Gold Gilding Flakes to the circle and the little stars, removing the excess with a piece of Rubit Scrubit.

I cut the scalloped circle die from the Festive Cornucopia Die Set out out Coconut White Card. I pressed Clear Perfect Medium in the edges, added Clear Mirage Embossing Powder and heat set using a Low Speed Heat Tool.

I added glue and CS Frosted Crystals around the edges of my gilded circle before adding my Rudolf piece. I also edged my embossed background with glue and Frosted Crystals Glitter Jewels.

Thanks for stopping by.

Julia.
www.juliawattscrafts.co.uk

Saturday, 16 September 2017

Simple Doodle Poinsettia

Hi Bloggers.

It's Day 1 of Ally Pally. If you're visiting today, please pop by the Creative Expressions stand and say Hi.

Here's today's card -

Products Used -
Woodware - Doodle Poinsettia, Merry Christmas From Our House to Yours, Anti-Static Pad
Onyx Black Versafine
Cosmic Shimmer - Clear Mirage Brilliant Sparkle Embossing Powder, Matt Clear Embossing Powder, Christmas Watercolour Palette
Sakura - Gold Stardust Pen, Large Tip Water Brush
Phill Martin - Snowflakes Paper Pad, Stamping Mat
Creative Expressions - 5mm White Pearls, Card : Coconut White, Rich Red, Brunswick Green

Thanks for stopping by.

Julia.
www.juliawattscrafts.co.uk
Free card with all website orders over £10 (ask for one in the comments box at checkout).


Sunday, 10 September 2017

Let it Snow

Morning.

Here's today's card -

I cut the bottom section of the Paper Cuts Let it Snow Frame out of Coconut White Card and trimmed away the excess to just leave the sentiment. I also cut 3 of the snowflakes in the set and the snowflake corner from the Paper Cuts Jingle Bells Die Set 4 times. I pressed them all into Clear Perfect Medium, added CS Sea Turtle Embossing Powder and heat set. I added more ink, more powder and heat set again.

I popped a piece of Creative Expressions Double Sided Adhesive Sheet onto Coconut White Card and cut one of Sue Wilson's Double Pierced Background Rectangles from it. I peeled away the other backing sheet, added my sentiment and then added Snow White Opaque Micro Beads to the exposed adhesive. You may find that your sentiment may lift a little if there is embossing powder on the back - just lift it up from around the Micro Beads, add some CS Glue and seat back in place. I glued my extra snowflakes as shown. I matted onto Silver Shine Pearl Card cut from the next sized rectangle in the set.

For the background, I cut a piece of Coconut White Card using a larger die in the rectangles set and embossed using the CE Ice Crystals Embossing Folder. I matted onto Silver Shine Pearl Card cut using the next sized die in the set. I added my snowflake corners.

I added CS Glue around the edges of the sentiment panel and the background and sprinkled CS Iced Snow over. I added CS Polar White Twinkles to the centres of the snowflakes and corners.

Thanks for stopping by.

Julia.
www.juliawattscrafts.co.uk
Free card with all website orders over £10 (ask for one in the comments box at checkout).

Wednesday, 6 September 2017

Art Deco Snowflake 3D Bauble

Hi Bloggers.

I'm up at Creative Expresions HQ today running a Chalk Cloud masterclass - should be great fun!

Here's today's card -

I started by making the 3D element. I cut dies #1,#3 and #4 together from Sue Wilson's Art Deco Snowflake Die Set out of Antique Gold Pearl Card 5 times. I scored and folded each of then down the middle and then glued them together, half to half. Instead of sticking the final pair together (which you can do if you want to make a bauble for the tree - remember to add some twine before glueing) I cut die #4 from the set out of Rich Red Card, added a ittle Metallic Baker's Twine and glued by 3D element to it.

For the background, I embossed a piece of Milk Card using the Creative Expressions Shimmering Stars Embossing Folder. I dusted it with an Anti-Static Pad and then edged with Clear Perfect Medium Pen using my Tim Holtz Ruler. I added Ruby Slippers CS Brilliant Sparkle Embossing Powder and set using a Low Speed Heat Tool.

I cut Sue's Checkerboard Poinsettia Border out of Antique Gold Pearl Card. I trimmed it and matted onto Rich Red Card. I stamped the sentiment from the CE Santa's Sentiments Stamp Set onto Milk Card using Clear Perfect Medium and embossed with CS Gold Detail Embossing Powder. I cut it out using Sue's Pierced Flags and cut the next sized die out of Rich Red Card. I cut the single poinsettia from Sue's Poinsettia Flourish & Corner Die Set out of Rich Red Card twice and added them to the end of my sentiment flag.

I cut the corner from Sue's Poinsettia Flourish & Corner Die Set out of Rich Red Card twice and the single poinsettia once and added them to the top part of my card as shown.

Lisa Horton is launching a One Day Special on Hochanda today at 6pm with her first ever die release. She's mega excited and I can't blame - her designs are just lovely. The reindeers are my favourites -

I'm offering 10% discount on my website on items from the shows - you can find them here. Offer applies till midnight tomorrow night. Discount will be applied automatically at checkout.

Thanks for stopping by.

Julia.
www.juliawattscrafts.co.uk
Free card with all website orders over £10 (ask for one in the comments box at checkout).

Tuesday, 29 August 2017

There's no place like home for Christmas

Hi Bloggers.

Here's today's card -

For the background, I spread Cosmic Shimmer Polar White Sparkle Texture Paste through the Nordic Mask onto Coconut White Card and put aside to dry ( a couple of hours).

I made a frame out of Coconut White Card using Sue Wilson's Double Pierced Squares Set B. I added my frame to my background (once dry) using 2mm Woodware Foam Tape and trimmed away the excess. I matted onto Rich Red Card, Brunswick Green Card and another piece of Coconut White Card.

I stamped the Creative Expressions Holly Coronet Stamp to Die For onto Coconut White Card using Onyx Black Versafine Ink and embossed with CS Clear Detail Embossing Powder. I coloured in using Lava Red, Rich Gold and Peacock Green Pixie Powders using a Water Brush. I cut out using the largest die in Sue's Art Deco Snowflake Die Set.

I stamped the sentiment from the Creative Expressions Santa's Sentiments Stamp Set using Versafine Ink and embossed with CS Clear Detail Embossing Powder. I cut it out using die #2 from the same set. I edged with the Versafine Ink.

I cut the largest die in Sue's Scalloped Snowflake Frame out of Rich Red Card and the largest die from Sue's Looped Snowflake Frame out of Brunswick Green Card. I stacked all my die cuts up using CE Mounting Cushion and added them to my background.

I cut the holly border from Sue's Poinsettia Flourish & Corner Die Set out of Brunswick Green Card 4 times and added them to 2 of the corners on my frame. I pressed two 8mm Pearls into Clear Perfect Medium. I added CS Ruby Slippers Brilliant Sparkle Embossing Powder and heat set. I added more Perfect Medium, more embossing powder and heat set again. I added them to my corners.

I have loaded all of the September Release of Sue Wilson Dies to my website for pre-orders. You can find them here. Orders will be dispatched 13th September onwards.

Thanks for stopping by.

Julia.
www.juliawattscrafts.co.uk
Free card with all website orders over £10 (ask for one in the comments box at checkout).

Wednesday, 23 August 2017

Gilded Turtle Doves Paper Cuts Sneak Peek

Hi Bloggers.

As promised, I have a sneak peek today from the Paper Cuts One Day Special that I'm launching on Hochanda on Friday at 6pm.

This card features the Paper Cuts Turtle Doves Die Set.

I started by adding a piece of CE Double Sided Self Adhesive Sheet to a piece of Coconut White Card. I removed the other backing sheet and then added CS Egyptian Gold Gilding Flakes. I removed any excess using a piece of Rubit Scrubit.

I cut the Turtle Doves (dies #1 and #2 together) out of my Gilded background. I cut die 2 out of Coconut White Card and glued the 2 die cuts together using CS Glue in a Woodware Fine Tip Glue Applicator.

I cut one of the corner dies from the same die set out of my Gilded background 4 times.

For my background, I embossed a piece of Coconut White with the Creative Expressions Nordic Tiles Embossing Folder. I dusted with Anti-Static Bag and added CS Clear Perfect Medium Pen around the edges using my Tim Holtz Ruler. I added CS Pharoh Gold Brilliant Sparkle Embossing Powder and heat set.

I matted onto a couple of pieces of Coconut White Card and added my centre piece using Woodware 2mm Foam Tape. I added my corners using CS Glue in a Woodware Fine Tip Glue Applicator.

I'll be back tomorrow with another sneak peek.

Thanks for stopping by.

Julia.
www.juliawattscrafts.co.uk
Free card with all website orders over £10 (ask for one in the comments box at checkout).

Tuesday, 22 August 2017

Woodware Nativity Silhouette Two-fer

Hi Bloggers.

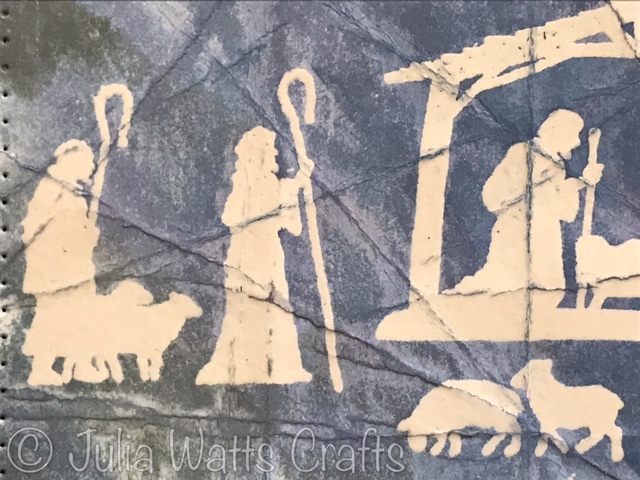
I have a couple of simple cards for you today featuring the Woodware Nativity Silhouette Stamp Set.

Here's your first card -

The background is a mopped up waste ink background on Coconut White Card with Broken China and Faded Jeans Distress Oxides. Inked around the edges with Faded Jeans. Dusted with Anti-Static Pad then a couple of the stamps from the Vintage Nativity Silhouette Stamp Set stamped using Clear Perfect Medium and embossed with CS Black Mirage Brilliant Sparkle Embossing Powder. Sentiment stamped with Onyx Black Versafine and embossed with CS Matt Clear Embossing Powder. Matted onto Black Card and then onto a Coconut White Card blank.

Here's your second card -

For this one, I dusted Coconut White Card with an Anti-Static Pad. I stamped several of the images from the Woodware Nativity Silhouette Stamp Set using Clear Perfect Medium and embossed with CS Matt Clear Embossing Powder. Next, I folded the card several times, turned it over and folded some more. I spritzed with water and then brayered Faded Jeans and Iced Spruce Oxides over - very important : don't put a wet brayer into your ink pad! I removed excess ink from the images using a piece of Kitchen Roll.

Once dry, I cut out using Sue Wilson's Double Pierced Background Rectangles and cut a mat out of Black Card using the next sized die in the set.

I stamped the sentiment from the same set onto Coconut White Card using Clear Perfect Medium and embossed with CS Matt Clear Embossing Powder. I added Faded Jeans and Iced Spruce Oxides using Smoothies and removed excess ink with Kitchen Roll. I cut out using a die from the Justrite A2 Card Front Basics and matted onto Black Card. I added it to my card using CE Mounting Cushion.

Lisa Horton is continuing with her One Day Special on Hochanda today with shows at 9am, 1pm and 5pm. The stamps are exclusive to Hochanda until the end of the week. I'm offering 10% discount on the other items from the shows that I have on my website. You can find them here. Offer applies till midnight tonight or while stocks last. Discount will be applied automatically at checkout.

I'll be back tomorrow with a sneak peek from the Paper Cuts One Day Special that I'm launching at 6pm on Hochanda on Friday.

Thanks for stopping by.

Julia.
www.juliawattscrafts.co.uk
Free card with all website orders over £10 (ask for one in the comments box at checkout).

Tuesday, 15 August 2017

Gilded Nativity Silhouette Sneak Peek

Hi Bloggers.

As promised, I have a sneak peek for you today from the shows I have on Hochanda on Thursday.

This is a very simple card, suitable for batch making - you may as well use the stamps several times while they have glue on them.

I used a piece of Black Card. I popped some CS Flake & Glitter Glue onto a piece of Wax Paper. I picked it up onto a piece of Cut n Dry Foam and used it to 'ink up' the stamps I wanted to use. I only added glue to the stamps when I was ready to used them. I stamped them, leaving the stamp on the card no longer that 3 seconds. I popped the stamps into a bowl of water as I finished with them. I find this is the best way to clean the stamps.

I added CS Warm Sunrise Gilding Flakes to my stamped scene. I removed the excess using a piece of Rubit Scrubit.


I dusted my card with an Anti-Static Pad. I edged with a Clear Perfect Medium Pen using my Tim Holtz Ruler. I added CS Black Mirage Brilliant Sparkle Embossing Powder and heat set using a Low Speed Heat Tool. I matted onto Antique Gold Pearl Card and then popped onto a Milk Card blank.

I stamped the sentiment from the same stamp set using Clear Perfect Medium and embossed with CS Gold Detail Embossing Powder. I edged with Clear Perfect Medium Pen and embossed with CS Black Mirage BS EP. I matted onto Antique Gold Pearl Card and added to my card.

I'll be doing my very best to catch up with all my website orders today. Thanks for your patience.

Thanks for stopping by.

Julia.
www.juliawattscrafts.co.uk
Free card with all website orders over £10 (ask for one in the comments box at checkout).

Thursday, 10 August 2017

One Day Special Shows on Hochanda today

Hi Bloggers.

One Day Special Shows continue on Hochanda today at 7am (Netherlands), 9am, 1pm and 5pm. I hope you can join me.

I have a different colourway for you today - obviously change the colours if you're not confortable with pink for Christmas. Personally, I find it quite a relaxing change 😊

For the background, I embossed a piece of Milk Card with the Creative Expressions Shimmering Stars Embossing Folder. I matted onto Baby Pink Card and another piece of Milk Card.

I stamped the motif from the Creative Expressions Christmas Motifs Stamp Set onto Milk Card using Clear Perfect Medium and embossed with CS Silver Shine Detail Embossing Powder. I cut it out using die #4 from Sue Wilson's Looped Snowflake Frame Die Set. I placed die #3 over the top of it and drew around the outside edge of the die using a Clear Perfect Medium Pen. I added CS Silver Light Brilliant Sparkle Embossing Powder and heat set.

I cut dies #5 and #6 together from Sue's Scalloped Snowflake Frame out of Milk Card. I cut die #6 out of Baby Pink Card and glued the 2 die cuts together.

I cut die #5 from Sue's Looped Snowflake Frame out of Milk Card. I added Clear Perfect Medium, then Silver Light Brilliant Sparkle Embossing Powder and heat set.

I cut Sue's Checkerboard Poinsettia Border out of Milk Card. I matted it onto a piece of Baby Pink Card. I added it to the bottom section of my card. I cut the snowflake from Sue's Looped Snowflake Frame out of Milk Card 5 times. I pressed 3 of them into Clear Perfect Medium, added Silverlight Brilliant Sparkle Embossing Powder and heat set. I added all 5 snowflakes to the Checkerboard Poinsettia Border covering the flowers in the border as shown. I added a 5mm Cream Pearl to the centre of each snowflake.

I added CS Glue around all the edged of my embossed background and then sprinkled CS Crystal Stars over. I completed my card by adding an 8mm Cream Pearl to the top corners.

I'm offering 10% discount on items from the shows on my website. You can find them here. Offer applies till midnight tonight or while stocks last. Discount will be applied automatically at checkout.

Thanks for stopping by.

Julia.
www.juliawattscrafts.co.uk
Free card with all website orders over £10 (ask for one in the comments box at checkout).

Sunday, 6 August 2017

Pine Wreath Sneak Peek

Hi Bloggers.

I have another sneak peek for you today from Wednesday's One Day Special -

For the background, I spread some Holly Green Sparkle Texture Paste through the Holly Background Mask onto Rich Red Card. Leaving the mask in place, I sprinkled over some Rich Gold Pixie Powder. I removed the mask and cleaned it under a tap and put my background aside to dry (a couple of hours).

I dusted a piece of Milk Card with an Anti-Static Pad. I stamped the CE Pine Wreath Stamp using Clear Perfect Medium and embossed with Forest CS Brilliant Sparkle Embossing Powder. I cut out using die #6 from Sue Wilson's Scalloped Snowflake Frame Die Set. I coloured in a little using Red Star Stardust Pen. I cut die #6 out of Brunswick Green Card and added my stamped die cut on top, offsetting it slightly.

I stamped the sentiment from the CE Santa's Sentiments Stamp Set using Olive Archival. I cut out using die #2 from Sue's Scalloped Snowlake Frame and added it to the centre of my wreath.

Once my background was dry, I matted onto Brunswick Green Card, then Antique Gold Pearl Card and Milk Card.

I cut a pair of pine cones out of Antique Gold Pearl Card and foliage out of Brunswick Green Card using Sue's Pine Cone & Greenery Die Set.

I completed my card by adding some pearls to the central die cut and to the corners of my background.

Thanks for stopping by.

Julia.
www.juliawattscrafts.co.uk
Free card with all website orders over £10 (ask for one in the comments box at checkout).

Saturday, 5 August 2017

Checkerboard Poinsettia Border Sneak Peek

Hi Bloggers.

As promised, I have a sneak peek for you today from the One Day Special that I'm launching on Hochanda on Wednesday at 6pm.

For the background, I cut Sue Wilson's Checkerboard Poinsettia Border out of Milk Card 5 times. I created my own background paper by spritzing a piece of Milk Card with water and adding Lava Red and Rich Gold Pixie Powders.

Once my Pixie Powder Background was dry, I added my die cut background securing with CS Glue in a Woodware Fine Tip Glue Applicator.

I made a frame out of Milk Card using Sue's Double Pierced Background Rectangles. I added it to my background using 2mm Foam Tape, trimming away the excess.

I dusted a piece of Milk Card with an Anti-Static Pad and stamped the sentiment from the Creative Expressions Santa's Sentiments Stamp Set using Clear Perfect Medium. I added CS Ruby Slippers Brilliant Sparkle Embossing Powder and heat set using a Low Speed Heat Tool. I cut it out using Sue's Pierced Flags and cut the next sized die out of Antique Gold Pearl Card.

I cut Sue's Poinsettia Cluster dies out of Rich Red Card and Antique Gold Pearl Card. I added a 5mm Cream Pearl to the centre of each flower.

I matted onto Antique Gold Pearl Card, Rich Red Card and Milk Card. I completed my card by adding an 8mm Cream Pearl to each corner of my frame.

Thanks for stopping by.

Julia.
www.juliawattscrafts.co.uk
Free card with all website orders over £10 (ask for one in the comments box at checkout).