Sunday, 31 May 2015

Dream

Hi Bloggers.

Here's today's card -

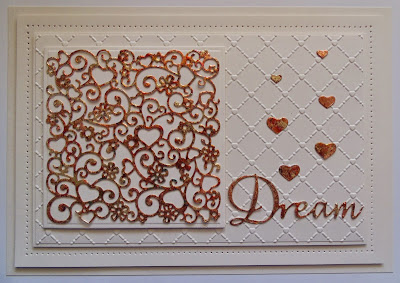
For the background, I ran a piece of Milk Card through the Grand Calibur with the Creative Expressions Heart Lattice Embossing Folder.

I popped a piece of Creative Expressions Double Sided Self Adhesive Sheet onto a piece of Milk Card and added Cosmic Shimmer Harvest Moon Gilding Flakes.

I cut the Couture Creations Touch of Love Background Savy Die and the Dream Everyday Essentials Die out of the gilded piece.

I added some of the hearts from the waste of the Touch of Love die cut.

I assembled the card as shown piercing around the edges.

Be sure to pop by tomorrow for something very special!

Thanks for stopping by.

Julia.
www.juliawattscrafts.co.uk

Saturday, 30 May 2015

A Friend is like a Rainbow

Hi Bloggers.

I'm demoing at Strikes Garden Centre, Ladygreen, Ince Blundell today 10 till 4. If you're in the area, please stop by.

Here's today's card -

I started by spreading some Phill Martin Cosmic Shimmer Decadent Teal and Decadent Denim Sparkle Texture Paste through the Wavy Mask onto Coconut White Card and put aside to dry. Once dry, I cut a frame using 2 dies from the Spellbinders 6 x 6 Matting Basics A Die Set. I cut the largest die in the same die set out of Teal Card. I also cut the largest die in the Spellbinders Blooming Collection Die Set out of Teal Card.

I embossed a piece of Coconut White Card using the Creative Expressions Fine Finials Embossing Folder and popped the frame upon it.

I stamped the sentiment from the Creative Expressions Amazing Sentiments Stamp Set onto Coconut White Card using Cobalt Archival. I cut it out using a die from the Spellbinders Captivating Squares Die Set and inked through the die with Peacock Feathers Distress Ink using a Smoothie. I cut the middle sized die from the Spellbinders Floral Assortment Die Set out of Teal Card.

I assembled the card as shown piercing around the edges.

Just an early heads up - I will heading down south for a Crafty Weekend at Craftasmic in Taunton on the the 26th & 27th September. I've been there a few times now. Last year I went down there with Sue Wilson. This year, I'm taking John Lockwood with me. It's always a brilliant weekend. Click HERE to see the details

Thanks for stopping by.

Julia.
www.juliawattscrafts.co.uk

Friday, 29 May 2015

A True Friend is a Work of Heart

Hi Bloggers.

We had a fun day at Creative Expressions HQ yesterday. Lots of giggles and some stunning cards made.

I'm heading up north again this afternoon with Kathryn for a demo tomorrow at Strikes Garden Centre, Ladygreen, Ince Blundell. Let's hope the motorways are kind!

Here's today's card -

For the background, I spread some Phill Martin Cosmic Shimmer Decadent Grape Sparkle Texture Paste through the Criss Cross Mask onto a piece of Coconut White Card, removed the mask and set aside to dry (it takes about an hour with this pattern).

I cut the largest die in the Spellbinders Triple Floral Die Set and a die from the Spellbinders 6 x 6 Matting Basics B Die Set out of Lilac Card to make a frame. I cut the largest die in the Spellbinders 6 x 6 Matting A Die Set out of Coconut White Card. I glued the 2 die cuts together using Cosmic Shimmer Dries Clear Glue. I seated the appropriate die back into the frame and ran through the Calibur again to cut the hold in the Coconut White Card.

I stamped the sentiment from John Lockwood's Rosebud Elements Stamp Set using Plum Archival. I cut it out using the smallest die in the Spellbinders Floral Assortment Die Set and inked through the die with Dusty Concord Distress Ink using a Smoothie. I cut the middle die from the same set from Lilac Card.

I made a couple of Decorative Stick Pins using Creative Expressions Stick Pin Elements and Glossy Accents.

I tied a bow using 2 lengths of Off White Satin Ribon. I made a flower out of Lilac Card using Spellbinders Flower Play Die Set following Sue Wilson's Tutorial here and here. I added some Cosmic Shimmer Dries Clear Glue and Cosmic Shimmer Iced Snow Glitter Jewels.

I assembled the card as shown adding some 3mm White Pearls, some Purple Dazzlers and piercing around the edges.

Thanks for stopping by.

Julia.
www.juliawattscrafts.co.uk

Thursday, 28 May 2015

Love

Hi Bloggers.

I'm at Creative Expressions HQ today running a workshop this afternoon. John Lockwood is there running a workshop this morning. For details of my next workshop at Creative Expressions, please see the end of this post.

Here's today's card -

I started by cutting an aperture in a piece of Sky Blue Card using the largest tag die in the Couture Creations 2 Tags & Flower Pot Die Set. I placed the Sky Blue Card on a piece of Cobalt Card and placed the smaller tag die in the centre of the aperture. I removed the Sky Blue Card and cut the smaller tag. I cut the Couture Creations Nostalgia Die from a piece of Coconut White Card. I glued it into place on another piece of Coconut White Card using Cosmic Shimmer Dries Clear Glue, so that it could be seen through both apertures. I secured both pieces of Blue Card using 3D Foam Tape.

I cut the Couture Creations Love Everyday Essentials Die out of Coconut White Card. I pressed Clear Perfect Medium into it, added Phill Martin Cosmic Shimmer Decadent Denim Embossing Powder and heat set. I added more Perfect Medium, more powder and heat set again.

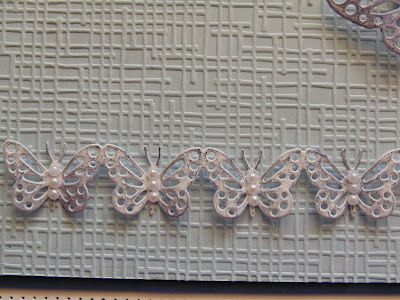
 I cut the Couture Creations Edith Border out of Coconut White Card and rubbed some Decadent Denim Gilding Wax over.

I cut the Couture Creations Edith & Baby Die Set out of Coconut White Card and again rubbed some Decadent Denim Gilding Wax over them.

I assembled the card as shown adding some 3mm and 5mm White Pearls to the butterflies, some Pearl Corners and piercing around the edges.

My next workshops at Creative Expressions HQ in Kettering are on Tuesday 16th June. This is the project for the morning -


This is the afternoon workshop -

Please contact Tracey on 01536 481778 during office hours or email her at tracey@creative-expressions.uk.com for more information or to book a place.

I'm also going to be doing some workshops at That's Really Crafty in Loughborough.

Contact Christian on 01509 767740 for more details and to book a place.

Monday 27th July 

Morning workshop -


Afternoon Workshop -

Other dates - Saturday 8th August and Monday 17th August. Details to follow soon.

Thanks for stopping by.

Julia.
www.juliawattscrafts.co.uk
 

Wednesday, 27 May 2015

A little greeting

Hi Bloggers.

Quite a clean and simple card today -

I started by making my frame. I placed the largest die in the Spellbinders 6 x 6 Matting Basics B Die Set onto a piece of Coconut White Card. I added a couple of Spellbinders 6 x 6 Matting Basics A Dies and ran them all through the Grand Calibur using the emboss sandwich. I removed the inner die and ran the remaining 2 dies through the Calibur using the Cut sandwich. I matted the frame onto a piece of Teal Card cut using the largest die in the 6 x 6 Matting Basics A Die Set using 3d Foam.

I cut the largest of the Spellbinders Floral Assortment Dies out of Coconut White Card and inked through the die with Peacock Feathers Distress Ink using a Smoothie. I added this to the centre of my frame using 3d Foam.

I stamped the sentiment from John Lockwood's Tulip Elements Stamp Set using Jet Black Archival. I cut it out using the smallest die in the Floral Assortment Set and inked through the die with Peacock Feathers. I cut the middle die from the same set and again inked through the die with Peacock Feathers.

I assembled the card as shown adding a few White Pearls and piercing around the edges.

Kathryn's done a blog post about our trip to Skegness last weekend. You can see it here.

Thanks for stopping by.

Julia.
www.juliawattscrafts.co.uk

Tuesday, 26 May 2015

Congratulations

Hi Bloggers.

I've got another woven card today. I love playing with different combinations. This one uses Sue Wilson's Striped Weaving Die in a 2 by 2 weave.

I cut the Striped Weaving Die twice out of Coconut White Card and twice out of Custard Card. I split the Custard die cuts into strips of 2. The Coconut White Die Cuts, I glued together on both ends offsetting them to fill in the gaps.

I left the left hand side intact and cut up the right hand side to make pairs of strips. I wove a pair of Custard strips in and out of every 2 Coconut White strips until the full length was completed.

I cut a frame out of Coconut White and Custard Card using Sue's Ornate Pierced Rectangles Die Set. I cut the largest die in the set out of Coconut White Card to form a mat.

I stamped the sentiment from the Creative Expressions Delightful Sentiments Stamp Set onto Custard Card using Perfect Medium and embossed with Cosmic Shimmer True White Detail Embossing Powder. I cut it out using Sue's Pierced Flags Die Set and cut a mat out of Coconut White Card.

I made a flower out of Felt using Sue's Classic Foldover Flowers Die Set (see my video here).

I cut some leaves and flowers using Sue's Blossoming Branch Die Set. I shaped them using an Embossing Tool and Moulding Mat. I added some 3mm White Pearls to the centre of the flowers.

I assembled the card as shown adding some 8mm White Pearls and piercing around the edges.

Thanks for stopping by.

Julia.
www.juliawattscrafts.co.uk
Monday, 25 May 2015

Wishing You the Happiest of Days

Hi Bloggers.

Another purple card today -

The background is from a demo, using an old favourite technique by Tim Holtz. I scrunched up a piece of Milk Card, openend it back up and rubbed my Seedless Preserves Distress Ink Pad over the peaks. I misted with water, left it a few minutes and then ironed with my encaustic iron. I then randomly stamped the Happy Birthday and cherry blossom branch from John Lockwood's Cherry Blossom Elements Stamp Set, again using Seedless Preserves.

I cut the largest die in the Spellbinders Triple Floral Die Set together with a die from the Spellbinders 6 x 6 Matting Basics B. At the emboss stage, I removed the Matting Basics Die and added the next sized die in the Triple Floral Die Set.

I stamped the sentiment from John Lockwood's Daisy Chain Elements Stamp Set using Plum Archival. I cut it out using the smallest die in the Spellbinders Floral Assortment Die Set and inked through the die with Seedless Preserves. I cut the next sized die out of Rich Plum Card.

I tied a bow using 2 lengths of Antique White Satin Ribbon and another using 3 lengths of Raisin Satin Ribbon. I added a Dazzler Setting and a Purple Dazzler.

I assembled the card as shown adding some 5mm Cream Pearls, some Cream Pearl Corners and piercing around the edges.

Thanks for stopping by.

Julia.
www.juliawattscrafts.co.uk


Sunday, 24 May 2015

Very Purple!

Hi Bloggers.

Here's today's card -

For the background, I ran a piece of Coconut White through the Grand Calibur with the Creative Expressions Scored Lines 8 x 8 Embossing Folder. I lightly rubbed some Phill Martin Decadent Grape Gilding Wax over it.

I had cut the Couture Creations Touch of Love Die out of Coconut White Card and used it as a mask to spritz through some Decadent Grape Mister through for another card. Rather than waste it, I have used it here and matted it onto a piece of Rich Plum Card cut using Spellbinders 6 x 6 Matting Basics.

I cut the 2 circle dies from the Couture Creations Frames n Frills Elissa Set together out of Coconut White Card and rubbed Decadent Grape Gilding Wax over it. I glued a piece of Acetate behind it.

I popped a little piece of Creative Expressions Double Sided Self Adhesive Sheet onto some Rich Plum Card and cut the flower pot from the Couture Creations 2 Tags & Flower Pot Die Set. I peeled away the backing sheet and added Cosmic Shimmer Diamond Snow Glitter Jewels.

I assembled the card as shown adding a 5mm White Pearl to the flower, some White Pearl Corners and piercing around the edges.

Thanks for stopping by.

Julia.
www.juliawattscrafts.co.uk

Saturday, 23 May 2015

Thank You for being my Friend

Hi Bloggers.

As mentioned yesterday, I'm demoing at Apple Crafts in Chapel St Leonards near Skegness today. 10am till 4pm. Please stop by if you're in the area.

Here's today's card - still using up demo bits!

The background is a variation of Sue Wilson's Fire & Ice Technique but with mica powders instead of Gilding Flakes.

I ran a piece of Coconut White Card through the Grand Calibur with the Spellbinders Grate Effect Die (just the inner die). I put a piece of Creative Expressions Double Sided Self Adhesive Sheet over the front. I turned it over and dusted some Phill Martin Cosmic Shimmer Mica Powders over the adhesive peering through the die cut - I used Decadent Teal, Decadent Denim, and Decandent Oak. I removed the excess mica powder using a dry wet wipe. It's very important at this point to seal the back as some excess mica powder may be hiding somewhere and you don't want to contaminate the Glitter Jewels used in the next step. So, I glued a piece of Coconut White Card over the mica area using Cosmic Shimmer Dries Clear Glue.

I turned the piece over, removed the other piece of backing from the Adhesive Sheet and added Cosmic Shimmer Iced Snow Glitter Jewels.

 I stamped the sentiment from John Lockwood's Cherry Blossom Elements Stamp Set using Cobalt Archival. I cut it out using a die from the Spellbinders Devine Floral Die Set and inked through the die with Stormy Sky Distress Ink.

I cut a frame out of Coconut White Card using Spellbinders Grand Rectangles and some White Pearl Corners.

I assembled the card as shown piercing around the edges.

Thanks for stopping by.

Julia.
www.juliawattscrafts.co.uk

Friday, 22 May 2015

Happy Birthday

Hi Bloggers.

I'm heading north east this afternoon for a demo at Apple Crafts in Chapel St Leonards near Skegness tomorrow. My daughter, Kathryn, is coming with me - hope she won't be too bored!

Here's today's card -

For the background, I ran a piece of Milk Card through the Grand Calibur with the Creative Expressions Fine Finials Embossing Folder.

I cut the Couture Creations Nostalgia die, the circular die from the Elissa Frames n Frills Die Set and the Birthday die from the Happy Birthday Everyday Essentials Die Set - all out of Rich Red Card.

I cut the little birdy from the Couture Creations 2 Tags & Bird Branch Die Set and the Happy from the Happy Birthday Everyday Essentials Die Set out of Milk Card.

I assembled the card as shown adding a couple of Cream Pearl Corners and piercing around the edges.

Thanks for stopping by.

Julia.
www.juliawattscrafts.co.uk